
Tips and Tricks for Setting Up your Nokia XR21 Phone Pattern Lock
Tips and Tricks for Setting Up your Nokia XR21 Phone Pattern Lock
Failing to remember the pattern lock of a phone is one of the most puzzling situations for Android users. Unlike the famous OS, Android gives a seamless method to eliminate the issue.
You can attempt the methods below or an expert tool if you have forgotten the pattern lock on your gadget and reset it. However, we suggest you try Dr.Fone - Screen Unlock for a quick and safe solution. To make things more straightforward, we have given you other techniques as a workaround to the issue.
So, keep following us to unlock the lock screen pattern and use your phone again.

Part 1: What Is Android Pattern?
A pattern lock is used to identify the actual user by your Android phone. It is a widely used phone locking system and a secured one. Simply put, a pattern lock includes a line pattern you choose that you can draw to unlock a lock screen. You can enable this lock screen feature from the security menu in the settings application.
So, if you have set a pattern lock as a screen lock for your device, you will need to draw the exact pattern every time you log in.
Parental Control Software
## Part 2: Best Tool to Unlock Your Pattern
Dr.Fone - Screen Unlock
The most effective and quick tool to unlock a pattern lock is Dr.Fone - Screen Unlock by Wondershare. Dr.Fone is an all-in-one tool for all your Android needs and has been in the business for a long time. We suggest you use Dr.Fone. The following steps will help you unlock your device:
Step 1. Select the “Screen Unlock” option in the Dr.Fone interface.

Step 2. Select Unlock Android Screen
To unlock the pattern lock on your device, the “Unlock Android Screen” will guide you to finish the whole process.

Step 3. Select unlock mode
If you click “Remove without Data Loss,” only some limited Samsung or LG phone models can be unlocked without losing data. To unlock most phone brands’ screens, “100% Remove Screen Lock” is a better choice.

You can find the brand compatible with your phone in the following list.

Step 4. Go into Recovery Mode
Read the program instructions carefully; entering recovery mode is the prerequisite to unlocking the pattern lock.
(Here are 3 examples of Samsung phones)
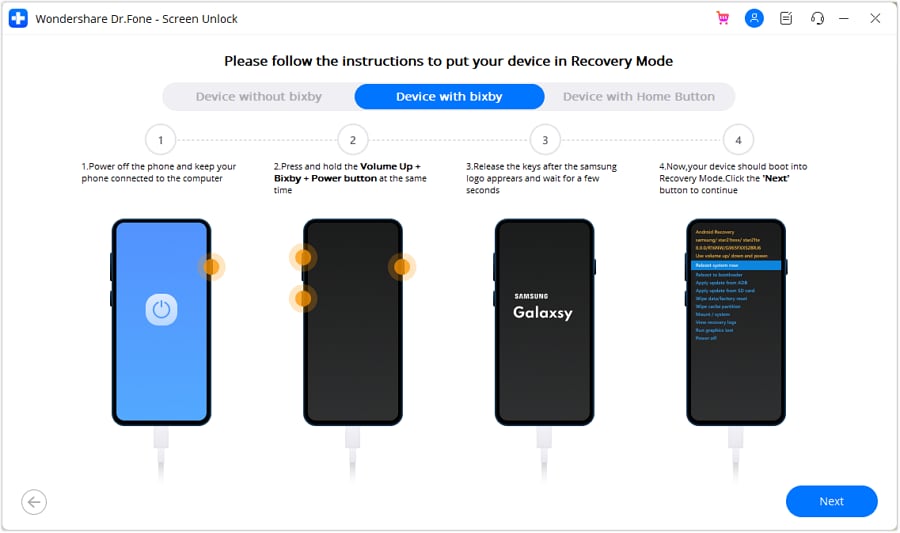
How to get into recovery mode with Bixby
How to get into recovery mode without Bixby

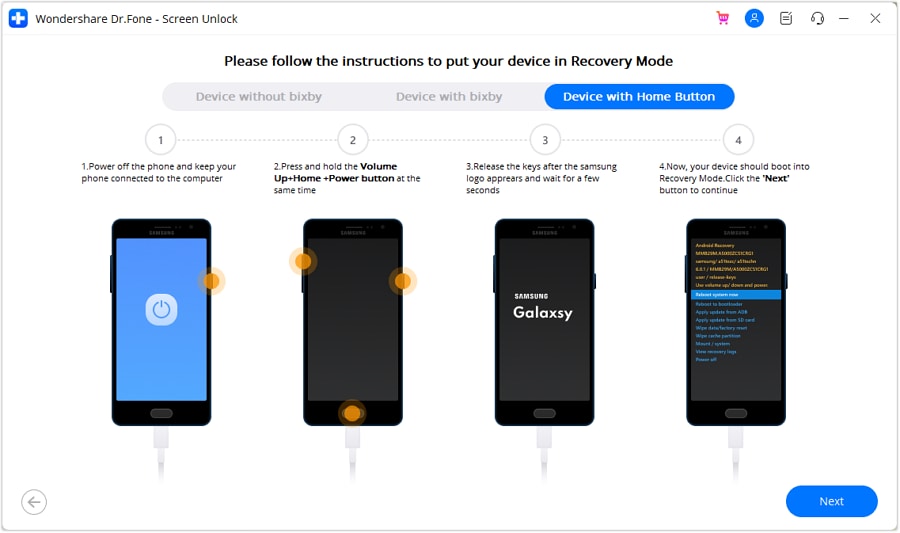
How to get into recovery mode with Home button
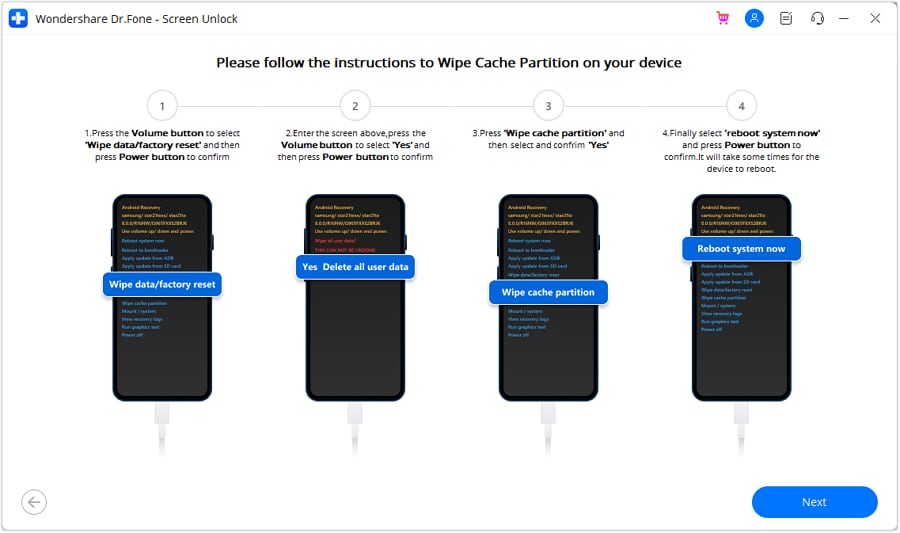
Step 5. Instructions to Wipe Cache Partition
Now you’re in recovery mode, pick these options in the image below.
When the “Unlocked successfully” appears on the screen, you can access your device without a pattern lock or other locks!


1. Google Find My Device (For Android7.1.1 or later)
Step 1. Open the Android Device Manager site by typing https://www.google.com/android/find in an internet browser.
Step 2. You must give your Google ID credentials to sign in. Remember that this should be a similar Google account connected to your phone.
Step 3. After logging in, select your device.
Step 4. You will get three choices here, i.e., lock, erase, and ring.
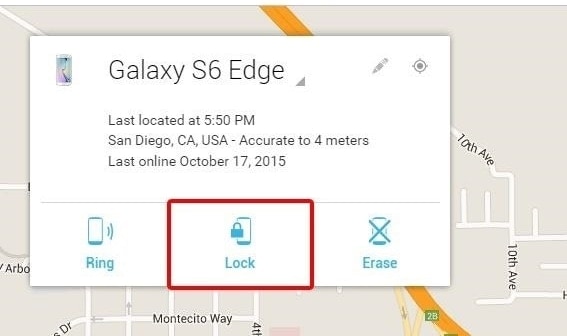
Step 5. Click on the “Lock” button to reset its pattern.
Step 6. It will open another spring-up window. From here, you can give the new password to your phone.
Step 7. After affirming your PIN/password, you can give a recovery message and number (in case of theft only).
Step 8. Complete the process and sign out of your account on the browser.
2. Forgot Pattern (For Android 4.4 or earlier)
Step 1. First and foremost, give some wrong patterns to your phone. It will tell you that you attempted the incorrect pattern lock.
Step 2. On a similar window, click the “Forgot pattern” choice on the base.
Step 3. That will open another screen, which you can use to sidestep the forgotten pattern of Android. Select the choice for entering the Google Account credentials and continue.

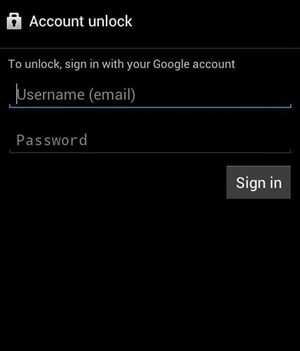
Step 4. To reset the lock screen pattern, you must give the correct details of the Google ID previously logged into the Nokia XR21 device.
Step 5. After giving the correct details, you can provide another pattern lock to the phone.

Step 6. Affirm your decision and set another pattern lock on your phone.
3. Emergency Call Trick (For Android 5 or 5.1.1)
Step 1: Tap the Emergency Call button and enter ten asterisks (*).
Step 2: Copy and paste the asterisks on the dialer until you no longer see the paste choice.
Step 3: Return to the lock screen and tap on the camera symbol.
Step 4: Press the settings choice on your Android gadget after pulling down the notification tray. Now you will have the chance to enter the PIN/password, and you ought to continue unlocking your Android phone. Continue to paste until the lock screen UI crashes.
4. Safe Mode Boot (For Android 4.1 or later)
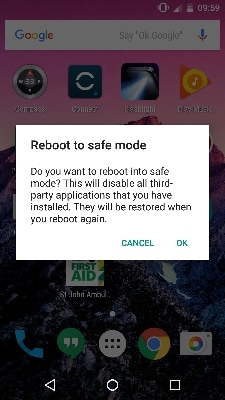
Step 1: You can bring up the power menu and hold the “Power Off” button for most phones, especially Android phones. A warning will spring up, asking whether you might want to Reboot to Safe Mode. Here, it would help if you had to press Ok.
Step 2: Clear your lock screen application’s data.
Clean data off your lock screen app, uninstall it, and then reboot your device to escape safe mode. When you do so, your phone or Android device will unlock.
5. Use ADB (USB required for Android 10 and lower)
- Connect your device to your PC using a USB connector.
- On your PC, open a terminal window (or command prompt).
- Type in the commands given below. Press Enter after each line:
adb shell
album/data/data/com.android.providers.settings/databases
sqlite3 settings.db
update system set value=0 where name=’lock_pattern_autolock’;
update system set value=0 where name=’lockscreen.lockedoutpermanently’;
.quit
exit
adb reboot
- After your gadget has rebooted, enter the command below:
adb shell
rm/data/framework/gesture.key
exit
adb reboot
- Your phone will reboot. After it reboots and requests a security pattern, you can utilize any pattern, and it will unlock.
Conclusion
This guide provides insight into the most common Android issue. Here, we have discussed different techniques to bypass the pattern lock on your Android phone. However, we suggest you go for a professional tool while carrying this out. Therefore, you should choose an expert tool like Dr.Fone - Screen Unlock to open the lock screen pattern.
How Can We Unlock Our Nokia XR21 Phone Screen?
A phone lock acts as your Android phone’s shield against unauthorized users. Some users have new security features, such as fingerprint impression unlocks for an Android lock screen.
However, certain people like to create a PIN and password on their Google account as their Android screen lock. It tends to be distressing and tedious when you fail to remember the code of your Android phone. Surprisingly, being fully locked out of your device is awful. Also, it can be hard at first to unlock your Android.
Anyway, no one can escape such a situation. Yet, sit back and relax! We know several techniques on the best way to unlock your phone and set a screen lock. You can attempt software like Wondershare Dr.Fone - Screen Unlock for Android to assist you with unlocking your phone in a couple of steps. Besides this, there are various other ways.
Part 1: What Is Your Nokia XR21 Phone Lock System?
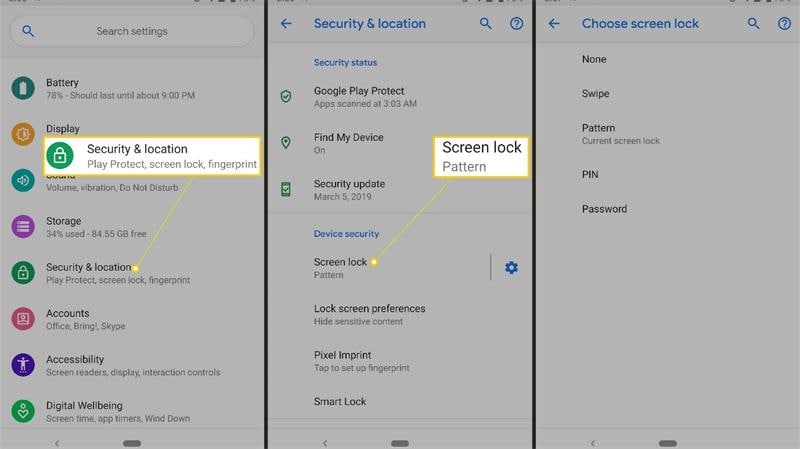
There are three types of standard lock types available for Android. You can set a PIN/password, fingerprint, or a pattern as your phone lock. All have their pros and cons. However, everyone should select the ideal one based on their liking and ease of use.
Once you decide on the phone lock type, you can enable or disable them from the Security tab in your Android phone’s settings. After you set a screen lock, your Android will require it every time you try to open your device.
Here you will see how to set up a screen lock on your Android device:

Part 2: Quickly Unlock Your Screen By Dr.Fone
Dr.Fone - Screen Unlock
For a quick, easy, and hassle-free unlocking experience, we suggest you download Dr.Fone - Screen Unlock. Dr.Fone not only unlocks your phone but keeps your data secured during the process. It has a simple interface, and even an amateur can use it to unlock their device.
So, look no further if you want to remove your Android screen lock in just a few clicks. Install Dr.Fone and enjoy using your device again.
![]()
Dr.Fone - Screen Unlock (Android)
The Best Tool to unlock Android Phone Screen!
- Remove all Android screen locks (PIN/pattern/fingerprints/face ID) in minutes.
- Bypass the FRP lock of Samsung without a PIN or Google account.
- Everyone can handle the lock screen without any tech knowledge.
- Provide specific removal solutions to promise success rate.
4,008,672 people have downloaded it
Step 1. Open Dr.Fone on your PC and select the “Screen Unlock” tool.
Step 2. Select Unlock Android Screen
This is the page to start your unlock process with two options here, please select” Unlock Android Screen” to unlock your device screen.
Step 3. Select device model
For most Brands, it should be “100% Remove Screen Lock”. These two solutions unlock screens for almost all Android devices, for example, Samsung, Huawei, OPPO, Vivo, Lenovo, LG, etc.
In the supported device brands list, please find the right one for you.
Step 4. Enter into Recovery Mode
Before unlocking your device screen, the instructions below are here to help you to get into Recovery Mode. We take 3 Samsung phones as an example.
Get into Recovery Mode on Samsung phone with Bixby:
Get into Recovery Mode on Samsung phone without Bixby:
Get into Recovery Mode in Samsung phone with Home Button:
Step 5. Instructions to Wipe Cache Partition
During the steps in Recovery Mode, please don’t pick the wrong choices!
You’re now able to access your Android device again when the whole process is over. And you no longer need a password or pattern!
Part 3: Solutions to Unlock Android Screen
1. Google Find My Device
Step 1: Open the “Find my Device” webpage from a browser on your PC.

Step 2: Click “Erase my device,” which you will see on the left half of your screen. After affirming the Delete capability, your phone will boot into recovery and begin playing out a production line reset. It is difficult to stop or drop on your android gadget when you endorse this activity. Regardless of whether you shut down your Android phone - the reboot will continue on startup.
2. Recovery Mode
Depending on your phone, the steps for this process might vary a little. Most phones will allow you to reset by getting to the recovery mode. Follow the steps below to remove the Android screen lock:
Step 1: Turn on the Nokia XR21 device and enter the boot menu. If you want to know how to do so, you can do a speed search on the internet.
Step 2: Access the safe mode, use the volume keys to navigate, and press the Power key to click.
Step 3: Search for the Wipe Data option and select it.

After that, your Android will start the process, which can require a few minutes. However, this process will erase all your user data.
3. Use ADB
This method is very confusing, so follow the steps cautiously on your Android phone to remove the phone lock. With your phone connected to your PC, and the cmd open, type the accompanying commands altogether:
- adb shell
- disc/data/data.com.android.providers.settings/databases
- sqlite3 settings.db
- update system set value=0 where name=’lock_pattern_autoblock’;
- update system set value=0 where name=’lockscreen.lockedoutpermanently’;
- .quit
After you’ve finished this, reboot your Android phone. If this doesn’t reset your lock screen, proceed to the following stage.
With your Android phone connected and the cmd opens, enter:
- abd shell rm/data/system/gesture.key
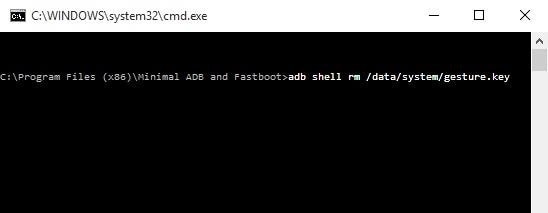
After entering, reboot your phone once more.
4. Boot into Safe Mode
Step 1: For most phones and your Android, you can do this by opening the power menu and holding the “Power Off.” A message will spring up on your screen, asking whether you might want to Reboot to Safe Mode. Press Ok.
Step 2: Clear data from your lock screen application, uninstall and reboot your phone to escape the Safe mode. When you do so, your Android screen lock will unlock.
5. Crash Lock Screen
This strategy to sidestep a locked screen is only a crisis workaround for the phones in this classification.
- Enter ten asterisks (*) through the dialer application.

- Copy and paste asterisks on the dialer until the “Paste” choice no longer appears.
- Get back to the lock screen and tap on the camera symbol.
- Go to the settings on your Android after pulling down the notifications bar. Now you will have the chance to enter the password, and you must continue the same thing here. Continue to paste until the Android lock screen crashes.
Conclusion
Passwords shield our phones from unapproved access, yet we get locked out unexpectedly on our phone lock. Failing to remember your PIN can be irritating. However, we can assist you in reaccessing your locked phone without a factory reset by using Dr.Fone - Screen Unlock. Dr.Fone is an expert in solving such problems in just a few minutes. So download this expert tool immediately for a quick solution.
Rootjunky APK To Bypass Google FRP Lock For Nokia XR21
Factory Reset Protection (FRP) is a security feature built into Android devices running Android 5.1 Lollipop and later versions. It prevents someone from using your phone after a factory data reset without Google account login credentials. The FRP makes it much less attractive for thieves to steal Android phones, knowing they will need help to access them.
FRP automatically activates when you add a Google account to your Android phone. It links the Nokia XR21 device to your account, making it the “trusted owner.” Once activated, FRP becomes embedded in the phone’s system.
While Google FRP is a valuable security feature, it’s vital to acknowledge that there are legitimate situations where bypassing it might be necessary. These instances include forgotten Google account credentials, buying a second-hand device, and device issues. In these cases, tools like RootJunky can help you bypass FRP Lock. We’ll explore how to use RootJunky APK later, but first, let’s define what it is and its role in FRP bypass.
The RootJunky APK is a free Android application also called RootJunky SDL or RootJunky FRP Bypass tool. This app’s primary function is to bypass the Google Account FRP lock on Samsung devices. Rootjunky uses the weaknesses in Android’s setup process to create a new user account or switch existing ones, letting you bypass the FRP and regain control of your phone.
You can complete this process using the app by connecting your phone to a computer through an OTG cable. RootJunky can be helpfu l if you’ve forgotten your Google account password or bought a second-hand phone locked to someone else’s account. However, only use it if you have legitimate reasons to bypass FRP lock, like accessing your device after forgetting your Google account details.

Downloading the RootJunky FRP bypass tool from unofficial sources can introduce malware risks, so stick to trusted sources like the official website. Additionally, when exploring RootJunky, it is vital to keep the following in mind:
- Not all Android devices are susceptible to the methods used by RootJunky. It is necessary to check compatibility with your specific device model and Android version.
- Using FRP bypass tools like RootJunkycan potentially compromise the security of your device. Be cautious and proceed if you fully understand the risks involved.
- Bypassing FRP may involve data loss.
- Download RootJunky FRP bypass APK from a reliable source to minimize the risk of malware or viruses. You can check the APK file from official websites or trusted forums.
- Google constantly updates its security measures, so these tools may not always work effectively.
Part 2: How To Use RootJunky To Bypass Google FRP?
Here are the general steps to use the FRP Bypass APK RootJunky app to bypass Google FRP lock. But remember that specific steps may vary depending on your device and Android version:
- Step 1: On your computer, download the Rootjunky RealTerm program from the official Rootjunky website.

- Step 2: On your phone, download the Rootjunky APK (com.rootjunky.frpbypass-1.0.apk) file from the official website or other reputable sites.

- Step 3: Go to Settings > Security and tap Install unknown apps. Then, enable unknown sources to allow installation of apps from outside the Play Store. Connect your device to a Wi-Fi network.

- Step 4: On your Android phone, open a file explorer app and install the downloaded RootJunky APK file.
- Step 5: Connect your smartphone to your computer using a USB cable.
- Step 6: Launch the Rootjunky RealTerm program on your computer. Under the Display tab, check the Half Duplex option.
- Step 7: On your computer, go to Device Manager > Modems. Locate your device’s port name (e.g., COM3).
- Step 8: On the RealTerm program, enter the correct port number under the Ports tab, then click Change.

Step 9: Click Send to establish a connection. Enter the two commands:
at + creg? \ r \ n
atd1234; \ r \ n
Step 10: Once connected, the Rootjunky APK on your phone will provide on-screen instructions to bypass FRP.
Step 11: If prompted, perform a factory data reset of your device.
While RootJunky offers a free method for FRP bypass, it can be incompatible with your device’s brand, requiring technical knowledge, tedious, and potentially risky. If you are looking for a simpler, safer, and more user-friendly solution, Wondershare Dr.Fone might be a better fit for you. If you want to learn how to use this tool to bypass FRP lock with minimal technical expertise, then keep reading.
Part 3: Easier Tool Than RootJunky APK To Bypass Google FRP
Google FRP adds an extra layer of security after a device reset. However, regaining access to the smartphone can be challenging if you forget your Google account details, forget your lock screen, or just buy a used device. While methods like the FRP RootJunky app exist, using it can be complex or risky.
Consider exploring third-party options like Dr.Fone for a potentially easier and safer FRP bypass solution. Dr.Fone Screen Unlock tool helps remove the Android FRP lock without requiring a PIN or Google Account.
Why Use Dr.Fone - Screen Unlock?
Here are some of the key features of Dr.Fone - Screen Unlock:
- **User-friendly:**Fone boasts an intuitive interface, eliminating the need for technical expertise. Even beginners can navigate the process with ease.
- **Widespread Brand Compatibility:**Fone supports mainstream brands, such as Samsung, Xiaomi, Oppo, Redmi, Realme, and Vivo, catering to a broader user base.
- **Fast and Efficient:**Regain access to your device in minutes without wasting time on tedious procedures.
Step-by-step Guide to Removing FRP Lock With Dr.Fone - Screen Unlock
Ready to leave the hassle of using RootJunky and easily bypass the FRP lock? Download and install Dr.Fone on your computer, then follow these steps to learn how to bypass Google FRP on your device:
- Step 1: Launch Dr.Fone on your computer and connect it to your Android device. Choose Screen Unlock from the Toolbox in the main interface.
- Step 2: Choose Android as your device type. This will take you to the next screen, where you can select Remove Google FRP Lock to proceed.
- Step 3: Select your device’s brand from the list and click Start to continue.

Note:
The next steps may vary depending on the brand you selected.
- Step 4: Select the OS version of your device and click Start to continue.

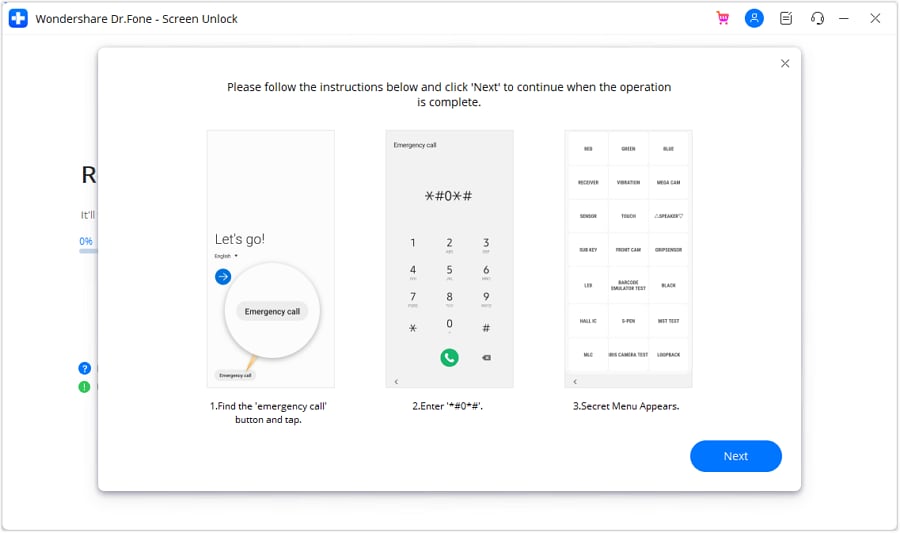
- Step 5: Access the secret menu on your phone using the on-screen instructions, then click Next to proceed to the next step.
- Step 6: When your Samsung prompts you to activate USB debugging, tap Allow. Then, on your computer screen, click Authorized to confirm.

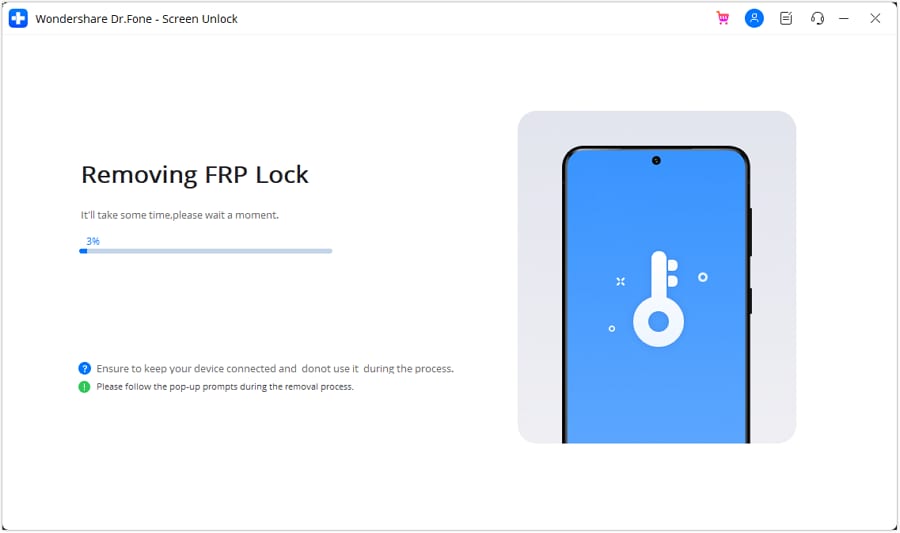
- Step 7: You will see the FRP lock being bypassed on your Android device on the next screen.
- Step 8: Click Done if the FRP lock removal was successful, otherwise, click Try Again to repeat the process.

That’s it! With Dr.Fone Screen Unlock, you can easily bypass Google FRP and regain access to your Android device, leaving the complexities of RootJunky behind.
Tips: Are you searching for a powerful FRP bypass tool? No worries as Dr.Fone is here to help you. Download it and start a seamless unlock experience!
Conclusion
Both RootJunky and Dr.Fone offer options for you to regain control of phones with Google FRP lock. FRP Bypass RootJunky tool excels with its free-to-use approach, perfect for tech-savvy users comfortable with APK installations. While requiring a paid subscription, Dr. Fone provides pre-rooted firmware installations and broader device compatibility, which is ideal for those seeking a more streamlined but supported experience.
The best choice boils down to your personal needs and budget. Remember, FRP bypass should only be utilized by rightful owners facing genuine lockouts. When used responsibly, these tools can help you access your phone after a factory reset even without your Google account credentials. Choose the tool that best fits your needs and proceed with caution. Use these tools responsibly and regain access to your device the right way.
- Title: Tips and Tricks for Setting Up your Nokia XR21 Phone Pattern Lock
- Author: Aaron
- Created at : 2024-07-15 19:21:14
- Updated at : 2024-07-16 19:21:14
- Link: https://easy-unlock-android.techidaily.com/tips-and-tricks-for-setting-up-your-nokia-xr21-phone-pattern-lock-by-drfone-android/
- License: This work is licensed under CC BY-NC-SA 4.0.