
Mastering Lock Screen Settings How to Enable and Disable on Poco X5
Mastering Lock Screen Settings: How to Enable and Disable on Poco X5
In the modern world, the use of smartphones has become such a common trend that everyone would feel abnormal if they don’t have a smartphone of their own. So big the demand is that all IT companies are trying their best to introduce as well as innovate several excellent brands of smartphones. To support the function of smartphones, by far there have been numerous operating systems existed. Among them, Android is one of the most popular as well as trustworthy OS.
Just like any other smartphone, all Android devices have their ways to protect the data stored inside a smartphone from being corrupted or leaked. One of the simplest and most easy-to-use ways is to make use of the lock screen.
The lock screen has proved to be a traditional yet efficient way to help you protect your Android phones. In this article, we will provide you with an informative piece of writing about everything you need to know when it comes to the Android lock screen, and ways to enable and disable it.
If you have spent time searching and looking for features of your Android devices, you will find the process of enabling a lock screen is a piece of cake.
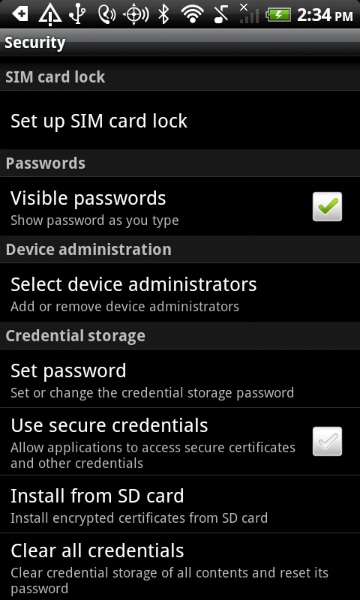
· Step 1: On the main screen of your Android devices, tap on the gear icon - which is the icon representing the Settings menu. Once you have chosen it, you will see a drop-down menu on the screen. In the options provided, tap on the Security bar.
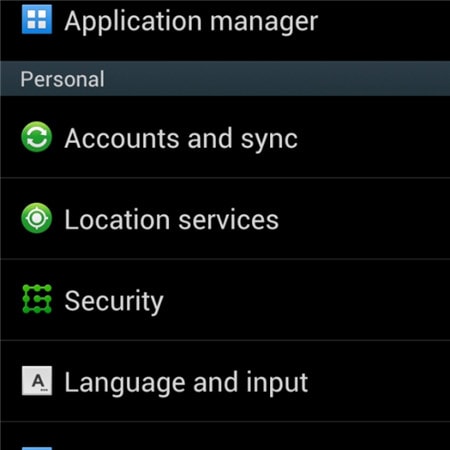
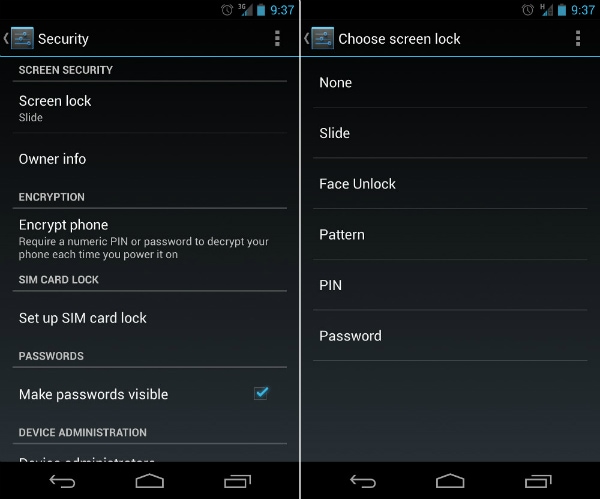
· Step 2: Under the tab whose heading is entitled Screen Security, tap on the first bar in the list called Screen lock.

· Step 3: Once the step is done successfully, Android will give you plenty of choices about ways to lock your Android devices’ screens. Among these ways, select one particular type which you feel is most convenient as well as free-risk. After that, type in your PIN code to confirm the choice and finally activate your lock screen feature as you wish.
Part 2: How to Disable Android Lock Screen
To certain customers, the lock screen can do more harm than good, and they would prefer to disable the screen lock on their Android devices. This process is also an easy one to follow, as long as you still hold good memory of the security code.
· Step 1: On the main screen of your Android devices, tap on the gear icon. It will directly lead you to the Settings menu of the phone. After that, a drop-down menu will appear with several choices and bars. Among them, tap on the Security option to begin your work.

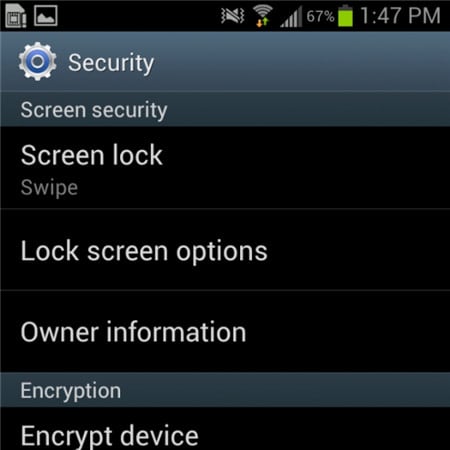
· Step 2: Under the heading called Screen Security heading, you will be shown 3 choices. Tap on the first one, which is entitled Screen lock.
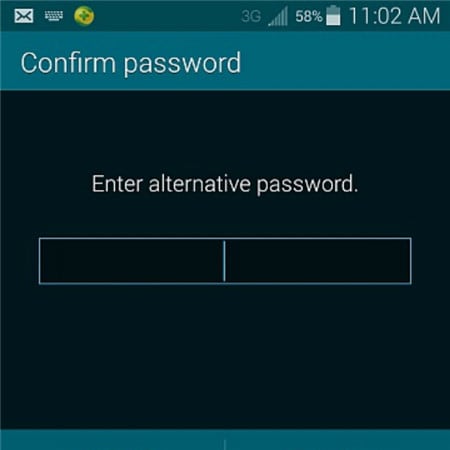
· Step 3: Once you have done the previous step, a brand new screen will appear and then you will be asked to fill in your PIN code. This is a step that helps guarantee that you are the true owner of the Android device.

Step 4: As soon as you have confirmed the right PIN code in the bar provided, you will then be presented to the next drop-down menu. A similar screen will appear which shows you plenty of choices. Tap on the top of that list, which is a bar called None.

Step 5: In the end, you have successfully disabled the screen lock on your Android devices. You are now capable of using it without any hesitation about the screen lock.
Part 3: Common Problems of Disabling Lock Screen
The process to disable the screen lock on Android may seem easy to handle as well as straightforward to several customers, but there are still some annoying problems that users have to deal with while trying to disable the lock screen.
What are the top 2 common problems?
Below are the two most common problems faced by Android users during their efforts to disable the feature of screen lock.
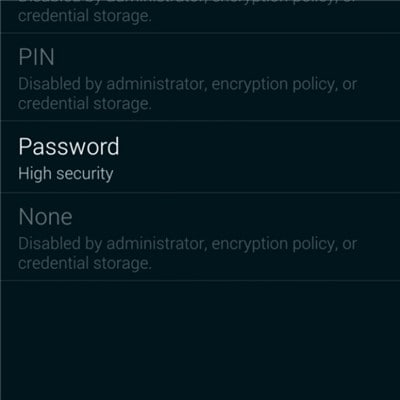
1. In the Screen Security choice, the None bar can not be chosen.
Description of the problem: There is a sentence below it stated: “Disabled by administrators, encryption policy or credential storage”. All the space of the None option is in white and grey.
The solution to this problem is quite simple. Once you have made sure you are suffering from this nasty one, try to follow these below pieces of advice to see if it is capable of giving you a hand.
Step 1: Open the Settings menu from the main screen. Then tap on the Credential Storage. You will see a drop-down menu like the screenshot below.
Step 2: Continue to tap on the Clear Credentials (Remove all certificates) option. Then next click on the OK button. Wait for some seconds until your Android device has finished the process.
Step 3: To make sure that the previous step has been performed successfully, try looking at the bottom of the drop-down menu. If the Clear Credentials (Remove all certificates) are grey out and can not be selected, then you have managed to do it.

Step 4: Now that the problem is solved, you can feel free to turn back to your Screen lock option in the beginning and disable the feature of locking screen Android as usual.
2. You have mistakenly encrypted your SD card. You want to disable the encryption, only to realize that it requires you to set a new screen lock code. But when you come to the Screen lock menu, all the options but Password have been greyed out.
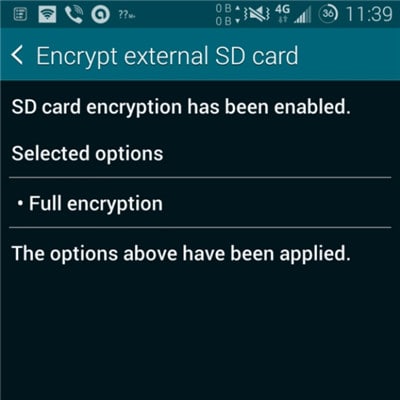
This is pretty weird, but actually, it is one of the most common troubles that many users have complained about. But to your surprise, the solution is very simple and easy. All you have to do is to reset your password, but with a little change. Your password MUST include at least ONE NUMBER in it. Confirm your new password then you will be able to disable the lock screen Android as usual.
Bonus Tip: Remove Android Screen Lock If Forgotten Password/Pattern
As much as the lock screen can protect the personal information on the phone, it can also cause much trouble if you forget the lock screen password or enter the wrong password too many times. So here comes the need for phone unlocking software . One of the best is Dr.Fone - Screen Unlock (Android), which can help us bypass forgotten Android screen locks without any data loss(limited to Samsung and LG series phones). Other Android brand phones will be wiped out all the data once starting to unlock with Dr.Fone
Dr.Fone - Screen Unlock (Android)
Remove 4 Types of Android Screen Lock without Data Loss
- It can remove 4 screen lock types - pattern, PIN, password & fingerprints.
- One-time payment for unlimited use of multiple devices within a specified time period.
- Work for Samsung Galaxy S/Note/Tab series, LG G2/G3/G4, etc.
- Besides, unlocking the screen lock, it also works best to unlock the Samsung FRP lock in devices with Android 5.0 and higher.
3981454 people have downloaded it
Steps on How to Unlock Forgotten Password in Android Phones
Step 1: Launch Dr.Fone and click on Screen Unlock from the primary window.

Step 2: Connect your Android device to the computer via USB cable. The program will recognize the phone directly. Select the phone model or “I can’t find my device model from the list above” to continue.

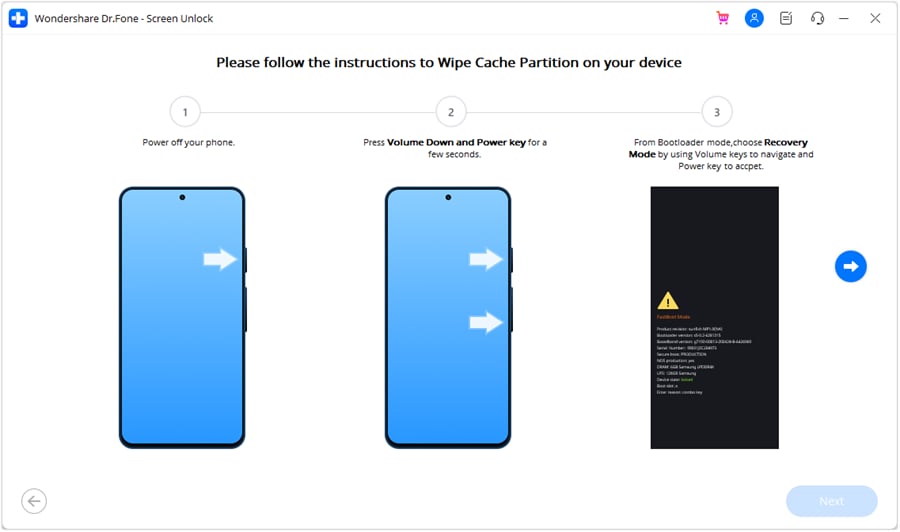
Step 3: Follow the instruction on the program exactly to set the phone to Download Mode. First, you will need to Power off your Phone. Secondly, Press on Volume Down, Home button, and Power button simultaneously. Thirdly press the Volume up button to navigate until the phone enters Download mode.

Step 4: After you set the phone to Download mode, it will begin to download the recovery package. When the recovery package is downloaded successfully, the lock screen on your Poco X5 devicewill be removed. You won’t lose any data during the whole process.
Parental Control Software

Delete Gmail Account With/Without Password On Poco X5
Email accounts have proven their worth in digital devices beyond sending emails. Lately, Android devices have only operated with a Gmail account. This is because most of the data, such as contact information, messages, and other details, are saved across the storage space offered with the email. Against all recognizable uses of Gmail accounts, users look for ways how to delete Gmail accounts.
To this day, it is known that Gmail accounts can be removed with or without a password. However, one should know that if they consider deleting their Gmail account, they won’t be able to send or receive emails. With that, let’s proceed to reveal all essential methods that can be used to delete a Gmail account permanently. This article will also focus on a perfect tool that assists in making the process easier.
Part 1. Synopsis: Things To Know Before Deleting Gmail Account
Although the process of deleting a Gmail account sounds basic, there are many pointers connected to it. For that, this part is putting up a discussion on the important things that a user should know before they delete their Gmail account permanently:
- No Going Back: If you delete a Gmail account, the process is irreversible. All details and information will be lost, and the email won’t be trackable ever again.
- Cannot Reset Passwords if Connected: If the Gmail account is connected to any other service, make sure that you remember their passwords. Since the account will be deleted, you cannot reset their passwords.
- Access to Other Services: Although you are deleting your Gmail account, you can still access Google Photos, Google Drive, and other services.
- Lookout For Emails: Ensure that the emails in your account are saved. You can easily download them anywhere before deleting the Gmail account.
Part 2. Delete Your Gmail Account Using Your Password: Desktop Solution
For the first method, we will discuss how to delete a Google account with your password. You will use your computer for this process and access the Google Account services. The service helps you save all your essential Gmail data before you remove it. To understand how it makes it possible, look through the steps provided below:
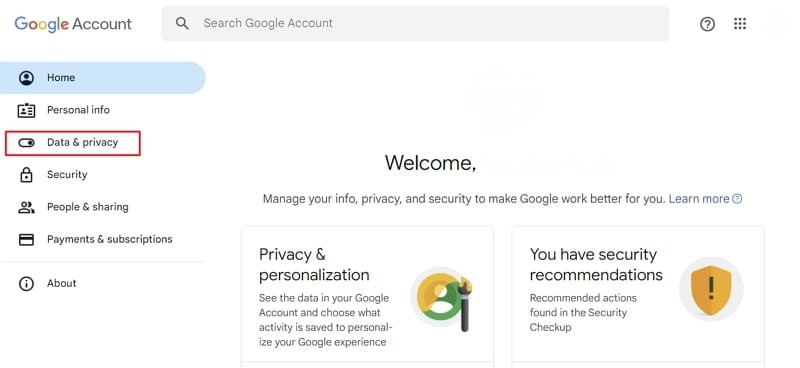
- Step 1. Access the website https://myaccount.google.com/ on your desktop browser and log in with your credentials. Proceed to the “Data & privacy” section from the left panel.
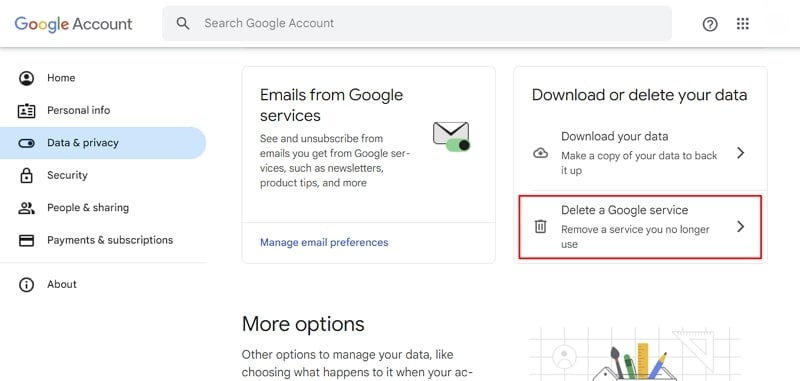
- Step 2. On the following window, scroll down and look for the “Delete a Google service” option. Accessing this would allow you to delete your Gmail account permanently.
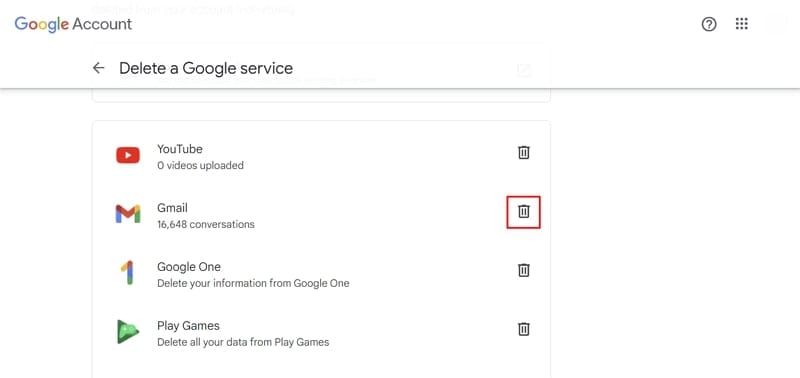
- Step 3. You will be led to a new screen where you need to provide your password credentials again. On successfully providing your password, look for the “Gmail” option on the next screen. Click the “Trash” icon to continue deleting the Gmail account.
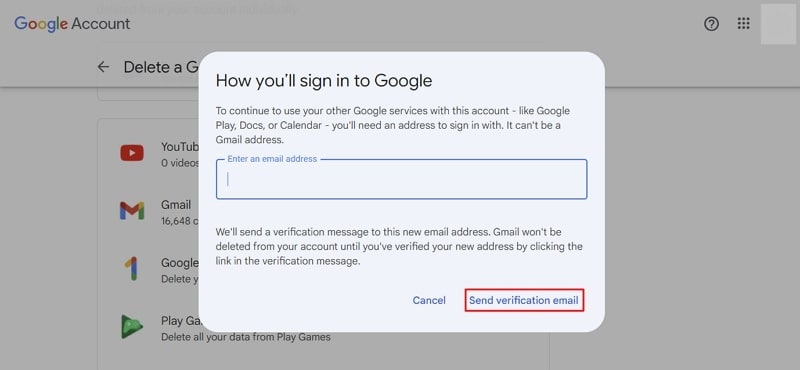
- Step 4. A new pop-up window opens, demanding another email address that can help connect to other Google services. Provide the email address and continue to click “Send verification email .” The Gmail account won’t be deleted until the user verifies the email sent to the new address.
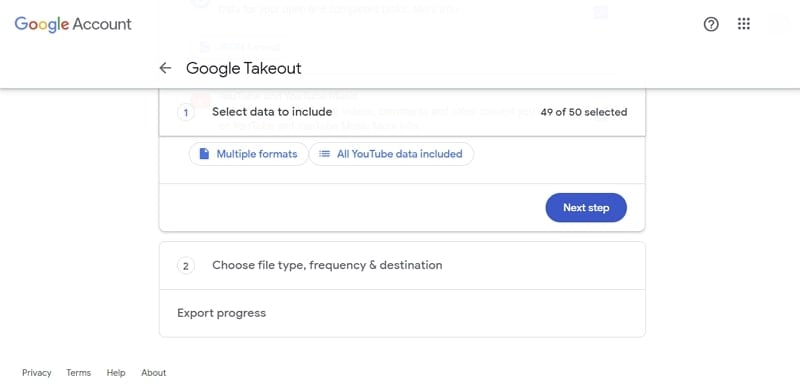
- Step 5. For those who want to save their email data, look for the “Download your data” option in the same window. This leads you to the Google Takeout window, where you need to select the data to include. After selecting the data, define the file type, frequency, and destination for exporting all important data.
Part 3. Delete Your Gmail Account From Your Smartphone: Android & iOS
If you use a smartphone device and want to delete your Gmail account from that particular device, you are at the right place. The following methods will help you understand how to delete Gmail from your Android and iOS devices:
Android Devices
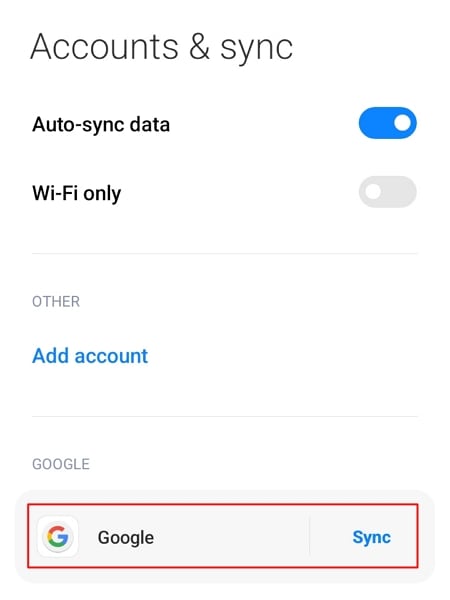
- Step 1. Look for “Settings” on your Android and continue to the “Accounts & sync” option in the list. As you proceed into the next window, look for the Google account and select it.
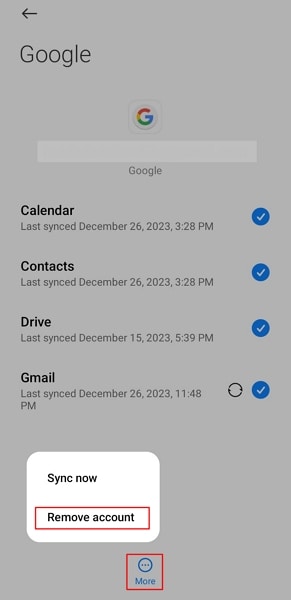
- Step 2. Select the “More” option at the bottom on the following screen. Choose the “Remove account” option in the pop-up menu and provide your credentials to execute the deletion of your Gmail account.
iOS Devices
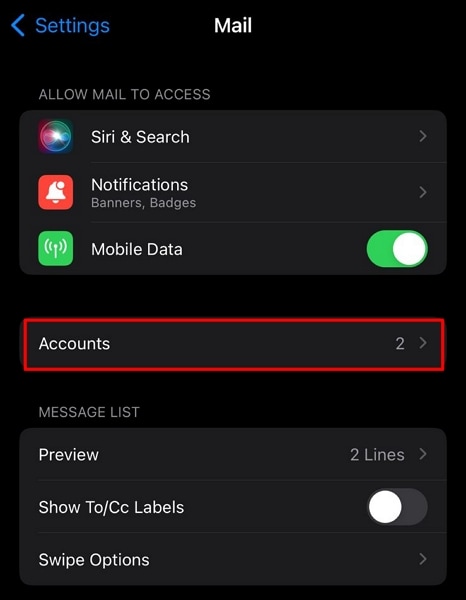
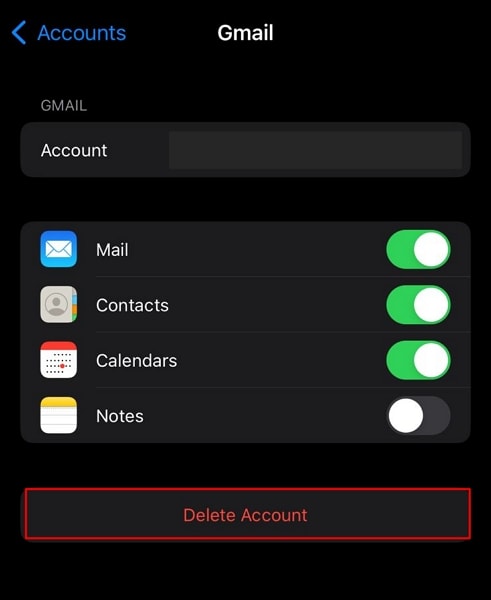
- Step 1. Open your iPhone’s “Settings” app and scroll down to the “Mail” option. You will find the “Accounts” option on the following screen, which you need to tap to proceed.
- Step 2. Discover the option of “Gmail” in the list of signed-in accounts and continue to the next screen. Select “Delete Account” to remove the account from your iOS device.
Part 4. Don’t Know Password of Device? Reset To Delete Gmail Account
What if you’ve forgotten the password to your smartphone device, and you have to delete your Gmail account permanently? In such cases, you are left with the option of accessing the Poco X5 device’s Recovery Mode and factory resetting the Poco X5 device, where possible. To know how it is done flawlessly, look through the steps provided next:
Android Devices
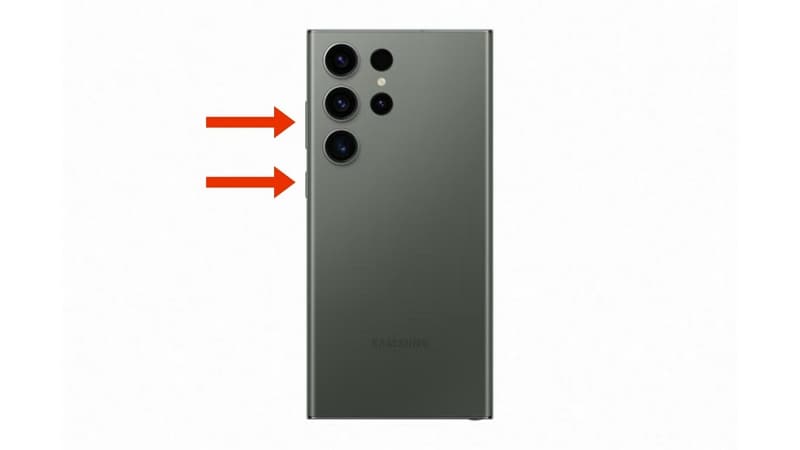
- Step 1. Those owning an Android device need to put it in Recovery Mode first. For that, use the combination of the “Power” and “Volume” keys to put the Poco X5 device in Recovery Mode.
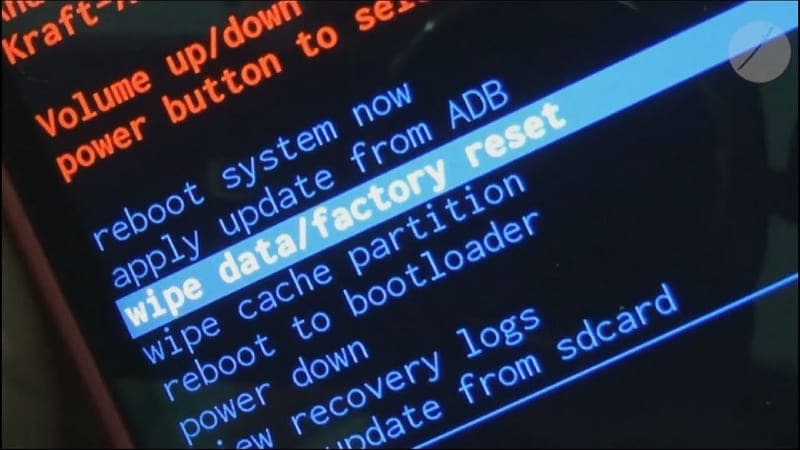
- Step 2. Once you boot into the Recovery Mode, use the Power and Volume buttons to scroll through the menu. Scroll down with the Volume buttons and select the “Wipe data/factory reset” option with the Power button.
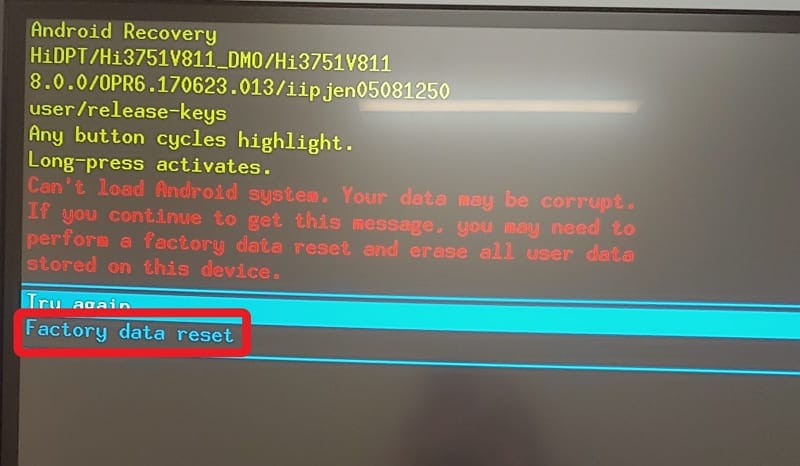
- Step 3. Select “Factory data reset” on the next screen and confirm that factory reset your Android device successfully. The device automatically gets out of Recovery Mode and starts normally after resetting.
iOS Devices
Step 1. You need to turn on Finder if you own a macOS Catalina or later device. Conversely, use iTunes if you have a macOS Mojave or earlier version or if you are using Windows. Connect your iPhone to the computer using the lightning cable and put it in Recovery Mode.
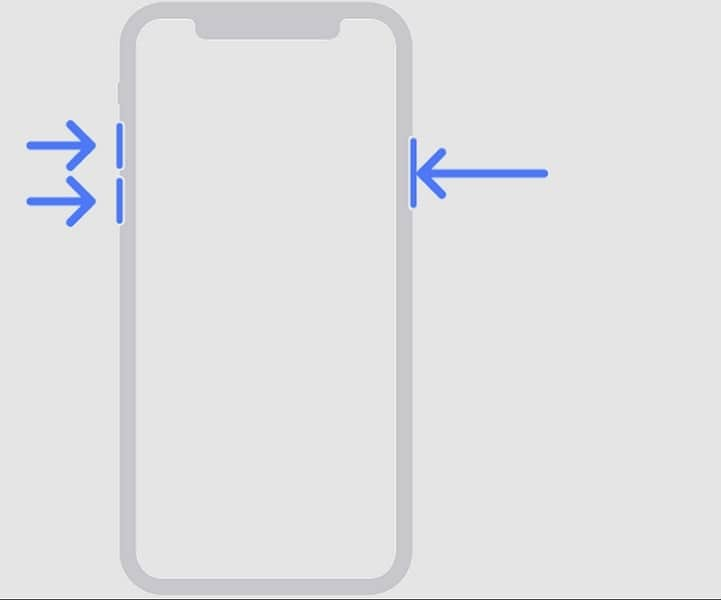
For iPhone X or Later Models: Press and release the “Volume Up” button, followed by the “Volume Down” button. Hold the “Side” button until the Recovery Mode screen appears.
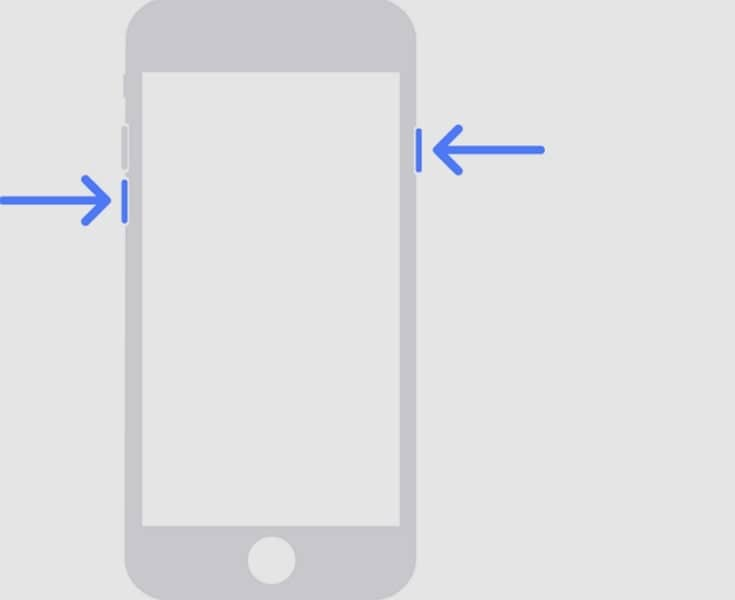
- For iPhone 7 Models: Hold the “Side” and “Volume Down” button until the Recovery Mode screen appears.
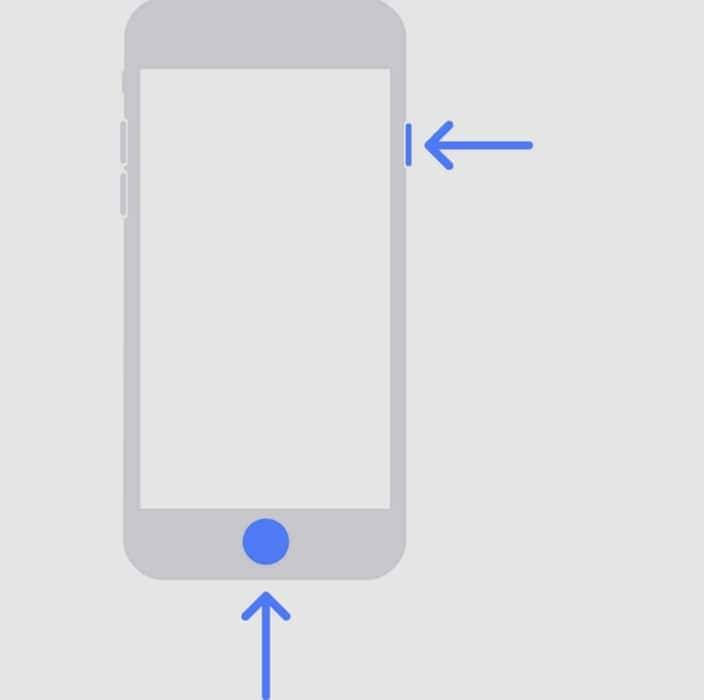
- For iPhone 6 and Earlier Models: Hold the “Side” and “Home” buttons simultaneously until the Recovery Mode screen appears.

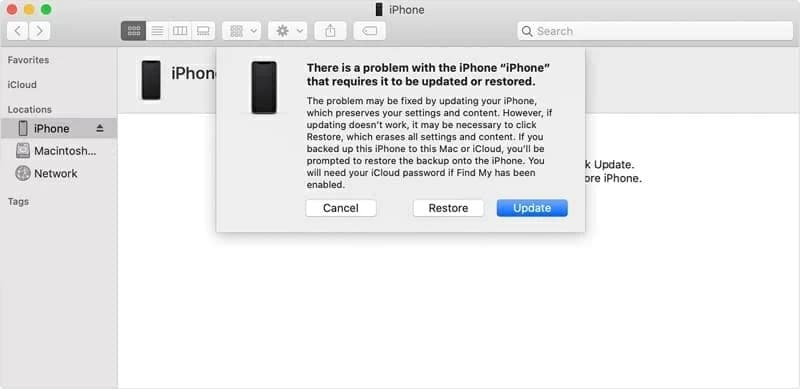
- Step 2. The device automatically gets detected on Finder/iTunes, and a pop-up appears on the screen. Click “Restore” to reset your iOS device to factory settings.
Part 5. Remove Gmail Account From Device Without Password: Using Wondershare Dr.Fone
While you seek some appropriate way to close a Gmail account from a device whose password you’ve forgotten, you might get into Wondershare Dr.Fone. This all-in-one service offers a unique Screen Unlock feature that helps you restore your device. If you have forgotten the lock screen password of your Android device, Dr.Fone – Screen Unlock (Android) makes it exceptionally easy to recover.
Key Features of Wondershare Dr.Fone
![]()
Dr.Fone - Screen Unlock (Android)
The Best UnlockJunky Alternative to Bypass FRP and Solve Your Screen Locks
- Remove all Android screen locks (PIN/pattern/fingerprints/face ID) in minutes.
- Bypass the FRP lock of Samsung without a PIN or Google account.
- Everyone can handle the lock screen without any tech knowledge.
- Provide specific removal solutions to promise good success rate.
4,008,671 people have downloaded it
Whether it is your latest Samsung or other Android smartphone, the process is easy to work with. You might look for more details about this unique tool, for which some important features are highlighted as follows:
- It removes all major types of screen locks from your Android devices.
- Provides support to the latest Android devices, along with all mainstream brands.
- You can recover your device with and without data loss, according to your discretion.
Steps To Remove Google Account While Removing Screen Lock
The following steps highlight the way to remove screen lock from your Android device, which would also cover removing the Google Account automatically:
- Step 1.Launch Screen Unlock Feature
To start with the process, launch Dr.Fone on your computer and navigate to the “Toolbox” section. Proceed to the “Screen Unlock” feature, which opens a new window. After selecting “Android” as your device type, select “Unlock Android Screen” from the available options.

- Step 2.Select Device Brand and Unlock Mechanism
As you direct into the next window, select the brand of your Android device. Continue to select “100% Remove Screen Lock” from the following window.

- Step 3. Follow the Instructions and Successfully Remove the Screen Lock
According to your selected device brand, Dr.Fone provides guidelines for entering the specific mode. Follow the on-screen instructions to start unlocking the screen of your device. If the process is successful, click “Done” to conclude using Dr.Fone – Screen Unlock.

Conclusion
This article has specifically provided you with some important details on how to delete a Gmail account with ease. The article explains everything from the methods of deleting it from the computer to removing it from the Poco X5 device. Furthermore, it also serves as a guidance for those who have forgotten their device passwords. For that, they’ve provided an insight into Wondershare Dr.Fone – Screen Unlock and its unique functions.
## Pattern Locks Are Unsafe: Secure Your Poco X5 Phone Now with These TipsPattern locks have been available for about as long as people can remember, and they have been hugely popular with people thanks to how easy it is to simply swipe your screen and unlock your smartphone, as against, say, keying in the 4-digit PIN/ 6-digit PIN. However, pattern locks are easy to crack, and today, we bring you all you want to know about pattern locks and how to create a hard pattern lock. Further to this, we also tell you how to move beyond pattern locks and what to do in case you forgot the hard pattern lock you just set and are unable to unlock your smartphone.


Part 1: What You Need to Know About Pattern Locks
Pattern lock is an Android-only feature that makes it easy for users to have a modicum of security on their smartphones. Most users do not prefer using and remembering a PIN to unlock the smartphone. Creating a pattern makes it easier, somehow.
There is a 9-point grid on which you swipe your finger from point to point, in any direction, and when you take your finger off, that pattern you swiped becomes the key to unlock your smartphone.
Pattern locks were exceedingly common only a few years ago, and they are not recommended for use any longer due to concerns (mentioned later in the article).
1.1: Popularity and Usage
Old habits die hard, or so they say, right? That’s because it is true. We are creatures of habit, and pattern locks have been around for a long, long time. We are accustomed to pattern locks. So, even with even easier technologies such as fingerprint recognition and face recognition, we tend to gravitate towards the familiar old pattern lock.
The only thing is, there is a reason why pattern locks are no longer the preferred option to use for unlocking your smartphones. As it happens, that reason is security, and it can be very easy for humans to take a swipe (pardon the pun) at your pattern lock. And guess what? The research conducted suggests that they would get it right with an unsettling accuracy.
1.2: Advantages and Drawbacks
With on-the-go lifestyles, our smartphones have become indispensable and contain some of the most sensitive aspects of our lives – IDs, credit and debit cards in digital wallets, photo and video memories, business documents – you name it, the smartphones have it, on the go. This has opened our lives up to the public at large, and if someone steals our smartphone or, best case, finds it, the only barrier preventing them from being privy to all that wealth of our sensitive information is that screen lock – the pattern lock that we set on our smartphones. That’s it – the single pattern lock stands between malicious actors and our data. You might be beginning to realize just how crazy this is.
Advantages of Pattern Locks
There are two advantages to using pattern locks. One, they are better than nothing. Two, they are easy to use. And that’s about it. There is no third advantage to pattern locks. We might think we set a hard pattern lock that nobody could guess, but, as research proves, we might be thinking too low of human prowess.
Disadvantages of Pattern Locks
Security, or rather, the lack of it, is the lone disadvantage of using a pattern lock. What good is a pattern lock that can be easily deciphered? Sure, they are easy to use, and they are better than not having anything, but would you really want to protect your life’s data with something that could be, as researchers found out, breached in under 5 attempts? We don’t think you do!
The research found that 64% of test subjects who were shown videos of people unlocking their phones could correctly guess a 6-point pattern lock, that too after viewing the video only once! That number shot up to 80% if they were allowed to see the video again. That is simply astounding and a nightmare for security. When it comes to PINs, only 11% could guess a 6-digit PIN after viewing the unlocking video once, and that number shot up to 27% when they could see the video two times.
Part 2: How To Create a Hard Pattern Lock (Including Remembering Complex Patterns)
Now, if you must continue using a pattern lock, let’s help you know how to create a hard pattern lock that would not be as easy to decipher as easy pattern locks. For that, you should know how people use pattern locks, the kind of pattern locks they create, and the ones that are the most commonly used pattern locks. That way, you can avoid those fallacies and create a hard pattern lock for your smartphone.
2.1: The Pattern Locks People Use Most Commonly
Marte Loge, an M.Sc. Computer Science student, gave a presentation on pattern locks at DEFCON 23 and made a bold claim. She said, “Tell me who you are, and I will tell you your lock pattern.”
She presented the following statistics to support her claim:
- - In her research, she found that 77% of people started with one of the 4 corners when creating a pattern lock.
- - 44% of people started with the top-left dot and 15% with the top-right, while the bottom-left was preferred by 14% of her test subjects.
- - People set 5-point pattern locks on average, and most users were content with a 4-point pattern.
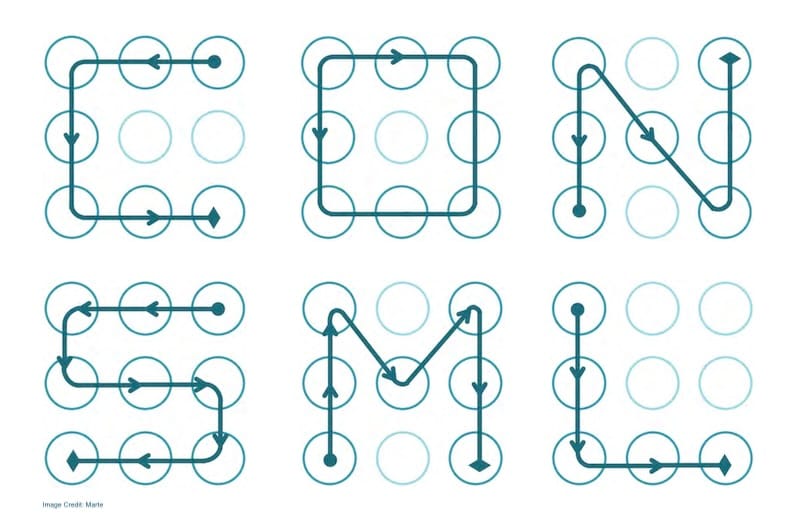
These are some of the most common pattern locks people create:
- - patterns in the shapes of alphabets,
- - patterns in the shapes of numerals,
- - patterns in any other simple shape, such as square, triangle, star, etc.
To understand how this is a security nightmare, the possible combinations for a 4-point pattern are a measly 1624, whereas by adding just 1 more point to the pattern and creating a 5-point pattern, the number of possible combinations becomes 7152, an increase of 5528 combinations. In stark contrast, creating a 9-point pattern would give you over 140,000 possible combinations!
2.2: How to Create a Hard Pattern Lock
Knowing what most people do when creating a pattern lock, it becomes easy to avoid those mistakes and instead create a hard pattern lock for oneself.
- - Do not start creating a pattern lock from any of the 4 corners of the grid.
- - Never use your first initial as your pattern lock.
- - Never use the shape of a numeral as your pattern lock.
- - Use all 9 points on the grid to create your pattern lock, and contrary to popular belief, you can go over the connecting lines several times, creating a hard pattern lock that would not be as easy for people to decipher!
Part 3: Going Beyond Pattern Locks
You might think that now that you have set a hard pattern lock, you are good to go. Hardly. Technology has evolved, so have methods to break into your device.
Step 1: Set a 6-digit PIN
The minimum you should do today is set a 6-digit PIN to unlock your phone. Consider this a necessary investment into the safety of your data residing on your smartphone.
Step 2: Use Fingerprint Recognition (or Face Recognition on Apple Devices)
All modern smartphones released over the last decade have come with fingerprint recognition. Using fingerprint recognition requires you to set a 6-digit PIN and then set a fingerprint to unlock your device. You can set additional fingerprints, too.
This way, your device is the most secure it can be today. In case your fingerprint is not recognized for any reason, the phone falls back on the 6-digit PIN that you can enter and unlock your phone.
While face recognition is available on both Android and Apple devices, it is truly secure only on Apple devices. This is why Apple iPhones released after the iPhone X in 2017 have come only with Face ID. They fall back on a minimum 6-digit PIN (called Passcode in Apple world) to unlock in case the face does not get recognized in the first attempt.
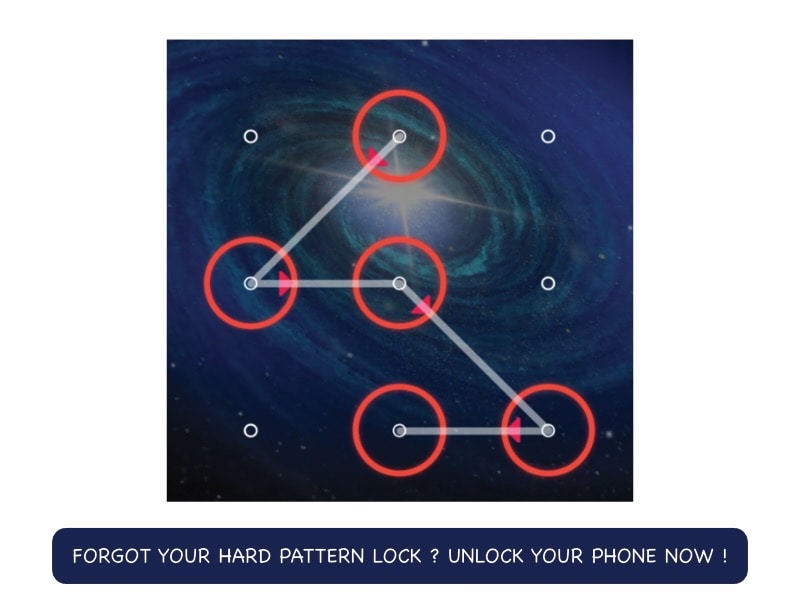
Part 4: How To Unlock Phone If Hard Pattern Lock Forgotten
Just in case you set a hard pattern lock and promptly forgot that abstruse pattern you just set, we have a tool for you to quickly unlock your phone in case of a forgotten hard pattern lock: Wondershare Dr.Fone - Screen Unlock.
![]()
Dr.Fone - Screen Unlock (Android)
Remove the Hard Pattern Lock on Your Poco X5 If You Forgot!
- Remove all Android screen locks (PIN/pattern/fingerprints/face ID) in minutes.
- Bypass the FRP lock of Samsung without a PIN or Google account.
- Everyone can handle the lock screen without any tech knowledge.
- Provide specific removal solutions to promise good success rate.
4,008,671 people have downloaded it
Download the latest version of Dr.Fone from the Wondershare website and launch the app.
Step 1: Click Android under Toolbox > Screen Unlock.

Step 2: Click Unlock Android Screen.
Step 3: Select your device manufacturer.
Step 4: Prepare your device to unlock the screen.
When the greyed Next button becomes available, click it and wait for your device to be unlocked.
All data on the Poco X5 device is wiped under this method. Select Samsung phones may be unlocked without data loss. Check this list for devices that may be unlocked without data loss.
Closing Words
Whether it is an easy pattern lock or a hard pattern lock, the fact is that pattern locks are antiquated and a security nightmare. A minimum 6-digit PIN must be used, and using fingerprint recognition is the preferred way to go for Android devices. Using fingerprint recognition will require that users create a 6-digit PIN. On Apple devices launched after 2017, there is Face ID, Apple’s marketing term for face recognition. If you did indeed still set a hard pattern lock, only to promptly forget it, use Wondershare Dr.Fone – Screen Unlock (Android) to seamlessly unlock your phone right now.
- Title: Mastering Lock Screen Settings How to Enable and Disable on Poco X5
- Author: Aaron
- Created at : 2024-07-15 20:03:47
- Updated at : 2024-07-16 20:03:47
- Link: https://easy-unlock-android.techidaily.com/mastering-lock-screen-settings-how-to-enable-and-disable-on-poco-x5-by-drfone-android/
- License: This work is licensed under CC BY-NC-SA 4.0.