
Mastering Android Device Manager The Ultimate Guide to Unlocking Your Poco M6 Pro 4G Device
Mastering Android Device Manager: The Ultimate Guide to Unlocking Your Poco M6 Pro 4G Device
So, what is Android Device Manager? Android has this amazing native tool to help you locate and remote wipe your lost or stolen phone. We lock our phones via passwords or patterns or fingerprints to maintain the security but what if someone dares to meddle with your phone or unfortunately, it gets stolen? Don’t worry, all you need to do is let Android Device Manager unlock your Android phone. For this, it just needs to be enabled on your phone (before you unluckily locked yourself out of it). Android Device Manager unlocks your phone in a small amount of time, saving you from all the troubles.
In addition to this, the Android Device Manager also unlocks your password/pin-encrypted phone if you have forgotten the passcode by chance. The procedure is quite simple; all you need is a Google account to set this up onyour phone and then you can make use of any other online device to track down your lost or stolen phone or to even wipe all data in it. Phew!
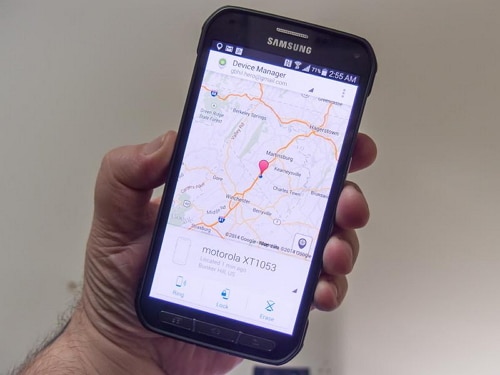
Using the Android Device Manager to track a lost phone

Part 1: What is Android Device Manager lock?
Android Device Manager is Google’s take on Apple’s Find My iPhone. Enabling the ADM is quite easy; just go to google.com/android/devicemanager on your computer and search through your list of devices that are already connected to your Google account. Once you are there, you can easily send a notification to the phone you want to enable remote password application and wiping upon.
ADM comes with a set of features that helps you to unlock your Android phone as well. It not only helps you to find your device, but also Ring it, lock it, and wipe and erase all the data as well, if your phone is lost or stolen. Once you’re logged into the ADM website from your computer, you can avail all these options once your phone is located. It is a wise option to get your device locked by Android Device Manager in case it is lost or stolen, so that your phone is secured.
Android Device Manager can unlock your phone under a specific set of circumstances only.
- • First of all, Android Device Manager needs to be enabled on your phone before it is lost, stolen, etc.
- • Secondly, your phone can only be tracked by ADM if the GPS option is switched on.
- • Thirdly, the Poco M6 Pro 4G device you are using for ADM, must be connected to Wi-Fi or internet, to login to your Google account.
- • Lastly, Android Device Manager is not compatible for all Android versions. For now, it is only compatible with devices running Android 4.4 and above, so your phone must be in this category for ADM to work.
Part 2: How to unlock Android phone with Android Device Manager?
Just act according to the following steps, and the Android Device Manager will unlock your phone.
1. On your computer or any other mobile phone, visit: google.com/android/devicemanager
2. Then, sign in with the help of your Google login details that you had used in your locked phone as well.
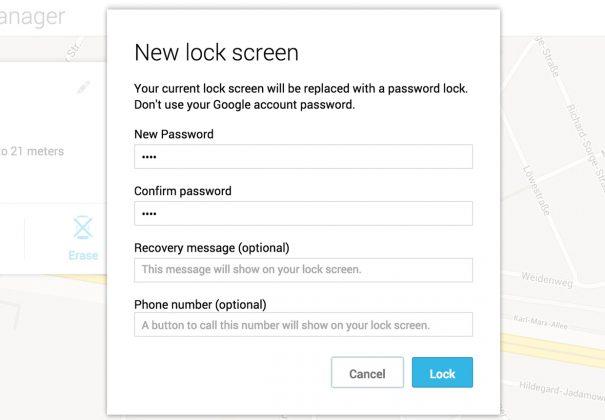
3. In the ADM interface, choose the Poco M6 Pro 4G device you want to unlock. Now, select “Lock”.
4. Enter a temporary password. Now go ahead and click on “Lock” again.
5. If the previous step was successful, you should be seeing a confirmation below the box with the buttons – Ring, Lock and Erase.
6. Now, you should see a password field on your phone screen. Enter a temporary password to unlock your phone.
7. Visit your phone’s lock screen settings and disable the temporary password.

The Android Device Manager has successfully unlocked your phone!
A downside to this process, is an error message faced by some users while using ADM. Many users have reported the issue, that when they have tried using ADM to unlock their locked device, an error message has occurred, saying, “since Google has verified that a screen lock is already set”. Basically, this error message conveys that you will not be able to unlock your phone using Android Device Manager, and this is a flaw on Google’s part, not your phone’s.
Part 3: What to do if phone is locked by Android Device Manager
There are 2 situations where you would want to know how to unlock the Android Device Manager lock – one, when you have unfortunately forgotten the screen lock passcode and the other is when your phone is locked by Android Device Manager.
ADM is built to completely lock your device so that unknown people cannot access it. So, if your phone is locked by Android Device Manager, you might be in a problem.While ADM is a wonderful tool to lock your phone or erase and wipe data if its stolen or lost, most of the users have reported the issue that they cannot unlock their phones that are locked by Android Device Manager. A possible solution to this is adding a temporary password via Google login and bypassing the ADM lock. Or, you can try resetting the password again by entering a new password via ADM. If that does not work, you can make use of several third-party applications which can be found in the internet, that will help to completely erase the Android Device Manager lock.
So, now you know how to unlock the Android Device Manager lock. Do keep in mind, your device must be connected to internet or Wi-Fi, to login to your Google account.
Part 4: Unlock Android devices with Dr.Fone - Screen Unlock (Android)
As mentioned before, many were unable to unlock their phones with ADM. This is why we use the Dr.Fone - Screen Unlock (Android) . It is hassle-free and easy-to-use; the Dr.Fone toolkit needs to be downloaded on your computer and with a few easy steps, it erases any kind of lock-screen passcode and avoids any kind of data loss as well!
Dr.Fone - Android Lock Screen Removal
Remove 4 Types of Android Screen Lock without Data Loss
- It can remove 4 screen lock types - pattern, PIN, password & fingerprints.
- Only remove the lock screen, no data loss at all.
- No tech knowledge asked, everybody can handle it.
- Work for Samsung Galaxy S/Note/Tab series, and LG G2, G3, G4, etc.
3,224,627 people have downloaded it
This tool works on removing all four types of lock-screen passcodes – PINs, Patterns, Fingerprints, and Passwords. Anyone can use this tool following these easy steps:
You can also use this tool to bypass the locked screen beyond Samsung and LG.Things you should pay attention is that it will remove all the data after finishing unloking on other brand android phone.
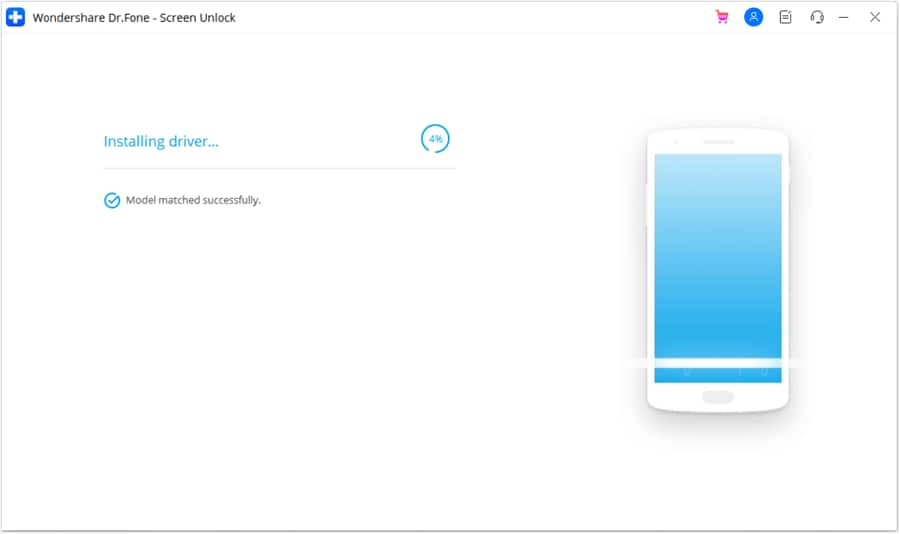
1. Fire up the Dr.Fone toolkit for Android on your computer and select the Screen Unlock among all the other tools.

2. Now, connect your Android device to the computer and select phone model in the list on the program.

3. Boot your phone into Download mode:
- • Power off your Android phone.
- • Press and hold the volume down+the home button + the power button at the same time.
- • Press the volume up button to enter Download Mode.

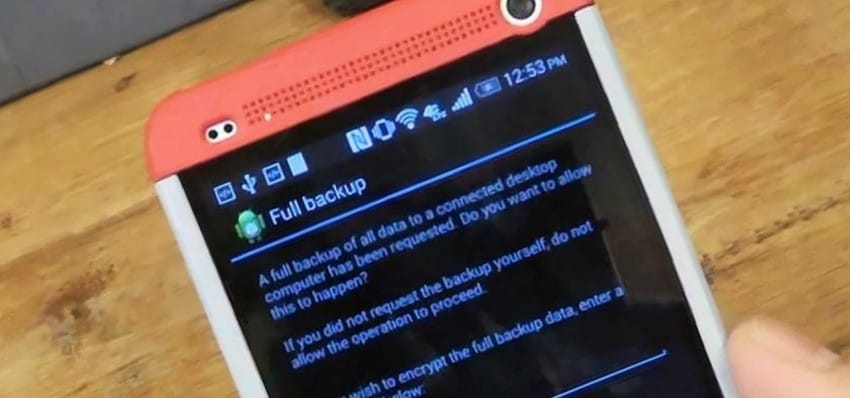
4. After you get your phone into the Download mode, it will start downloading a recovery package. Wait for this to be completed.

5. When the recovery package download is completed, Dr.Fone toolkit will begin removing the screen lock. This process will not cause any data loss on your Android device, so do not worry. Once the whole procedure is over, you can easily access your Android phone without entering any kind of password. Hurrah!

The Dr.Fone software is currently compatible with Samsung Galaxy S/Note/Tab series, and LG G2/G3/G4 series. For windows, it is compatible with 10/8.1/8/7/XP/Vista.
The Android Device Manager is an excellent initiative taken by Google to give people the chance to not lose any data and regain access to their phones. This also teaches us to take precautions before such unfortunate incidents take place. Phones are probably one of the most important belongings of ours, in which we confide all our private and confidential documents that we wouldn’t want to be meddled with.
So, make use of this guide and get back command over your Android phone.
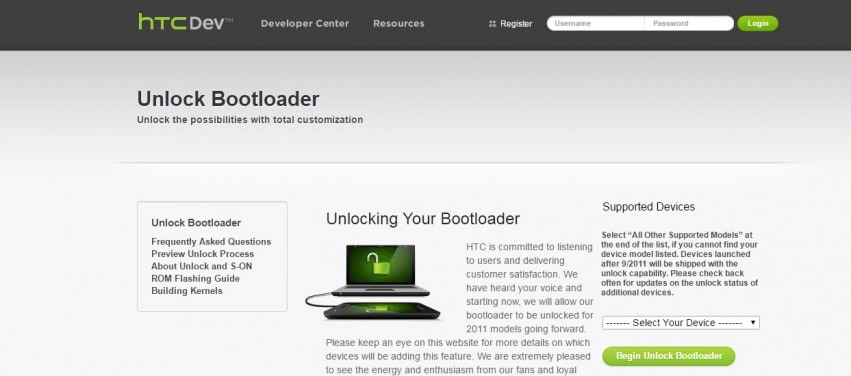
How to Unlock Poco M6 Pro 4G Bootloader Easily
Do you want to unleash the true power of your smart phone? Do you wish to have complete control over your smart phone? If yes, well, here is the answer; unlock bootloader. For people who are already into the tricks of hacking and rooting smart phones, might be aware of this. But still, there are exciting new developments. Bootloader is a code existing in all operating systems which usually comes pre-locked. So, it is important, if you wish to have a custom ROM installed on the Poco M6 Pro 4G device, or if you wish to have other controls like installing applications which are incompatible, to have the Poco M6 Pro 4G device bootloader unlocked. But going through with the process of unlocking bootloader and rooting the Poco M6 Pro 4G device will not help and rather might break the warranty of the Poco M6 Pro 4G device. This definitely calls for a diligent watch on how to unlock HTC bootloader. So, it is imperative as a user to know the process of HTC bootloader unlock. This article serves you with some ways you could follow to unleash the true power of your HTC device. Here’s how you can do it.
Part 1: Why We Want to Unlock HTC Bootloader
For people with HTC device, unlocking bootloader would mean complete authority over the smart phone and you have all the power to control the HTC device by all means. Since, bootloader usually comes pre-locked, unlocking the bootloader is the initial step if you would like to have a custom ROM installed in your device. There are various advantages of HTC unlock starting from gaining rights of control to installing latest custom ROMs in the phone and installing incompatible applications. Moreover, HTC unlock bootloader could boost the Poco M6 Pro 4G device speed and battery life and also help in making complete backups of the Poco M6 Pro 4G device. You could also have controls to remove bloatware from the HTC device. So, all in all, while there could be certain side effects, if not done properly, there are various advantages of unlocking HTC bootloader. If the process is carried out properly, the Android device could be the perfect smart phone you would like to have.
Part 2: How to Unlock Poco M6 Pro 4G Bootloader
Poco M6 Pro 4G is the flagship device of HTC by all means. With a world of features and offerings, Poco M6 Pro 4G truly is a beast. While the phone is very powerful without any modifications, the true potential is yet to be seen and that can only be done if the bootloader is unlocked. So, to have a complete control over the Poco M6 Pro 4G device, it is important to unlock the bootloader and the process has to be carried out diligently. One of the initial things that needs to be ensured is that the Poco M6 Pro 4G device is fully charged or atleast 80% mark. Make sure you have the fastboot drivers for the Poco M6 Pro 4G device configured on the windows machine and the Android SDK. Here are some of the steps which can be followed to unlock bootloader.
Step 1: It is always very important to keep the phone data backed up and more so when you are planning to unlock the bootloader.
As one of the initial measures, backup the Poco M6 Pro 4G device completely as bootloader unlocking process will wipe all the data off. So, backup all the data like photos, contacts, multimedia files, documents, etc.
Step 2: Go to htcdev.com/bootloader. Ensure that you are registered with HTC and once the sign up is done, log in to HTC dev.
Now, ensure that HTC Sync Manager is installed on the PC.
Step 3: From the bootloader page, select your device using the drop down option as shown in the picture below.
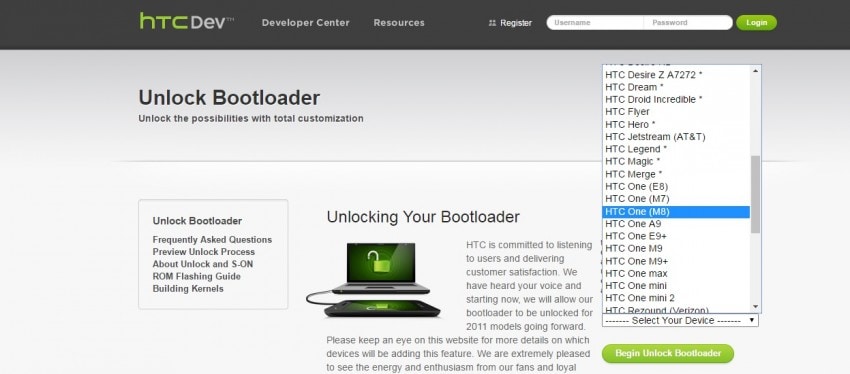After selecting the Poco M6 Pro 4G device, click on “Begin Unlock Bootloader”, and then confirm all the dialogue boxes which come your way on screen.
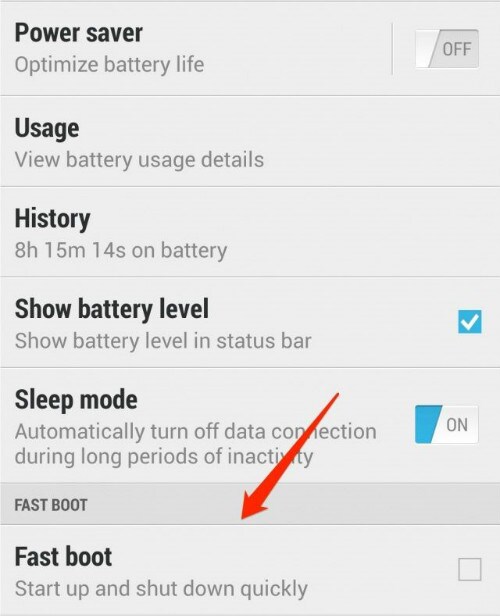
Step 4: Now, you will be presented with four steps to put the Poco M6 Pro 4G device in bootloader mode. Disconnect the Poco M6 Pro 4G device from the PC and turn the Poco M6 Pro 4G device off completely. Press the volume down button along with the power button to switch the Poco M6 Pro 4G device on in bootloader mode.
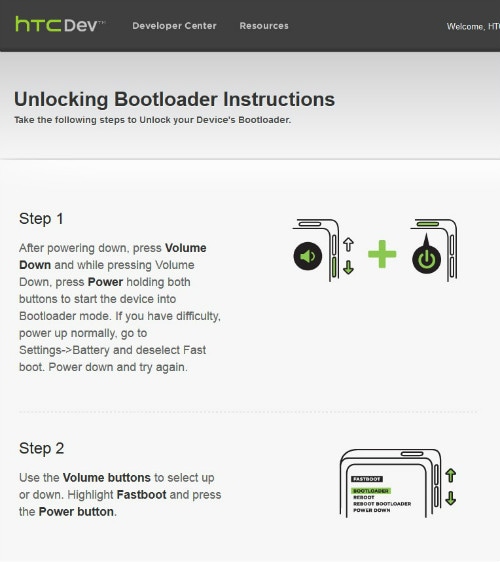
Step 5: Use the volume keys of the Poco M6 Pro 4G device to select Fastboot option along with pressing power button to confirm, after the Poco M6 Pro 4G device is in bootloader mode. Now, connect the Poco M6 Pro 4G device to the computer using a USB cable.
Step 6: Go to Fastboot folder on the PC and holding down the shift key, click on any empty space followed by a click on “Open command window here”.
Step 7: In the command prompt window, type “fastboot devices” and press enter. Poco M6 Pro 4G will show up in the command prompt.
Note: The drivers have to be installed correctly to see the Poco M6 Pro 4G device in the command prompt. So, if the Poco M6 Pro 4G device does not show up, reinstall HTC Sync Manager and try again after restarting the computer.
Step 8: On HTC Dev’s website third page, click on “proceed to Step 9”. Follow the steps listed and then click on submit. The unlock token code for the Poco M6 Pro 4G device will be mailed by HTC. Download the token and name it “Unlock_code.bin” and place the token in the fastboot folder.
Step 9: Now, in the command prompt window, type the following:
fastboot flash unlocktoken Unlock_code.bin
Step 10: On the Poco M6 Pro 4G , one message will appear asking if you want to unlock the Poco M6 Pro 4G device bootloader.
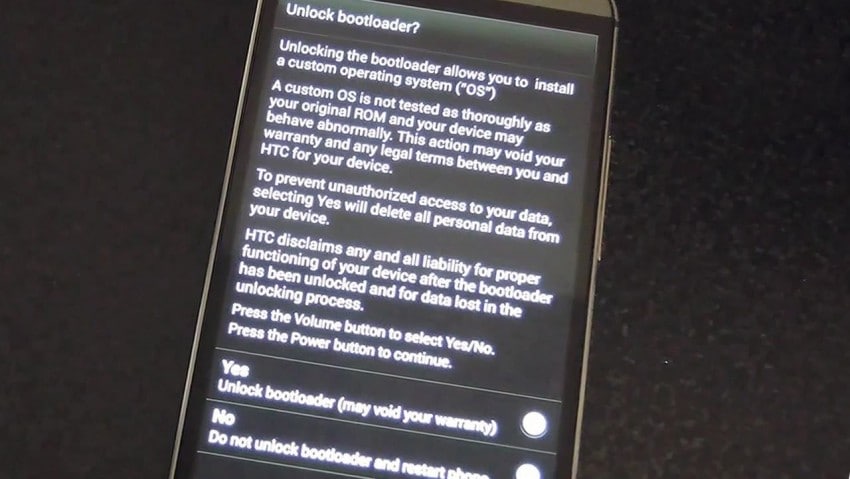
Use volume keys to select and power button to confirm. Once this is done, the Poco M6 Pro 4G device will restart once and it’s done. The device is now bootloader unlocked.
How to Show Wi-Fi Password on Poco M6 Pro 4G
Since the invention of Android OS in 2008 by Andy Rubin, our world has faced a dramatic change. Android seems to be controlling a considerably high portion of our life. We have bought many gadgets that use this amazing OS and most of which are phones. But how much can you do with your Android phone? Developers are always making it more interesting to use this interface.
Most of the time, we use Android phones, we get faced with the need to access the internet. The Wi-Fi capability of these Android gadgets makes it super easy for us to surf the web. Throughout using Wi-Fi, we connect to a number of them. This could be at school, a sub-way café, the gym, buses, hospitals, hotels, towns, and the list is endless. A password secures most of this. Needless to say, our brain is weak to store all these passwords for future use, especially if you would want to connect with a different gadget you have recently bought or even your laptop. In this article, we will introduce you to how to find wifi password on rooted and also unrooted Android devices.
Part 1: Show Wifi Password on Rooted Android Device
What is Rooting?
First of all, what does rooting mean? You have probably used a Windows computer or even Linux. For the case of Windows, when installing a new program or software, it always prompts a dialog box saying, “Administrator permission required to run this program.” If you don’t have the administrator permission, you won’t install the program. In Android, this is called rooting. In simple terms, it means having the root permission to your phone. Some Android apps will require you the root permission, e.g., flashing your ROM. In this part, we will explain how you can show the Wi-Fi password on your Android with root.
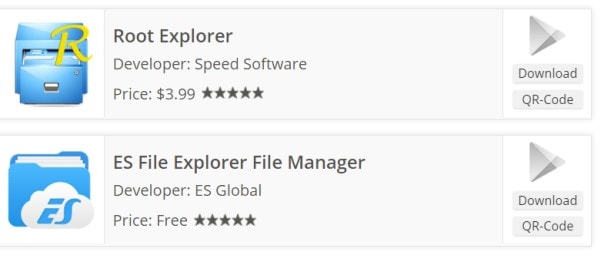
To find the Wi-Fi passwords on your Android phone, you need to have an app to explore files which also supports a root user. In this case, ES FileExplorer or Root Explorer will come in handy. However, it turns out that the latter is offered at $3. Let’s use the free ES File Explorer.
Steps of getting Wi-Fi password on Android with root
In only four steps, we, at this moment, learn how we can find the password of a Wi-Fi on an Android phone.
Step 1: Install the ES File Explorer
Download the ES File Explorer from your play store, install it, and open it.

Step 2: Enable Root Explorer
The root explorer needs to be enabled so that you can reach the root folders of the Wi-Fi passwords you need. By default, the root feature in this ES explorer is not enabled. To enable it, just tap on the list menu on the top left corner.:
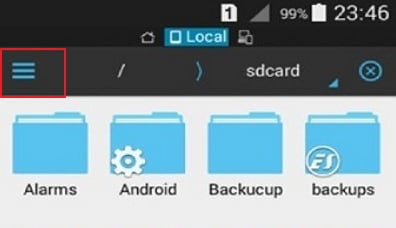
This will drop down a list of controls. Scroll down and find the Root Explorer option and enable it.

Step 3: Get the passwords’ file.
Go back to ES file explorer, and this time, find the folder named data.
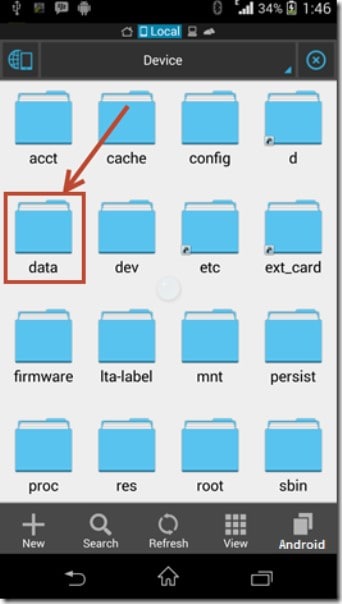
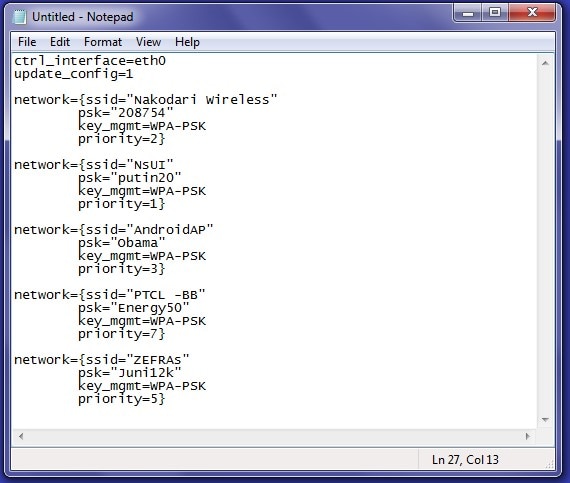
When this folder opens, find another one named misc. Open it and find another one named wifi. Here, find a file named wpa_supplicant.conf.

Step 4: Retrieve the wifi password on Android
Make sure that you don’t edit anything in the file. You might mess up with important data and fail to access the Wi-Fi(s) in the future.
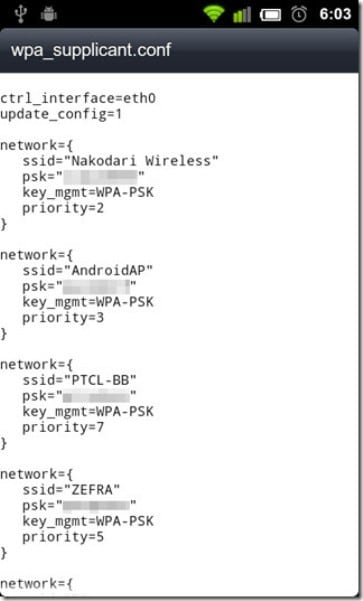
As you can see above, we have found the Wi-Fi passwords on the android device. On each network profile, we have the name of the network represented by name (ssid=”{the name}”), the network’s password represented by psk, the network’s access point represented by key_mgmt=WPA-PSK and its priority represented by priority.
Part 2: Show Wifi Password on Android without Root
What if I don’t have root access to my Android, can I still see Android Wi-Fi password? The short answer is yes. However, this is a bit involving but simple. You don’t need to be a computer guru to do it, but you need to have a computer and some internet access of course. The key thing is to find a way through which we can fetch the password file from the phone without using a root access protocol in the Android. This is made possible by some little programming insight using the Windows Command prompt.
Steps to show Wi-Fi password on Android without root
Step 1: Access the Developer authority
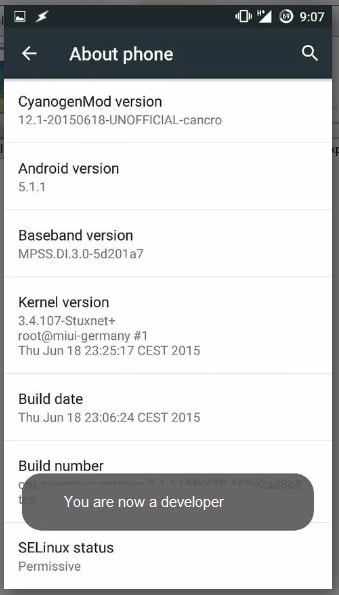
To access the files that Android uses to run passwords, you must first become a developer. This is very simple.
Get your Android phone and go to settings. Scroll down and find “About phone.” Tap on it and scroll down again to find Build number.

Tap on this “build number” 5 to 6 times until a message pops up, saying, “You are now a developer”.
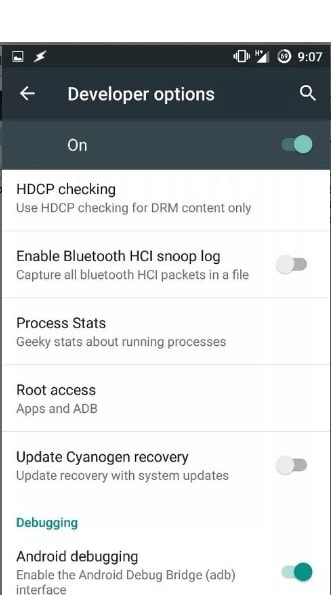
Step 2: Enable the debugging.
Go back to Settings. Scroll down for developer options. Turn on the button for “Android/USB debugging”.
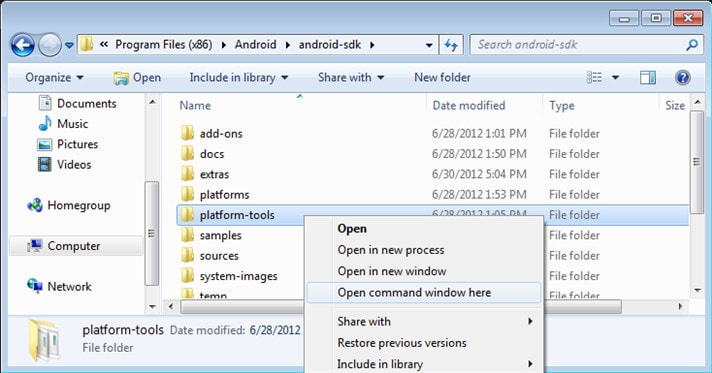
Step 3: Install ADB drivers.
Now, open your Windows desktop. Download and install ADB drivers. (Use this download link adbdriver.com ). You need to download and install platform tools (minimal ADB and fastboot) from http://forum.xda-developers.com/... Now open the folder where you’ve installed the above tools. By default, it is in the Local disc C\windows\system32\platform_tools location. However, you might want to locate them by searching on the windows search engine. You have to hold the Shift key and right-click inside the folder to click on”Open Command Window Here.”
Step 4: Test the ADB
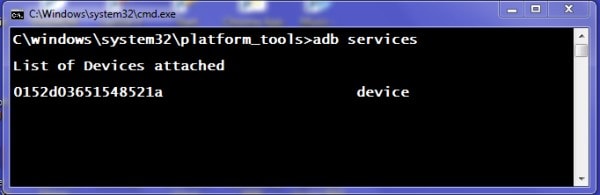
Here, we would like to test whether the ABD is working properly. To do this, connect your phone to the PC using a USB. In the command prompt, type adb services and then press enter. If it’s working properly, you should see a device on this list.
Step 5: Find the Android wifi password.
Now, it is time to type the given command in the command prompt and type: adb pull /data/misc/wifi/wpa_supplicant.conf c:/wpa_supplicant.conf. This will fetch the file from your phone to the local disc C drive of the PC.
Step 6: Get the wifi passwords.
Lastly, open the file with a notepad, and there you go.
Now you learned how to show the wifi password on your Android device.
- Title: Mastering Android Device Manager The Ultimate Guide to Unlocking Your Poco M6 Pro 4G Device
- Author: Aaron
- Created at : 2024-07-15 20:31:16
- Updated at : 2024-07-16 20:31:16
- Link: https://easy-unlock-android.techidaily.com/mastering-android-device-manager-the-ultimate-guide-to-unlocking-your-poco-m6-pro-4g-device-by-drfone-android/
- License: This work is licensed under CC BY-NC-SA 4.0.