
In 2024, Tips and Tricks for Setting Up your Realme 11X 5G Phone Pattern Lock
Tips and Tricks for Setting Up your Realme 11X 5G Phone Pattern Lock
Failing to remember the pattern lock of a phone is one of the most puzzling situations for Android users. Unlike the famous OS, Android gives a seamless method to eliminate the issue.
You can attempt the methods below or an expert tool if you have forgotten the pattern lock on your gadget and reset it. However, we suggest you try Dr.Fone - Screen Unlock for a quick and safe solution. To make things more straightforward, we have given you other techniques as a workaround to the issue.
So, keep following us to unlock the lock screen pattern and use your phone again.
Part 1: What Is Android Pattern?
A pattern lock is used to identify the actual user by your Android phone. It is a widely used phone locking system and a secured one. Simply put, a pattern lock includes a line pattern you choose that you can draw to unlock a lock screen. You can enable this lock screen feature from the security menu in the settings application.
So, if you have set a pattern lock as a screen lock for your device, you will need to draw the exact pattern every time you log in.
Part 2: Best Tool to Unlock Your Pattern
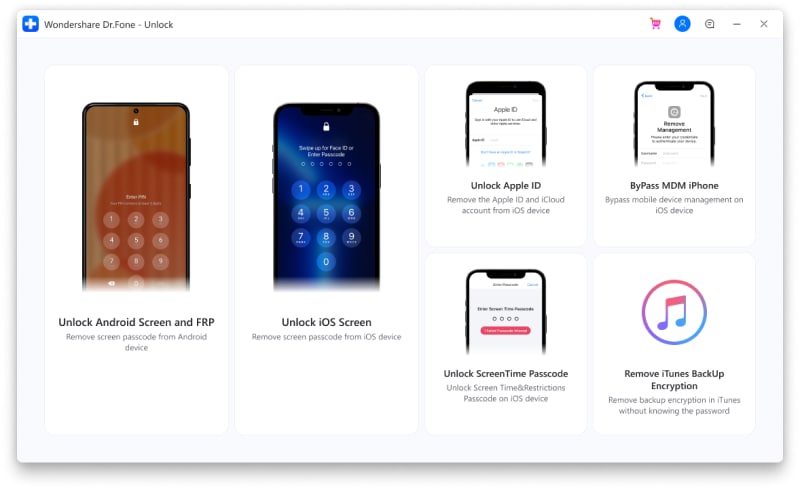
Dr.Fone - Screen Unlock
The most effective and quick tool to unlock a pattern lock is Dr.Fone - Screen Unlock by Wondershare. Dr.Fone is an all-in-one tool for all your Android needs and has been in the business for a long time. We suggest you use Dr.Fone. The following steps will help you unlock your device:
Step 1. Select the “Screen Unlock” option in the Dr.Fone interface.

Step 2. Select Unlock Android Screen
To unlock the pattern lock on your device, the “Unlock Android Screen” will guide you to finish the whole process.

Step 3. Select unlock mode
If you click “Remove without Data Loss,” only some limited Samsung or LG phone models can be unlocked without losing data. To unlock most phone brands’ screens, “100% Remove Screen Lock” is a better choice.

You can find the brand compatible with your phone in the following list.

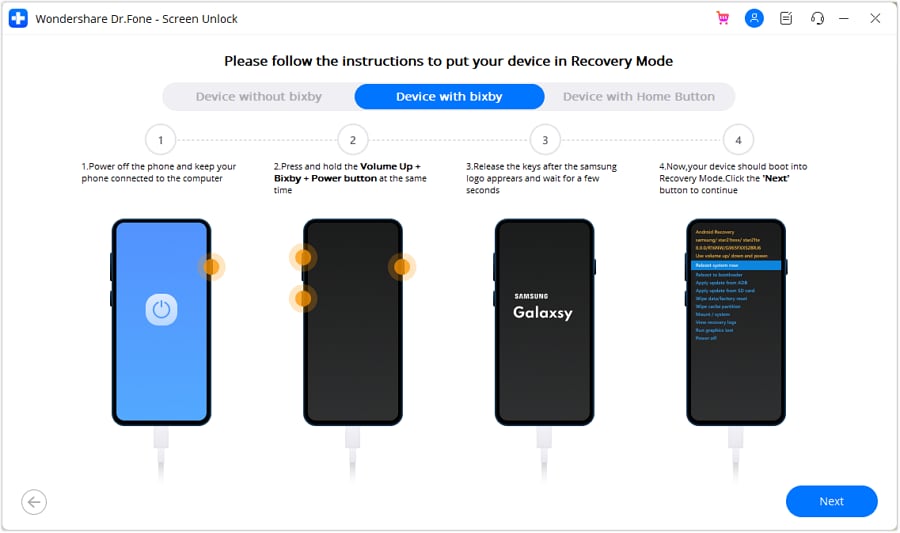
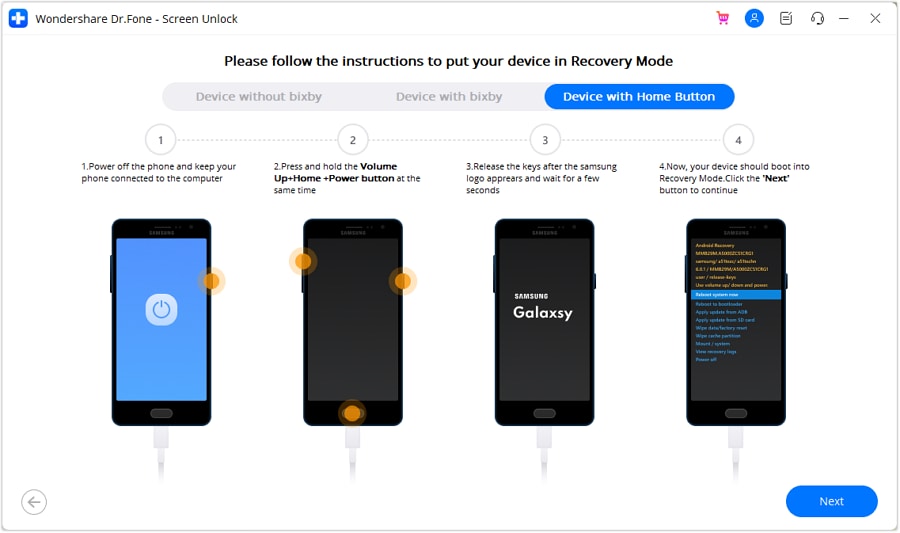
Step 4. Go into Recovery Mode
Read the program instructions carefully; entering recovery mode is the prerequisite to unlocking the pattern lock.
(Here are 3 examples of Samsung phones)
How to get into recovery mode with Bixby
How to get into recovery mode without Bixby

How to get into recovery mode with Home button
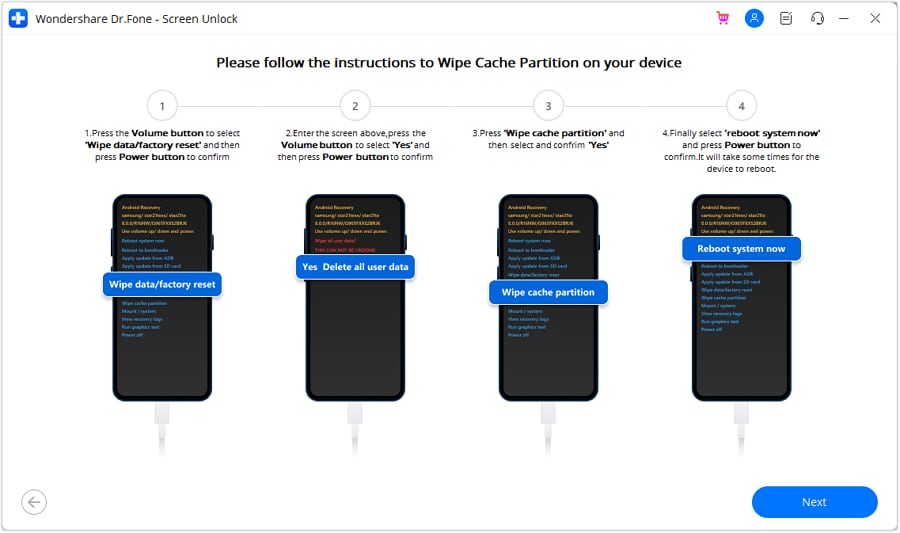
Step 5. Instructions to Wipe Cache Partition
Now you’re in recovery mode, pick these options in the image below.
When the “Unlocked successfully” appears on the screen, you can access your device without a pattern lock or other locks!

Part 3: How to Bypass Android Pattern When You Forgot It?
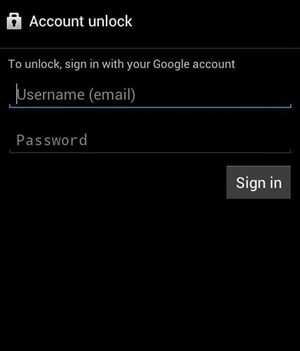
1. Google Find My Device (For Android7.1.1 or later)
Step 1. Open the Android Device Manager site by typing https://www.google.com/android/find in an internet browser.
Step 2. You must give your Google ID credentials to sign in. Remember that this should be a similar Google account connected to your phone.
Step 3. After logging in, select your device.
Step 4. You will get three choices here, i.e., lock, erase, and ring.
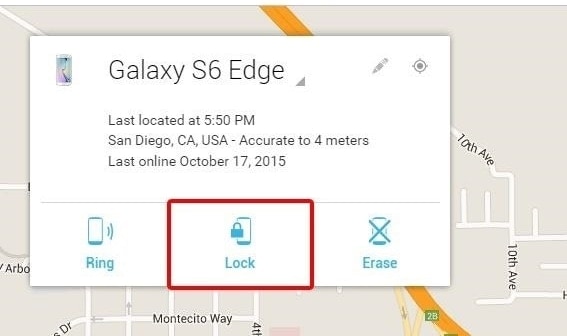
Step 5. Click on the “Lock” button to reset its pattern.
Step 6. It will open another spring-up window. From here, you can give the new password to your phone.
Step 7. After affirming your PIN/password, you can give a recovery message and number (in case of theft only).
Step 8. Complete the process and sign out of your account on the browser.
2. Forgot Pattern (For Android 4.4 or earlier)
Step 1. First and foremost, give some wrong patterns to your phone. It will tell you that you attempted the incorrect pattern lock.
Step 2. On a similar window, click the “Forgot pattern” choice on the base.
Step 3. That will open another screen, which you can use to sidestep the forgotten pattern of Android. Select the choice for entering the Google Account credentials and continue.
Step 4. To reset the lock screen pattern, you must give the correct details of the Google ID previously logged into the Realme 11X 5G device.
Step 5. After giving the correct details, you can provide another pattern lock to the phone.

Step 6. Affirm your decision and set another pattern lock on your phone.
3. Emergency Call Trick (For Android 5 or 5.1.1)
Step 1: Tap the Emergency Call button and enter ten asterisks (*).
Step 2: Copy and paste the asterisks on the dialer until you no longer see the paste choice.
Step 3: Return to the lock screen and tap on the camera symbol.
Step 4: Press the settings choice on your Android gadget after pulling down the notification tray. Now you will have the chance to enter the PIN/password, and you ought to continue unlocking your Android phone. Continue to paste until the lock screen UI crashes.
4. Safe Mode Boot (For Android 4.1 or later)
Step 1: You can bring up the power menu and hold the “Power Off” button for most phones, especially Android phones. A warning will spring up, asking whether you might want to Reboot to Safe Mode. Here, it would help if you had to press Ok.
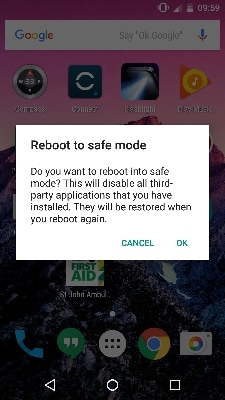
Step 2: Clear your lock screen application’s data.
Clean data off your lock screen app, uninstall it, and then reboot your device to escape safe mode. When you do so, your phone or Android device will unlock.
5. Use ADB (USB required for Android 10 and lower)
- Connect your device to your PC using a USB connector.
- On your PC, open a terminal window (or command prompt).
- Type in the commands given below. Press Enter after each line:
adb shell
album/data/data/com.android.providers.settings/databases
sqlite3 settings.db
update system set value=0 where name=’lock_pattern_autolock’;
update system set value=0 where name=’lockscreen.lockedoutpermanently’;
.quit
exit
adb reboot
- After your gadget has rebooted, enter the command below:
adb shell
rm/data/framework/gesture.key
exit
adb reboot
- Your phone will reboot. After it reboots and requests a security pattern, you can utilize any pattern, and it will unlock.
Conclusion
This guide provides insight into the most common Android issue. Here, we have discussed different techniques to bypass the pattern lock on your Android phone. However, we suggest you go for a professional tool while carrying this out. Therefore, you should choose an expert tool like Dr.Fone - Screen Unlock to open the lock screen pattern.
Full Tutorial to Bypass Your Realme 11X 5G Face Lock?
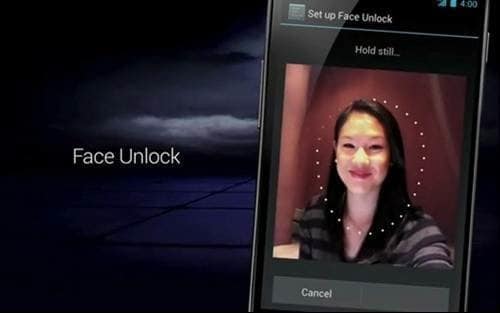
Your android phone face unlock may be buggy, or the camera may be damaged. It can’t recognize your face. When you try multiple times in such cases, it will lock your device permanently. Are you stuck with a locked phone? And you’re still confused about what just happened. Face unlock may face problems such as
- Face unlock app may be buggy
- Your face unlock settings may be unstable
- Your phone camera or face unlock sensor may be damaged
- Someone else may have registered their face without your permission
Whatever the reason, they are equally big obstacles for you to use your phone as usual; trying to unlock your device can lead to a permanently locked phone. So how do you bypass face unlock?
Follow the guide below to bypass the face unlock settings and choose the best one for yourself.
How To Bypass Android Face Lock by Ourselves?
If you want to bypass face lock by yourself, then different methods can help you. These are all tested and work well.
1. A Picture Possibly Bypasses Face Lock
You can use your photo to manipulate the face lock app. Simply use your photo to unlock the phone, which should work fine. If your phone doesn’t recognize your face from a photo, try again.
If it still doesn’t recognize your face, try a different photo or even change the camera’s lighting settings or the angles to see if that helps.
Anyway, this method is still unstable because of many uncontrollable factors. If everything fails, consider the following methods to bypass the face lock.
2. Hard Reset your phone
To get around the Android lock screen, perform a factory reset. While resetting your phone allows you to set a new password, it also erases all data from your device. This method works like a charm, but it also requires more technical knowledge. To bypass screen lock via factory reset, follow these steps.
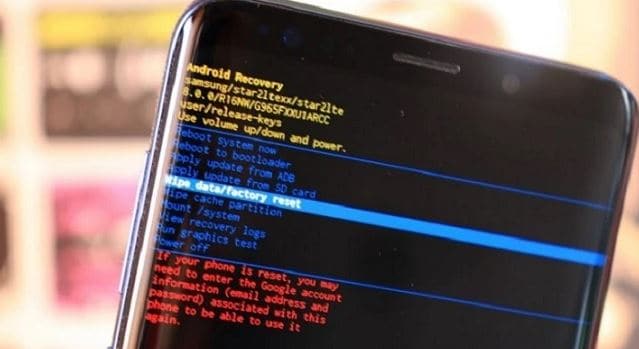
Step 1: Turn off your phone and hold the Power and Volume-down buttons simultaneously until the recovery mode screen appears. There are minor variations depending on the brand and model.
Step 2: Select the Wipe data/Factory Reset option using the volume buttons. To confirm the option, press the Power button.
Step 3: Choose Yes > Delete All User Data, then press the power button to continue. When the process is complete, turn on your phone.
So, before facing such awkward cases, like data loss, we suggest you have a backup habit of keeping your data safe.
3. Google Find My Device
Google Find My Device is a service that lets you remotely lock, track, and wipe data from stolen or lost phones. With a Google account and the password, it won’t be complicated to remove any locks on your phone. You can bypass the Android lock screen by following the steps below:
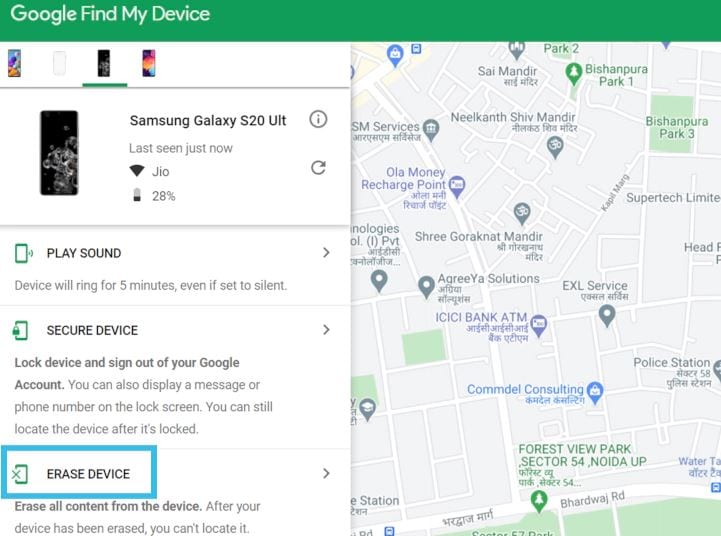
Step 1: Navigate to Find My Device and sign in with your Google account.
Step 2: Your phone receives a notification.
Step 3: Select Erase Device, confirm, and click Erase as a warning pops up on the screen.
Step 4: The factory reset process on your phone begins. When it’s finished, choose My Google Account instead of using your phone as if it were brand new.
Just like the hard reset, after using Google Find My Device, all your data and settings will be erased. Please make everything well prepared before you decide to unlock your device.
Easiest Way to Unlock Your Android Face Recognition Using Dr.Fone-Screen unlock
The methods mentioned above may be hard for you, and you don’t know any technical skills. If you are looking for an easy tool that can face unlocking for you, then Dr.Fone - Screen Unlock is all you need.
Dr.Fone by Wondershare has many useful tools, and Screen Unlock is one of them. It is the easiest and safest method to bypass the Android face lock. It is safe, secure, and easy to use.
The following guide explains how to use Dr.Fone-Screen unlock to bypass the Android face lock.
Step 1: Install and open Dr.Fone on your computer
Step 2: Run Dr.Fone on your PC and select “Screen Unlock” from the tools
Step 3: Select Unlock Android Screen
Please select” Unlock Android Screen” for the rest process.
Step 4: Select device model
Please click the button fitting your phone.
When arriving at this page, we have a lot of options to unlock your device screen for most phone brands, like Samsung, Nokia, LG, OPPO, etc.
Step 5: Enter into Recovery Mode
Here are examples of Samsung phones via its Recovery Mode to unlock your Android device screen.
(Recovery Mode When the Samsung phone with Bixby)
(Recovery Mode When the Samsung phone without Bixby)
(Recovery Mode When the Samsung phone with Home button)
Step 6: Instructions to Wipe Cache Partition
This step in Recovery Mode is the most important to unlock your screen. Please click the buttons as instruction.
Now you can see your device is unlocked successfully
Conclusion
There are various methods to bypass Android face lock, but Dr.Fone-Screen Unlock is the easiest and safest method. Dr.Fone offers Screen Unlock and many other handy tools to help you recover, remove and unlock your Android phone without geeky knowledge. Dr.Fone-Screen Unlock is a step-by-step process, and you do not need to do anything; Dr.Fone will do all you want to do on your phone!
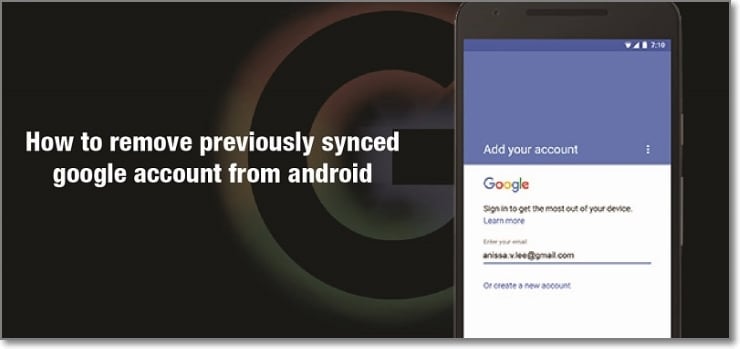
How to Remove a Previously Synced Google Account from Your Realme 11X 5G
The setting up process of a new Android phone requires you to add a Google account that saves all activities and data of the phone like search history, details of online shipping, play store purchases, and more. Once the account is set, it cannot be changed till you delete everything from your phone. Moreover, with the introduction of FRP lock, even a factory reset will not remove the synced Google account.
So, now what if you want to sell your phone or have purchased a second-hand device that is still associated with the previous owner’s Google account? No, worries as there are workarounds available that will help you remove your previously synced google account from your Android device.
Keep reading to know more in detail about how to bypass previously synced google accounts.
Heres a full guide on how to remove google account from android, click to know more!
Part 1: Remove Previously Synced Google Account from Android Phone Without Phone Reset
In this part, we will discuss the methods that can be used for removing the previously synced account from your Android phone without a phone reset.
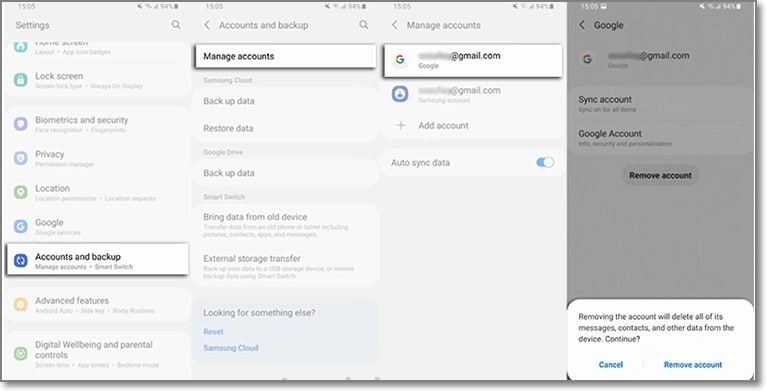
Method 1: Removing Google Account using the Android Settings Menu
If you just plan to reset your phone, maybe because of the lag caused by the phone cache, and you know the inconvenience of Google FRP as a protection mechanism, then you can remove Google FRP through the Settings menu.
The steps for this method are listed below.
- Step 1: On your Android phone go to the Settings option and choose Accounts & Backup.
- Step 2: Select the Manage Accounts option now and the list of the associated Google Devices will appear.
- Step 3: Choose and click on the Google Account that you want to remove and a pop-up message will appear to inform you that all the account data will be deleted with this action.
To confirm the removal of the account, click on the Remove account button.
Method 2: Remove the Google account from the Android phone using the computer
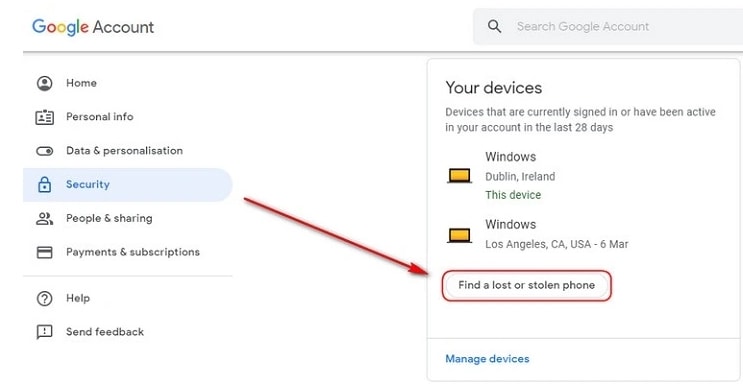
There is another method using which you can remotely remove the Google account associated with your phone. The steps for the method are listed below.
- Step 1: Using another device or a PC, sign in to your Google account that was previously synced on this device and choose the Security option.
- Step 2: Next scroll down and then tap on the Your devices option and choose to Manage devices.
- Step 3: You will now see the list of devices linked to your Google account. Next, tap on Find a lost or stolen phone and then select the Remove option present next to Account access.
- Step 4: You will be again asked if you want to delete the account. Select the Remove option.
- Step 5: The account will be removed successfully and the confirmation message will appear.
Note: This method will actually sign out you from the Google account and will not delete it permanently. To again get access to the account, a notification will appear on your phone to enter the password.
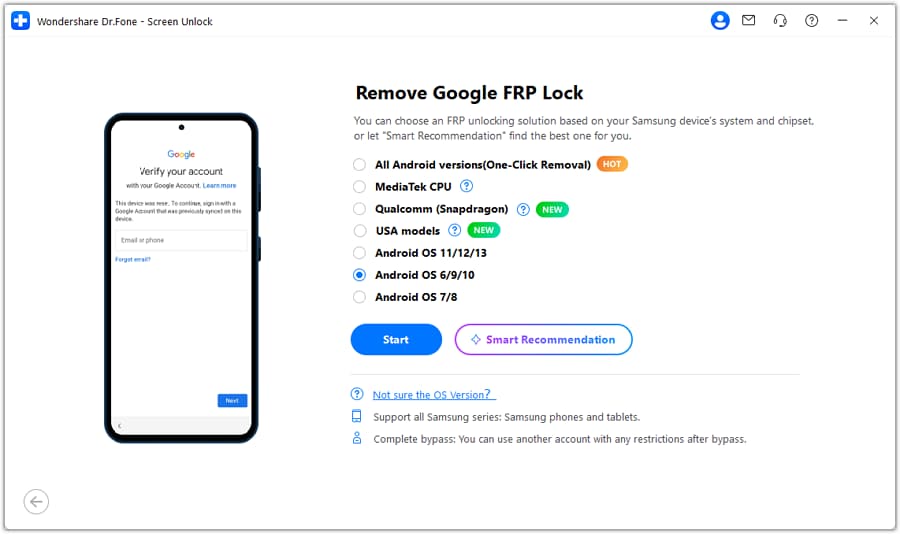
Part 2: How to Disable Factory Reset Protection to Bypass Google Account Verification After Factory Reset
The Factory Reset Protection (FRP) is a security feature for the Android device that allows factory reset only after the associated Google ID and password are entered correctly. With multiple accounts and passwords to remember there is quite a possibility that you may forget your Android phone Google account details and here the need to bypass Google account verification arises.
Though there are multiple tools available we recommend Dr. Fone - Screen Unlock (Android) as the best and the most reliable option. Using this excellent Windows and Mac-based software, FRP lock on all popular Android devices including Samsung, LG, HTC, and others. The tool is simple to use and requires no technology. There is also an option where you can unlock your device if you do not know the OS version.
![]()
Dr.Fone - Screen Unlock (Android)
Get into Locked Phones within Minutes
- 4 screen lock types are available: pattern, PIN, password & fingerprints.
- Easily remove the lock screen; No need to root your device.
- Everybody can handle it without any technical background.
- Provide specific removal solutions to promise good success rate
4,008,669 people have downloaded it
Steps to remove FRP lock using Dr. Fone-Screen Unlock (Android)
Step 1: Download, install and run the software on your system, and from the main interface choose the Screen Unlock option. Make sure that your phone is connected to WiFi.
Step 2: Next, choose Unlock Android Screen/FRP and then select the Remove Google FRP Lock option.
Step 3: Next, choose the OS version of your device from the given options, and then using a USB cable, connect your phone to your system.
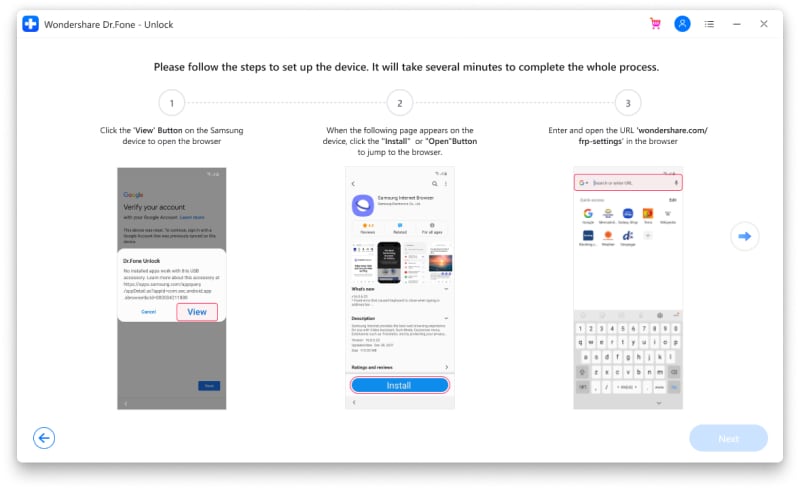
Step 4: After the Realme 11X 5G device is connected, the Realme 11X 5G device information will appear on the software for you to confirm and the notification for the same will be sent to your Android phone.
Step 5: Now follow the notifications for removing the FRP lock and in the browser enter drfonetoolkit.com.
Step 6: Next, click on the Android 6/9/10 button, choose Open Settings and select the PIN option to set a PIN to be used in the further steps.
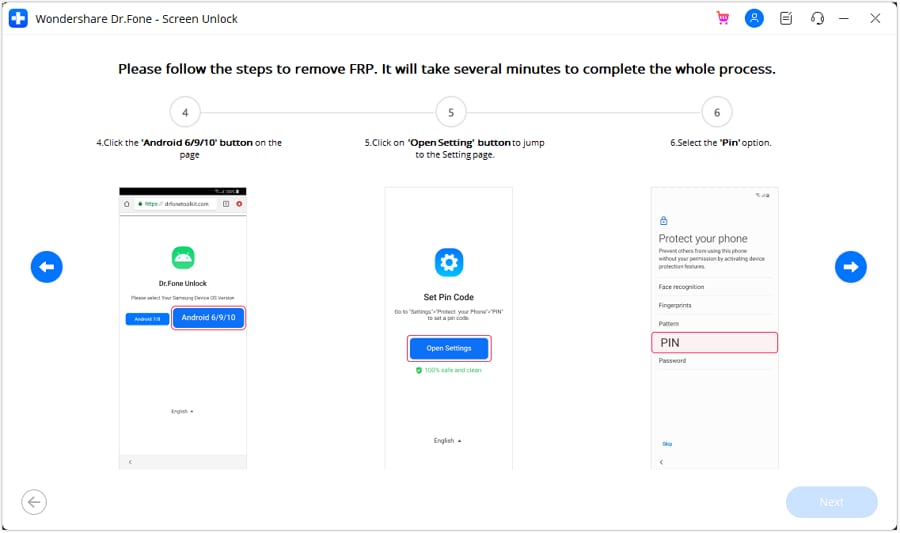
Step 7: Keep following the steps as they appear till you reach the Google Account Sign-In page. Here click on the Skip option that will successfully remove and bypass the Google Account.

The above given are the brief steps for the FRP bypass process. To learn about the entire process in detail, check Dr.Fone-Screen Unlock (Android) guide .
Part 3: Hire a Remote FRP Removal Service to Bypass ZTE/Motorola After Factory Reset
To bypass the FRP lock on your ZTE, Motorola, and Samsung device, there is also an online service called UnlockJunky.com that claims to remove the FRP lock and previously linked account on your Android device within 5-15 minutes. This is a paid service that also claims that if they are unable to remove the lock, they will refund the amount to their customers.
So, if you cannot sign in with a Google account that was previously synced, you can give this, method a try.
Step 1: Open the official service page Unlockjunky on your browser.
Step 2: Next, choose the Realme 11X 5G device’s brand, model, and unlock type from their respective drop-down menus. Click on Unlock Now button after entering the details.
Step 3: Now you need to initiate the order by providing the details asked and completing the payment.
Step 4: Next, the software needs to be downloaded and installed on your system, and using a USB cable, connect your phone to your computer.
Step 5: Connect with one of the support provider members through the live chat and they will help you remove the FRP lock on your Android phone.
With the steps above, you can remove the account previously synced on this device.

Limitations of using the Unlockjunky method:
- This is a paid service.
- Works only with Motorola, ZTE, and Samsung devices.
- There is no surety that the service will work for removing the FRP lock on your devices.
- If you have to remove the FRP lock from multiple devices, a separate payment for each device has to be done.
Conclusion
Above we have listed several ways to remove a previously synced Google account on your Android device. The best of all the listed solutions is Dr. Fone - Screen Unlock (Android) as it supports bypassing FRP lock on multiple Android devices in a hassle-free manner. Once the license is purchased, you can unlock as many numbers of devices as you want without any worries.
Also read:
- [Updated] ZenithAiPhotonix Reimagining Image Artistry
- 2024 Approved Aiming for the Stars Select 7 Top Shooter Experiences
- Countdown Begins: How Microsoft Must Resolve the Critical Issues of Windows 11 in Under a Year | Insights From ZDNet
- Due Metodi Rapidi per Trasferire Windows Nova Versione Dal Tuo Attuale SSD Ad Uno Nuovo
- Expertly Selected Top Combo Modems with Routers for the Year 2024
- How to Stop My Spouse from Spying on My Google Pixel 8 | Dr.fone
- In 2024, Everything You Need to Know about Lock Screen Settings on your OnePlus 11 5G
- In 2024, How To Enable USB Debugging on a Locked Oppo Reno 8T Phone
- In 2024, How To Fix OEM Unlock Missing on Realme 12 Pro+ 5G?
- In 2024, How to Unlock Realme GT 5 Pattern Lock if Forgotten? 6 Ways
- Premium Picks The Very Best Tripods for Sharp 4K Videos
- Understanding Antivirus Behavior: Why Is Files Often Quarantined Rather Than Immediately Removed?
- Unlock Your Realme 12 5G Phone with Ease The 3 Best Lock Screen Removal Tools
- Title: In 2024, Tips and Tricks for Setting Up your Realme 11X 5G Phone Pattern Lock
- Author: Aaron
- Created at : 2025-02-04 16:07:07
- Updated at : 2025-02-07 16:15:18
- Link: https://easy-unlock-android.techidaily.com/in-2024-tips-and-tricks-for-setting-up-your-realme-11x-5g-phone-pattern-lock-by-drfone-android/
- License: This work is licensed under CC BY-NC-SA 4.0.