
In 2024, Rootjunky APK To Bypass Google FRP Lock For Oppo A1x 5G

Rootjunky APK To Bypass Google FRP Lock For Oppo A1x 5G
Factory Reset Protection (FRP) is a security feature built into Android devices running Android 5.1 Lollipop and later versions. It prevents someone from using your phone after a factory data reset without Google account login credentials. The FRP makes it much less attractive for thieves to steal Android phones, knowing they will need help to access them.
FRP automatically activates when you add a Google account to your Android phone. It links the Oppo A1x 5G device to your account, making it the “trusted owner.” Once activated, FRP becomes embedded in the phone’s system.
While Google FRP is a valuable security feature, it’s vital to acknowledge that there are legitimate situations where bypassing it might be necessary. These instances include forgotten Google account credentials, buying a second-hand device, and device issues. In these cases, tools like RootJunky can help you bypass FRP Lock. We’ll explore how to use RootJunky APK later, but first, let’s define what it is and its role in FRP bypass.

The RootJunky APK is a free Android application also called RootJunky SDL or RootJunky FRP Bypass tool. This app’s primary function is to bypass the Google Account FRP lock on Samsung devices. Rootjunky uses the weaknesses in Android’s setup process to create a new user account or switch existing ones, letting you bypass the FRP and regain control of your phone.
You can complete this process using the app by connecting your phone to a computer through an OTG cable. RootJunky can be helpfu l if you’ve forgotten your Google account password or bought a second-hand phone locked to someone else’s account. However, only use it if you have legitimate reasons to bypass FRP lock, like accessing your device after forgetting your Google account details.

Downloading the RootJunky FRP bypass tool from unofficial sources can introduce malware risks, so stick to trusted sources like the official website. Additionally, when exploring RootJunky, it is vital to keep the following in mind:
- Not all Android devices are susceptible to the methods used by RootJunky. It is necessary to check compatibility with your specific device model and Android version.
- Using FRP bypass tools like RootJunkycan potentially compromise the security of your device. Be cautious and proceed if you fully understand the risks involved.
- Bypassing FRP may involve data loss.
- Download RootJunky FRP bypass APK from a reliable source to minimize the risk of malware or viruses. You can check the APK file from official websites or trusted forums.
- Google constantly updates its security measures, so these tools may not always work effectively.
Part 2: How To Use RootJunky To Bypass Google FRP?
Here are the general steps to use the FRP Bypass APK RootJunky app to bypass Google FRP lock. But remember that specific steps may vary depending on your device and Android version:
- Step 1: On your computer, download the Rootjunky RealTerm program from the official Rootjunky website.

- Step 2: On your phone, download the Rootjunky APK (com.rootjunky.frpbypass-1.0.apk) file from the official website or other reputable sites.

- Step 3: Go to Settings > Security and tap Install unknown apps. Then, enable unknown sources to allow installation of apps from outside the Play Store. Connect your device to a Wi-Fi network.

- Step 4: On your Android phone, open a file explorer app and install the downloaded RootJunky APK file.
- Step 5: Connect your smartphone to your computer using a USB cable.
- Step 6: Launch the Rootjunky RealTerm program on your computer. Under the Display tab, check the Half Duplex option.
- Step 7: On your computer, go to Device Manager > Modems. Locate your device’s port name (e.g., COM3).
- Step 8: On the RealTerm program, enter the correct port number under the Ports tab, then click Change.

Step 9: Click Send to establish a connection. Enter the two commands:
at + creg? \ r \ n
atd1234; \ r \ n
Step 10: Once connected, the Rootjunky APK on your phone will provide on-screen instructions to bypass FRP.
Step 11: If prompted, perform a factory data reset of your device.
While RootJunky offers a free method for FRP bypass, it can be incompatible with your device’s brand, requiring technical knowledge, tedious, and potentially risky. If you are looking for a simpler, safer, and more user-friendly solution, Wondershare Dr.Fone might be a better fit for you. If you want to learn how to use this tool to bypass FRP lock with minimal technical expertise, then keep reading.
Part 3: Easier Tool Than RootJunky APK To Bypass Google FRP
Google FRP adds an extra layer of security after a device reset. However, regaining access to the smartphone can be challenging if you forget your Google account details, forget your lock screen, or just buy a used device. While methods like the FRP RootJunky app exist, using it can be complex or risky.
Consider exploring third-party options like Dr.Fone for a potentially easier and safer FRP bypass solution. Dr.Fone Screen Unlock tool helps remove the Android FRP lock without requiring a PIN or Google Account.
Why Use Dr.Fone - Screen Unlock?
Here are some of the key features of Dr.Fone - Screen Unlock:
- **User-friendly:**Fone boasts an intuitive interface, eliminating the need for technical expertise. Even beginners can navigate the process with ease.
- **Widespread Brand Compatibility:**Fone supports mainstream brands, such as Samsung, Xiaomi, Oppo, Redmi, Realme, and Vivo, catering to a broader user base.
- **Fast and Efficient:**Regain access to your device in minutes without wasting time on tedious procedures.
Step-by-step Guide to Removing FRP Lock With Dr.Fone - Screen Unlock
Ready to leave the hassle of using RootJunky and easily bypass the FRP lock? Download and install Dr.Fone on your computer, then follow these steps to learn how to bypass Google FRP on your device:
- Step 1: Launch Dr.Fone on your computer and connect it to your Android device. Choose Screen Unlock from the Toolbox in the main interface.

- Step 2: Choose Android as your device type. This will take you to the next screen, where you can select Remove Google FRP Lock to proceed.

- Step 3: Select your device’s brand from the list and click Start to continue.
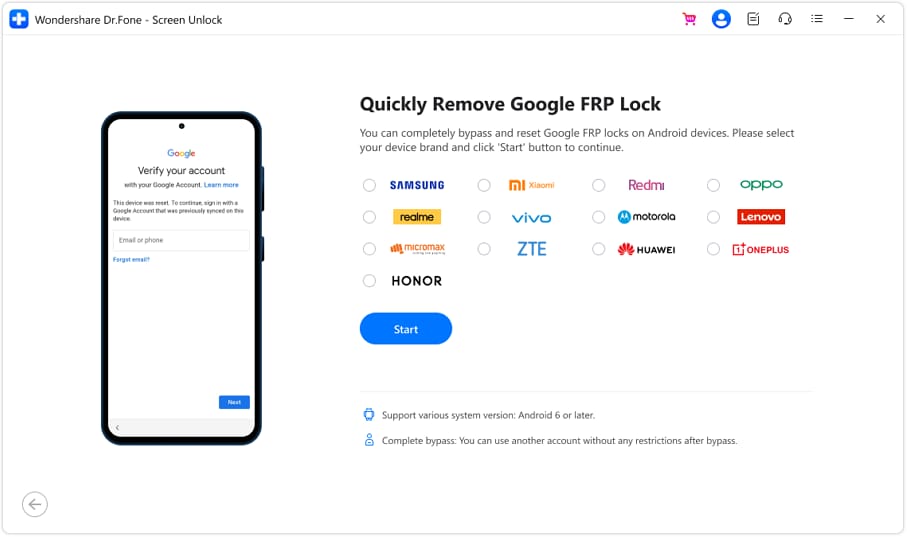
Note:
The next steps may vary depending on the brand you selected.
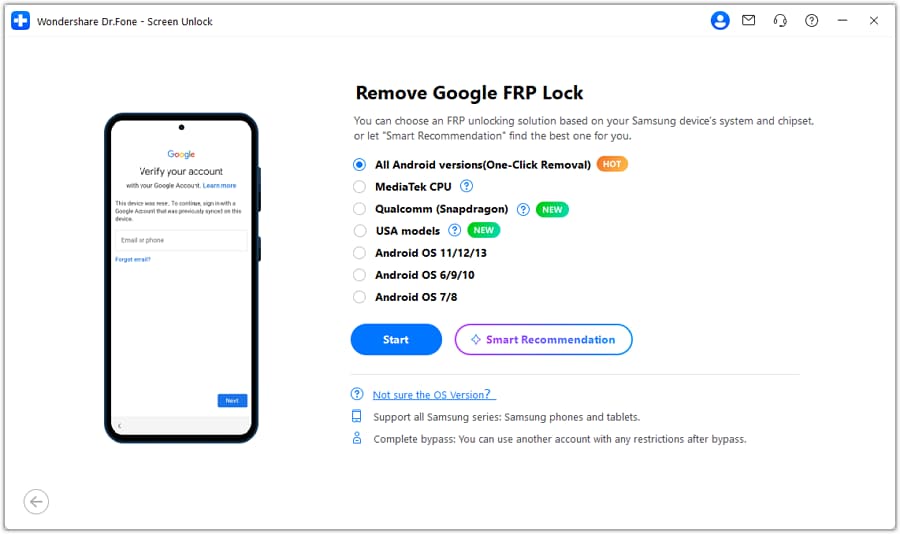
- Step 4: Select the OS version of your device and click Start to continue.
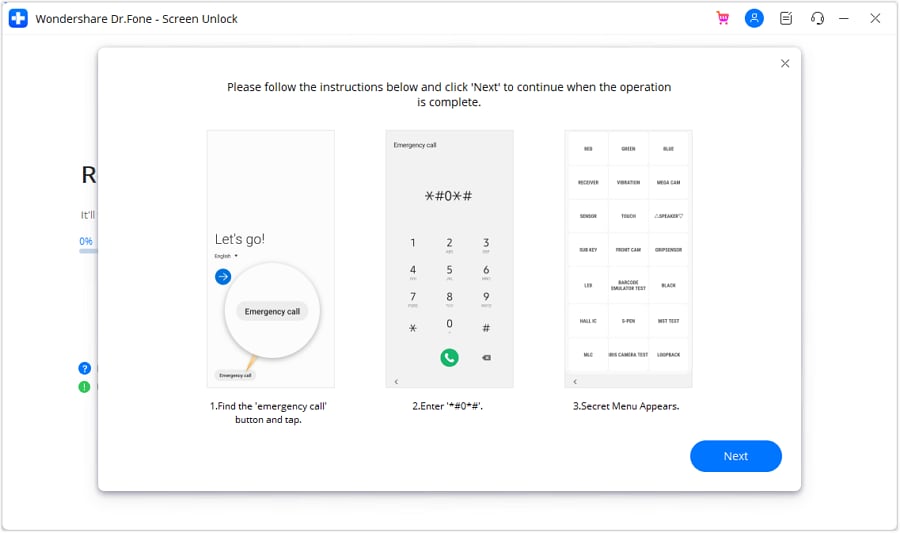
- Step 5: Access the secret menu on your phone using the on-screen instructions, then click Next to proceed to the next step.
- Step 6: When your Samsung prompts you to activate USB debugging, tap Allow. Then, on your computer screen, click Authorized to confirm.

- Step 7: You will see the FRP lock being bypassed on your Android device on the next screen.
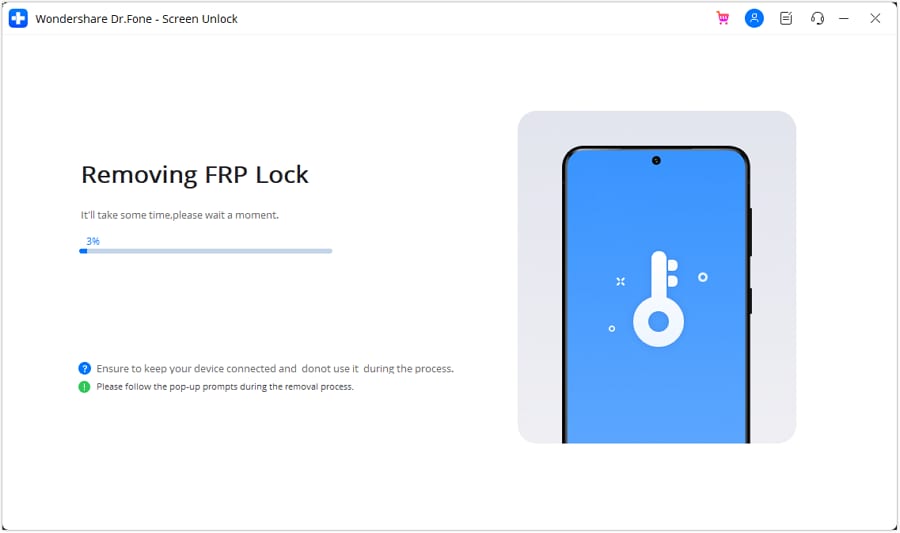
- Step 8: Click Done if the FRP lock removal was successful, otherwise, click Try Again to repeat the process.
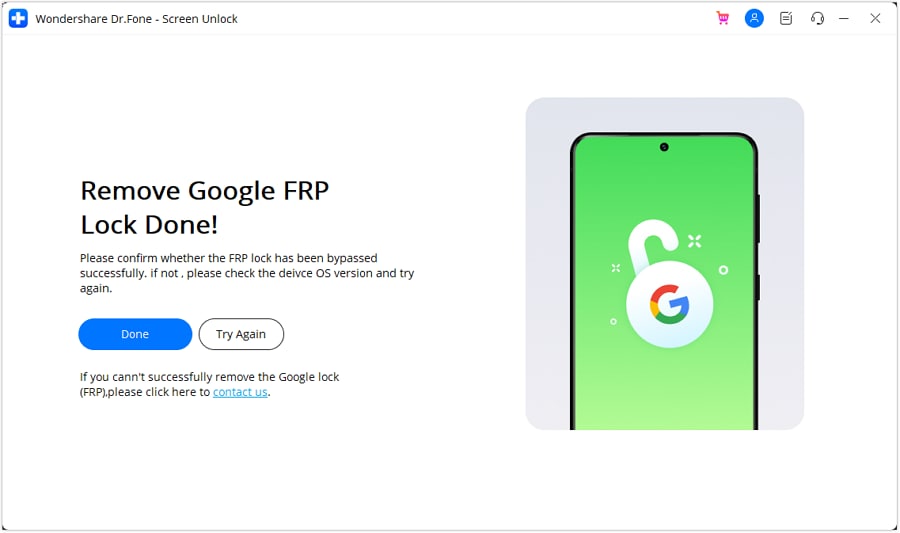
That’s it! With Dr.Fone Screen Unlock, you can easily bypass Google FRP and regain access to your Android device, leaving the complexities of RootJunky behind.
Tips: Are you searching for a powerful FRP bypass tool? No worries as Dr.Fone is here to help you. Download it and start a seamless unlock experience!
Conclusion
Both RootJunky and Dr.Fone offer options for you to regain control of phones with Google FRP lock. FRP Bypass RootJunky tool excels with its free-to-use approach, perfect for tech-savvy users comfortable with APK installations. While requiring a paid subscription, Dr. Fone provides pre-rooted firmware installations and broader device compatibility, which is ideal for those seeking a more streamlined but supported experience.
The best choice boils down to your personal needs and budget. Remember, FRP bypass should only be utilized by rightful owners facing genuine lockouts. When used responsibly, these tools can help you access your phone after a factory reset even without your Google account credentials. Choose the tool that best fits your needs and proceed with caution. Use these tools responsibly and regain access to your device the right way.
Full Tutorial to Bypass Your Oppo A1x 5G Face Lock?
Your android phone face unlock may be buggy, or the camera may be damaged. It can’t recognize your face. When you try multiple times in such cases, it will lock your device permanently. Are you stuck with a locked phone? And you’re still confused about what just happened. Face unlock may face problems such as
- Face unlock app may be buggy
- Your face unlock settings may be unstable
- Your phone camera or face unlock sensor may be damaged
- Someone else may have registered their face without your permission
Whatever the reason, they are equally big obstacles for you to use your phone as usual; trying to unlock your device can lead to a permanently locked phone. So how do you bypass face unlock?
Follow the guide below to bypass the face unlock settings and choose the best one for yourself.
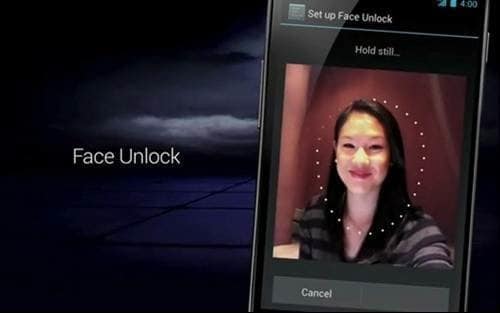
How To Bypass Android Face Lock by Ourselves?
If you want to bypass face lock by yourself, then different methods can help you. These are all tested and work well.
1. A Picture Possibly Bypasses Face Lock
You can use your photo to manipulate the face lock app. Simply use your photo to unlock the phone, which should work fine. If your phone doesn’t recognize your face from a photo, try again.
If it still doesn’t recognize your face, try a different photo or even change the camera’s lighting settings or the angles to see if that helps.
Anyway, this method is still unstable because of many uncontrollable factors. If everything fails, consider the following methods to bypass the face lock.
2. Hard Reset your phone
To get around the Android lock screen, perform a factory reset. While resetting your phone allows you to set a new password, it also erases all data from your device. This method works like a charm, but it also requires more technical knowledge. To bypass screen lock via factory reset, follow these steps.
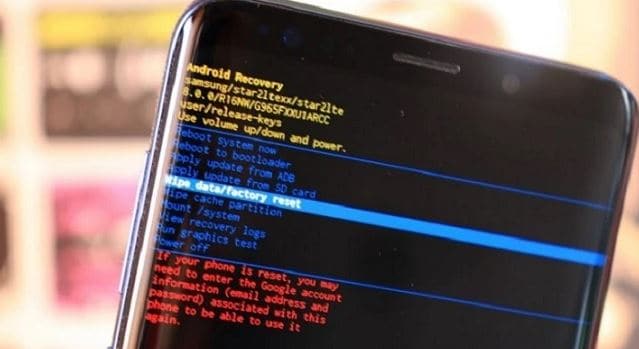
Step 1: Turn off your phone and hold the Power and Volume-down buttons simultaneously until the recovery mode screen appears. There are minor variations depending on the brand and model.
Step 2: Select the Wipe data/Factory Reset option using the volume buttons. To confirm the option, press the Power button.
Step 3: Choose Yes > Delete All User Data, then press the power button to continue. When the process is complete, turn on your phone.
So, before facing such awkward cases, like data loss, we suggest you have a backup habit of keeping your data safe.
3. Google Find My Device
Google Find My Device is a service that lets you remotely lock, track, and wipe data from stolen or lost phones. With a Google account and the password, it won’t be complicated to remove any locks on your phone. You can bypass the Android lock screen by following the steps below:
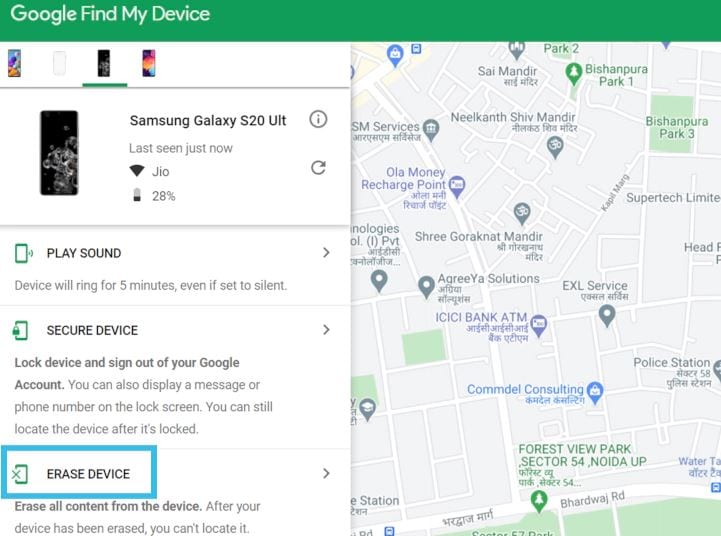
Step 1: Navigate to Find My Device and sign in with your Google account.
Step 2: Your phone receives a notification.
Step 3: Select Erase Device, confirm, and click Erase as a warning pops up on the screen.
Step 4: The factory reset process on your phone begins. When it’s finished, choose My Google Account instead of using your phone as if it were brand new.
Just like the hard reset, after using Google Find My Device, all your data and settings will be erased. Please make everything well prepared before you decide to unlock your device.
Easiest Way to Unlock Your Android Face Recognition Using Dr.Fone-Screen unlock
The methods mentioned above may be hard for you, and you don’t know any technical skills. If you are looking for an easy tool that can face unlocking for you, then Dr.Fone - Screen Unlock is all you need.
Dr.Fone by Wondershare has many useful tools, and Screen Unlock is one of them. It is the easiest and safest method to bypass the Android face lock. It is safe, secure, and easy to use.
The following guide explains how to use Dr.Fone-Screen unlock to bypass the Android face lock.
Step 1: Install and open Dr.Fone on your computer
Step 2: Run Dr.Fone on your PC and select “Screen Unlock” from the tools

Step 3: Select Unlock Android Screen
Please select” Unlock Android Screen” for the rest process.

Step 4: Select device model
Please click the button fitting your phone.

When arriving at this page, we have a lot of options to unlock your device screen for most phone brands, like Samsung, Nokia, LG, OPPO, etc.

Step 5: Enter into Recovery Mode
Here are examples of Samsung phones via its Recovery Mode to unlock your Android device screen.
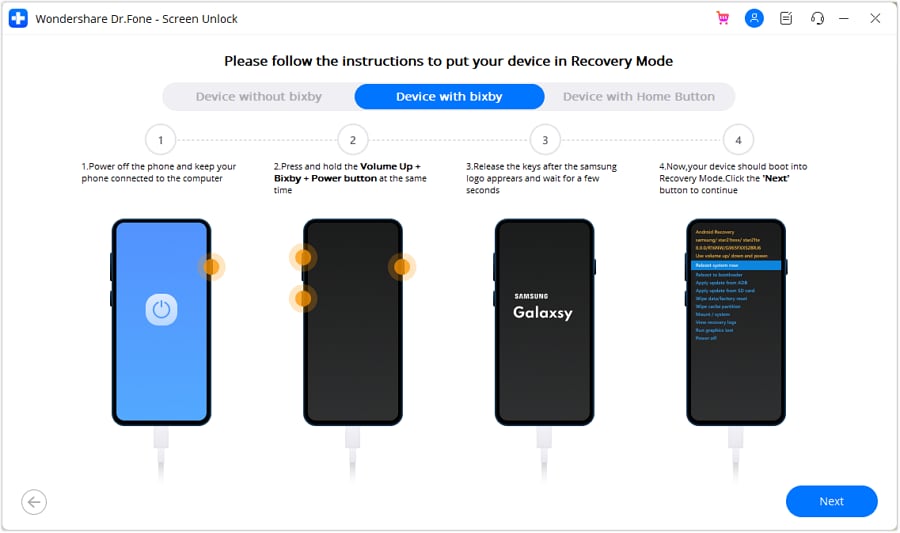
(Recovery Mode When the Samsung phone with Bixby)
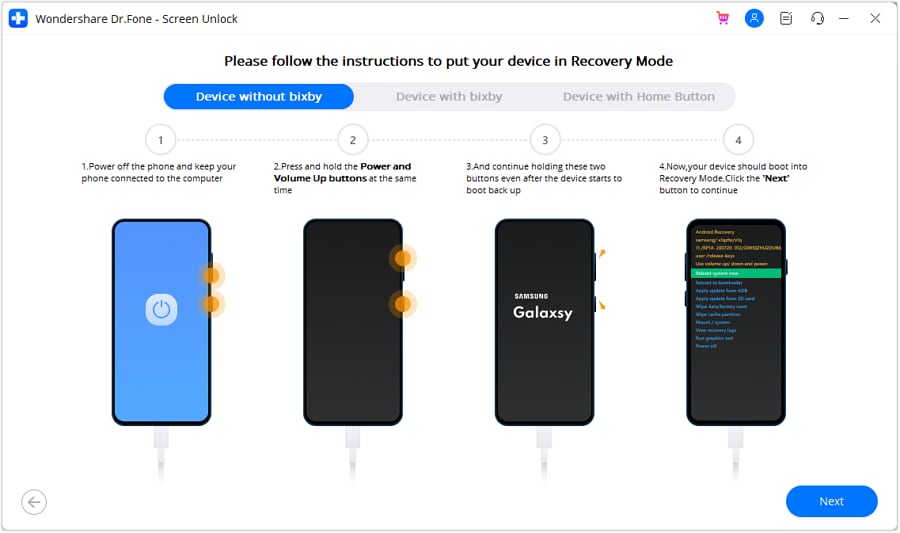
(Recovery Mode When the Samsung phone without Bixby)
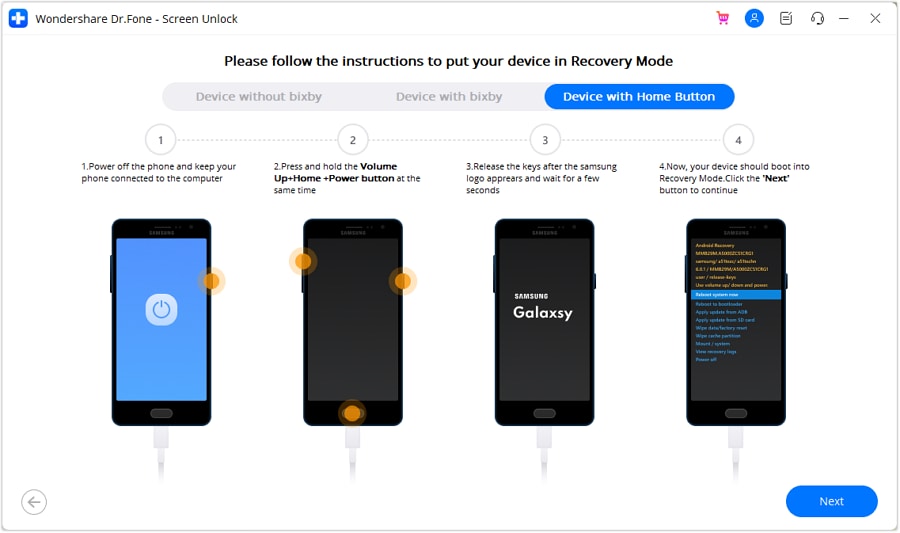
(Recovery Mode When the Samsung phone with Home button)
Step 6: Instructions to Wipe Cache Partition
This step in Recovery Mode is the most important to unlock your screen. Please click the buttons as instruction.
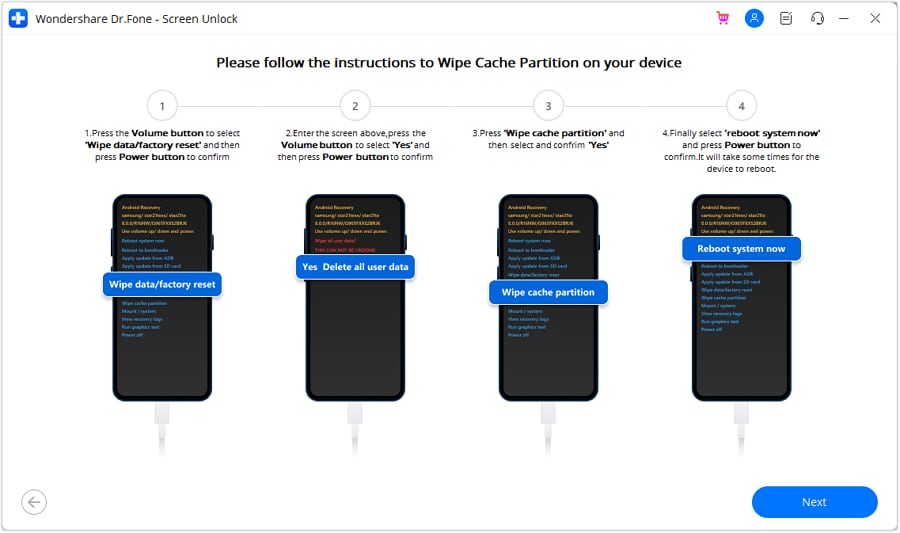
Now you can see your device is unlocked successfully

Conclusion
There are various methods to bypass Android face lock, but Dr.Fone-Screen Unlock is the easiest and safest method. Dr.Fone offers Screen Unlock and many other handy tools to help you recover, remove and unlock your Android phone without geeky knowledge. Dr.Fone-Screen Unlock is a step-by-step process, and you do not need to do anything; Dr.Fone will do all you want to do on your phone!
How to Bypass Android Lock Screen Using Emergency Call On Oppo A1x 5G?
The main reason why we keep our smartphone locked is to prevent children (or stalkers) checking out our private photos or messages. You don’t want anyone to access your pictures, emails, or other important data. What if you forget your pattern or PIN and cannot access your phone? Or someone changes lock screen pattern to leave you annoyed?
To avoid such types of conditions, we have tried and tested the following methods to bypass the Oppo lock screen pattern, PIN, password, and fingerprint.
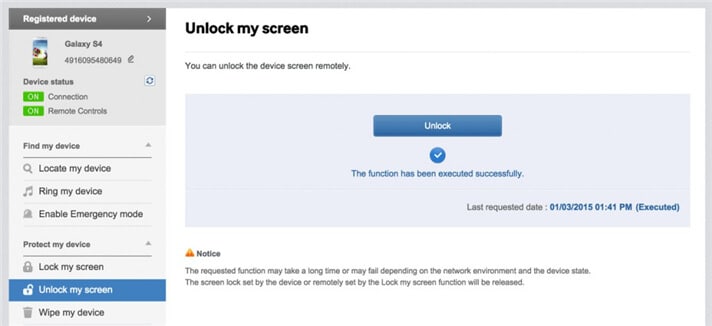
Method 1. Use ‘Find My Mobile’ feature on Oppo Phone
All Oppo devices come with the “Find My Mobile” feature. To bypass the Oppo lock screen pattern, PIN, password, and fingerprint, you can just follow the below steps to get it done.
- Step 1. First, set up your Oppo account and log in.
- Step 2. Click the “Lock My Screen” button.
- Step 3. Enter a new PIN in the first field
- Step 4. Click the “Lock” button at the bottom
- Step 5. Within a few minutes, it will change the lock screen password to the PIN so that you can unlock your device.
Method 2. Use Android Device Manager to Bypass Oppo Password
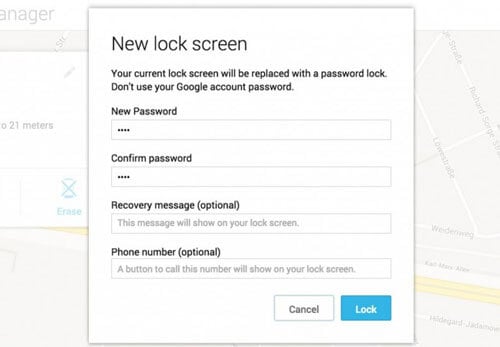
To know how to unlock a Oppo phone lock password with Android device manager, make sure the Android Device Manager is enabled on your device.
- Step 1. Visit google.com/android/devicemanager on other smartphones or PC.
- Step 2. Log into your Google account that you used on your locked device.
- Step 3. Choose the Oppo A1x 5G device you want to unlock in ADM interface
- Step 4. Click on the “Lock” option.
- Step 5. Enter a password. There is no need to enter any recovery message. Select “Lock” again.
- Step 6. You would see a confirmation below if it is successful, with “Ring, Lock and Erase” buttons.
- Step 7. Now you must get the password field on your phone where you can enter your new password, and your phone will be unlocked.
- Step 8. Go to lock screen settings on your device and disable the temporary password.
Method 3. Google Login (Supports Only Android 4.4 or Lower)
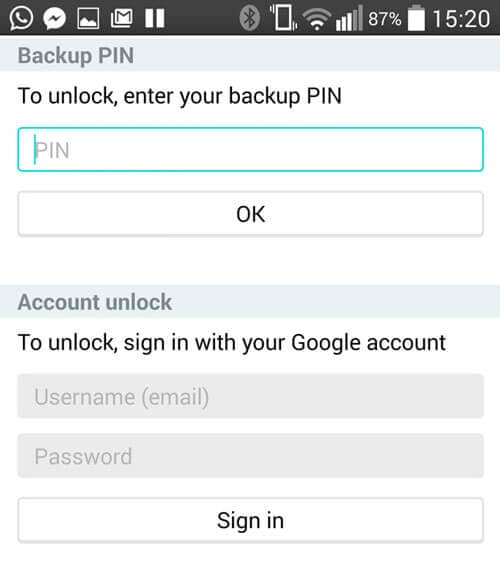
If your device is still running on Android 4.4 or lower, here’s how to bypass the Oppo lock screen fast.
- Step 1. Enter the wrong pattern for five times
- Step 2. Choose “Forgot Pattern”
- Step 3. Enter your Google account login or backup PIN
- Step 4. Now your phone would be unlocked.
Method 4. ‘Pattern Password Disable’ and Custom Recovery (SD Card needed)
To bypass the Oppo lock screen in this method, you ought to be an advanced user who knows what are “custom recovery” and “rooting”. You have to install any kind of customer recovery, and you should have an SD card on your phone. SD card is required to move a ZIP file to the phone, and it is the only way to transfer the file when the Oppo A1x 5G device is locked.
- Step 1. Download a zip file named “Pattern Password Disable” on your computer and move it to the SD card of your Oppo device.
- Step 2. Insert the card on your device
- Step 3. Restart your device into recovery mode.
- Step 4. Flash the file on your card and restart the phone.
- Step 5. Now your phone would boot up without lock screen. Don’t worry if you had a gesture lock or password. All you need to do is to input a random gesture or password, and it will be unlocked.
Method 5. Delete the Password File Using ADB
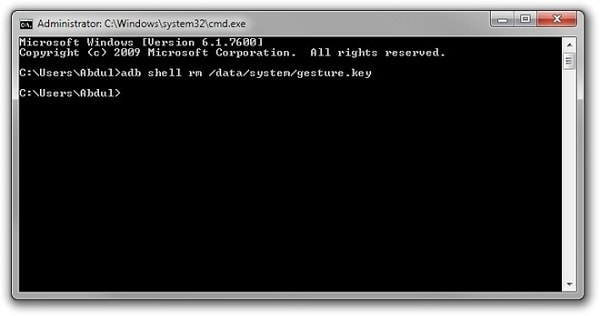
It is yet another option that will work only when you have enabled USB Debugging previously on your device, and your PC is allowed to connect via ADB. If you meet such requirements, it is ideal to use this method to unlock the Oppo lock screen.
- Step 1. Connect your device to the PC using USB cable and open command prompt in the adb directory. Type the command “adb shell rm /data/system/gesture.key” and then press “Enter”.
- Step 2. Restart your phone, and a secure lock screen must be gone, and you can access your device. Be sure to set a new PIN, pattern, or password before rebooting again.
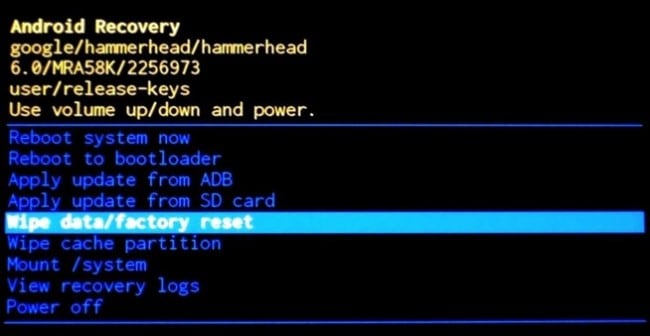
Method 6. Factory Reset to Bypass Oppo Lock Screen
A factory reset is the best option in almost any case if one of these solutions couldn’t work. According to your device type, the process may vary. In most devices, you have to turn off the Oppo A1x 5G device completely to start the process. But this method will delete all the precious data on the Oppo A1x 5G device after the factory reset.
- Step 1. Hold the power button and volume down at the same time. It will open the Bootloader menu.
- Step 2. Press the volume down button two times to choose “Recovery Mode” and select it by pressing the “Power” button.
- Step 3. Hold down the power button and tap “Volume Up” once, and you would enter “recovery” mode.
- Step 4. Choose “Wipe Data/Factory Reset” option by using volume buttons.
- Step 5. Select it by pressing the Power button.
- Step 6. Select “Reboot System Now” once the process is done.
Backup your Oppo phone regularly in case of any data loss in the future.
Method 7. Boot into Safe Mode
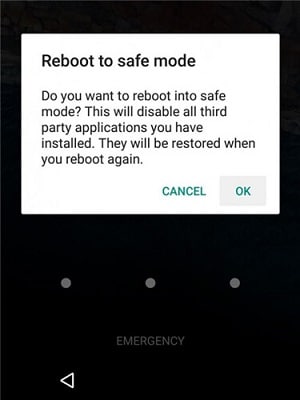
Chances may be that you are using a third-party lock screen app. Then lucky for you, this way works best to bypass the Oppo lock screen. Specifically, you can boot your Oppo device into Android Safe Mode .
- Step 1. Open up the Power menu from the lock screen and press and hold the “Power Off” option.
- Step 2. It will ask if you want to boot in safe mode. Tap “OK”
- Step 3. Once the process finishes, it will temporarily disable the lock screen activated by the third-party app.
- Step 4. Uninstall the third-party lock screen or just reset the data.
- Step 5. Reboot your device and get out of safe mode.
- Step 6. Now the irritating lock screen app is removed completely.
Method 8. Other Methods
- Step 1. Take your friend’s phone to call on your locked phone.
- Step 2. Accept the call and press the back button without disconnecting.
- Step 3. Now you can access the Oppo A1x 5G device completely
- Step 4. Go to the security settings of the Oppo A1x 5G device and remove the pattern or pin.
- Step 5. It will ask you the correct pin that you don’t know, guess, and try various combinations you can recall.
To avoid forgetting your password or PIN next time, be sure to write the pattern or numbers on a text file or paper to keep them safe. If you have to bypass the Oppo lock screen pattern, PIN, password, and fingerprint, you may consider using Dr.Fone - Screen Unlock (Android). It is a professional tool that can remove all the fingerprints, pattern, and password lock screens without losing any data on your phone.
Also read:
- [New] The Best at Memes (App Version) for 2024
- [Updated] In 2024, FreeWinRecorder Straightforward PC Screens
- 3 Easy Steps for Masterful Image Grading
- Crafting Creativity in Photo Deformation
- Ensure that Both Your Computer and iPhone/iPad Are Fully Charged or Connected to Power Sources While Setting up the Connection. Low Battery Levels Can Sometimes Cause Connectivity Issues.
- Guide: Overcoming Missing comctl32.dll Error in Windows Systems
- How to Change GPS Location on Vivo S17 Pro Easily & Safely | Dr.fone
- In 2024, How to Unlock Oppo F23 5G Phone without Any Data Loss
- In 2024, Mastering Android Device Manager The Ultimate Guide to Unlocking Your OnePlus Ace 2V Device
- In 2024, Top Apps and Online Tools To Track Oppo Find X6 Phone With/Without IMEI Number
- Top 10 Password Cracking Tools For Oppo Reno 9A
- Unlocking the Power of Smart Lock A Beginners Guide for OnePlus Nord N30 SE Users
- Title: In 2024, Rootjunky APK To Bypass Google FRP Lock For Oppo A1x 5G
- Author: Aaron
- Created at : 2025-03-04 18:09:42
- Updated at : 2025-03-05 22:03:50
- Link: https://easy-unlock-android.techidaily.com/in-2024-rootjunky-apk-to-bypass-google-frp-lock-for-oppo-a1x-5g-by-drfone-android/
- License: This work is licensed under CC BY-NC-SA 4.0.