
In 2024, Rootjunky APK To Bypass Google FRP Lock For Nokia 130 Music

Rootjunky APK To Bypass Google FRP Lock For Nokia 130 Music
Factory Reset Protection (FRP) is a security feature built into Android devices running Android 5.1 Lollipop and later versions. It prevents someone from using your phone after a factory data reset without Google account login credentials. The FRP makes it much less attractive for thieves to steal Android phones, knowing they will need help to access them.
FRP automatically activates when you add a Google account to your Android phone. It links the Nokia 130 Music device to your account, making it the “trusted owner.” Once activated, FRP becomes embedded in the phone’s system.
While Google FRP is a valuable security feature, it’s vital to acknowledge that there are legitimate situations where bypassing it might be necessary. These instances include forgotten Google account credentials, buying a second-hand device, and device issues. In these cases, tools like RootJunky can help you bypass FRP Lock. We’ll explore how to use RootJunky APK later, but first, let’s define what it is and its role in FRP bypass.

The RootJunky APK is a free Android application also called RootJunky SDL or RootJunky FRP Bypass tool. This app’s primary function is to bypass the Google Account FRP lock on Samsung devices. Rootjunky uses the weaknesses in Android’s setup process to create a new user account or switch existing ones, letting you bypass the FRP and regain control of your phone.
You can complete this process using the app by connecting your phone to a computer through an OTG cable. RootJunky can be helpfu l if you’ve forgotten your Google account password or bought a second-hand phone locked to someone else’s account. However, only use it if you have legitimate reasons to bypass FRP lock, like accessing your device after forgetting your Google account details.

Downloading the RootJunky FRP bypass tool from unofficial sources can introduce malware risks, so stick to trusted sources like the official website. Additionally, when exploring RootJunky, it is vital to keep the following in mind:
- Not all Android devices are susceptible to the methods used by RootJunky. It is necessary to check compatibility with your specific device model and Android version.
- Using FRP bypass tools like RootJunkycan potentially compromise the security of your device. Be cautious and proceed if you fully understand the risks involved.
- Bypassing FRP may involve data loss.
- Download RootJunky FRP bypass APK from a reliable source to minimize the risk of malware or viruses. You can check the APK file from official websites or trusted forums.
- Google constantly updates its security measures, so these tools may not always work effectively.
Part 2: How To Use RootJunky To Bypass Google FRP?
Here are the general steps to use the FRP Bypass APK RootJunky app to bypass Google FRP lock. But remember that specific steps may vary depending on your device and Android version:
- Step 1: On your computer, download the Rootjunky RealTerm program from the official Rootjunky website.

- Step 2: On your phone, download the Rootjunky APK (com.rootjunky.frpbypass-1.0.apk) file from the official website or other reputable sites.

- Step 3: Go to Settings > Security and tap Install unknown apps. Then, enable unknown sources to allow installation of apps from outside the Play Store. Connect your device to a Wi-Fi network.

- Step 4: On your Android phone, open a file explorer app and install the downloaded RootJunky APK file.
- Step 5: Connect your smartphone to your computer using a USB cable.
- Step 6: Launch the Rootjunky RealTerm program on your computer. Under the Display tab, check the Half Duplex option.
- Step 7: On your computer, go to Device Manager > Modems. Locate your device’s port name (e.g., COM3).
- Step 8: On the RealTerm program, enter the correct port number under the Ports tab, then click Change.

Step 9: Click Send to establish a connection. Enter the two commands:
at + creg? \ r \ n
atd1234; \ r \ n
Step 10: Once connected, the Rootjunky APK on your phone will provide on-screen instructions to bypass FRP.
Step 11: If prompted, perform a factory data reset of your device.
While RootJunky offers a free method for FRP bypass, it can be incompatible with your device’s brand, requiring technical knowledge, tedious, and potentially risky. If you are looking for a simpler, safer, and more user-friendly solution, Wondershare Dr.Fone might be a better fit for you. If you want to learn how to use this tool to bypass FRP lock with minimal technical expertise, then keep reading.
Part 3: Easier Tool Than RootJunky APK To Bypass Google FRP
Google FRP adds an extra layer of security after a device reset. However, regaining access to the smartphone can be challenging if you forget your Google account details, forget your lock screen, or just buy a used device. While methods like the FRP RootJunky app exist, using it can be complex or risky.
Consider exploring third-party options like Dr.Fone for a potentially easier and safer FRP bypass solution. Dr.Fone Screen Unlock tool helps remove the Android FRP lock without requiring a PIN or Google Account.
Why Use Dr.Fone - Screen Unlock?
Here are some of the key features of Dr.Fone - Screen Unlock:
- **User-friendly:**Fone boasts an intuitive interface, eliminating the need for technical expertise. Even beginners can navigate the process with ease.
- **Widespread Brand Compatibility:**Fone supports mainstream brands, such as Samsung, Xiaomi, Oppo, Redmi, Realme, and Vivo, catering to a broader user base.
- **Fast and Efficient:**Regain access to your device in minutes without wasting time on tedious procedures.
Step-by-step Guide to Removing FRP Lock With Dr.Fone - Screen Unlock
Ready to leave the hassle of using RootJunky and easily bypass the FRP lock? Download and install Dr.Fone on your computer, then follow these steps to learn how to bypass Google FRP on your device:
- Step 1: Launch Dr.Fone on your computer and connect it to your Android device. Choose Screen Unlock from the Toolbox in the main interface.

- Step 2: Choose Android as your device type. This will take you to the next screen, where you can select Remove Google FRP Lock to proceed.

- Step 3: Select your device’s brand from the list and click Start to continue.
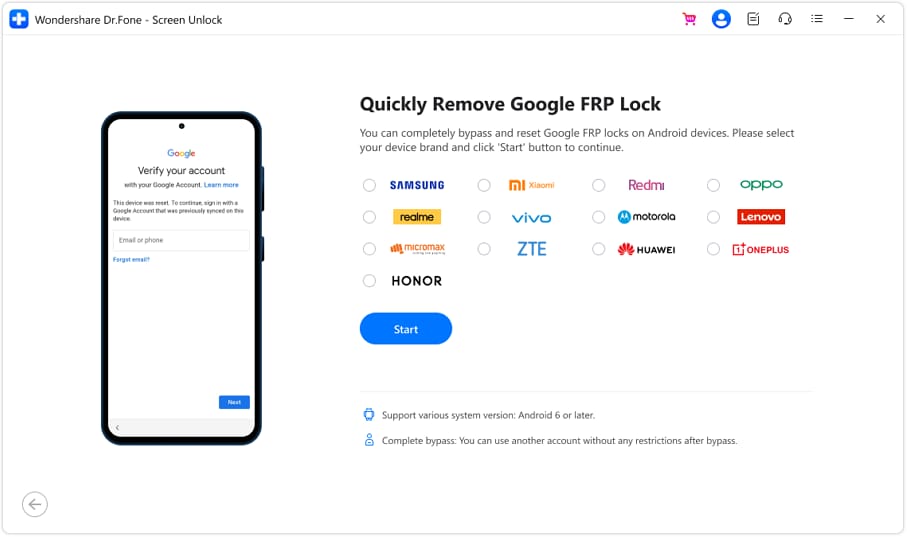
Note:
The next steps may vary depending on the brand you selected.
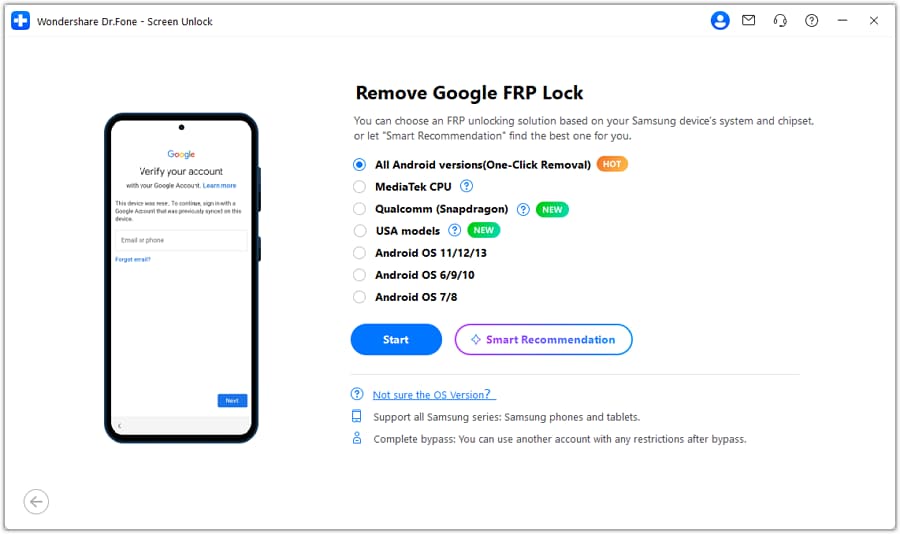
- Step 4: Select the OS version of your device and click Start to continue.
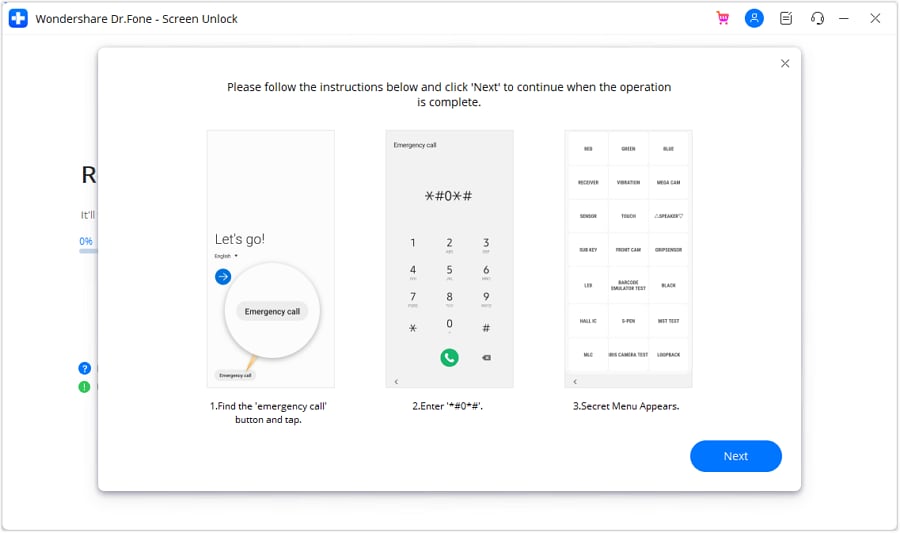
- Step 5: Access the secret menu on your phone using the on-screen instructions, then click Next to proceed to the next step.
- Step 6: When your Samsung prompts you to activate USB debugging, tap Allow. Then, on your computer screen, click Authorized to confirm.

- Step 7: You will see the FRP lock being bypassed on your Android device on the next screen.
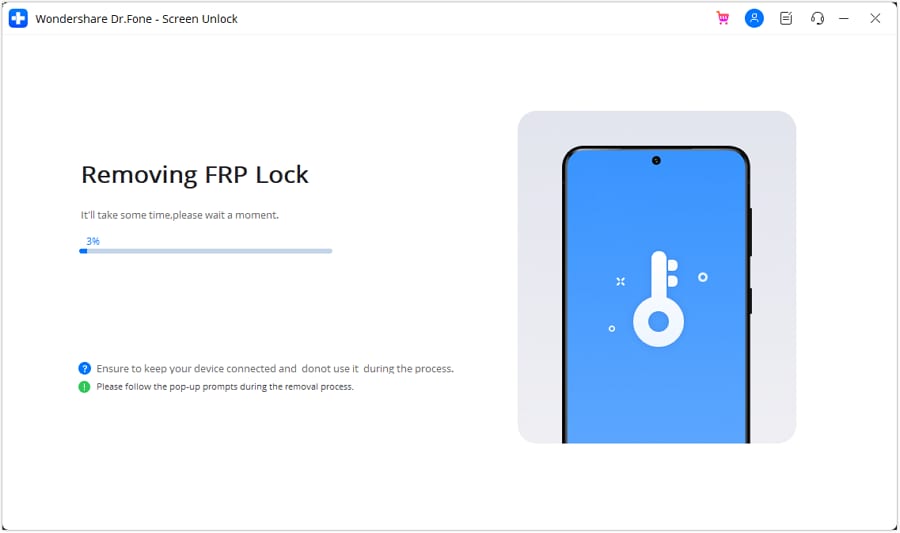
- Step 8: Click Done if the FRP lock removal was successful, otherwise, click Try Again to repeat the process.
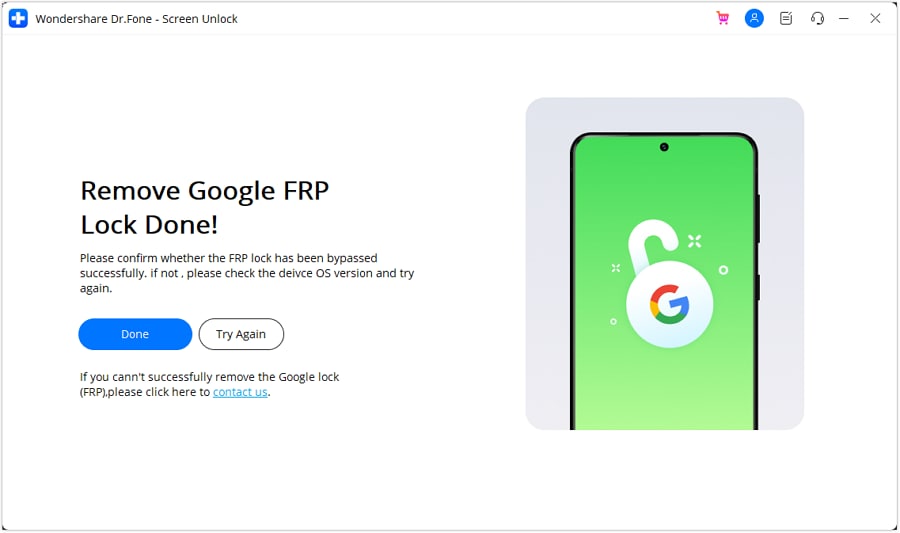
That’s it! With Dr.Fone Screen Unlock, you can easily bypass Google FRP and regain access to your Android device, leaving the complexities of RootJunky behind.
Tips: Are you searching for a powerful FRP bypass tool? No worries as Dr.Fone is here to help you. Download it and start a seamless unlock experience!
Conclusion
Both RootJunky and Dr.Fone offer options for you to regain control of phones with Google FRP lock. FRP Bypass RootJunky tool excels with its free-to-use approach, perfect for tech-savvy users comfortable with APK installations. While requiring a paid subscription, Dr. Fone provides pre-rooted firmware installations and broader device compatibility, which is ideal for those seeking a more streamlined but supported experience.
The best choice boils down to your personal needs and budget. Remember, FRP bypass should only be utilized by rightful owners facing genuine lockouts. When used responsibly, these tools can help you access your phone after a factory reset even without your Google account credentials. Choose the tool that best fits your needs and proceed with caution. Use these tools responsibly and regain access to your device the right way.
Mastering Lock Screen Settings: How to Enable and Disable on Nokia 130 Music
In the modern world, the use of smartphones has become such a common trend that everyone would feel abnormal if they don’t have a smartphone of their own. So big the demand is that all IT companies are trying their best to introduce as well as innovate several excellent brands of smartphones. To support the function of smartphones, by far there have been numerous operating systems existed. Among them, Android is one of the most popular as well as trustworthy OS.
Just like any other smartphone, all Android devices have their ways to protect the data stored inside a smartphone from being corrupted or leaked. One of the simplest and most easy-to-use ways is to make use of the lock screen.
The lock screen has proved to be a traditional yet efficient way to help you protect your Android phones. In this article, we will provide you with an informative piece of writing about everything you need to know when it comes to the Android lock screen, and ways to enable and disable it.
If you have spent time searching and looking for features of your Android devices, you will find the process of enabling a lock screen is a piece of cake.
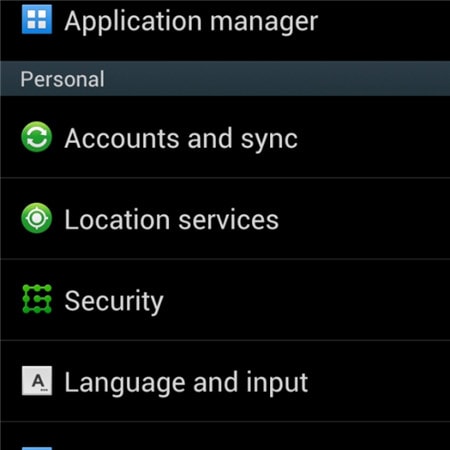
· Step 1: On the main screen of your Android devices, tap on the gear icon - which is the icon representing the Settings menu. Once you have chosen it, you will see a drop-down menu on the screen. In the options provided, tap on the Security bar.
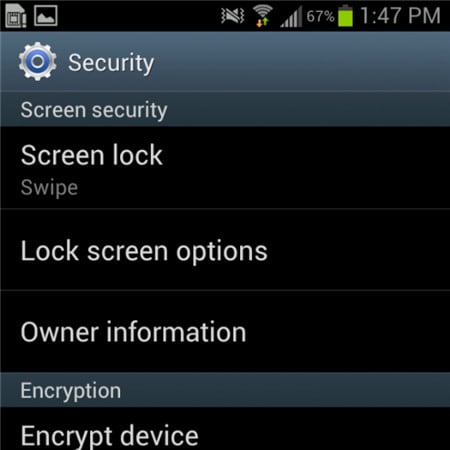
· Step 2: Under the tab whose heading is entitled Screen Security, tap on the first bar in the list called Screen lock.
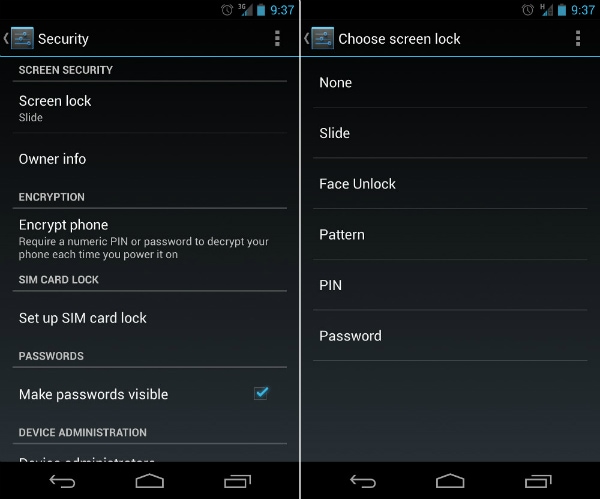
· Step 3: Once the step is done successfully, Android will give you plenty of choices about ways to lock your Android devices’ screens. Among these ways, select one particular type which you feel is most convenient as well as free-risk. After that, type in your PIN code to confirm the choice and finally activate your lock screen feature as you wish.
Part 2: How to Disable Android Lock Screen
To certain customers, the lock screen can do more harm than good, and they would prefer to disable the screen lock on their Android devices. This process is also an easy one to follow, as long as you still hold good memory of the security code.
· Step 1: On the main screen of your Android devices, tap on the gear icon. It will directly lead you to the Settings menu of the phone. After that, a drop-down menu will appear with several choices and bars. Among them, tap on the Security option to begin your work.

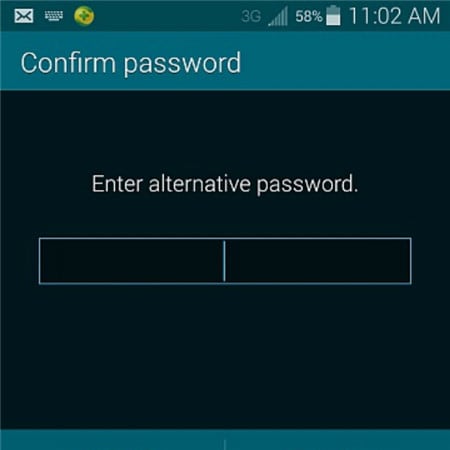
· Step 2: Under the heading called Screen Security heading, you will be shown 3 choices. Tap on the first one, which is entitled Screen lock.
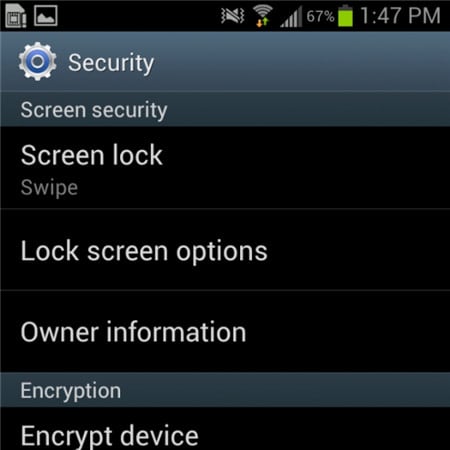
· Step 3: Once you have done the previous step, a brand new screen will appear and then you will be asked to fill in your PIN code. This is a step that helps guarantee that you are the true owner of the Android device.
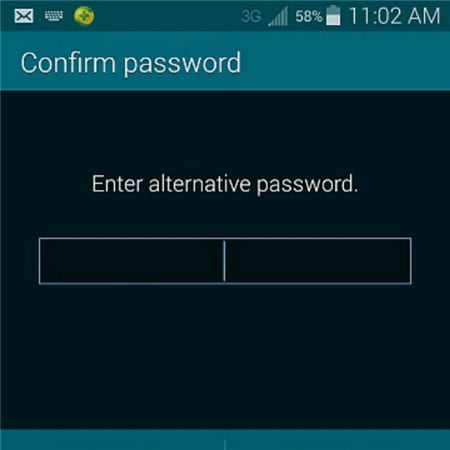
Step 4: As soon as you have confirmed the right PIN code in the bar provided, you will then be presented to the next drop-down menu. A similar screen will appear which shows you plenty of choices. Tap on the top of that list, which is a bar called None.
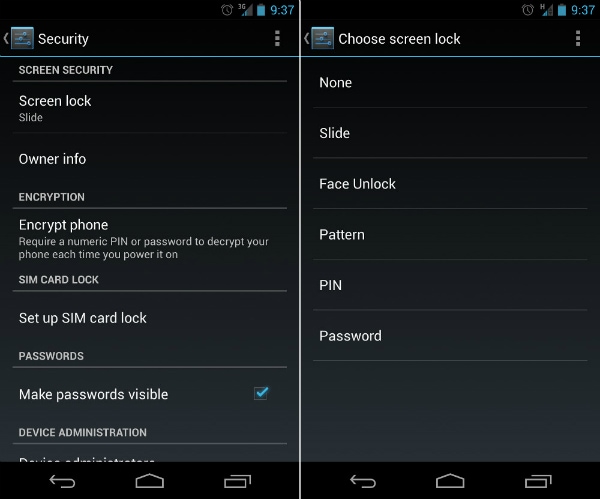
Step 5: In the end, you have successfully disabled the screen lock on your Android devices. You are now capable of using it without any hesitation about the screen lock.
Part 3: Common Problems of Disabling Lock Screen
The process to disable the screen lock on Android may seem easy to handle as well as straightforward to several customers, but there are still some annoying problems that users have to deal with while trying to disable the lock screen.
What are the top 2 common problems?
Below are the two most common problems faced by Android users during their efforts to disable the feature of screen lock.
1. In the Screen Security choice, the None bar can not be chosen.
Description of the problem: There is a sentence below it stated: “Disabled by administrators, encryption policy or credential storage”. All the space of the None option is in white and grey.
The solution to this problem is quite simple. Once you have made sure you are suffering from this nasty one, try to follow these below pieces of advice to see if it is capable of giving you a hand.
Step 1: Open the Settings menu from the main screen. Then tap on the Credential Storage. You will see a drop-down menu like the screenshot below.
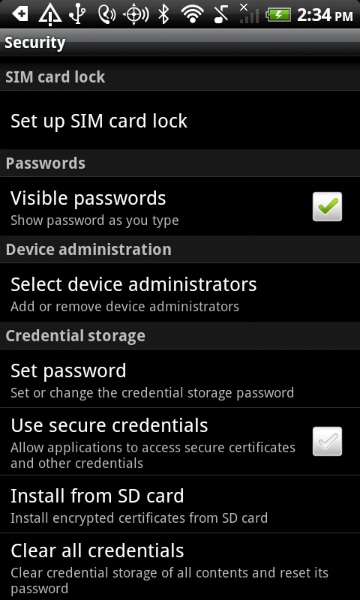
Step 2: Continue to tap on the Clear Credentials (Remove all certificates) option. Then next click on the OK button. Wait for some seconds until your Android device has finished the process.
Step 3: To make sure that the previous step has been performed successfully, try looking at the bottom of the drop-down menu. If the Clear Credentials (Remove all certificates) are grey out and can not be selected, then you have managed to do it.
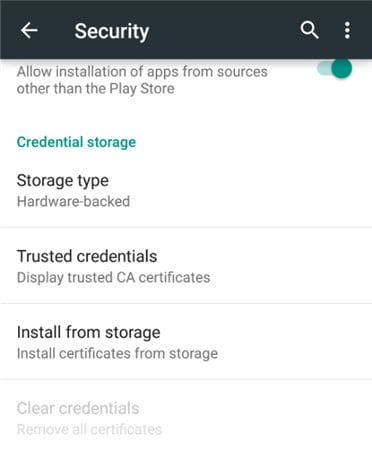
Step 4: Now that the problem is solved, you can feel free to turn back to your Screen lock option in the beginning and disable the feature of locking screen Android as usual.
2. You have mistakenly encrypted your SD card. You want to disable the encryption, only to realize that it requires you to set a new screen lock code. But when you come to the Screen lock menu, all the options but Password have been greyed out.
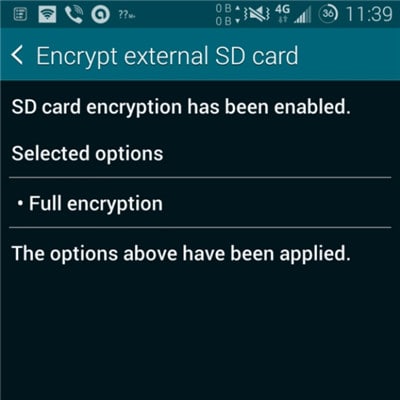
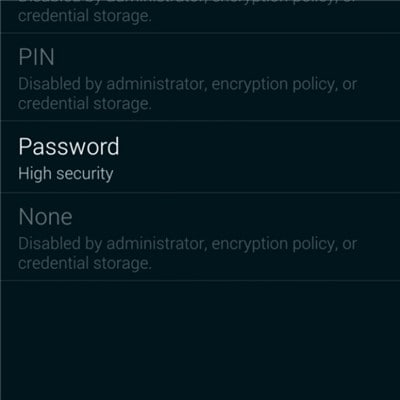
This is pretty weird, but actually, it is one of the most common troubles that many users have complained about. But to your surprise, the solution is very simple and easy. All you have to do is to reset your password, but with a little change. Your password MUST include at least ONE NUMBER in it. Confirm your new password then you will be able to disable the lock screen Android as usual.
Bonus Tip: Remove Android Screen Lock If Forgotten Password/Pattern
As much as the lock screen can protect the personal information on the phone, it can also cause much trouble if you forget the lock screen password or enter the wrong password too many times. So here comes the need for phone unlocking software . One of the best is Dr.Fone - Screen Unlock (Android), which can help us bypass forgotten Android screen locks without any data loss(limited to Samsung and LG series phones). Other Android brand phones will be wiped out all the data once starting to unlock with Dr.Fone
Dr.Fone - Screen Unlock (Android)
Remove 4 Types of Android Screen Lock without Data Loss
- It can remove 4 screen lock types - pattern, PIN, password & fingerprints.
- One-time payment for unlimited use of multiple devices within a specified time period.
- Work for Samsung Galaxy S/Note/Tab series, LG G2/G3/G4, etc.
- Besides, unlocking the screen lock, it also works best to unlock the Samsung FRP lock in devices with Android 5.0 and higher.
3981454 people have downloaded it
Steps on How to Unlock Forgotten Password in Android Phones
Step 1: Launch Dr.Fone and click on Screen Unlock from the primary window.

Step 2: Connect your Android device to the computer via USB cable. The program will recognize the phone directly. Select the phone model or “I can’t find my device model from the list above” to continue.

Step 3: Follow the instruction on the program exactly to set the phone to Download Mode. First, you will need to Power off your Phone. Secondly, Press on Volume Down, Home button, and Power button simultaneously. Thirdly press the Volume up button to navigate until the phone enters Download mode.

Step 4: After you set the phone to Download mode, it will begin to download the recovery package. When the recovery package is downloaded successfully, the lock screen on your Nokia 130 Music devicewill be removed. You won’t lose any data during the whole process.

Forgotten The Voicemail Password Of Nokia 130 Music? Try These Fixes
You can always stay in touch with friends, family, and coworkers thanks to voicemail support, which is provided by most cell phones. However, forgetting the voicemail passcode is simple when we must remember many codes to open various devices. Fortunately, there are workarounds you can use to get back into your voicemail mailbox. Keep reading to find out what to do if you forget your voicemail password.
Part 1: 3 Easy Ways To Reset Or Change Your Lost Voicemail Password
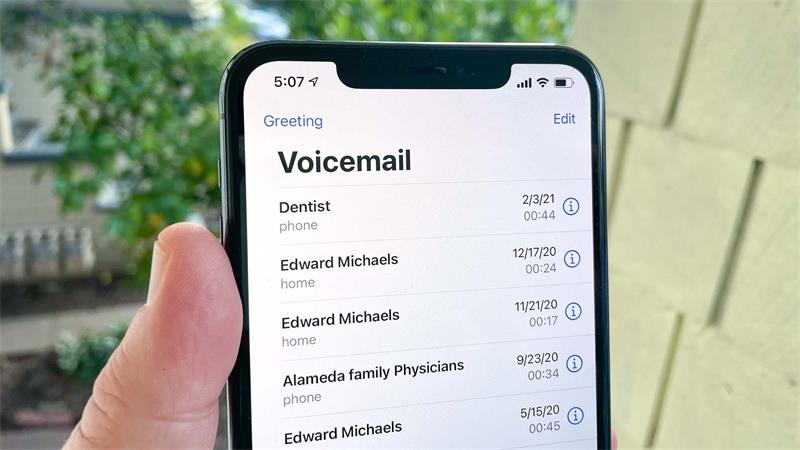
1. Contact your carrier
Your carrier can also unlock your voicemail. Get in touch with your carrier and ask for an unlock. For unlocking, your account may need to satisfy certain conditions. The request can take a few days to be processed after you submit it.
Get in touch with your carrier to find out the status of your unlock request.
The actions following should be followed when your carrier certifies that the voicemail has been reset.
- Take your SIM card out.
- Put the new SIM card in. Your gadget will turn on, and you will be able to generate a new voicemail password.
2. Use your code to reset password
To change your Voicemail password, use star codes. Fortunately, this process is quick and easy, and you won’t need to contact customer care to change your password.
Use the star code as follows:
- Type #793# into the dialer app on your phone.
- Press the Call key.
- Await the instructions.
This will change your voicemail password to your phone’s last four digits.
You can also reset your voicemail password, which means that you can generate a new code by resetting it from the settings. Let’s have a look at how you can do this.
- Open My Wireless from your account summary.
- Select the Nokia 130 Music device you wish to manage by scrolling to My Devices & Add-ons.
- Choosing Manage my device.
- Look under Device choices & settings, choose Reset voicemail password, then adhere to the on-screen instructions.
3. User carriers’ apps or websites
All of the apps/websites below enable you to reset a voicemail password because they are purely user carrier apps or websites that are recommended officially.
- Vxt
Their voicemail is visually shown via the app.
Your voicemails will be converted to text by Vxt, which will then provide a preview on your lock screen.
Carrier: US Cellular, AT&T, MetroPCS, T-Mobile, Verizon, Alltel, Cricket
- YouMail
YouMail is an Android app that helps you to control visual voicemail. Additionally, it provides some great call-blocking features. With the help of this program, unsolicited calls will never longer ever reach you.
Carrier: US Cellular, AT&T, MetroPCS, T-Mobile, Verizon, Alltel.
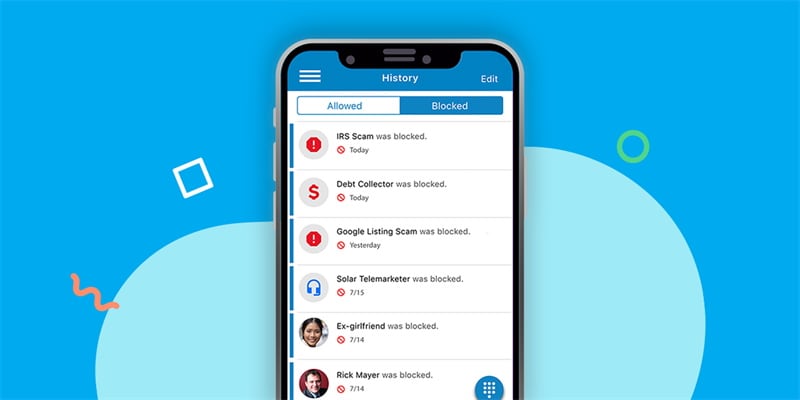
- Visual voicemail from AT&T
You can view the caller’s name and phone number before listening to their message, which makes monitoring your voicemail incredibly simple.
Carrier: US Cellular, AT&T, MetroPCS, T-Mobile, Verizon, Alltel, Cricket
Part 2: FAQs
1. How To Know My Default Voicemail Password?
Depending on your carrier, the default voicemail password is either the last seven or final four digits of your phone number. Your voicemails should be accessible if you dial the number without the area code. In this way, you can quickly get your default voicemail password.
2. Can I Remove My Voicemail Password?
From your mobile device, dial 123 to see the password for your voicemail. To enable (add) or disable (delete) your voicemail password, choose option 4. To enable or disable the screen password, select option 1. If your password has been deactivated, dialing 123 will not ask you to enter one.
3. How Can I Receive Voicemail Messages From Another Device?
You may access your mailbox on another phone if your phone is out of reach or the battery is dead. Make a call to your phone number from a different one. Tap the pound key (#) on the phone’s dial pad after the prerecorded “Please leave a message” greeting has begun to play. Enter the pin from your voicemail to start receiving messages from another device.
Bonus Tip: Best Tool When You Forgot The Phone Password

Dr.Fone - Screen Unlock (Android)
The Best Tool to Remove the Phone Screen!
- Completely unlinked from the previous Google account, it won’t be traced or blocked by it anymore.
- Remove all Android screen locks (PIN/pattern/fingerprints/face ID) in minutes.
- Almost all Samsung phones and tablets are supported (Currently for Android 6-14).
- Provide specific removal solutions to promise good success rate.
4,008,670 people have downloaded it
Dr.Fone - Screen Unlock (Android) is the ultimate solution when you are sort of a person who always forgets passwords and does not even have any technical knowledge. We always recommend you use easy and safe tools; Dr.Fone - Screen Unlock (Android) is one of them. Here’s how you can use this tool when you forget the phone password and want to recover it on your own.
Step 1: Connect your phone
Installing Dr.Fone on your computer is the first step. From the list of available tools, select “Screen Unlock” from the drop-down menu.

When connecting your locked phone to the PC you wish to save the wallpapers after unlocking it, you should think about utilizing a USB cord. You must select the “Unlock Android Screen” option on the program.
Step 2. Select Unlock Android Screen
In this interface of Dr.Fone, please select “Unlock Android Screen” to keep your unlock process, or your phone cannot be unlocked as you wish.

Step 3. Select device model
Besides a part of Samsung and LG models, “100% Remove Screen Lock” includes most Android phone brands. Please choose your phone brand, and don’t make it wrong!

Here is the brand list; you can check it and find your phone brand.

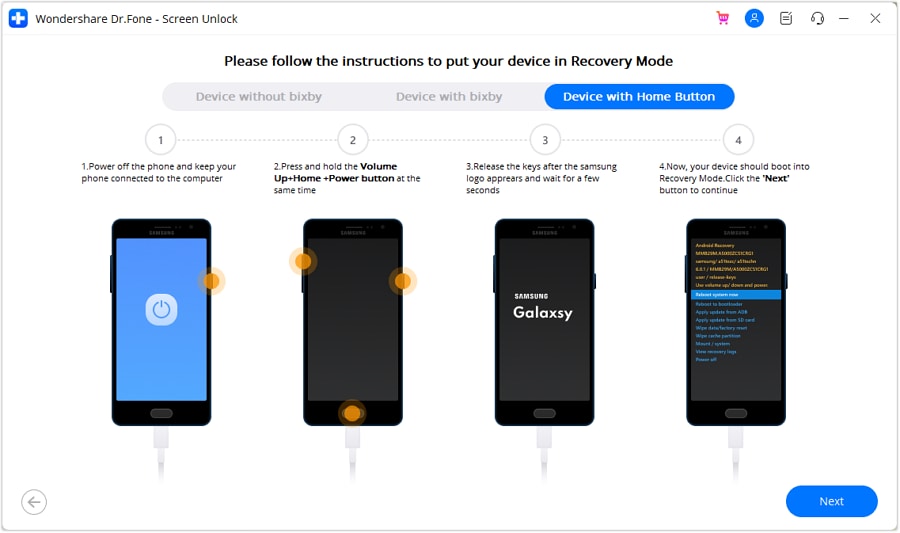
Step 4. Enter into Recovery Mode
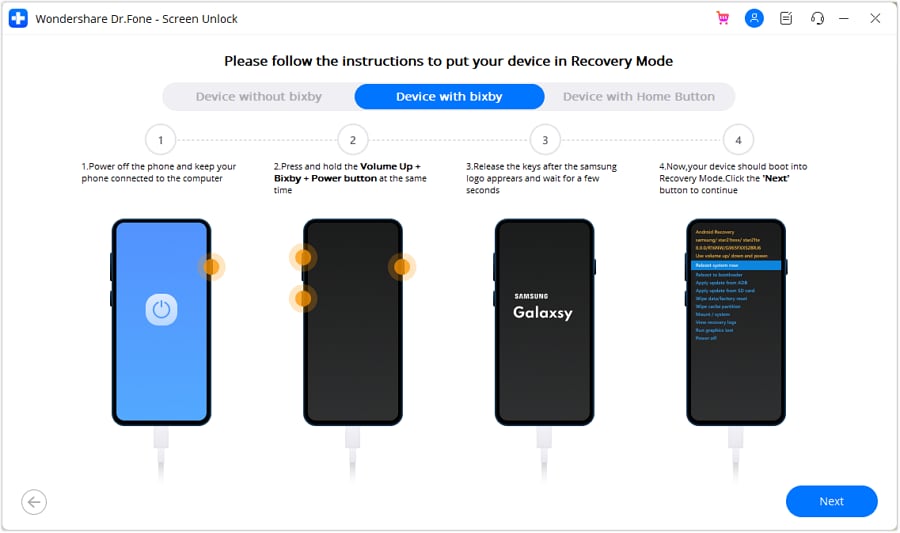
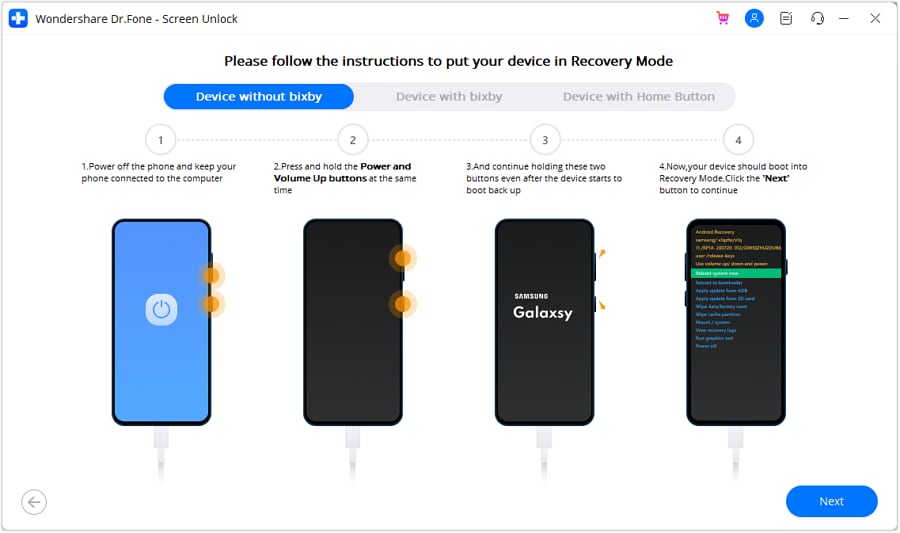
Then follow the instructions on the program to get the Android phone into Recovery Mode. Here we take 3 different models of Samsung phones as examples.
Note: Different brands have different steps to enter the Recovery Mode.
Go to the Recovery Mode on Samsung phone with Bixby
Go to the Recovery Mode on Samsung phone without Bixby
Go to Recovery Mode on Samsung phone with Home Button
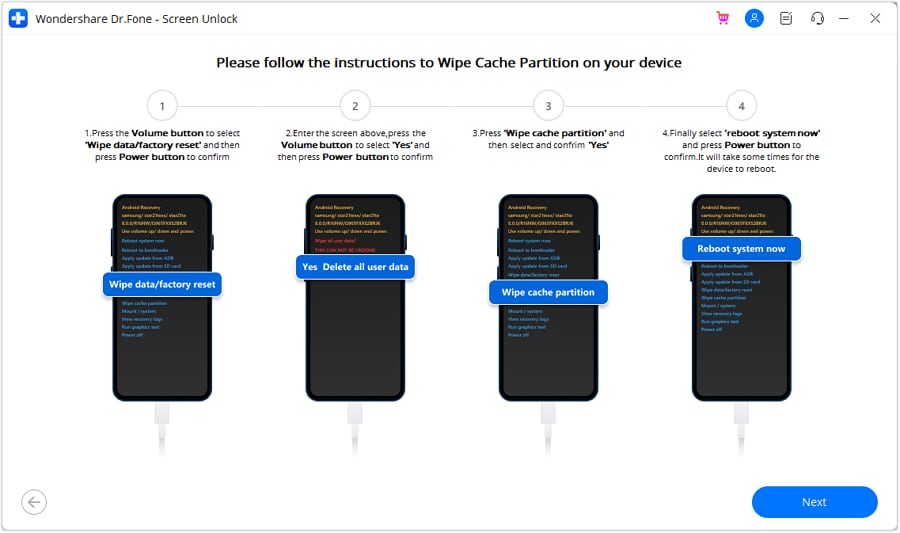
Step 5. Instructions to Wipe Cache Partition
Good! You’re now in the final step, be careful to choose the correct options so that the whole process will be perfectly over.
Now no pattern or password is on your phone screen to bother you!

This is how you can easily get rid of phone lock issues.
The Bottom Line
The voicemail function on your mobile device is a crucial tool for improving your interpersonal relationships. You must always have access to it because of this. You may use your iPhone or Samsung smartphone to receive a temporary code even if you forget your password. Alternatively, you can follow instructions for resetting your passcode on the carrier’s app or website.
Have you ever experienced voicemail lockout? Which technique did you employ to fix the issue? Did you know how to reset voicemail password on Android? Comment below with your thoughts and let us know.
Also read:
- Discover the Ultimate Collection of Dolby Atmos Movies to Elevate Your Movie Night
- Easy Ways to Keep Your AMD Radeon RX 480 Drivers Current for Optimal Performance!
- Guide: Enjoy Xbox Games Anyhow
- How To Fix OEM Unlock Missing on Oppo Reno 8T?
- How to Transfer Videos from Poco M6 Pro 5G to iPad | Dr.fone
- How to Unlock Oppo K11x Phone without Any Data Loss
- In 2024, Can I Bypass a Forgotten Phone Password Of Oppo Find X6?
- In 2024, Can I Bypass a Forgotten Phone Password Of Poco C55?
- In 2024, Complete Review & Guide to Techeligible FRP Bypass and More For Realme 11X 5G
- In 2024, How to Show Wi-Fi Password on Poco F5 5G
- In 2024, Unova Stone Pokémon Go Evolution List and How Catch Them For Xiaomi Mix Fold 3 | Dr.fone
- Mastering Desktop Merging Images Seamlessly for 2024
- Top iPhone 6 Plus Message Recovery Software | Stellar
- Title: In 2024, Rootjunky APK To Bypass Google FRP Lock For Nokia 130 Music
- Author: Aaron
- Created at : 2024-10-03 00:51:18
- Updated at : 2024-10-10 01:37:29
- Link: https://easy-unlock-android.techidaily.com/in-2024-rootjunky-apk-to-bypass-google-frp-lock-for-nokia-130-music-by-drfone-android/
- License: This work is licensed under CC BY-NC-SA 4.0.