
In 2024, Mastering Android Device Manager The Ultimate Guide to Unlocking Your Nokia C32 Device
Mastering Android Device Manager: The Ultimate Guide to Unlocking Your Nokia C32 Device
So, what is Android Device Manager? Android has this amazing native tool to help you locate and remote wipe your lost or stolen phone. We lock our phones via passwords or patterns or fingerprints to maintain the security but what if someone dares to meddle with your phone or unfortunately, it gets stolen? Don’t worry, all you need to do is let Android Device Manager unlock your Android phone. For this, it just needs to be enabled on your phone (before you unluckily locked yourself out of it). Android Device Manager unlocks your phone in a small amount of time, saving you from all the troubles.
In addition to this, the Android Device Manager also unlocks your password/pin-encrypted phone if you have forgotten the passcode by chance. The procedure is quite simple; all you need is a Google account to set this up onyour phone and then you can make use of any other online device to track down your lost or stolen phone or to even wipe all data in it. Phew!
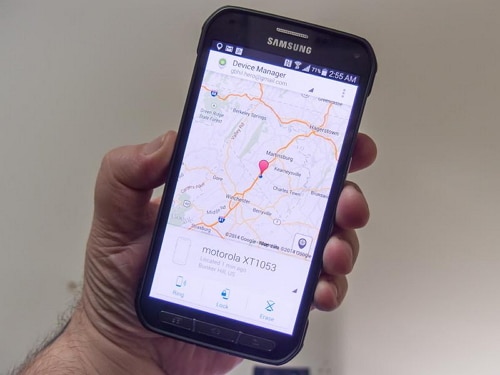
Using the Android Device Manager to track a lost phone
Part 1: What is Android Device Manager lock?
Android Device Manager is Google’s take on Apple’s Find My iPhone. Enabling the ADM is quite easy; just go to google.com/android/devicemanager on your computer and search through your list of devices that are already connected to your Google account. Once you are there, you can easily send a notification to the phone you want to enable remote password application and wiping upon.
ADM comes with a set of features that helps you to unlock your Android phone as well. It not only helps you to find your device, but also Ring it, lock it, and wipe and erase all the data as well, if your phone is lost or stolen. Once you’re logged into the ADM website from your computer, you can avail all these options once your phone is located. It is a wise option to get your device locked by Android Device Manager in case it is lost or stolen, so that your phone is secured.
Android Device Manager can unlock your phone under a specific set of circumstances only.
- • First of all, Android Device Manager needs to be enabled on your phone before it is lost, stolen, etc.
- • Secondly, your phone can only be tracked by ADM if the GPS option is switched on.
- • Thirdly, the Nokia C32 device you are using for ADM, must be connected to Wi-Fi or internet, to login to your Google account.
- • Lastly, Android Device Manager is not compatible for all Android versions. For now, it is only compatible with devices running Android 4.4 and above, so your phone must be in this category for ADM to work.
Part 2: How to unlock Android phone with Android Device Manager?
Just act according to the following steps, and the Android Device Manager will unlock your phone.
1. On your computer or any other mobile phone, visit: google.com/android/devicemanager
2. Then, sign in with the help of your Google login details that you had used in your locked phone as well.
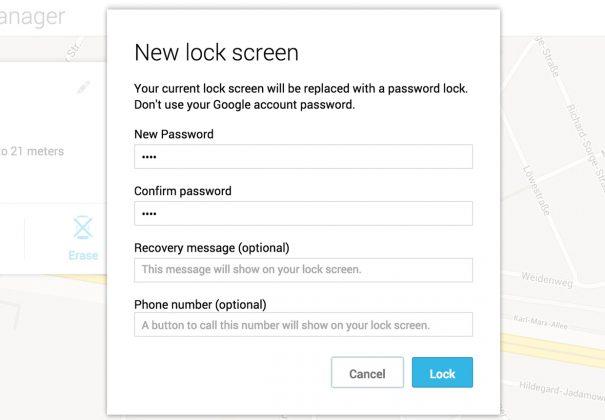
3. In the ADM interface, choose the Nokia C32 device you want to unlock. Now, select “Lock”.
4. Enter a temporary password. Now go ahead and click on “Lock” again.
5. If the previous step was successful, you should be seeing a confirmation below the box with the buttons – Ring, Lock and Erase.
6. Now, you should see a password field on your phone screen. Enter a temporary password to unlock your phone.
7. Visit your phone’s lock screen settings and disable the temporary password.
The Android Device Manager has successfully unlocked your phone!
A downside to this process, is an error message faced by some users while using ADM. Many users have reported the issue, that when they have tried using ADM to unlock their locked device, an error message has occurred, saying, “since Google has verified that a screen lock is already set”. Basically, this error message conveys that you will not be able to unlock your phone using Android Device Manager, and this is a flaw on Google’s part, not your phone’s.

Part 3: What to do if phone is locked by Android Device Manager
There are 2 situations where you would want to know how to unlock the Android Device Manager lock – one, when you have unfortunately forgotten the screen lock passcode and the other is when your phone is locked by Android Device Manager.
ADM is built to completely lock your device so that unknown people cannot access it. So, if your phone is locked by Android Device Manager, you might be in a problem.While ADM is a wonderful tool to lock your phone or erase and wipe data if its stolen or lost, most of the users have reported the issue that they cannot unlock their phones that are locked by Android Device Manager. A possible solution to this is adding a temporary password via Google login and bypassing the ADM lock. Or, you can try resetting the password again by entering a new password via ADM. If that does not work, you can make use of several third-party applications which can be found in the internet, that will help to completely erase the Android Device Manager lock.
So, now you know how to unlock the Android Device Manager lock. Do keep in mind, your device must be connected to internet or Wi-Fi, to login to your Google account.
Part 4: Unlock Android devices with Dr.Fone - Screen Unlock (Android)
As mentioned before, many were unable to unlock their phones with ADM. This is why we use the Dr.Fone - Screen Unlock (Android) . It is hassle-free and easy-to-use; the Dr.Fone toolkit needs to be downloaded on your computer and with a few easy steps, it erases any kind of lock-screen passcode and avoids any kind of data loss as well!
Dr.Fone - Android Lock Screen Removal
Remove 4 Types of Android Screen Lock without Data Loss
- It can remove 4 screen lock types - pattern, PIN, password & fingerprints.
- Only remove the lock screen, no data loss at all.
- No tech knowledge asked, everybody can handle it.
- Work for Samsung Galaxy S/Note/Tab series, and LG G2, G3, G4, etc.
3,224,627 people have downloaded it
This tool works on removing all four types of lock-screen passcodes – PINs, Patterns, Fingerprints, and Passwords. Anyone can use this tool following these easy steps:
You can also use this tool to bypass the locked screen beyond Samsung and LG.Things you should pay attention is that it will remove all the data after finishing unloking on other brand android phone.
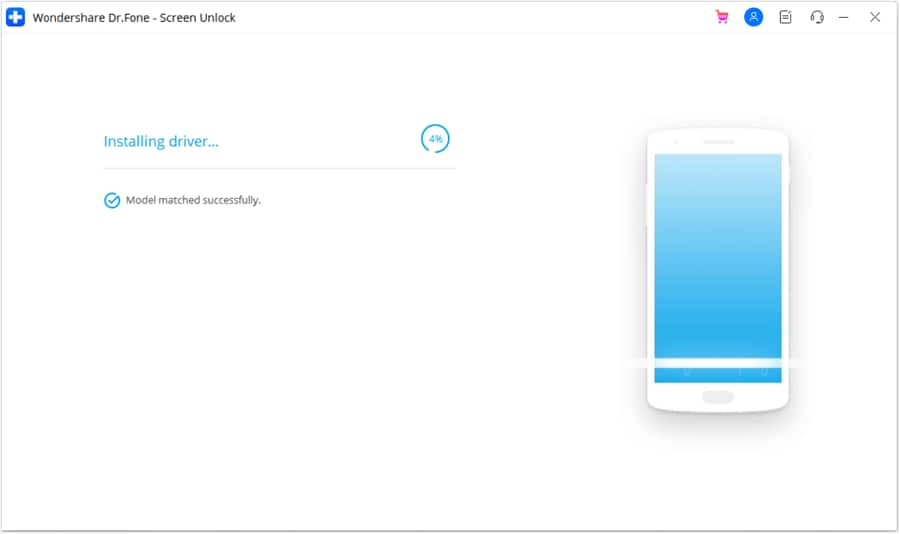
1. Fire up the Dr.Fone toolkit for Android on your computer and select the Screen Unlock among all the other tools.


2. Now, connect your Android device to the computer and select phone model in the list on the program.

3. Boot your phone into Download mode:
- • Power off your Android phone.
- • Press and hold the volume down+the home button + the power button at the same time.
- • Press the volume up button to enter Download Mode.

4. After you get your phone into the Download mode, it will start downloading a recovery package. Wait for this to be completed.
5. When the recovery package download is completed, Dr.Fone toolkit will begin removing the screen lock. This process will not cause any data loss on your Android device, so do not worry. Once the whole procedure is over, you can easily access your Android phone without entering any kind of password. Hurrah!

The Dr.Fone software is currently compatible with Samsung Galaxy S/Note/Tab series, and LG G2/G3/G4 series. For windows, it is compatible with 10/8.1/8/7/XP/Vista.
The Android Device Manager is an excellent initiative taken by Google to give people the chance to not lose any data and regain access to their phones. This also teaches us to take precautions before such unfortunate incidents take place. Phones are probably one of the most important belongings of ours, in which we confide all our private and confidential documents that we wouldn’t want to be meddled with.
So, make use of this guide and get back command over your Android phone.
How Can We Unlock Our Nokia C32 Phone Screen?
A phone lock acts as your Android phone’s shield against unauthorized users. Some users have new security features, such as fingerprint impression unlocks for an Android lock screen.
However, certain people like to create a PIN and password on their Google account as their Android screen lock. It tends to be distressing and tedious when you fail to remember the code of your Android phone. Surprisingly, being fully locked out of your device is awful. Also, it can be hard at first to unlock your Android.
Anyway, no one can escape such a situation. Yet, sit back and relax! We know several techniques on the best way to unlock your phone and set a screen lock. You can attempt software like Wondershare Dr.Fone - Screen Unlock for Android to assist you with unlocking your phone in a couple of steps. Besides this, there are various other ways.
Part 1: What Is Your Nokia C32 Phone Lock System?
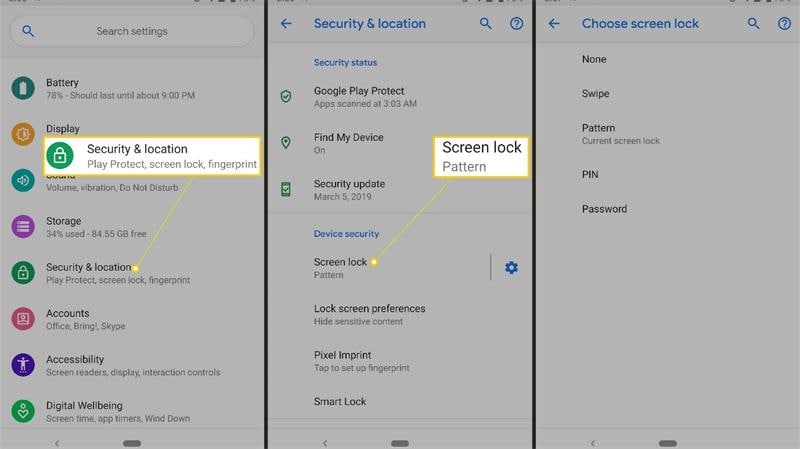
There are three types of standard lock types available for Android. You can set a PIN/password, fingerprint, or a pattern as your phone lock. All have their pros and cons. However, everyone should select the ideal one based on their liking and ease of use.
Once you decide on the phone lock type, you can enable or disable them from the Security tab in your Android phone’s settings. After you set a screen lock, your Android will require it every time you try to open your device.
Here you will see how to set up a screen lock on your Android device:
Part 2: Quickly Unlock Your Screen By Dr.Fone
Dr.Fone - Screen Unlock
For a quick, easy, and hassle-free unlocking experience, we suggest you download Dr.Fone - Screen Unlock. Dr.Fone not only unlocks your phone but keeps your data secured during the process. It has a simple interface, and even an amateur can use it to unlock their device.
So, look no further if you want to remove your Android screen lock in just a few clicks. Install Dr.Fone and enjoy using your device again.
![]()
Dr.Fone - Screen Unlock (Android)
The Best Tool to unlock Android Phone Screen!
- Remove all Android screen locks (PIN/pattern/fingerprints/face ID) in minutes.
- Bypass the FRP lock of Samsung without a PIN or Google account.
- Everyone can handle the lock screen without any tech knowledge.
- Provide specific removal solutions to promise success rate.
4,008,672 people have downloaded it
Step 1. Open Dr.Fone on your PC and select the “Screen Unlock” tool.
Step 2. Select Unlock Android Screen
This is the page to start your unlock process with two options here, please select” Unlock Android Screen” to unlock your device screen.

Step 3. Select device model
For most Brands, it should be “100% Remove Screen Lock”. These two solutions unlock screens for almost all Android devices, for example, Samsung, Huawei, OPPO, Vivo, Lenovo, LG, etc.

In the supported device brands list, please find the right one for you.
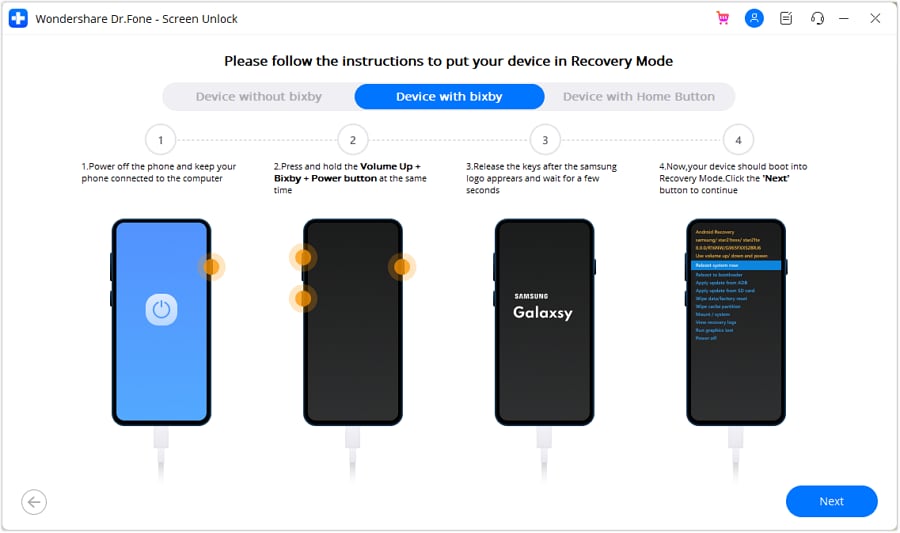
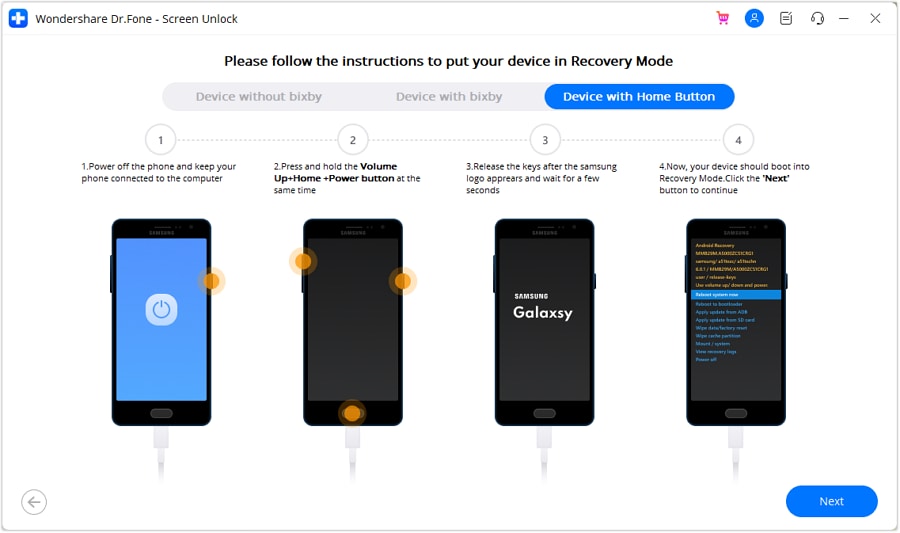
Step 4. Enter into Recovery Mode
Before unlocking your device screen, the instructions below are here to help you to get into Recovery Mode. We take 3 Samsung phones as an example.
Get into Recovery Mode on Samsung phone with Bixby:

Get into Recovery Mode on Samsung phone without Bixby:

Get into Recovery Mode in Samsung phone with Home Button:
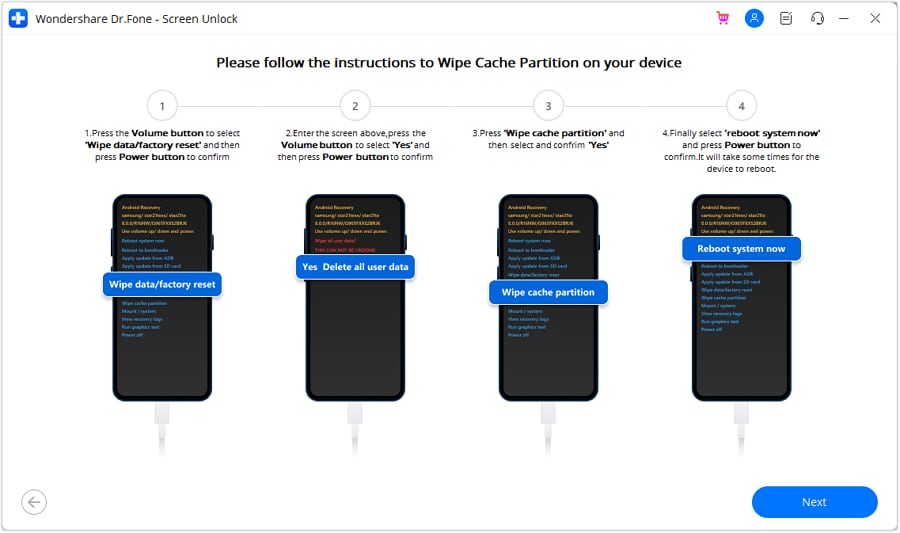
Step 5. Instructions to Wipe Cache Partition
During the steps in Recovery Mode, please don’t pick the wrong choices!
You’re now able to access your Android device again when the whole process is over. And you no longer need a password or pattern!

Part 3: Solutions to Unlock Android Screen
1. Google Find My Device
Step 1: Open the “Find my Device” webpage from a browser on your PC.

Step 2: Click “Erase my device,” which you will see on the left half of your screen. After affirming the Delete capability, your phone will boot into recovery and begin playing out a production line reset. It is difficult to stop or drop on your android gadget when you endorse this activity. Regardless of whether you shut down your Android phone - the reboot will continue on startup.
2. Recovery Mode
Depending on your phone, the steps for this process might vary a little. Most phones will allow you to reset by getting to the recovery mode. Follow the steps below to remove the Android screen lock:
Step 1: Turn on the Nokia C32 device and enter the boot menu. If you want to know how to do so, you can do a speed search on the internet.
Step 2: Access the safe mode, use the volume keys to navigate, and press the Power key to click.
Step 3: Search for the Wipe Data option and select it.

After that, your Android will start the process, which can require a few minutes. However, this process will erase all your user data.
3. Use ADB
This method is very confusing, so follow the steps cautiously on your Android phone to remove the phone lock. With your phone connected to your PC, and the cmd open, type the accompanying commands altogether:
- adb shell
- disc/data/data.com.android.providers.settings/databases
- sqlite3 settings.db
- update system set value=0 where name=’lock_pattern_autoblock’;
- update system set value=0 where name=’lockscreen.lockedoutpermanently’;
- .quit
After you’ve finished this, reboot your Android phone. If this doesn’t reset your lock screen, proceed to the following stage.
With your Android phone connected and the cmd opens, enter:
- abd shell rm/data/system/gesture.key
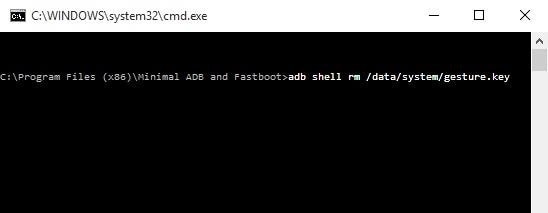
After entering, reboot your phone once more.
4. Boot into Safe Mode
Step 1: For most phones and your Android, you can do this by opening the power menu and holding the “Power Off.” A message will spring up on your screen, asking whether you might want to Reboot to Safe Mode. Press Ok.
Step 2: Clear data from your lock screen application, uninstall and reboot your phone to escape the Safe mode. When you do so, your Android screen lock will unlock.
5. Crash Lock Screen
This strategy to sidestep a locked screen is only a crisis workaround for the phones in this classification.
- Enter ten asterisks (*) through the dialer application.

- Copy and paste asterisks on the dialer until the “Paste” choice no longer appears.
- Get back to the lock screen and tap on the camera symbol.
- Go to the settings on your Android after pulling down the notifications bar. Now you will have the chance to enter the password, and you must continue the same thing here. Continue to paste until the Android lock screen crashes.
Conclusion
Passwords shield our phones from unapproved access, yet we get locked out unexpectedly on our phone lock. Failing to remember your PIN can be irritating. However, we can assist you in reaccessing your locked phone without a factory reset by using Dr.Fone - Screen Unlock. Dr.Fone is an expert in solving such problems in just a few minutes. So download this expert tool immediately for a quick solution.
Full Tutorial to Bypass Your Nokia C32 Face Lock?
Your android phone face unlock may be buggy, or the camera may be damaged. It can’t recognize your face. When you try multiple times in such cases, it will lock your device permanently. Are you stuck with a locked phone? And you’re still confused about what just happened. Face unlock may face problems such as
- Face unlock app may be buggy
- Your face unlock settings may be unstable
- Your phone camera or face unlock sensor may be damaged
- Someone else may have registered their face without your permission
Whatever the reason, they are equally big obstacles for you to use your phone as usual; trying to unlock your device can lead to a permanently locked phone. So how do you bypass face unlock?
Follow the guide below to bypass the face unlock settings and choose the best one for yourself.
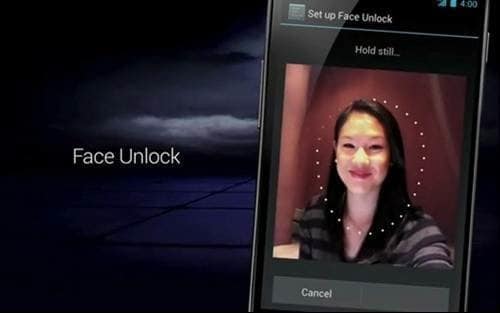
How To Bypass Android Face Lock by Ourselves?
If you want to bypass face lock by yourself, then different methods can help you. These are all tested and work well.
1. A Picture Possibly Bypasses Face Lock
You can use your photo to manipulate the face lock app. Simply use your photo to unlock the phone, which should work fine. If your phone doesn’t recognize your face from a photo, try again.
If it still doesn’t recognize your face, try a different photo or even change the camera’s lighting settings or the angles to see if that helps.
Anyway, this method is still unstable because of many uncontrollable factors. If everything fails, consider the following methods to bypass the face lock.
2. Hard Reset your phone
To get around the Android lock screen, perform a factory reset. While resetting your phone allows you to set a new password, it also erases all data from your device. This method works like a charm, but it also requires more technical knowledge. To bypass screen lock via factory reset, follow these steps.
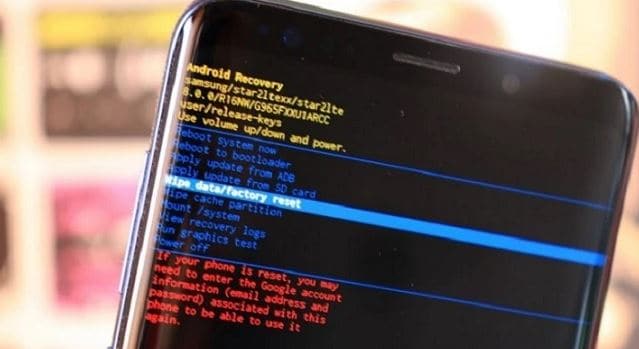
Step 1: Turn off your phone and hold the Power and Volume-down buttons simultaneously until the recovery mode screen appears. There are minor variations depending on the brand and model.
Step 2: Select the Wipe data/Factory Reset option using the volume buttons. To confirm the option, press the Power button.
Step 3: Choose Yes > Delete All User Data, then press the power button to continue. When the process is complete, turn on your phone.
So, before facing such awkward cases, like data loss, we suggest you have a backup habit of keeping your data safe.

3. Google Find My Device
Google Find My Device is a service that lets you remotely lock, track, and wipe data from stolen or lost phones. With a Google account and the password, it won’t be complicated to remove any locks on your phone. You can bypass the Android lock screen by following the steps below:
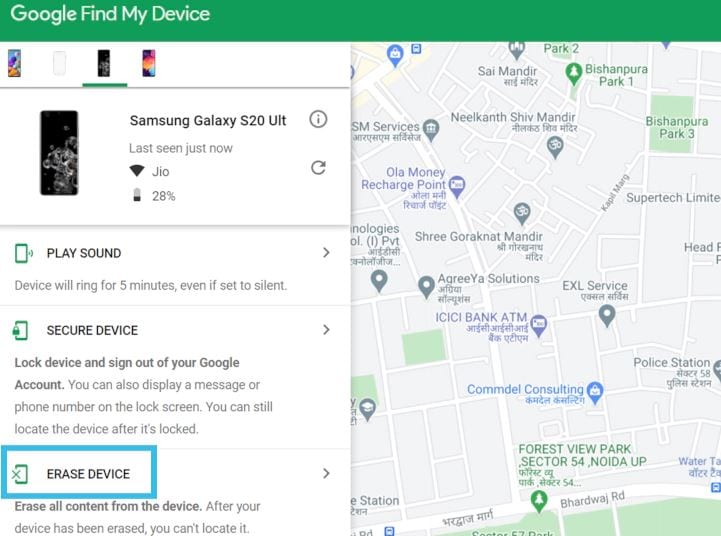
Step 1: Navigate to Find My Device and sign in with your Google account.
Step 2: Your phone receives a notification.
Step 3: Select Erase Device, confirm, and click Erase as a warning pops up on the screen.
Step 4: The factory reset process on your phone begins. When it’s finished, choose My Google Account instead of using your phone as if it were brand new.
Just like the hard reset, after using Google Find My Device, all your data and settings will be erased. Please make everything well prepared before you decide to unlock your device.
Easiest Way to Unlock Your Android Face Recognition Using Dr.Fone-Screen unlock
The methods mentioned above may be hard for you, and you don’t know any technical skills. If you are looking for an easy tool that can face unlocking for you, then Dr.Fone - Screen Unlock is all you need.
Dr.Fone by Wondershare has many useful tools, and Screen Unlock is one of them. It is the easiest and safest method to bypass the Android face lock. It is safe, secure, and easy to use.
The following guide explains how to use Dr.Fone-Screen unlock to bypass the Android face lock.
Step 1: Install and open Dr.Fone on your computer
Step 2: Run Dr.Fone on your PC and select “Screen Unlock” from the tools
Step 3: Select Unlock Android Screen
Please select” Unlock Android Screen” for the rest process.
Step 4: Select device model
Please click the button fitting your phone.
When arriving at this page, we have a lot of options to unlock your device screen for most phone brands, like Samsung, Nokia, LG, OPPO, etc.
Step 5: Enter into Recovery Mode
Here are examples of Samsung phones via its Recovery Mode to unlock your Android device screen.
(Recovery Mode When the Samsung phone with Bixby)
(Recovery Mode When the Samsung phone without Bixby)
Parental Control Software
(Recovery Mode When the Samsung phone with Home button)
Step 6: Instructions to Wipe Cache Partition
This step in Recovery Mode is the most important to unlock your screen. Please click the buttons as instruction.
Now you can see your device is unlocked successfully
Conclusion
There are various methods to bypass Android face lock, but Dr.Fone-Screen Unlock is the easiest and safest method. Dr.Fone offers Screen Unlock and many other handy tools to help you recover, remove and unlock your Android phone without geeky knowledge. Dr.Fone-Screen Unlock is a step-by-step process, and you do not need to do anything; Dr.Fone will do all you want to do on your phone!
- Title: In 2024, Mastering Android Device Manager The Ultimate Guide to Unlocking Your Nokia C32 Device
- Author: Aaron
- Created at : 2024-07-15 19:03:30
- Updated at : 2024-07-16 19:03:30
- Link: https://easy-unlock-android.techidaily.com/in-2024-mastering-android-device-manager-the-ultimate-guide-to-unlocking-your-nokia-c32-device-by-drfone-android/
- License: This work is licensed under CC BY-NC-SA 4.0.