
In 2024, How to Unlock Realme 11 Pro+ Bootloader Easily
How to Unlock Realme 11 Pro+ Bootloader Easily
Do you want to unleash the true power of your smart phone? Do you wish to have complete control over your smart phone? If yes, well, here is the answer; unlock bootloader. For people who are already into the tricks of hacking and rooting smart phones, might be aware of this. But still, there are exciting new developments. Bootloader is a code existing in all operating systems which usually comes pre-locked. So, it is important, if you wish to have a custom ROM installed on the Realme 11 Pro+ device, or if you wish to have other controls like installing applications which are incompatible, to have the Realme 11 Pro+ device bootloader unlocked. But going through with the process of unlocking bootloader and rooting the Realme 11 Pro+ device will not help and rather might break the warranty of the Realme 11 Pro+ device. This definitely calls for a diligent watch on how to unlock HTC bootloader. So, it is imperative as a user to know the process of HTC bootloader unlock. This article serves you with some ways you could follow to unleash the true power of your HTC device. Here’s how you can do it.
Part 1: Why We Want to Unlock HTC Bootloader
For people with HTC device, unlocking bootloader would mean complete authority over the smart phone and you have all the power to control the HTC device by all means. Since, bootloader usually comes pre-locked, unlocking the bootloader is the initial step if you would like to have a custom ROM installed in your device. There are various advantages of HTC unlock starting from gaining rights of control to installing latest custom ROMs in the phone and installing incompatible applications. Moreover, HTC unlock bootloader could boost the Realme 11 Pro+ device speed and battery life and also help in making complete backups of the Realme 11 Pro+ device. You could also have controls to remove bloatware from the HTC device. So, all in all, while there could be certain side effects, if not done properly, there are various advantages of unlocking HTC bootloader. If the process is carried out properly, the Android device could be the perfect smart phone you would like to have.
Part 2: How to Unlock Realme 11 Pro+ Bootloader
Realme 11 Pro+ is the flagship device of HTC by all means. With a world of features and offerings, Realme 11 Pro+ truly is a beast. While the phone is very powerful without any modifications, the true potential is yet to be seen and that can only be done if the bootloader is unlocked. So, to have a complete control over the Realme 11 Pro+ device, it is important to unlock the bootloader and the process has to be carried out diligently. One of the initial things that needs to be ensured is that the Realme 11 Pro+ device is fully charged or atleast 80% mark. Make sure you have the fastboot drivers for the Realme 11 Pro+ device configured on the windows machine and the Android SDK. Here are some of the steps which can be followed to unlock bootloader.
Step 1: It is always very important to keep the phone data backed up and more so when you are planning to unlock the bootloader.
As one of the initial measures, backup the Realme 11 Pro+ device completely as bootloader unlocking process will wipe all the data off. So, backup all the data like photos, contacts, multimedia files, documents, etc.
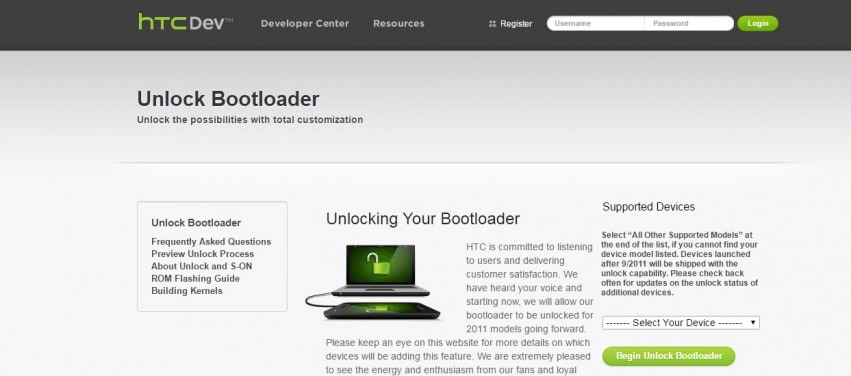
Step 2: Go to htcdev.com/bootloader. Ensure that you are registered with HTC and once the sign up is done, log in to HTC dev.

Now, ensure that HTC Sync Manager is installed on the PC.
Step 3: From the bootloader page, select your device using the drop down option as shown in the picture below.
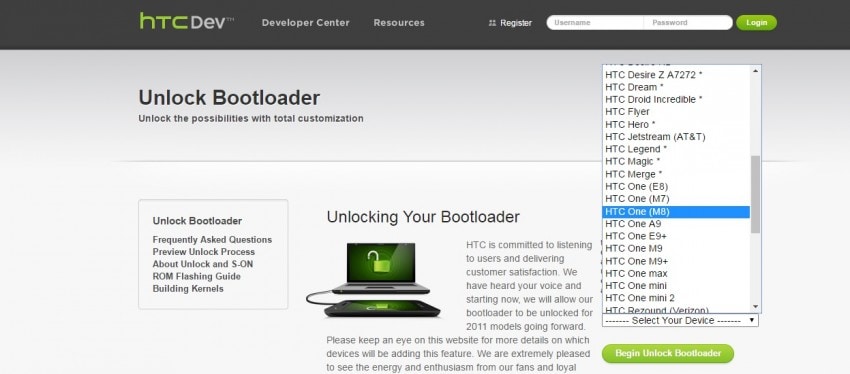
After selecting the Realme 11 Pro+ device, click on “Begin Unlock Bootloader”, and then confirm all the dialogue boxes which come your way on screen.
Step 4: Now, you will be presented with four steps to put the Realme 11 Pro+ device in bootloader mode. Disconnect the Realme 11 Pro+ device from the PC and turn the Realme 11 Pro+ device off completely. Press the volume down button along with the power button to switch the Realme 11 Pro+ device on in bootloader mode.
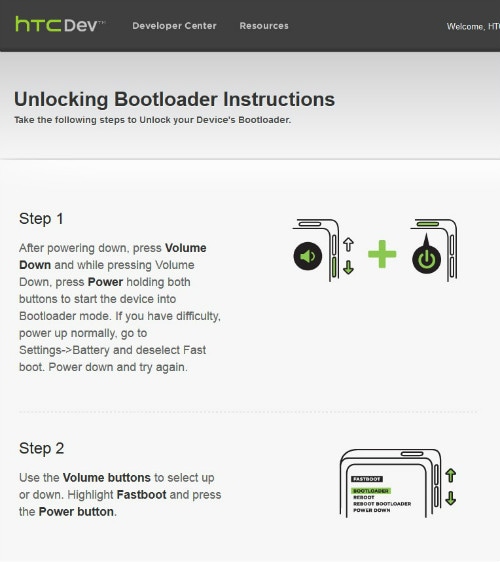
Step 5: Use the volume keys of the Realme 11 Pro+ device to select Fastboot option along with pressing power button to confirm, after the Realme 11 Pro+ device is in bootloader mode. Now, connect the Realme 11 Pro+ device to the computer using a USB cable.
Step 6: Go to Fastboot folder on the PC and holding down the shift key, click on any empty space followed by a click on “Open command window here”.
Step 7: In the command prompt window, type “fastboot devices” and press enter. Realme 11 Pro+ will show up in the command prompt.
Note: The drivers have to be installed correctly to see the Realme 11 Pro+ device in the command prompt. So, if the Realme 11 Pro+ device does not show up, reinstall HTC Sync Manager and try again after restarting the computer.
Step 8: On HTC Dev’s website third page, click on “proceed to Step 9”. Follow the steps listed and then click on submit. The unlock token code for the Realme 11 Pro+ device will be mailed by HTC. Download the token and name it “Unlock_code.bin” and place the token in the fastboot folder.
Step 9: Now, in the command prompt window, type the following:
fastboot flash unlocktoken Unlock_code.bin
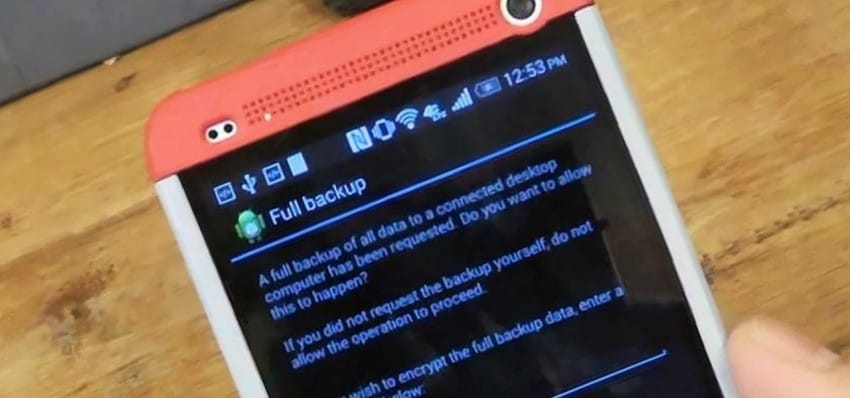
Step 10: On the Realme 11 Pro+ , one message will appear asking if you want to unlock the Realme 11 Pro+ device bootloader.
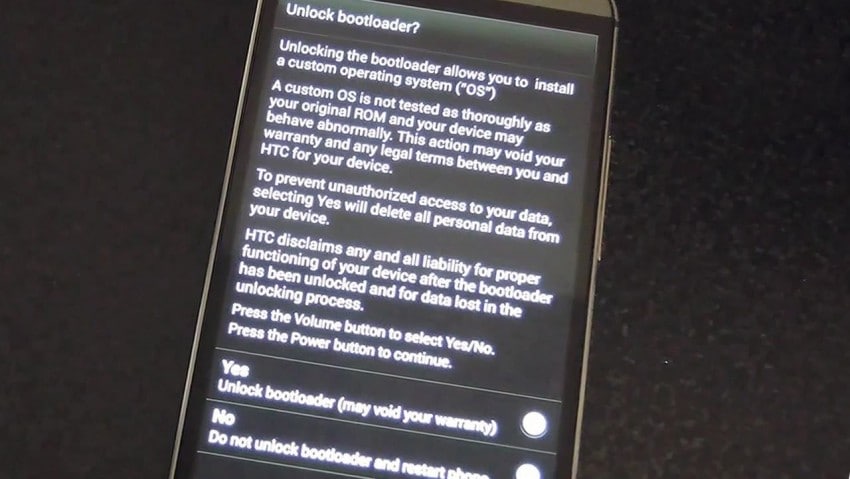
Use volume keys to select and power button to confirm. Once this is done, the Realme 11 Pro+ device will restart once and it’s done. The device is now bootloader unlocked.
How to Show Wi-Fi Password on Realme 11 Pro+
Since the invention of Android OS in 2008 by Andy Rubin, our world has faced a dramatic change. Android seems to be controlling a considerably high portion of our life. We have bought many gadgets that use this amazing OS and most of which are phones. But how much can you do with your Android phone? Developers are always making it more interesting to use this interface.
Most of the time, we use Android phones, we get faced with the need to access the internet. The Wi-Fi capability of these Android gadgets makes it super easy for us to surf the web. Throughout using Wi-Fi, we connect to a number of them. This could be at school, a sub-way café, the gym, buses, hospitals, hotels, towns, and the list is endless. A password secures most of this. Needless to say, our brain is weak to store all these passwords for future use, especially if you would want to connect with a different gadget you have recently bought or even your laptop. In this article, we will introduce you to how to find wifi password on rooted and also unrooted Android devices.
Part 1: Show Wifi Password on Rooted Android Device
What is Rooting?
First of all, what does rooting mean? You have probably used a Windows computer or even Linux. For the case of Windows, when installing a new program or software, it always prompts a dialog box saying, “Administrator permission required to run this program.” If you don’t have the administrator permission, you won’t install the program. In Android, this is called rooting. In simple terms, it means having the root permission to your phone. Some Android apps will require you the root permission, e.g., flashing your ROM. In this part, we will explain how you can show the Wi-Fi password on your Android with root.
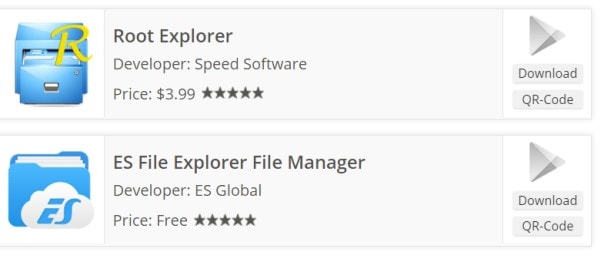
To find the Wi-Fi passwords on your Android phone, you need to have an app to explore files which also supports a root user. In this case, ES FileExplorer or Root Explorer will come in handy. However, it turns out that the latter is offered at $3. Let’s use the free ES File Explorer.
Steps of getting Wi-Fi password on Android with root
In only four steps, we, at this moment, learn how we can find the password of a Wi-Fi on an Android phone.
Step 1: Install the ES File Explorer
Download the ES File Explorer from your play store, install it, and open it.

Step 2: Enable Root Explorer
The root explorer needs to be enabled so that you can reach the root folders of the Wi-Fi passwords you need. By default, the root feature in this ES explorer is not enabled. To enable it, just tap on the list menu on the top left corner.:
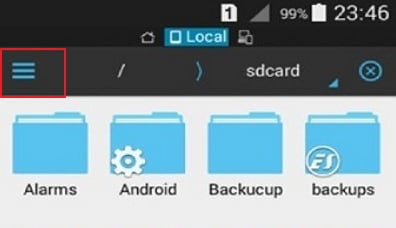
This will drop down a list of controls. Scroll down and find the Root Explorer option and enable it.


Step 3: Get the passwords’ file.
Go back to ES file explorer, and this time, find the folder named data.

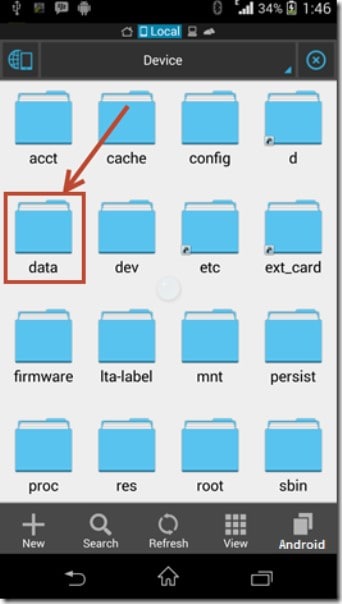
When this folder opens, find another one named misc. Open it and find another one named wifi. Here, find a file named wpa_supplicant.conf.

Step 4: Retrieve the wifi password on Android
Make sure that you don’t edit anything in the file. You might mess up with important data and fail to access the Wi-Fi(s) in the future.
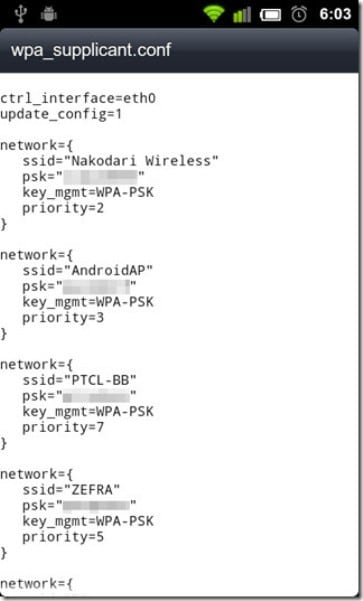
As you can see above, we have found the Wi-Fi passwords on the android device. On each network profile, we have the name of the network represented by name (ssid=”{the name}”), the network’s password represented by psk, the network’s access point represented by key_mgmt=WPA-PSK and its priority represented by priority.
Part 2: Show Wifi Password on Android without Root
What if I don’t have root access to my Android, can I still see Android Wi-Fi password? The short answer is yes. However, this is a bit involving but simple. You don’t need to be a computer guru to do it, but you need to have a computer and some internet access of course. The key thing is to find a way through which we can fetch the password file from the phone without using a root access protocol in the Android. This is made possible by some little programming insight using the Windows Command prompt.
Steps to show Wi-Fi password on Android without root
Step 1: Access the Developer authority
To access the files that Android uses to run passwords, you must first become a developer. This is very simple.
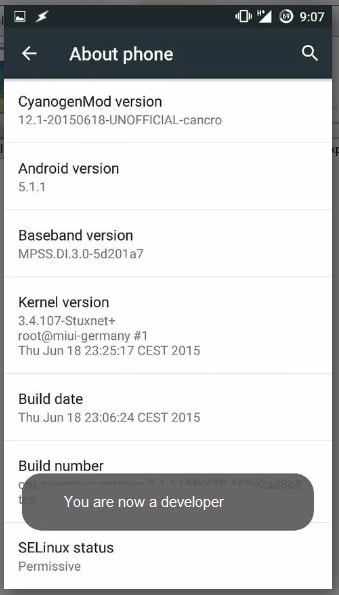
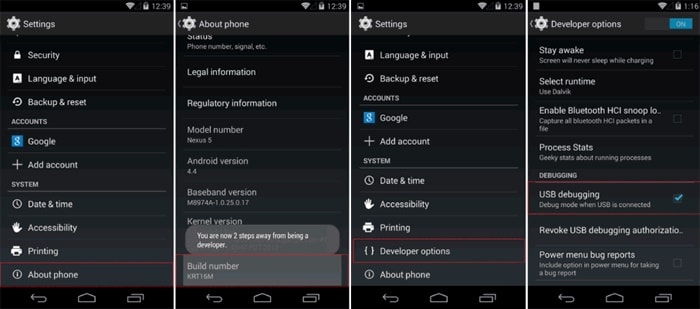
Get your Android phone and go to settings. Scroll down and find “About phone.” Tap on it and scroll down again to find Build number.

Tap on this “build number” 5 to 6 times until a message pops up, saying, “You are now a developer”.
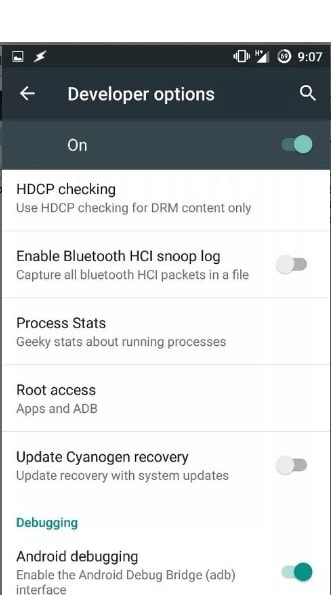
Step 2: Enable the debugging.
Go back to Settings. Scroll down for developer options. Turn on the button for “Android/USB debugging”.
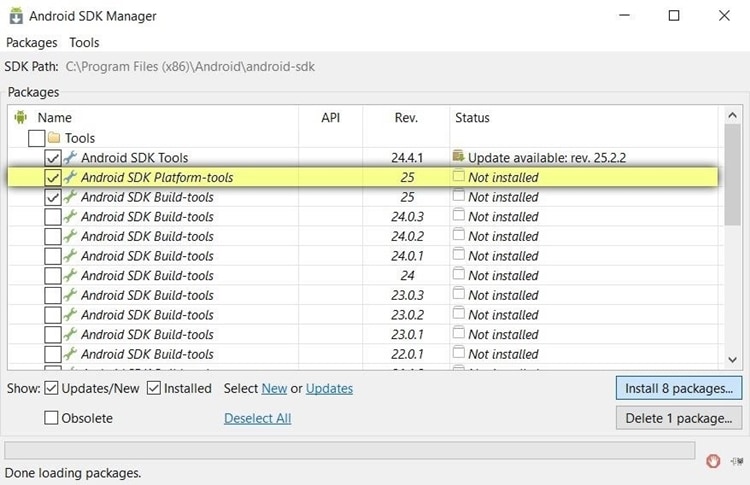
Step 3: Install ADB drivers.
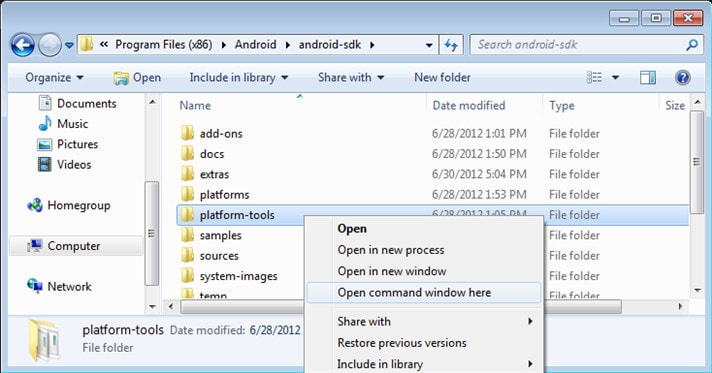
Now, open your Windows desktop. Download and install ADB drivers. (Use this download link adbdriver.com ). You need to download and install platform tools (minimal ADB and fastboot) from http://forum.xda-developers.com/... Now open the folder where you’ve installed the above tools. By default, it is in the Local disc C\windows\system32\platform_tools location. However, you might want to locate them by searching on the windows search engine. You have to hold the Shift key and right-click inside the folder to click on”Open Command Window Here.”
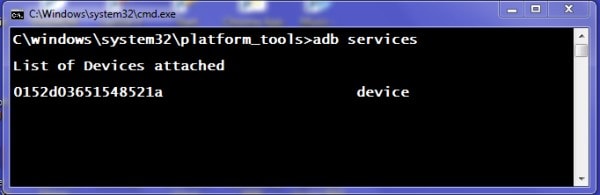
Step 4: Test the ADB
Here, we would like to test whether the ABD is working properly. To do this, connect your phone to the PC using a USB. In the command prompt, type adb services and then press enter. If it’s working properly, you should see a device on this list.
Step 5: Find the Android wifi password.
Now, it is time to type the given command in the command prompt and type: adb pull /data/misc/wifi/wpa_supplicant.conf c:/wpa_supplicant.conf. This will fetch the file from your phone to the local disc C drive of the PC.
Step 6: Get the wifi passwords.
Lastly, open the file with a notepad, and there you go.
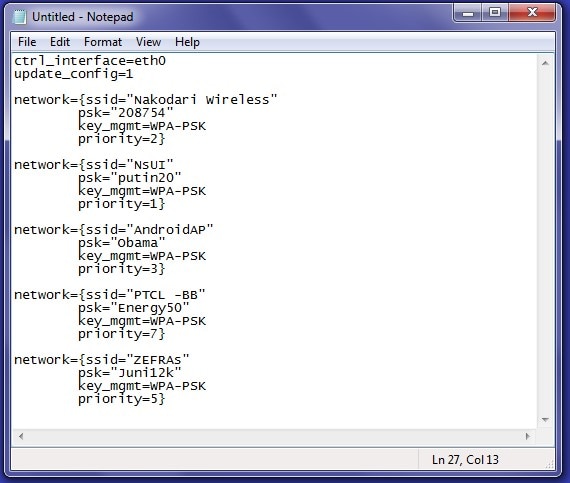
Now you learned how to show the wifi password on your Android device.
How to Unlock Realme 11 Pro+ Phone Pattern Lock without Factory Reset
Have you been locked out of your Android device and can’t seem to recall its pattern? Do you wish to learn how to unlock an Android phone pattern lock without a factory reset to access someone else’s device? If your answer is “yes”, then you have come to the right place. Lots of readers these days ask us about a foolproof way to learn how to unlock an Android phone pattern lock without a factory reset. To help you, we have decided to come up with an in-depth guide on the same. Read on and learn in 4 different ways.
Part 1: Unlock the Android Phone Pattern with Lock Screen Removal Tool
If you are locked out of the phone because forgot pattern lock, and fail to enter the phone after many times try with the word “phone has been locked”. No need to worry, there are many solutions to fix the issue. And Dr.Fone –Screen Unlock (Android) can be your first saver in the dilemma. It is a highly efficient pattern lock removal tool for over 2000+ mainstream android phones, like Samsung, Oneplus, Huawei, Xiaomi, Pixel, etc.
Except for pattern locks unlocking, it works for the PIN, fingerprints, Face ID, and Google FRP bypassing as well. It’s helpful even if you don’t know the OS version of your devices. So, now follow the below steps to unlock the pattern and regain access to your locked phone in minutes.
![]()
Dr.Fone - Screen Unlock (Android)
Get into Locked Phones within Minutes
- Pattern, PIN, password, fingerprints & face screen lock can all be unlocked.
- Easily remove the lock screen; No need to root your device.
- Everybody can handle it without any technical background.
- Provide specific removal solutions to promise good success rate
4,008,669 people have downloaded it
Step 1. Download Dr.Fone –Screen Unlock on your PC or Mac.

Step 2. Connect your Android phone to the computer using a USB cable. Next, click the “Unlock Android Screen“ from the interface.

Step 3. Choose the model version according to your android phone. For people who don’t know the operating system version, tick the circle “I can’t find my device model from the list above”.

Step 4. Enter and download the recovery package as the instructions show on the PC or Mac.

Step 5. It will be finished when the recovery package downloading is completed. Then, click “Remove Now“.

Once the whole progress is over, you can access your Android device without entering any password and view all your data on the Realme 11 Pro+ device with no limits.
 safe & secure
Part 2: How to unlock the Android phone pattern lock without resetting using a Google account?
If you have an older Android device, then you can simply move past its lock by taking the assistance of your Google account. All you need is access to the same Google account that is linked to your device. Though, this technique will only work on devices running on Android 4.4 and earlier versions. To learn how to remove pattern lock on Android without a factory reset, follow these steps:
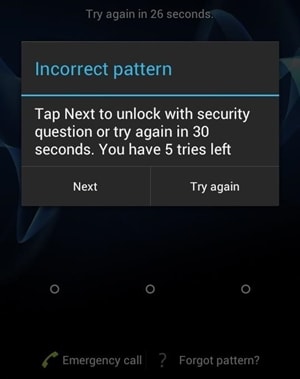
Step 1. Simply provide any pattern on the Realme 11 Pro+ device. Since the pattern would be wrong, you will get the following prompt.
Step 2. Tap on the “Forgot Pattern” option located at the bottom of the screen.
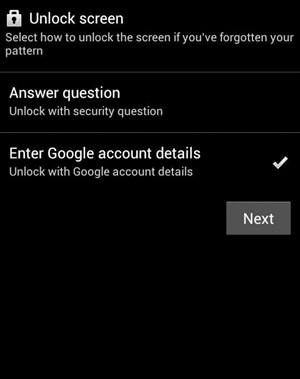
Step 3. This will provide different ways to access your phone. Select the Google Account details and tap on the “Next” option.
Step 4. Sign in using the credentials of the Google account that is linked to your device.

Step 5. Great! Now you can simply provide (and confirm) the new pattern for your device.
After following these instructions, you would be able to learn how to unlock an Android phone pattern lock without factory reset or causing any harm to your device.
Part 3: How to unlock Android phone password without factory reset - Android Device Manager
The Android Device Manager, which is now known as “Find My Device” is one of the best ways to locate your Android device remotely. Besides that, you can also use the interface to ring your device or change its lock from anywhere. All you need to do is access its interface from any other device and log-in with your Google credentials. You can follow these steps to learn how to unlock the Android pattern lock without factory reset.
Step 1. Log in to Android Device Manager (Find My Device) using your Google credentials.
Android Device Manager website: https://www.google.com/android/find .
Step 2. From the interface, you can select the Android device that is linked to your Google account.
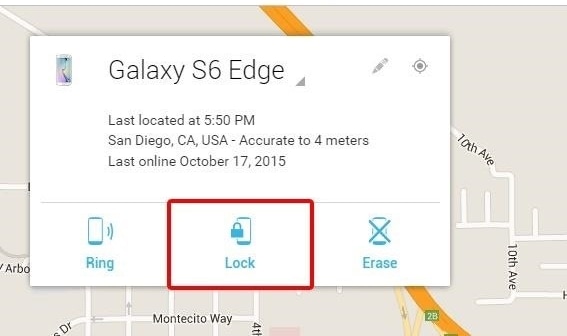
Step 3. You will get options to ring it, lock it, or erase it. Select the “Lock” option to proceed.
Step 4. This will launch a new pop-up window. From here, you can provide a new lock screen password, confirm it, and also set an optional recovery message or phone number (in case your device has been lost).
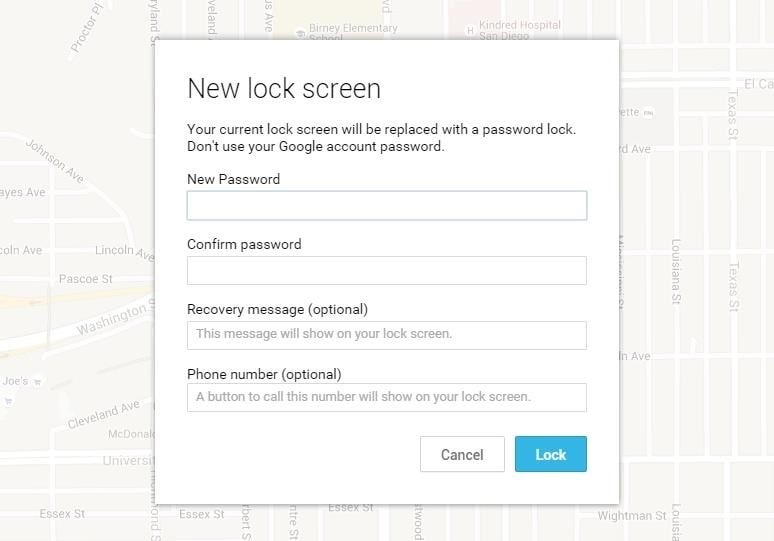
Step 5. Confirm your choice and save it to remotely change the lock screen password on your device.
In the end, you would be able to learn how to unlock an Android phone pattern lock without a factory reset after following these above-mentioned steps.
Part 4: How to unlock Android phone pattern lock without factory reset using ADB?
By using Android Debug Bridge (ADB), you can also learn how to unlock the Android pattern lock without a factory reset. Though, this is a more time-consuming and complicated process than other alternatives like Dr.Fone. Nevertheless, you can learn how to remove pattern lock on Android without factory reset using ADB with these instructions:
Step 1. To start with, you need to download ADB on your system. This can be done by visiting the Android Developer’s website https://developer.android.com/studio/command-line/adb.html .
Step 2. Afterward, launch the installer and download all the essential packages on your system.
Step 3. Now, connect your phone to the system. Make sure that its USB debugging feature is on.
Step 4. To do this, go to Settings > About Phone and tap the “Build Number” option seven consecutive times. This will enable the Developer Options on your device.
Step 5. Go to Settings > Developer Options and turn on the feature of USB debugging.
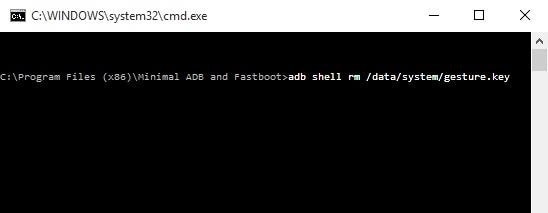
Step 6. After connecting your device to the system, launch the command prompt in the installation directory on your respective ADB.
Step 7. Type the command “ADB shell rm /data/system/gesture.key” and press enter.
Step 8. Simply restart your device and access it the usual way, without any lock screen pattern or pin.
Conclusion
Now when you know how to unlock the Android phone pattern lock without a factory reset, you can easily access your device in a trouble-free way. Out of all the provided options, Dr.Fone - Screen Unlock (Android) is the best alternative. It provides a fast, secure, and reliable way to unlock your device without causing any harm or removing its content. Go ahead and give it a try and share these solutions with your friends and family as well.
- Title: In 2024, How to Unlock Realme 11 Pro+ Bootloader Easily
- Author: Aaron
- Created at : 2024-07-15 21:11:39
- Updated at : 2024-07-16 21:11:39
- Link: https://easy-unlock-android.techidaily.com/in-2024-how-to-unlock-realme-11-proplus-bootloader-easily-by-drfone-android/
- License: This work is licensed under CC BY-NC-SA 4.0.