
In 2024, How to Unlock Nubia Z50 Ultra Bootloader Easily
How to Unlock Nubia Z50 Ultra Bootloader Easily
Do you want to unleash the true power of your smart phone? Do you wish to have complete control over your smart phone? If yes, well, here is the answer; unlock bootloader. For people who are already into the tricks of hacking and rooting smart phones, might be aware of this. But still, there are exciting new developments. Bootloader is a code existing in all operating systems which usually comes pre-locked. So, it is important, if you wish to have a custom ROM installed on the Nubia Z50 Ultra device, or if you wish to have other controls like installing applications which are incompatible, to have the Nubia Z50 Ultra device bootloader unlocked. But going through with the process of unlocking bootloader and rooting the Nubia Z50 Ultra device will not help and rather might break the warranty of the Nubia Z50 Ultra device. This definitely calls for a diligent watch on how to unlock HTC bootloader. So, it is imperative as a user to know the process of HTC bootloader unlock. This article serves you with some ways you could follow to unleash the true power of your HTC device. Here’s how you can do it.

Part 1: Why We Want to Unlock HTC Bootloader
For people with HTC device, unlocking bootloader would mean complete authority over the smart phone and you have all the power to control the HTC device by all means. Since, bootloader usually comes pre-locked, unlocking the bootloader is the initial step if you would like to have a custom ROM installed in your device. There are various advantages of HTC unlock starting from gaining rights of control to installing latest custom ROMs in the phone and installing incompatible applications. Moreover, HTC unlock bootloader could boost the Nubia Z50 Ultra device speed and battery life and also help in making complete backups of the Nubia Z50 Ultra device. You could also have controls to remove bloatware from the HTC device. So, all in all, while there could be certain side effects, if not done properly, there are various advantages of unlocking HTC bootloader. If the process is carried out properly, the Android device could be the perfect smart phone you would like to have.
Part 2: How to Unlock Nubia Z50 Ultra Bootloader
Nubia Z50 Ultra is the flagship device of HTC by all means. With a world of features and offerings, Nubia Z50 Ultra truly is a beast. While the phone is very powerful without any modifications, the true potential is yet to be seen and that can only be done if the bootloader is unlocked. So, to have a complete control over the Nubia Z50 Ultra device, it is important to unlock the bootloader and the process has to be carried out diligently. One of the initial things that needs to be ensured is that the Nubia Z50 Ultra device is fully charged or atleast 80% mark. Make sure you have the fastboot drivers for the Nubia Z50 Ultra device configured on the windows machine and the Android SDK. Here are some of the steps which can be followed to unlock bootloader.
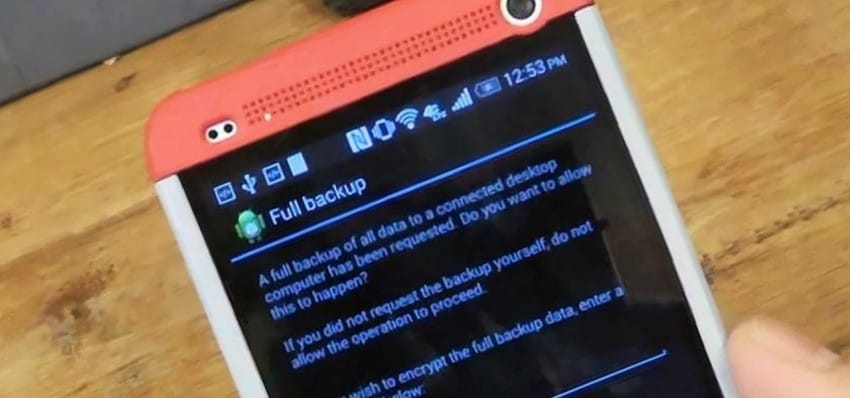
Step 1: It is always very important to keep the phone data backed up and more so when you are planning to unlock the bootloader.
As one of the initial measures, backup the Nubia Z50 Ultra device completely as bootloader unlocking process will wipe all the data off. So, backup all the data like photos, contacts, multimedia files, documents, etc.
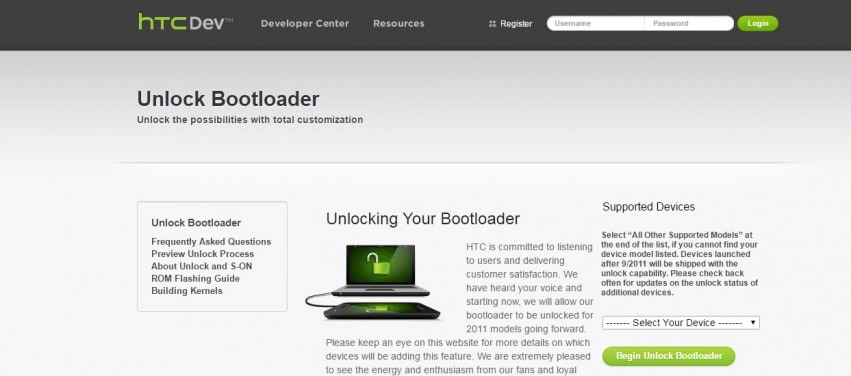
Step 2: Go to htcdev.com/bootloader. Ensure that you are registered with HTC and once the sign up is done, log in to HTC dev.
Now, ensure that HTC Sync Manager is installed on the PC.
Step 3: From the bootloader page, select your device using the drop down option as shown in the picture below.

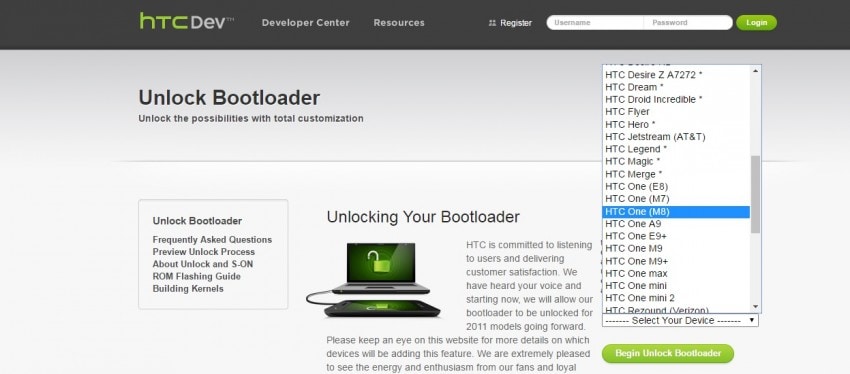
After selecting the Nubia Z50 Ultra device, click on “Begin Unlock Bootloader”, and then confirm all the dialogue boxes which come your way on screen.
Step 4: Now, you will be presented with four steps to put the Nubia Z50 Ultra device in bootloader mode. Disconnect the Nubia Z50 Ultra device from the PC and turn the Nubia Z50 Ultra device off completely. Press the volume down button along with the power button to switch the Nubia Z50 Ultra device on in bootloader mode.
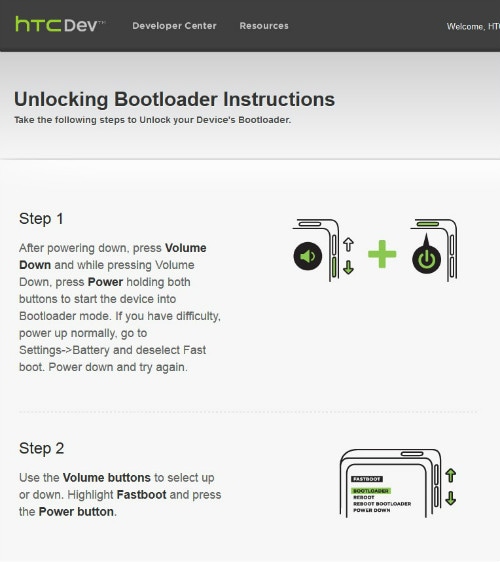
Step 5: Use the volume keys of the Nubia Z50 Ultra device to select Fastboot option along with pressing power button to confirm, after the Nubia Z50 Ultra device is in bootloader mode. Now, connect the Nubia Z50 Ultra device to the computer using a USB cable.
Step 6: Go to Fastboot folder on the PC and holding down the shift key, click on any empty space followed by a click on “Open command window here”.
Step 7: In the command prompt window, type “fastboot devices” and press enter. Nubia Z50 Ultra will show up in the command prompt.
Note: The drivers have to be installed correctly to see the Nubia Z50 Ultra device in the command prompt. So, if the Nubia Z50 Ultra device does not show up, reinstall HTC Sync Manager and try again after restarting the computer.
Step 8: On HTC Dev’s website third page, click on “proceed to Step 9”. Follow the steps listed and then click on submit. The unlock token code for the Nubia Z50 Ultra device will be mailed by HTC. Download the token and name it “Unlock_code.bin” and place the token in the fastboot folder.
Step 9: Now, in the command prompt window, type the following:
fastboot flash unlocktoken Unlock_code.bin
Step 10: On the Nubia Z50 Ultra , one message will appear asking if you want to unlock the Nubia Z50 Ultra device bootloader.
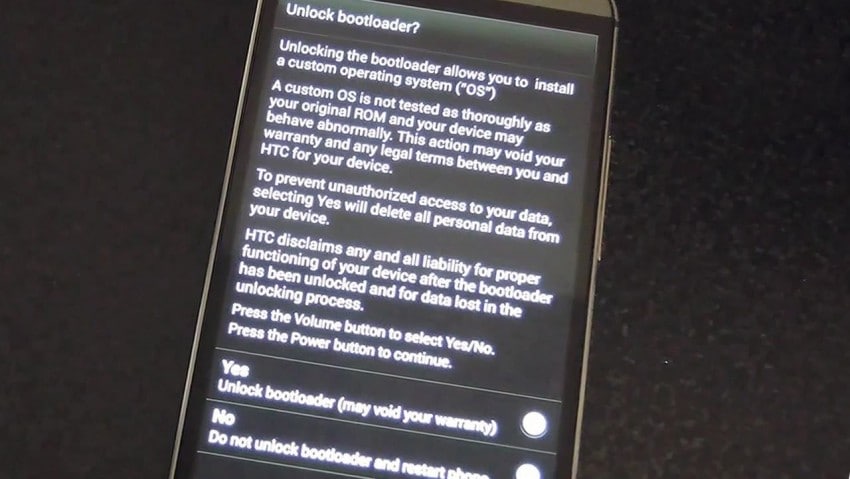
Use volume keys to select and power button to confirm. Once this is done, the Nubia Z50 Ultra device will restart once and it’s done. The device is now bootloader unlocked.

Mastering Lock Screen Settings: How to Enable and Disable on Nubia Z50 Ultra
In the modern world, the use of smartphones has become such a common trend that everyone would feel abnormal if they don’t have a smartphone of their own. So big the demand is that all IT companies are trying their best to introduce as well as innovate several excellent brands of smartphones. To support the function of smartphones, by far there have been numerous operating systems existed. Among them, Android is one of the most popular as well as trustworthy OS.
Just like any other smartphone, all Android devices have their ways to protect the data stored inside a smartphone from being corrupted or leaked. One of the simplest and most easy-to-use ways is to make use of the lock screen.
The lock screen has proved to be a traditional yet efficient way to help you protect your Android phones. In this article, we will provide you with an informative piece of writing about everything you need to know when it comes to the Android lock screen, and ways to enable and disable it.
If you have spent time searching and looking for features of your Android devices, you will find the process of enabling a lock screen is a piece of cake.
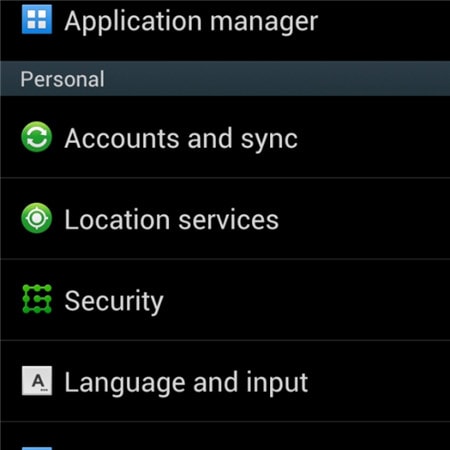
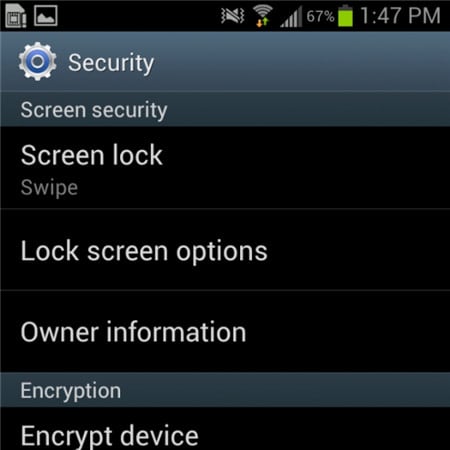
· Step 1: On the main screen of your Android devices, tap on the gear icon - which is the icon representing the Settings menu. Once you have chosen it, you will see a drop-down menu on the screen. In the options provided, tap on the Security bar.
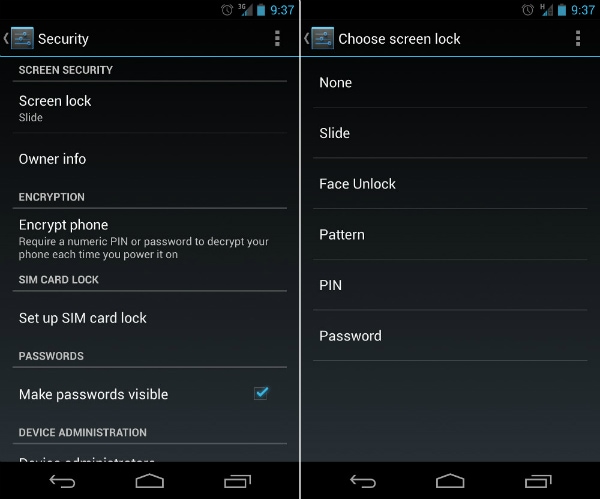
· Step 2: Under the tab whose heading is entitled Screen Security, tap on the first bar in the list called Screen lock.

· Step 3: Once the step is done successfully, Android will give you plenty of choices about ways to lock your Android devices’ screens. Among these ways, select one particular type which you feel is most convenient as well as free-risk. After that, type in your PIN code to confirm the choice and finally activate your lock screen feature as you wish.
Part 2: How to Disable Android Lock Screen
To certain customers, the lock screen can do more harm than good, and they would prefer to disable the screen lock on their Android devices. This process is also an easy one to follow, as long as you still hold good memory of the security code.
· Step 1: On the main screen of your Android devices, tap on the gear icon. It will directly lead you to the Settings menu of the phone. After that, a drop-down menu will appear with several choices and bars. Among them, tap on the Security option to begin your work.
· Step 2: Under the heading called Screen Security heading, you will be shown 3 choices. Tap on the first one, which is entitled Screen lock.

· Step 3: Once you have done the previous step, a brand new screen will appear and then you will be asked to fill in your PIN code. This is a step that helps guarantee that you are the true owner of the Android device.

Step 4: As soon as you have confirmed the right PIN code in the bar provided, you will then be presented to the next drop-down menu. A similar screen will appear which shows you plenty of choices. Tap on the top of that list, which is a bar called None.

Step 5: In the end, you have successfully disabled the screen lock on your Android devices. You are now capable of using it without any hesitation about the screen lock.
Part 3: Common Problems of Disabling Lock Screen
The process to disable the screen lock on Android may seem easy to handle as well as straightforward to several customers, but there are still some annoying problems that users have to deal with while trying to disable the lock screen.
What are the top 2 common problems?
Below are the two most common problems faced by Android users during their efforts to disable the feature of screen lock.
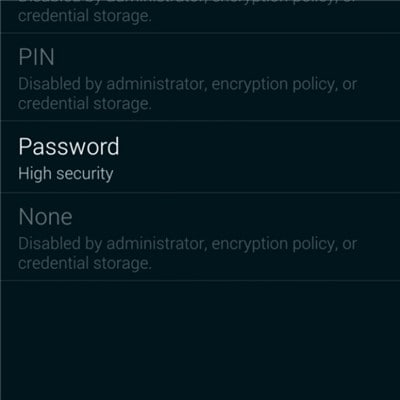
1. In the Screen Security choice, the None bar can not be chosen.
Description of the problem: There is a sentence below it stated: “Disabled by administrators, encryption policy or credential storage”. All the space of the None option is in white and grey.
The solution to this problem is quite simple. Once you have made sure you are suffering from this nasty one, try to follow these below pieces of advice to see if it is capable of giving you a hand.
Step 1: Open the Settings menu from the main screen. Then tap on the Credential Storage. You will see a drop-down menu like the screenshot below.
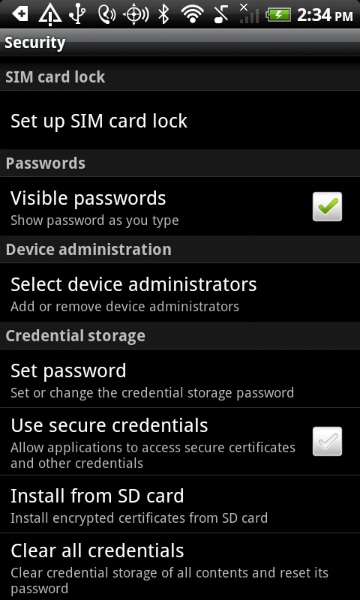
Step 2: Continue to tap on the Clear Credentials (Remove all certificates) option. Then next click on the OK button. Wait for some seconds until your Android device has finished the process.
Step 3: To make sure that the previous step has been performed successfully, try looking at the bottom of the drop-down menu. If the Clear Credentials (Remove all certificates) are grey out and can not be selected, then you have managed to do it.

Step 4: Now that the problem is solved, you can feel free to turn back to your Screen lock option in the beginning and disable the feature of locking screen Android as usual.
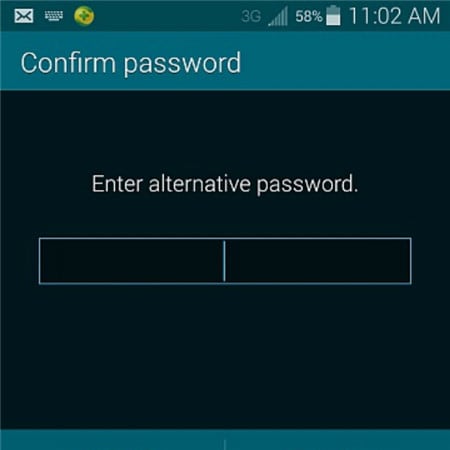
2. You have mistakenly encrypted your SD card. You want to disable the encryption, only to realize that it requires you to set a new screen lock code. But when you come to the Screen lock menu, all the options but Password have been greyed out.
This is pretty weird, but actually, it is one of the most common troubles that many users have complained about. But to your surprise, the solution is very simple and easy. All you have to do is to reset your password, but with a little change. Your password MUST include at least ONE NUMBER in it. Confirm your new password then you will be able to disable the lock screen Android as usual.
Bonus Tip: Remove Android Screen Lock If Forgotten Password/Pattern
As much as the lock screen can protect the personal information on the phone, it can also cause much trouble if you forget the lock screen password or enter the wrong password too many times. So here comes the need for phone unlocking software . One of the best is Dr.Fone - Screen Unlock (Android), which can help us bypass forgotten Android screen locks without any data loss(limited to Samsung and LG series phones). Other Android brand phones will be wiped out all the data once starting to unlock with Dr.Fone
Dr.Fone - Screen Unlock (Android)
Remove 4 Types of Android Screen Lock without Data Loss
- It can remove 4 screen lock types - pattern, PIN, password & fingerprints.
- One-time payment for unlimited use of multiple devices within a specified time period.
- Work for Samsung Galaxy S/Note/Tab series, LG G2/G3/G4, etc.
- Besides, unlocking the screen lock, it also works best to unlock the Samsung FRP lock in devices with Android 5.0 and higher.
3981454 people have downloaded it
Steps on How to Unlock Forgotten Password in Android Phones
Step 1: Launch Dr.Fone and click on Screen Unlock from the primary window.

Step 2: Connect your Android device to the computer via USB cable. The program will recognize the phone directly. Select the phone model or “I can’t find my device model from the list above” to continue.

Step 3: Follow the instruction on the program exactly to set the phone to Download Mode. First, you will need to Power off your Phone. Secondly, Press on Volume Down, Home button, and Power button simultaneously. Thirdly press the Volume up button to navigate until the phone enters Download mode.

Step 4: After you set the phone to Download mode, it will begin to download the recovery package. When the recovery package is downloaded successfully, the lock screen on your Nubia Z50 Ultra devicewill be removed. You won’t lose any data during the whole process.

How to Show Wi-Fi Password on Nubia Z50 Ultra
Since the invention of Android OS in 2008 by Andy Rubin, our world has faced a dramatic change. Android seems to be controlling a considerably high portion of our life. We have bought many gadgets that use this amazing OS and most of which are phones. But how much can you do with your Android phone? Developers are always making it more interesting to use this interface.
Most of the time, we use Android phones, we get faced with the need to access the internet. The Wi-Fi capability of these Android gadgets makes it super easy for us to surf the web. Throughout using Wi-Fi, we connect to a number of them. This could be at school, a sub-way café, the gym, buses, hospitals, hotels, towns, and the list is endless. A password secures most of this. Needless to say, our brain is weak to store all these passwords for future use, especially if you would want to connect with a different gadget you have recently bought or even your laptop. In this article, we will introduce you to how to find wifi password on rooted and also unrooted Android devices.
Part 1: Show Wifi Password on Rooted Android Device
What is Rooting?
First of all, what does rooting mean? You have probably used a Windows computer or even Linux. For the case of Windows, when installing a new program or software, it always prompts a dialog box saying, “Administrator permission required to run this program.” If you don’t have the administrator permission, you won’t install the program. In Android, this is called rooting. In simple terms, it means having the root permission to your phone. Some Android apps will require you the root permission, e.g., flashing your ROM. In this part, we will explain how you can show the Wi-Fi password on your Android with root.
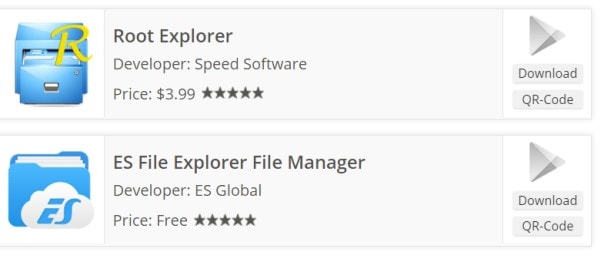
To find the Wi-Fi passwords on your Android phone, you need to have an app to explore files which also supports a root user. In this case, ES FileExplorer or Root Explorer will come in handy. However, it turns out that the latter is offered at $3. Let’s use the free ES File Explorer.
Steps of getting Wi-Fi password on Android with root
In only four steps, we, at this moment, learn how we can find the password of a Wi-Fi on an Android phone.
Step 1: Install the ES File Explorer
Download the ES File Explorer from your play store, install it, and open it.

Step 2: Enable Root Explorer
The root explorer needs to be enabled so that you can reach the root folders of the Wi-Fi passwords you need. By default, the root feature in this ES explorer is not enabled. To enable it, just tap on the list menu on the top left corner.:
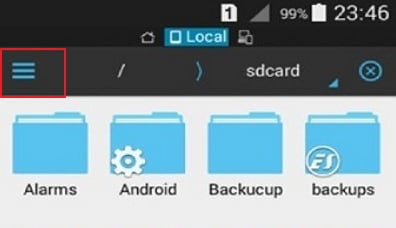
This will drop down a list of controls. Scroll down and find the Root Explorer option and enable it.

Step 3: Get the passwords’ file.
Go back to ES file explorer, and this time, find the folder named data.
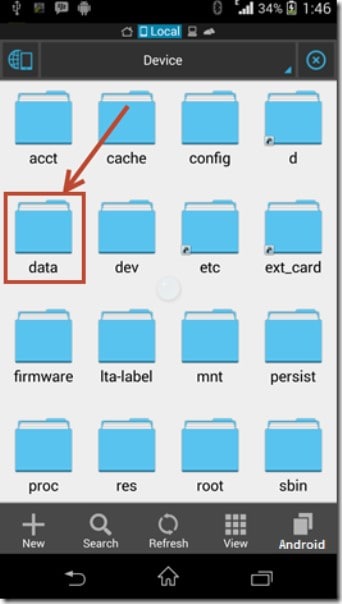
When this folder opens, find another one named misc. Open it and find another one named wifi. Here, find a file named wpa_supplicant.conf.

Step 4: Retrieve the wifi password on Android
Make sure that you don’t edit anything in the file. You might mess up with important data and fail to access the Wi-Fi(s) in the future.
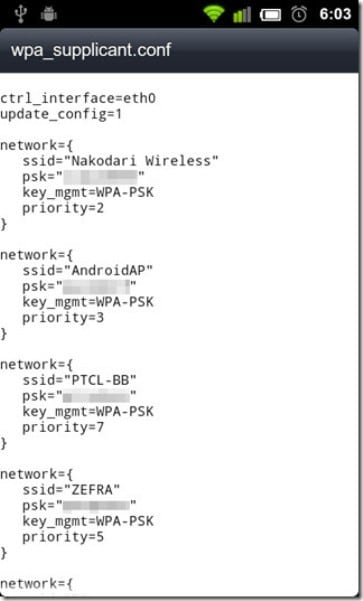
As you can see above, we have found the Wi-Fi passwords on the android device. On each network profile, we have the name of the network represented by name (ssid=”{the name}”), the network’s password represented by psk, the network’s access point represented by key_mgmt=WPA-PSK and its priority represented by priority.
Part 2: Show Wifi Password on Android without Root
What if I don’t have root access to my Android, can I still see Android Wi-Fi password? The short answer is yes. However, this is a bit involving but simple. You don’t need to be a computer guru to do it, but you need to have a computer and some internet access of course. The key thing is to find a way through which we can fetch the password file from the phone without using a root access protocol in the Android. This is made possible by some little programming insight using the Windows Command prompt.
Steps to show Wi-Fi password on Android without root
Step 1: Access the Developer authority
To access the files that Android uses to run passwords, you must first become a developer. This is very simple.
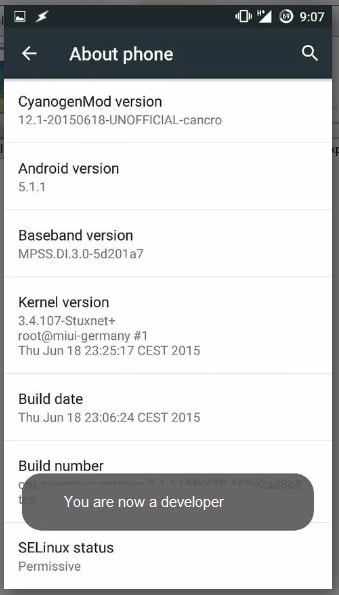
Get your Android phone and go to settings. Scroll down and find “About phone.” Tap on it and scroll down again to find Build number.

Tap on this “build number” 5 to 6 times until a message pops up, saying, “You are now a developer”.
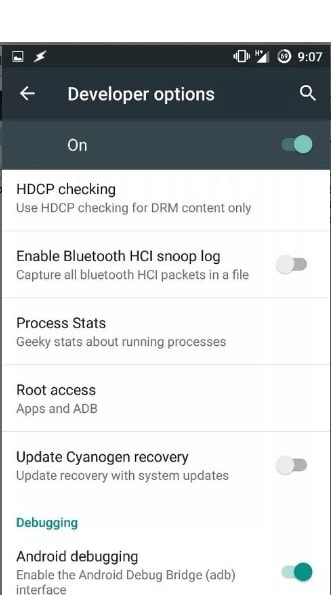
Step 2: Enable the debugging.
Go back to Settings. Scroll down for developer options. Turn on the button for “Android/USB debugging”.
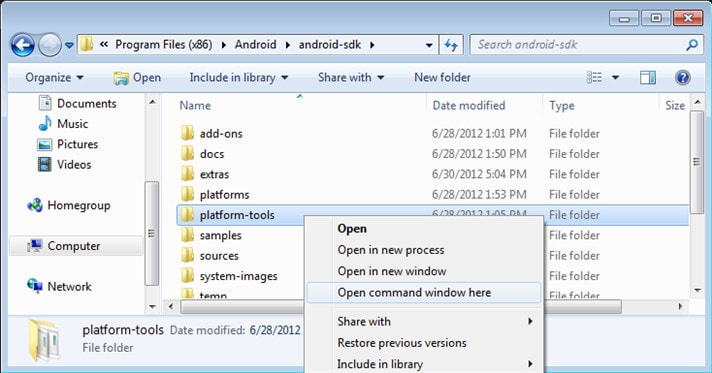
Step 3: Install ADB drivers.
Now, open your Windows desktop. Download and install ADB drivers. (Use this download link adbdriver.com ). You need to download and install platform tools (minimal ADB and fastboot) from http://forum.xda-developers.com/... Now open the folder where you’ve installed the above tools. By default, it is in the Local disc C\windows\system32\platform_tools location. However, you might want to locate them by searching on the windows search engine. You have to hold the Shift key and right-click inside the folder to click on”Open Command Window Here.”

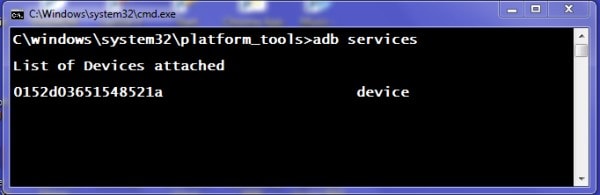
Step 4: Test the ADB
Here, we would like to test whether the ABD is working properly. To do this, connect your phone to the PC using a USB. In the command prompt, type adb services and then press enter. If it’s working properly, you should see a device on this list.
Step 5: Find the Android wifi password.
Now, it is time to type the given command in the command prompt and type: adb pull /data/misc/wifi/wpa_supplicant.conf c:/wpa_supplicant.conf. This will fetch the file from your phone to the local disc C drive of the PC.
Step 6: Get the wifi passwords.
Lastly, open the file with a notepad, and there you go.
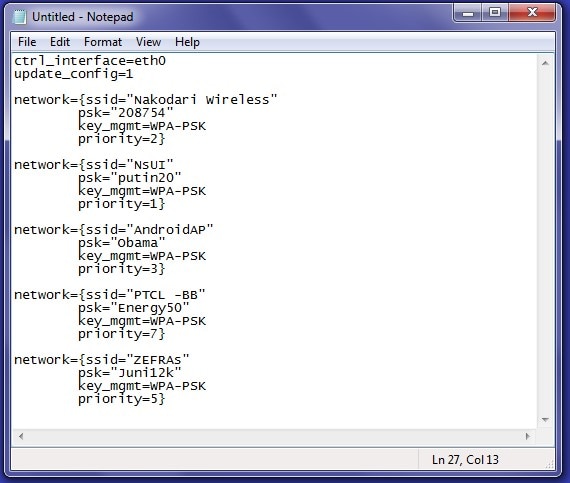
Now you learned how to show the wifi password on your Android device.
- Title: In 2024, How to Unlock Nubia Z50 Ultra Bootloader Easily
- Author: Aaron
- Created at : 2024-07-15 19:33:54
- Updated at : 2024-07-16 19:33:54
- Link: https://easy-unlock-android.techidaily.com/in-2024-how-to-unlock-nubia-z50-ultra-bootloader-easily-by-drfone-android/
- License: This work is licensed under CC BY-NC-SA 4.0.