
In 2024, How To Fix OEM Unlock Missing on Nokia G310?
How To Fix OEM Unlock Missing on Nokia G310?
Original Equipment Manufacturer (OEM) Unlock is a function on Android devices. It allows you to unlock your phone bootloader. A bootloader or bootstrap loader gathers the operating system files, loads them into memory, and hands over control, essentially starting your device. Unlocking the bootloader assists you in installing custom ROMs, flashing custom kernels, and rooting your phone.
However, this freedom comes with some trade-offs. Most manufacturers will void your warranty if you unlock the bootloader, and it can also make your phone face higher risks of malware and other security threats. Additionally, it can be difficult to relock the bootloader once you unlock it.
If you encounter the OEM unlock missing on your Android phone despite wanting to unlock your bootloader, this article can help. You will learn the step-by-step guide for the different methods to fix the missing OEM unlock option. Before diving into solutions, let’s explore why this option might be unavailable in the first place.

Part 1: Why Is OEM Unlock Missing on Your Device?
Finding that OEM Unlock is missing on your Android phones can be frustrating, particularly if you plan to modify your software or install a custom ROM. But don’t worry. There are several possible explanations for this. Let’s explore some of the most common reasons:
Manufacturer Restrictions
The Missing OEM Unlock option can often be due to restrictions imposed by your device’s manufacturers. They may intentionally remove this option to safeguard device security and compatibility. It is common with carrier-locked devices. As a result, the OEM Unlock option may not show.
Bootloader Already Unlocked
In some cases, the Android OEM Unlock Missing issue arises when the bootloader has already been unlocked. Relocking the bootloader might make the option reappear. But exercise caution as this process can erase device data.
Developer Options Not Enabled
It might seem obvious, but sometimes the simplest things get overlooked. The OEM Unlock option can only be accessed from within Developer Options. If this menu isn’t enabled, you won’t see it.
Carrier-Locked Devices
The OEM Unlock Missing issue can also occur if your device is carrier-locked. Carriers often impose restrictions to prevent users from switching networks, and bootloader unlocking is one way to do that. Unfortunately, the missing OEM Unlock option is usually intentional, and unlocking your device can be more complicated.
Security Features
Enhanced security features, like Samsung’s KNOX, can sometimes conceal the OEM Unlock option. Temporarily turning off these features might show the option, but it’s crucial to be aware of the potential security implications of doing so.
Corrupted Bootloader
A corrupted bootloader can also lead to the Android OEM Unlock missing problem. The bootloader plays a role in the boot process, and if it’s damaged, it might not display the necessary options. This can be caused by software glitches, failed flashing attempts, or even hardware issues. In this scenario, you might need to consult your device’s manufacturer or a technical specialist to help repair or re-flash the bootloader.
Connectivity Issues
A poor connection between your device and computer can also prevent the OEM Unlocking from showing up. Check your cables and try using different USB ports to ensure a stable connection.
Part 2: How To Enable Missing OEM Unlock Without a Password?
Unlocking your phone’s bootloader (OEM Unlock) varies across models and brands. Some need a passcode or PIN after rebooting the phone, while others don’t. Even if your phone doesn’t require a separate password, your existing screen lock (password, PIN, pattern) will usually be needed to enable the missing OEM unlock option.
But what if you forgot that, too? Wondershare Dr.Fone - Screen Unlock can help bypass forgotten passwords and unlock your phone even if you don’t have the technical knowledge. Here’s a quick breakdown of its key features in this area:
- Success Rate
High success rate for bypassing various lock screen types, including PIN code, pattern lock, passwords, and fingerprints.
- Ease of Use
Provides a concise and intuitive interface that guides users with clear instructions and on-screen prompts.
- Comprehensive Features
Dr.Fone - Screen Unlock tool can remove the Android phone lock screen without resetting your Samsung or LG device. It can also help you bypass Google Factory Reset Protection (FRP) on mainstream Android brands.
- Extensive Device Compatibility
Aside from Samsung and LG, it covers a wide range of popular Android brands like Vivo, Huawei, Xiaomi, Oppo, etc.
Regain control in minutes with Dr.Fone. First, download the app to your desktop and install it. Once it’s up and running, launch Dr.Fone and prepare to unlock your device with ease. You’ll find detailed instructions below – even if you don’t know your phone’s lock screen, Dr.Fone has you covered.
- Step 1: Select Screen Unlock from the Toolbox homepage. Then, establish a connection between your locked Android device and your computer using a USB cable.

- Step 2: Specify the Nokia G310 device type for screen lock removal.

- Step 3: Select Unlock Android Screen to proceed.


- Step 4: Choose the brand of your phone from the supported brands.

Note:
The following steps will vary based on your device’s manufacturer. Please refer to the instructions on your screen to proceed into Download or Recovery mode.
- Step 5: The screen unlock process is underway. If it encounters trouble, click Try Again. Once Dr.Fone successfully unlocks your Android device, tap Done.

Now that you’ve regained access to your device thanks to Dr.Fone - Screen Unlock, you can move forward with enabling the OEM unlock missing option. Next up, we’ll guide you through the steps in several ways. Let’s start with the Developer options.
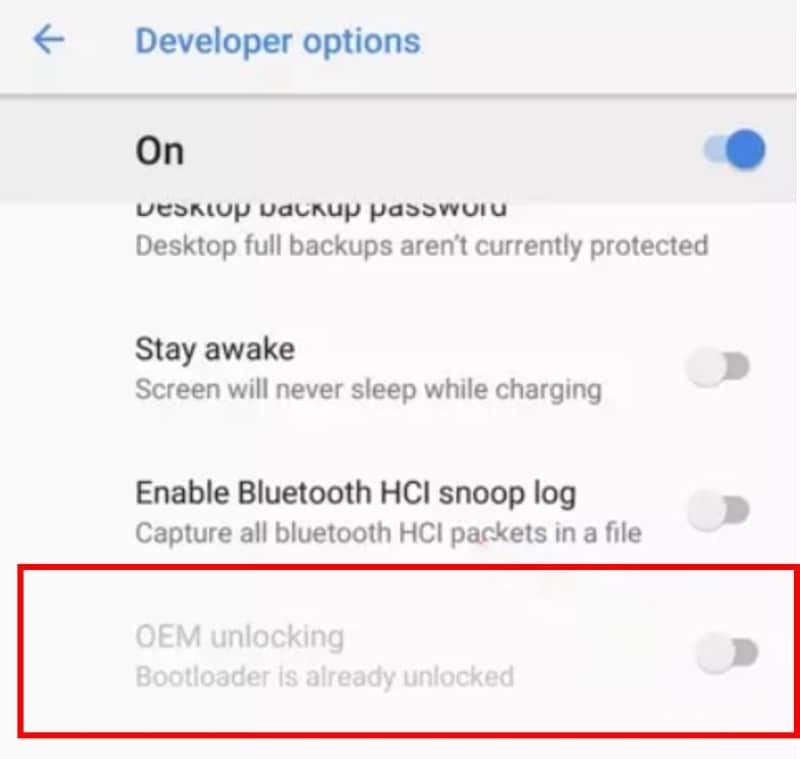
Part 3: How To Enable OEM Unlock Missing From the Developer Options?
Developer Options, a hidden menu in Android, offers advanced features like app debugging and custom ROM installation. But if the Android OEM unlock option is missing, you can’t unlock your device’s bootloader. Below is a step-by-step guide for you so the OEM unlock missing option will show in the Developer Options. Remember, this process may erase your device data, so a complete backup is essential before proceeding.
- Step 1: Open the Settings app on your Android phone.
- Step 2: Navigate to About Phone at the bottom of the list, then tap Software information.

- Step 3: Tap on the Build number repeatedly (7 times) until you see a message saying, “You are now a developer!“ or similar.
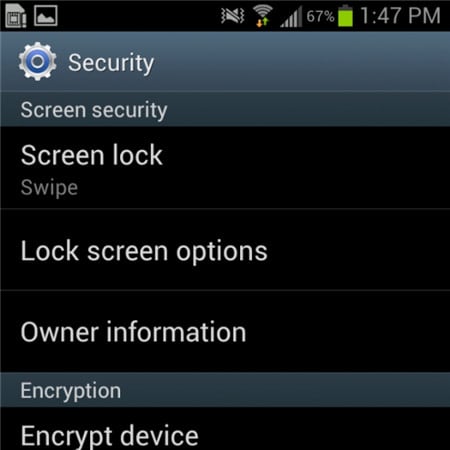
- Step 4: Go back to Settings > System and find the Developer options menu.
- Step 5: Scroll down and tap the toggle switch next to Enable OEM Unlock to turn it on.

- Step 6: A warning message explaining the risks of turning on the OEM unlock will appear. Read it carefully and tap Enable if you want to proceed.

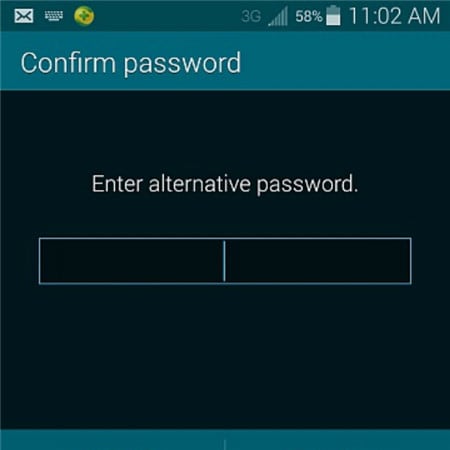
- Step 7: Enter your PIN or password to confirm the unlock when prompted
- Step 8: Your device will reboot, and OEM Unlocking will be enabled.
Part 4: How To Fix OEM Unlock Missing by Adjusting Date and Time?
Some manufacturers intentionally delay the availability of the OEM unlock after a software update for security reasons. Changing the date to a past date before the update rolled out can trick the system into displaying the option, as it thinks the update hasn’t happened yet. It is a temporary fix, and the option will likely disappear again later when the Nokia G310 device automatically syncs the correct date.
If you intend to try this method, follow these steps to enable OEM unlock missing or greyed out after an Android update:
- Step 1: Open the Settings app.
- Step 2: Go to System or General management, depending on your Android version.
- Step 3: Tap on Date and Time.
- Step 4: Turn off Automatic date and time.

- Step 5: Tap on Set date and choose the desired older date from the calendar.
- Step 6: Tap on Set time and choose the desired time from the clock.
- Step 7: Tap on Done to save the changes.
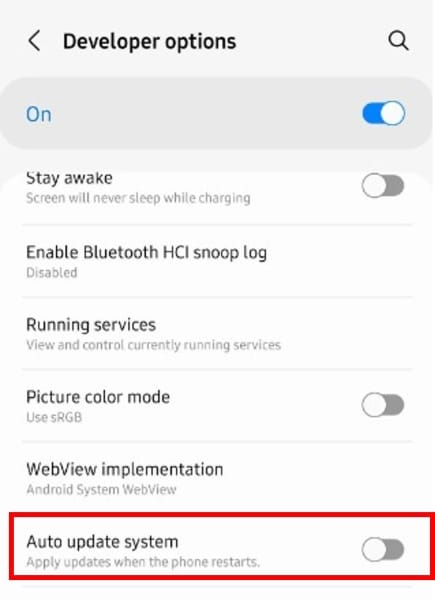
- Step 8: Go back to the Developers options and turn off the Auto update system option.
- Step 9: Go to Settings > Software update, then turn off Auto download over Wi-Fi.

This method should enable the OEM unlock missing issue. Otherwise, proceed to the next section for another solution.
Part 5: How To Fix OEM Unlock Missing by Removing SIM Card?
Certain carriers restrict bootloader unlocking on their devices to ensure compatibility and prevent unauthorized modifications. For these phones, unlocking the SIM card becomes crucial before you can toggle the OEM unlock option. Here are the steps to fix the OEM Unlock missing or greyed out using SIM card removal:
- Step 1: Use the SIM ejector tool (often included with your phone) or a small pin to push the tray out.
- Step 2: Go to Settings > General Management > Reset, then select Factory data reset. Enter your PIN or password if needed.

- Step 3: Review the warning and tap Reset to confirm.
- Step 4: Once the reset is complete, your phone will restart. Connect to Wi-Fi when prompted.
- Step 5: Skip any prompts to log in to your Google or email account. Then, repeat the process to open the Developer Options in the previous sections.
Conclusion
Having the OEM Unlock missing or greyed out can leave Android users feeling locked out of customization possibilities. Fortunately, this article has outlined helpful solutions like enabling the Android OEM Unlock missing option via the Developer Options. You can also try other methods above, like adjusting date and time settings or even a sim card removal trick. For those facing forgotten lock screens, we’ve offered guidance on bypassing them using the Dr.Fone - Screen Unlock tool to access the necessary phone settings.
While these methods provide a solid foundation, it’s always wise to research steps specific to your phone model. And never forget – caution is key. If things get technical, don’t hesitate to seek help from online communities or professional repair services.
Tips: Forget your device password and can’t get access to it? No worries as Dr.Fone is here to help you. Download it and start a seamless unlock experience!
Mastering Lock Screen Settings: How to Enable and Disable on Nokia G310
In the modern world, the use of smartphones has become such a common trend that everyone would feel abnormal if they don’t have a smartphone of their own. So big the demand is that all IT companies are trying their best to introduce as well as innovate several excellent brands of smartphones. To support the function of smartphones, by far there have been numerous operating systems existed. Among them, Android is one of the most popular as well as trustworthy OS.
Just like any other smartphone, all Android devices have their ways to protect the data stored inside a smartphone from being corrupted or leaked. One of the simplest and most easy-to-use ways is to make use of the lock screen.
The lock screen has proved to be a traditional yet efficient way to help you protect your Android phones. In this article, we will provide you with an informative piece of writing about everything you need to know when it comes to the Android lock screen, and ways to enable and disable it.
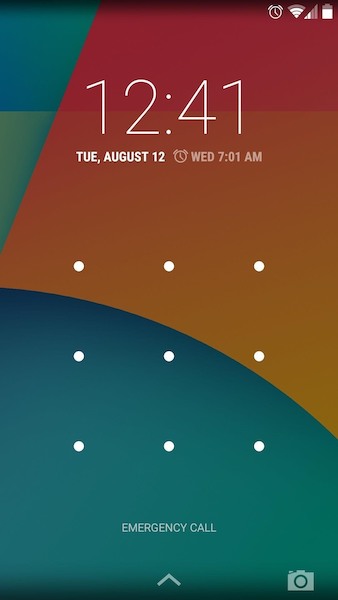
If you have spent time searching and looking for features of your Android devices, you will find the process of enabling a lock screen is a piece of cake.
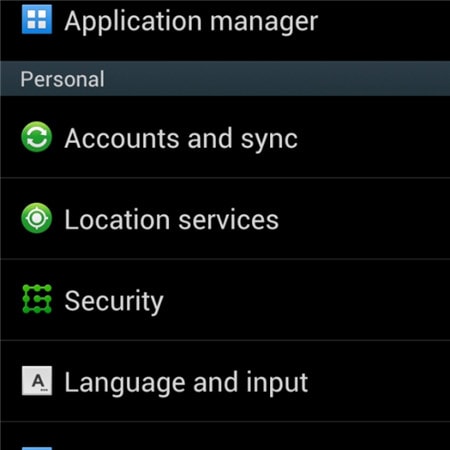
· Step 1: On the main screen of your Android devices, tap on the gear icon - which is the icon representing the Settings menu. Once you have chosen it, you will see a drop-down menu on the screen. In the options provided, tap on the Security bar.
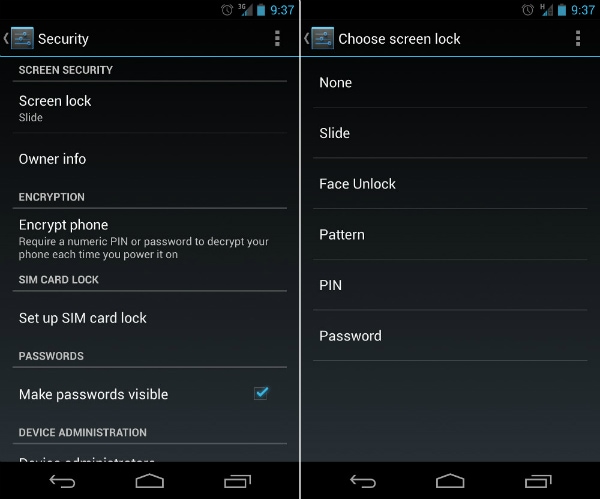
· Step 2: Under the tab whose heading is entitled Screen Security, tap on the first bar in the list called Screen lock.

· Step 3: Once the step is done successfully, Android will give you plenty of choices about ways to lock your Android devices’ screens. Among these ways, select one particular type which you feel is most convenient as well as free-risk. After that, type in your PIN code to confirm the choice and finally activate your lock screen feature as you wish.
Part 2: How to Disable Android Lock Screen
To certain customers, the lock screen can do more harm than good, and they would prefer to disable the screen lock on their Android devices. This process is also an easy one to follow, as long as you still hold good memory of the security code.
· Step 1: On the main screen of your Android devices, tap on the gear icon. It will directly lead you to the Settings menu of the phone. After that, a drop-down menu will appear with several choices and bars. Among them, tap on the Security option to begin your work.
· Step 2: Under the heading called Screen Security heading, you will be shown 3 choices. Tap on the first one, which is entitled Screen lock.
· Step 3: Once you have done the previous step, a brand new screen will appear and then you will be asked to fill in your PIN code. This is a step that helps guarantee that you are the true owner of the Android device.

Step 4: As soon as you have confirmed the right PIN code in the bar provided, you will then be presented to the next drop-down menu. A similar screen will appear which shows you plenty of choices. Tap on the top of that list, which is a bar called None.

Step 5: In the end, you have successfully disabled the screen lock on your Android devices. You are now capable of using it without any hesitation about the screen lock.
Part 3: Common Problems of Disabling Lock Screen
The process to disable the screen lock on Android may seem easy to handle as well as straightforward to several customers, but there are still some annoying problems that users have to deal with while trying to disable the lock screen.
What are the top 2 common problems?
Below are the two most common problems faced by Android users during their efforts to disable the feature of screen lock.
1. In the Screen Security choice, the None bar can not be chosen.
Description of the problem: There is a sentence below it stated: “Disabled by administrators, encryption policy or credential storage”. All the space of the None option is in white and grey.
The solution to this problem is quite simple. Once you have made sure you are suffering from this nasty one, try to follow these below pieces of advice to see if it is capable of giving you a hand.
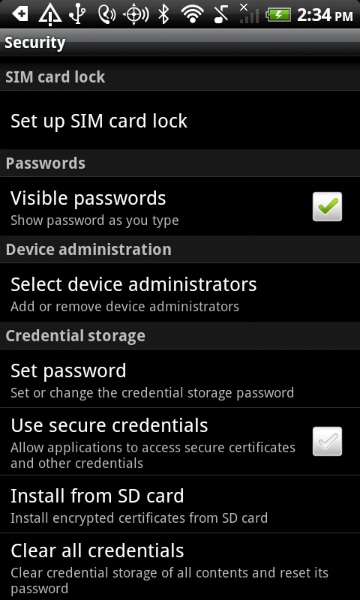
Step 1: Open the Settings menu from the main screen. Then tap on the Credential Storage. You will see a drop-down menu like the screenshot below.
Step 2: Continue to tap on the Clear Credentials (Remove all certificates) option. Then next click on the OK button. Wait for some seconds until your Android device has finished the process.
Step 3: To make sure that the previous step has been performed successfully, try looking at the bottom of the drop-down menu. If the Clear Credentials (Remove all certificates) are grey out and can not be selected, then you have managed to do it.

Step 4: Now that the problem is solved, you can feel free to turn back to your Screen lock option in the beginning and disable the feature of locking screen Android as usual.
2. You have mistakenly encrypted your SD card. You want to disable the encryption, only to realize that it requires you to set a new screen lock code. But when you come to the Screen lock menu, all the options but Password have been greyed out.
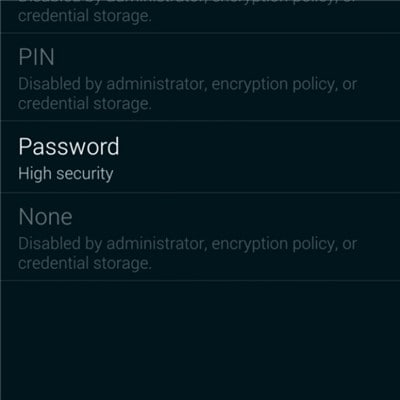
This is pretty weird, but actually, it is one of the most common troubles that many users have complained about. But to your surprise, the solution is very simple and easy. All you have to do is to reset your password, but with a little change. Your password MUST include at least ONE NUMBER in it. Confirm your new password then you will be able to disable the lock screen Android as usual.
Bonus Tip: Remove Android Screen Lock If Forgotten Password/Pattern
As much as the lock screen can protect the personal information on the phone, it can also cause much trouble if you forget the lock screen password or enter the wrong password too many times. So here comes the need for phone unlocking software . One of the best is Dr.Fone - Screen Unlock (Android), which can help us bypass forgotten Android screen locks without any data loss(limited to Samsung and LG series phones). Other Android brand phones will be wiped out all the data once starting to unlock with Dr.Fone
Dr.Fone - Screen Unlock (Android)
Remove 4 Types of Android Screen Lock without Data Loss
- It can remove 4 screen lock types - pattern, PIN, password & fingerprints.
- One-time payment for unlimited use of multiple devices within a specified time period.
- Work for Samsung Galaxy S/Note/Tab series, LG G2/G3/G4, etc.
- Besides, unlocking the screen lock, it also works best to unlock the Samsung FRP lock in devices with Android 5.0 and higher.
3981454 people have downloaded it
Steps on How to Unlock Forgotten Password in Android Phones
Step 1: Launch Dr.Fone and click on Screen Unlock from the primary window.
Step 2: Connect your Android device to the computer via USB cable. The program will recognize the phone directly. Select the phone model or “I can’t find my device model from the list above” to continue.
Step 3: Follow the instruction on the program exactly to set the phone to Download Mode. First, you will need to Power off your Phone. Secondly, Press on Volume Down, Home button, and Power button simultaneously. Thirdly press the Volume up button to navigate until the phone enters Download mode.

Step 4: After you set the phone to Download mode, it will begin to download the recovery package. When the recovery package is downloaded successfully, the lock screen on your Nokia G310 devicewill be removed. You won’t lose any data during the whole process.
Unlock Nokia G310 Phone Password Without Factory Reset: Full Guide Here
In today’s fast-paced digital age, our smartphones are more than just communication devices; they are repositories of our personal and professional lives. However, there comes a time when we find ourselves locked out of our Nokia G310 phones , desperately trying to remember a password or PIN that seems to have slipped our minds. The thought of a factory reset, which wipes our valuable data clean, can be daunting.
But fear not! This comprehensive guide is here to rescue you from the perils of forgotten passwords without factory reset. So, if you’re in a bind and need to regain access to your device, read on for a full guide to know how to unlock Nokia G310 phone password without factory reset!
Method 1: Unlock Nokia G310 Phones Running Older Android OS (4.4 Or Below) With Google Security Questions
Up until Android version 4.4, you could lock your phone screen with a pattern. Google allowed you to unlock the phone by answering security questions in case you forgot the pattern. Since these may also be easily guessed by people who are in possession of your device illegally, Google deprecated this method after Android 4.4. However, the phones running Android 4.4 or lower are still allowed to be unlocked using this method. So, if you have an old Nokia G310 with Android 4.4 or earlier, here is how to unlock Nokia G310 phone password without factory reset:
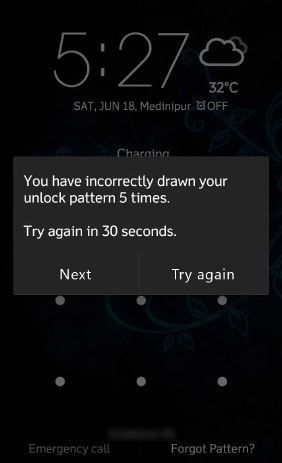
Step 1: You may already have entered the incorrect pattern a few times. If so, simply tap the Forgot Pattern to start the process of unlocking your Nokia G310 phone screen. Else, deliberately enter incorrect pattern a few times till you see the Forgot Pattern option:
Step 2: Next, choose the option to reset the pattern by answering your Google credentials.
Step 3: Sign into the Google account that matches with the Google account on the phone.
Step 4: Lastly, create a new pattern to unlock your Nokia G310 phone.
Side Tip
Now that you have unlocked your Nokia G310 phone with Google security questions, we have a tip for you. For the safety and security of your data on your phone, it might be time to trade in the Nokia G310 device for a newer phone with the latest Android OS. Between Android 4.4 and the Android 12 prevalent today, there have been massive security updates and code improvements that you can benefit from. It makes sense given that our phones hold a substantially large part of our personal and professional lives these days. And we are not even talking about features that you may or may not need - we are talking only from a data security point of view. Of course, you will also benefit from the massive performance improvements that have taken place thanks to hardware and software improvements over the years.
Method 2: Unlock Your Nokia G310 Phone Using Wondershare Dr.Fone (Easy & Fast)
Now, since the previous method of unlocking your Nokia G310 phone was deprecated after Android 4.4, what about the phones running newer versions? How to unlock a Nokia G310 phone with a newer Android version? There are still a few methods that are available to you, but the best way to unlock a Nokia G310 phone is to use this nifty little app called Wondershare Dr.Fone. And you will discover that there is nothing little about this app!
Dr.Fone is a collection of several modules unified in a single interface. Each of these modules is designed meticulously to serve a purpose for your device, such as unlocking your phone, repairing your phone, erasing data from your phone or wiping the phone securely, etc. With this approach, users are never encumbered with options. Instead, they can focus on every task in the simplest, easiest manner without worrying about doing something untoward because they could not understand the software. Dr.Fone is fast, intuitive and easy to use.
Step 1: Launch Dr.Fone on your computer. Select the Screen Unlock module.

Step 2: Click Unlock Android Screen.

Step 3: Select the first option – 100% Remove Screen Lock as Nokia G310 devices cannot be unlocked without data loss.
Step 4: Choose your phone brand carefully – Nokia G310 in this case.
Step 5: Complete the instructions to download the software to your phone.
Step 6: The software will start downloading, and if everything went smoothly you will see a screen to click Remove Now.
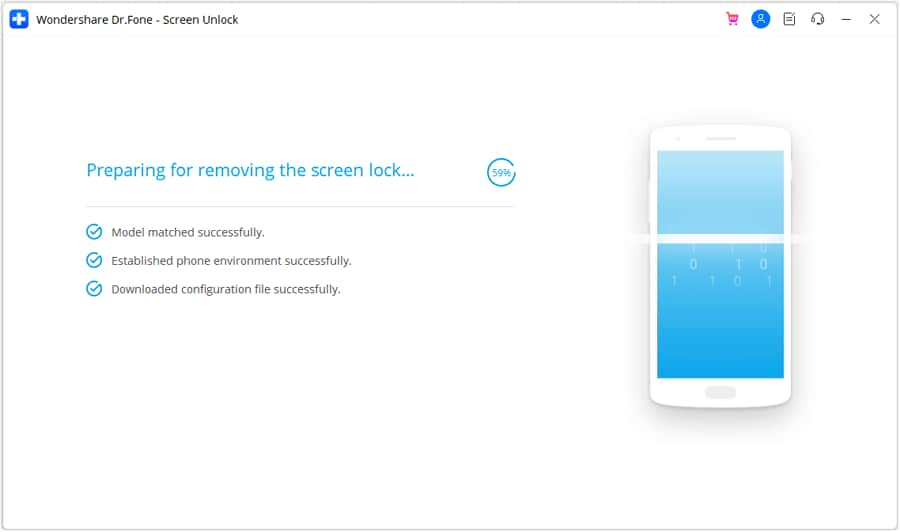
Step 7: When all is done, you will see the following:
Your Nokia G310 phone screen is now unlocked. Click the button below to unlock Nokia G310 phone password without factory reset now!
Method 3: Factory Reset Nokia G310 Phones (Wipes User Data)
There is a standard factory reset built into every Nokia G310 phone to allow users to erase the Nokia G310 device and start over fully. This option wipes all user data and resets the phone to how you received it in the box. Naturally, this is not a preferred way, as it requires the phone to be set up all over again and that takes time. Also, all data will need to be backed up beforehand in order to restore it again. Overall, this method consumes a lot of time.
Step 1: Go to Settings > Backup & Reset.
Step 2: Tap Factory Reset > Reset Phone.
Step 3: Tap Erase Everything.
Method 4: Use Google Find My Device To Unlock Nokia G310 Phones (Wipes User Data)
Google Find My Device is an online service by Google that is used to locate and track your Android devices. It works like how Apple’s Find My works for its range of hardware. Using Find My Device, you can play a sound on the Nokia G310 device to locate it in the house if you have misplaced it, lock the phone in case it is lost, and wipe the Nokia G310 device remotely.
Step 1: Go to https://accounts.google.com .
Step 2: Log in and go to Security > Your Devices:
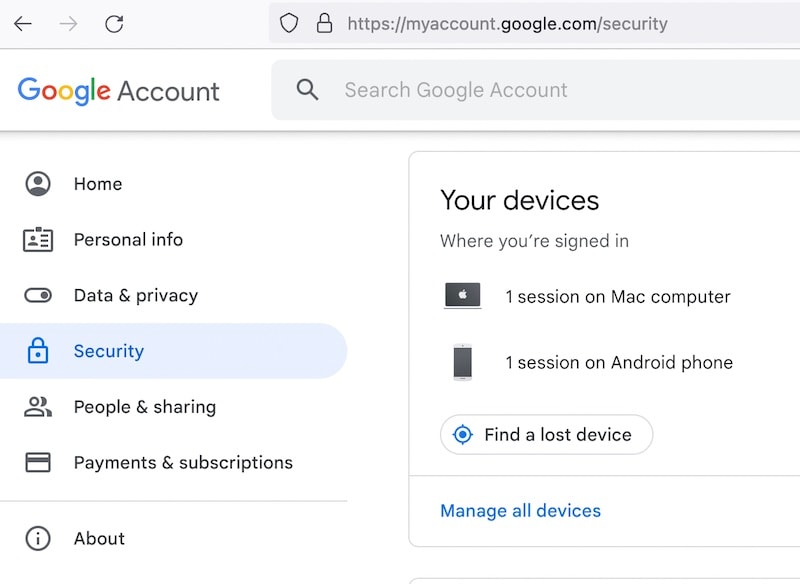
Step 3: Click Find A Lost Device.
Step 4: Select the Android device you want to wipe carefully if you have a few:
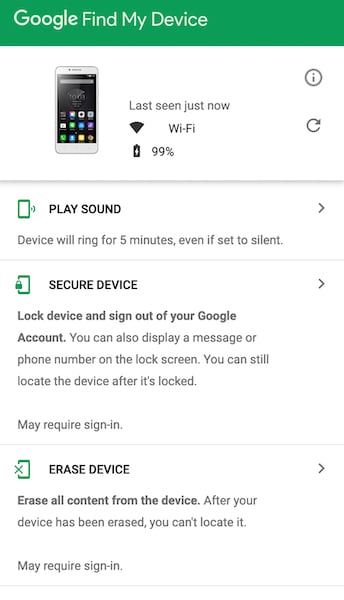
Step 5: Click Erase Device and confirm.
Step 6: After the erasure, your device will need to be set up all over again.
Method 5: Request Service Provider To Unlock Your Nokia G310 Phone
If your Nokia G310 phone is tied to a service contract and you want to unlock your device to use it with other service providers, this method is for you. You can request your service provider to unlock your Nokia G310 phone provided their conditions are met. Usually, they will be happy to oblige if there are no dues and the service period is over.
Bonus Tip: If You Want To Disable Screen Lock
Sometimes, you may not need to secure your device at all. For example, if you have an old device that you want to use as a media player in your car or to give to children to play games, you may not want to password-protect the Nokia G310 device. This is how to disable screen lock on Android:
Step 1: Navigate to Settings > Security > Screen Lock.
Step 2: Enter the PIN or pattern.
Step 3: Choose None and confirm.
Conclusion
There are a handful of methods you can use to unlock a Nokia G310 phone in case you forget the password or PIN or pattern. Especially for the old pattern-based screen locks, it is easy to unlock the phone if you know the answers to the security questions in your Google account. However, to unlock Nokia G310 phone screen without password on newer Android versions, you need technical knowledge, or you can use third-party software such as Wondershare Dr.Fone. Using Dr.Fone Screen Unlock, you can unlock your phone quickly with no technical mumbo jumbo to confuse you. All you will get is a software that guides you every step of the way so you can unlock Nokia G310 phone easily.
Also read:
- [New] The Swift Guide to Validate Your TikTok Age for 2024
- [Updated] In 2024, Avoiding the Common Path The Route to Unique Streamer Identities
- 2024 Approved Top-Rated Best Webcam Mounting Solutions
- 5 Solutions For Nubia Z50 Ultra Unlock Without Password
- Effective Solutions for the Missing 'FM20.DLL' Error Message
- Fine-Tuning Virtual Presence in MS Teams
- How to Unlock a Network Locked Nokia C110 Phone?
- How to Unlock a Network Locked Realme 11 Pro+ Phone?
- How to Update Apple iPhone 15 Pro without Losing Data? | Dr.fone
- How to Use Google Assistant on Your Lock Screen Of Nokia C12 Pro Phone
- In 2024, Building a Broadcast Brand with YouTube, Twitch and OBS
- In 2024, Can I Bypass a Forgotten Phone Password Of OnePlus Nord 3 5G?
- In 2024, Craft Your Channel Studio or Beta Innovation Comparison
- In 2024, How to Unlock Poco C51 Phone Password Without Factory Reset?
- In 2024, Top 4 SIM Location Trackers To Easily Find Your Lost Realme Narzo 60 Pro 5G Device
- Lock Your Realme Narzo N55 Phone in Style The Top 5 Gesture Lock Screen Apps
- New In 2024, Revolutionize Your Videos Top 3D Animation Makers Revealed
- Title: In 2024, How To Fix OEM Unlock Missing on Nokia G310?
- Author: Aaron
- Created at : 2024-11-16 20:06:46
- Updated at : 2024-11-19 16:48:34
- Link: https://easy-unlock-android.techidaily.com/in-2024-how-to-fix-oem-unlock-missing-on-nokia-g310-by-drfone-android/
- License: This work is licensed under CC BY-NC-SA 4.0.