
How to Use Google Assistant on Your Lock Screen Of Nokia C32 Phone
How to Use Google Assistant on Your Lock Screen Of Nokia C32 Phone
Android has undergone numerous changes to enhance user experience and security. One notable feature that was once present was the ability to unlock phones with voice Google Assistant. However, Google Assistant has removed this feature across all versions since 2021.
While this voice-unlocking feature is no longer available, there are still many things you can do with Google Assistant, even when the Nokia C32 device is locked. This tool brings an added layer of convenience to your smartphone experience.
Let’s dig deeper into how you can use Google Assistant on the lock screen and make the most out of this tool in the following article.

Part 1. What You Can Do With Voice Google Assistant
Google Assistant is a virtual assistant powered by artificial intelligence (AI) developed by tech giant Google. This application is readily available on most recent mobile phone models, especially those operating on Android 6.0 and newer versions.
Although you can no longer use the Google Assistant unlock feature, you can still perform a myriad of tasks using Google Assistant. These include:
- Getting the weather
- Setting alarms
- Playing music
- Sending texts
- Making a call
- Asking Google for information, etc.
Enable Google Assistant on Lock Screen: A Step-by-Step Guide
Now that you’re eager to try the potential of Google Assistant on your lock screen, let’s walk through the simple steps on how to enable this tool.
- Step 1: Open Google Assistant:
Look for “Google Assistant” and open the app.
- Step 2: Ask Google Assistant to open the settings.
You can ask, “Hey Google, open the Google Assistant settings,” and it will show you the Google Assistant settings.
- Step 3: Allow Google Assistant on the lock screen.
Locate the “Lock Screen” settings and make sure to switch on “Assistant responses on lock screen.”

Part 2. How To Use Google Assistant on Lock Screen
After you’ve successfully enabled Google Assistant on your lock screen, let’s see how to use Google Assistant to do certain tasks more efficiently and hands-free.
- Step 1: Wake Up Google Assistant
Start by waking up Google Assistant. You can do this by saying the wake word “Hey Google” or “OK Google.” If it doesn’t work, you can long-press the home button or use any dedicated gesture to activate Google Assistant.
- Step 2: Issue a Voice Command
Once Google Assistant is active, issue a voice command related to the task you want to perform. For example:
“Hey Google, what’s the weather today?”
“OK Google, set an alarm for 5 PM.”
“Hey Google, play my Spotify playlist.”
When you can still unlock with Google Assistant, you can ask it to “unlock my phone” or use any similar command.
- Step 3: Interact with Responses
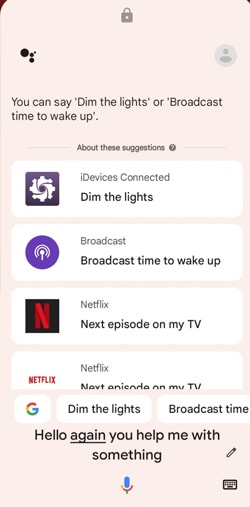
Google Assistant will then provide spoken responses and display relevant information on the lock screen. For instance, if you ask for the weather, it might verbally provide the current conditions and display a brief summary on your lock screen.

Part 3. Common Problems When Using Google Assistant
Unable to use Google Assistant to unlock phone is not the only drawback that users may have encountered in recent changes. Although Google Assistant on the lock screen presents a revolutionary way to interact with your phone, like any technology, it also comes with its share of challenges. Some of the common problems when using Google Assistant are:
- Misunderstandings and misinterpretations
One prevalent issue users encounter is Google Assistant misunderstanding or misinterpreting voice commands. This can be influenced by factors such as background noise, accent variations, or pronunciation differences.
- Limited context understanding
While Google Assistant is adept at understanding individual commands, it may struggle with complex, multi-step requests that rely heavily on context. Break down your tasks into simpler commands to enhance comprehension and execute it more accurately.
- Inability to execute certain tasks
Google Assistant’s capabilities are extensive, but there are instances where it may struggle to execute specific tasks. For example, it can’t execute tasks that involve interacting with certain third-party applications or services. You can’t also unlock phone with voice Google Assistant.
Tips to Make Voice Google Assistant Recognize Your Commands
One of the most infuriating problems with voice Google Assistant is that users often encounter difficulties in having their commands accurately recognized. To enhance the accuracy of voice recognition with Google Assistant, you can consider implementing the following tips:
- Speak Clearly and Naturally
Make sure that you speak in a clear and natural manner. Avoid mumbling or speaking too quickly. Enunciate your words, giving Google Assistant a better chance to interpret your commands accurately.
- Use Simple and Direct Phrases
Keep your commands simple and direct. Avoid unnecessary elaboration or complex sentence structures. Google Assistant is more likely to understand straightforward commands.
- Check Your Microphone
Ensure that your device’s microphone is in good working condition. Dirt or debris on your phone’s microphone can affect its performance. Clean the microphone area and try again.
- Quiet Environment
Background noise can interfere with voice recognition. Try to issue commands in a quiet environment to minimize any potential confusion caused by external sounds.
Part 4. How to Unlock Android Phone Screen Without Passcode
Now, you know that you can’t unlock phone via Google Assistant anymore. But what if you accidentally forget your phone’s passcode? Is there a reliable method to regain access to your Android device without the passcode?
Fortunately, Wondershare Dr.Fone offers a straightforward solution for precisely such scenarios. It provides a simple and effective way to unlock your Android phone screen through Dr.Fone - Screen Unlock when the screen lock is forgotten or becomes inaccessible.

![]()
Dr.Fone - Screen Unlock (Android)
The Best UnlockJunky Alternative to Solve Your Screen Locks
- Completely unlinked from the previous Google account, it won’t be traced or blocked by it anymore.
- Remove all Android screen locks (PIN/pattern/fingerprints/face ID) in minutes.
- Compatiable with various Android models.
- Provide specific removal solutions to promise good success rate.
4,008,670 people have downloaded it
If you are wondering how to unlock your Android phone screen without a passcode with Dr.Fone – Screen Unlock, follow the steps below.
- Step 1: Launch the Screen Unlock Tool
Open the latest version of Wondershare Dr.Fone on your computer and connect your phone device using a USB cable. Once connected, navigate to the Toolbox > Screen Unlock to access Dr.Fone – Screen Unlock tool.

- Step 2: Select Android for your device type.
As the Dr.Fone Screen Unlock tool supports both Android and iOS, you will need to indicate the specific device you are using. Opt for the Android option if you are unlocking an Android device. Then, continue to choose “Unlock Android Screen” on the next screen.

- Step 3: Remove Screen Lock Without Data Loss
- In this step, you will be directed to select your device brand. Choose the Android device brand you are using and opt for “Remove without Data Loss” if you don’t want to lose your data.

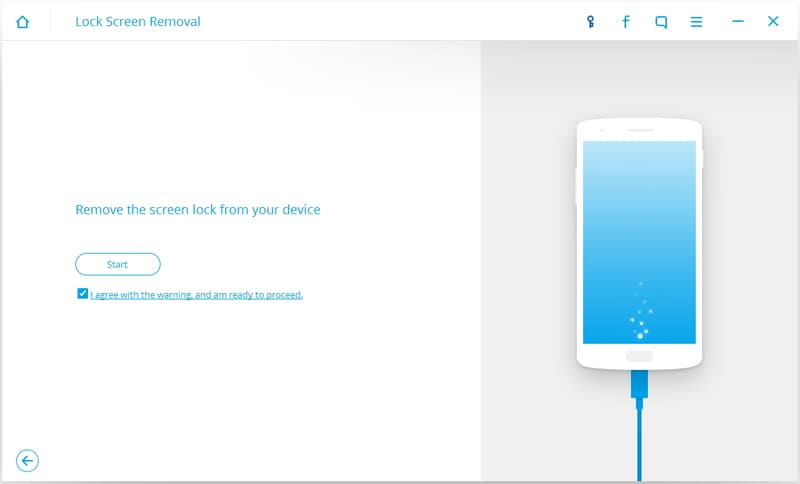
- Step 4: Define Device Details
Next, make sure to check and confirm the Brand, Device Name, and Device Model to unlock your Android screen. Tick the checkmark that says you agree with the warning and are ready to proceed. Click “Next” to unlock your screen.

- Step 5: Confirm to Unlock Screen
Type “000000” continue by clicking Confirm.

- Step 6: Put Android in Download Mode
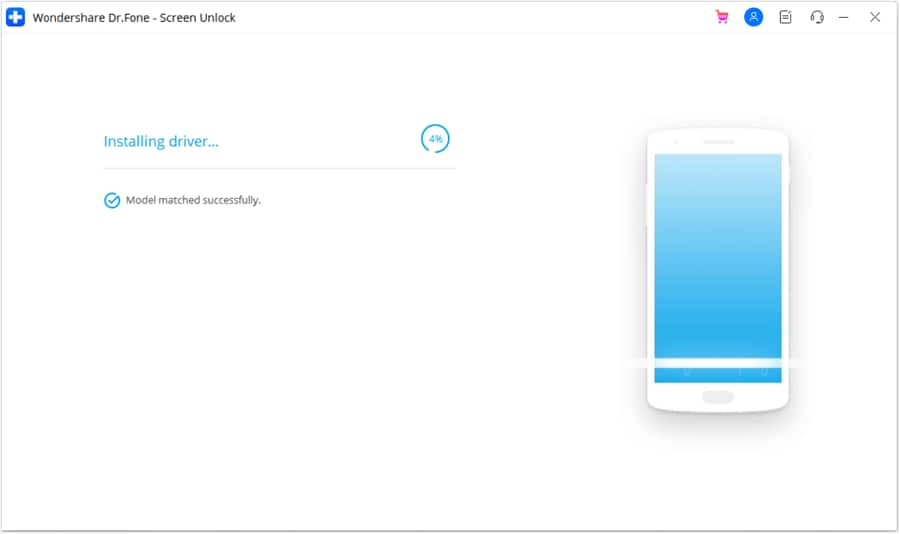
Dr.Fone will then guide you to put your Android device into Download Mode according to the model you have identified. After you have followed the instructions, Dr.Fone will automatically lead to the next screen to proceed the unlocking process.

After that, you can monitor the progress and wait for a few minutes until it shows “Unlocked successfully.”
You May Also Interested:
Unlocking Your Realme Phone Made Easy: Step-by-Step Guide
8 Safe and Effective Methods to Unlock Your iPhone Without a Passcode
Complete Guide to Unlock Mi Account Without Password In 2024
Conclusion
Google Assistant is a versatile virtual assistant that is designed to help you with a wide range of tasks and make your daily life more convenient. Accessible on most modern Android devices, it enables users to perform several tasks through voice commands.
However, if you are looking for ways to unlock phone with Google Assistant, this function is no longer available. Google Assistant unlock feature has been discontinued since 2021. But in case you’ve forgotten the screen lock passcode, you can use Wondershare Dr.Fone Screen Unlock tool to regain access to your Android phone. This tool facilitates the unlocking process without data loss, featuring a user-friendly learning curve.
How to Unlock Nokia C32 Phone Password Without Factory Reset?
You always set up some sort of lock to secure your smartphone to stop others from checking your phone data, messages, or pictures. More importantly, it is needed to deny admission to your valuable phone data in case it gets stolen. However, many times you come across this situation where your Android phones are stuck as you cannot unlock the password. Either your children have been playing with the lock patterns, and the screen gets locked due to entering the wrong password many times, or you have unexpectedly forgotten your password. Or somebody else has reset your password, or you have broken your mobile screen, and you cannot enter your password. Many similar situations may arise.
You are in the middle of some things, and you want to make some urgent calls. How to unlock Android phone passwords without a factory reset? What do you do then? There are very easy solutions to this that would help unlock your Android phone in no time without going for the factory reset and losing your valuable data.
Part 1: How to unlock Android password without factory reset using Dr.Fone - Screen Unlock?
Whether you have a pattern or PIN or fingerprint as a password, you can remove any type of password by using the Dr.Fone - Screen Unlock. The only defect is that your data will be wiped out after unlocking the phone successfully. It helps in removing the lock screen on Android phones. Now, if you are thinking about how safe it is, let me assure you that the process is very safe and simple, with no risk of data leakage. This process is supported by most Samsung and LG smartphones without data loss, and you just need to connect your handset to let the Dr.Fone - Screen Unlock start the procedure.
 safe & secure
![]()
Dr.Fone - Screen Unlock (Android)
Get into Locked Android Phones without Factory Reset
- 4 screen lock types are available: pattern, PIN, password, fingerprints, face ID, etc.
- Support 20,000+ mainstream models of Android phones & tablets.
- Save you from ending up with a locked phone after too many wrong attempts.
- Provide specific removal solutions to promise good success rate.
4,008,669 people have downloaded it
Follow the following steps to unlock your Android password without factory reset using Dr.Fone.
Step 1: Firstly, install and run Download Dr.Fone –Screen Unlock on your computer. And connect your Android phone to your computer with a USB cable > download.
Step 2: After that, select the phone model from the list or choose “I can’t find my device model from the list above” on the next screen.
Step 3: Now, there will be three steps mentioned that you must follow to get your phone into the Download mode. The first is to power off the phone. The second is to press and hold the Volume button along with the Home button and Power button. The third step is to press the volume up the option to get into the download mode.
Step 4: Once your phone is in download mode, the program will start downloading the recovery package and then unlock your Android password without factory reset or data loss.
Step 5: You will see that the icon showing “Remove Password Completed” will pop up. This whole process takes only a few minutes to get your work done without any loss of any data.

Part 2: How to unlock Android password without factory reset using Android Device Manager?
With very simple steps and a few minutes at hand, you can get rid of your password using Android Device Manager (ADM). This tool will unlock your password without going for a factory reset and losing data. The main feature of the Android device manager will run through the Google account. The installation of a Google account is very important to run out the Android device manager. The Android device will respond immediately once if the phone is switched on. The connectivity of the internet is a must to find the map on the Nokia C32 device. How to unlock Android phone passwords without factory reset? May it be quite interesting to use device manager visuals? The steps are mentioned below:
Step 1. Your Android phone is always linked to your Google account. So first and foremost, on your computer or on another mobile phone, open the site <www.google.com/Android/devicemanager> .
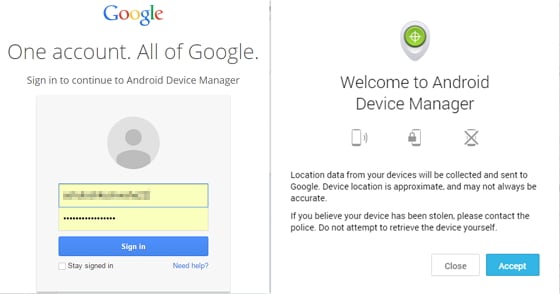
• Now sign in with your Google credentials. Google will start searching for your device. Here you need to choose the Android phone you want to unlock in case it is already not selected.
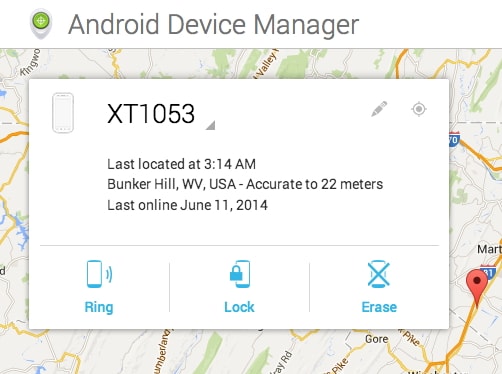
Step 2. Here you will see three options: “Ring,” “Lock,” and “Erase.” Select the “Lock” option
Step 3. A window will appear where you need to type any temporary password. Do not enter your Google password, and you need not enter the recovery message. Click on “Lock ” again.

Once successful, you will get a confirmation message below the three buttons: Ring, Lock, and the Erase option.
Step 4. On your locked phone, you will see a field asking for your password. Here you can enter your temporary password. Doing so will unlock your device.
Step 5. Now in your unlocked phone, go to Settings and then to Security. Now click on disable to remove the temporary password, and later you change it with a new one.
You have successfully unlocked your device.
Part 3: Unlock Android password using custom recovery and Pattern Password Disable (SD card needed)?
The third way to unlock an Android phone password without a factory reset it using the “custom recovery” technique. To work out this process, you would have to install the custom recovery process. Also, your phone needs to have an SD card. It will be required to send the zip file to the phone since your device is locked. This technique requires access to the Android System folder and rooting your device if not already rooted.
Custom recovery is a usual mechanism in all smartphones. It predicts the troubleshooting techniques and how to process the main configuration with all sequences. Quite interesting, isn’t it?
Follow the following steps to complete and unlock the Android password without a factory reset.
- Step 1. First of all, download a zip file by the name “Pattern Password Disable” to the computer system and then transfer it to your SD card.
- Step 2. Then you would need to insert the SD card into your locked phone and then restart the Nokia C32 device in recovery mode.
- Step 3. Next, move on to flash on the zip files to the card and restart. After that, your phone will boot and open up without the locked screen.
Note: Sometimes, the Nokia C32 device may ask for a pattern or password. You just need to put in any random pattern/password then it will get unlocked.
Through this easy method, you can now access your Android phone without using a factory reset and losing your valuable data.
The problem of getting your mobile locked and not being able to open it is a common problem on Android phones these days. Many of us tend to panic when such problems arise. However, now that we have given some easy solutions and methods to unlock Android phone passwords without factory reset and losing any data, things would be much easier. Thus, you will solve your problems in no time.
How to Unlock Nokia C32 Bootloader Easily
Do you want to unleash the true power of your smart phone? Do you wish to have complete control over your smart phone? If yes, well, here is the answer; unlock bootloader. For people who are already into the tricks of hacking and rooting smart phones, might be aware of this. But still, there are exciting new developments. Bootloader is a code existing in all operating systems which usually comes pre-locked. So, it is important, if you wish to have a custom ROM installed on the Nokia C32 device, or if you wish to have other controls like installing applications which are incompatible, to have the Nokia C32 device bootloader unlocked. But going through with the process of unlocking bootloader and rooting the Nokia C32 device will not help and rather might break the warranty of the Nokia C32 device. This definitely calls for a diligent watch on how to unlock HTC bootloader. So, it is imperative as a user to know the process of HTC bootloader unlock. This article serves you with some ways you could follow to unleash the true power of your HTC device. Here’s how you can do it.
Part 1: Why We Want to Unlock HTC Bootloader
For people with HTC device, unlocking bootloader would mean complete authority over the smart phone and you have all the power to control the HTC device by all means. Since, bootloader usually comes pre-locked, unlocking the bootloader is the initial step if you would like to have a custom ROM installed in your device. There are various advantages of HTC unlock starting from gaining rights of control to installing latest custom ROMs in the phone and installing incompatible applications. Moreover, HTC unlock bootloader could boost the Nokia C32 device speed and battery life and also help in making complete backups of the Nokia C32 device. You could also have controls to remove bloatware from the HTC device. So, all in all, while there could be certain side effects, if not done properly, there are various advantages of unlocking HTC bootloader. If the process is carried out properly, the Android device could be the perfect smart phone you would like to have.
Part 2: How to Unlock Nokia C32 Bootloader
Nokia C32 is the flagship device of HTC by all means. With a world of features and offerings, Nokia C32 truly is a beast. While the phone is very powerful without any modifications, the true potential is yet to be seen and that can only be done if the bootloader is unlocked. So, to have a complete control over the Nokia C32 device, it is important to unlock the bootloader and the process has to be carried out diligently. One of the initial things that needs to be ensured is that the Nokia C32 device is fully charged or atleast 80% mark. Make sure you have the fastboot drivers for the Nokia C32 device configured on the windows machine and the Android SDK. Here are some of the steps which can be followed to unlock bootloader.
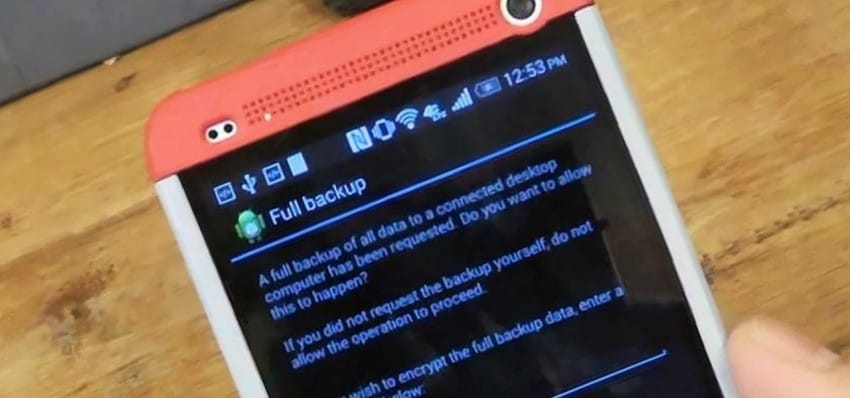
Step 1: It is always very important to keep the phone data backed up and more so when you are planning to unlock the bootloader.
As one of the initial measures, backup the Nokia C32 device completely as bootloader unlocking process will wipe all the data off. So, backup all the data like photos, contacts, multimedia files, documents, etc.
Step 2: Go to htcdev.com/bootloader. Ensure that you are registered with HTC and once the sign up is done, log in to HTC dev.
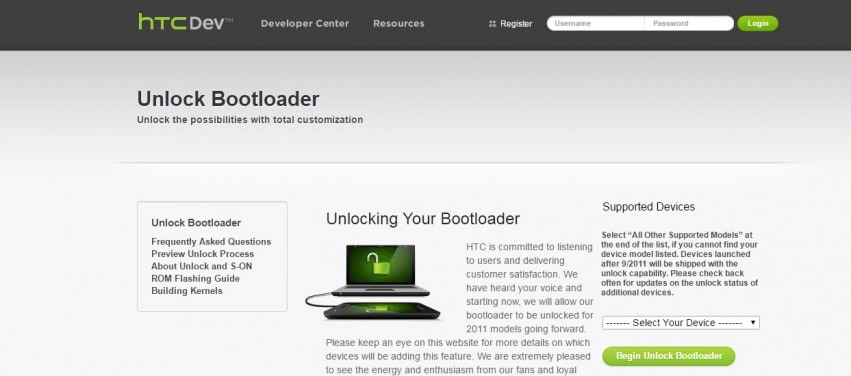
Now, ensure that HTC Sync Manager is installed on the PC.
Step 3: From the bootloader page, select your device using the drop down option as shown in the picture below.
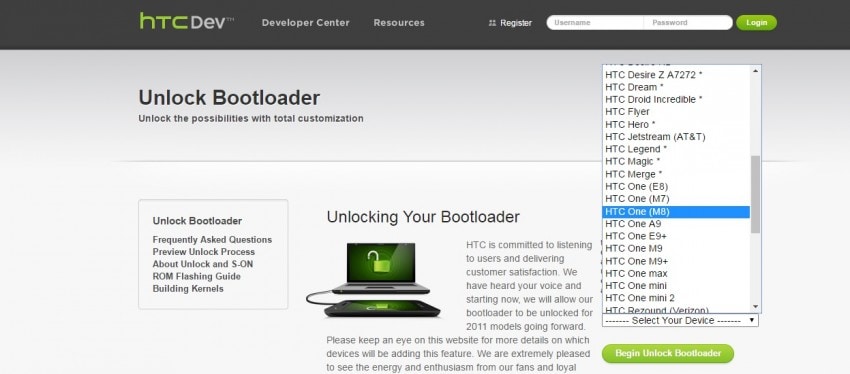
After selecting the Nokia C32 device, click on “Begin Unlock Bootloader”, and then confirm all the dialogue boxes which come your way on screen.
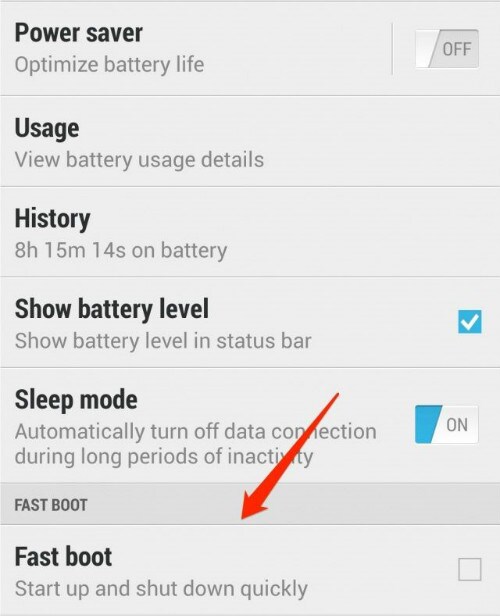
Step 4: Now, you will be presented with four steps to put the Nokia C32 device in bootloader mode. Disconnect the Nokia C32 device from the PC and turn the Nokia C32 device off completely. Press the volume down button along with the power button to switch the Nokia C32 device on in bootloader mode.
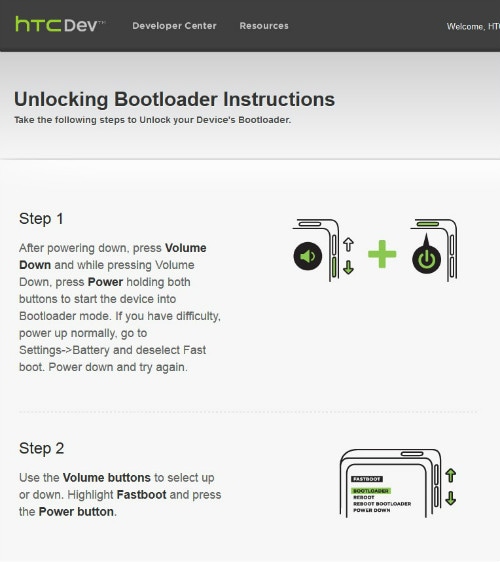
Step 5: Use the volume keys of the Nokia C32 device to select Fastboot option along with pressing power button to confirm, after the Nokia C32 device is in bootloader mode. Now, connect the Nokia C32 device to the computer using a USB cable.
Step 6: Go to Fastboot folder on the PC and holding down the shift key, click on any empty space followed by a click on “Open command window here”.
Step 7: In the command prompt window, type “fastboot devices” and press enter. Nokia C32 will show up in the command prompt.
Note: The drivers have to be installed correctly to see the Nokia C32 device in the command prompt. So, if the Nokia C32 device does not show up, reinstall HTC Sync Manager and try again after restarting the computer.
Step 8: On HTC Dev’s website third page, click on “proceed to Step 9”. Follow the steps listed and then click on submit. The unlock token code for the Nokia C32 device will be mailed by HTC. Download the token and name it “Unlock_code.bin” and place the token in the fastboot folder.
Step 9: Now, in the command prompt window, type the following:
fastboot flash unlocktoken Unlock_code.bin
Step 10: On the Nokia C32 , one message will appear asking if you want to unlock the Nokia C32 device bootloader.
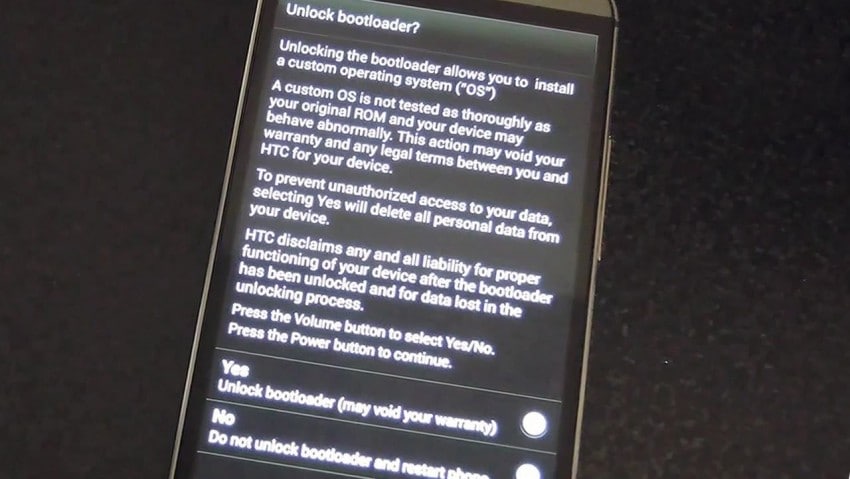
Use volume keys to select and power button to confirm. Once this is done, the Nokia C32 device will restart once and it’s done. The device is now bootloader unlocked.
- Title: How to Use Google Assistant on Your Lock Screen Of Nokia C32 Phone
- Author: Aaron
- Created at : 2024-07-15 19:03:26
- Updated at : 2024-07-16 19:03:26
- Link: https://easy-unlock-android.techidaily.com/how-to-use-google-assistant-on-your-lock-screen-of-nokia-c32-phone-by-drfone-android/
- License: This work is licensed under CC BY-NC-SA 4.0.