
How to Unlock Poco C65 Bootloader Easily
How to Unlock Poco C65 Bootloader Easily
Do you want to unleash the true power of your smart phone? Do you wish to have complete control over your smart phone? If yes, well, here is the answer; unlock bootloader. For people who are already into the tricks of hacking and rooting smart phones, might be aware of this. But still, there are exciting new developments. Bootloader is a code existing in all operating systems which usually comes pre-locked. So, it is important, if you wish to have a custom ROM installed on the Poco C65 device, or if you wish to have other controls like installing applications which are incompatible, to have the Poco C65 device bootloader unlocked. But going through with the process of unlocking bootloader and rooting the Poco C65 device will not help and rather might break the warranty of the Poco C65 device. This definitely calls for a diligent watch on how to unlock HTC bootloader. So, it is imperative as a user to know the process of HTC bootloader unlock. This article serves you with some ways you could follow to unleash the true power of your HTC device. Here’s how you can do it.
Part 1: Why We Want to Unlock HTC Bootloader
For people with HTC device, unlocking bootloader would mean complete authority over the smart phone and you have all the power to control the HTC device by all means. Since, bootloader usually comes pre-locked, unlocking the bootloader is the initial step if you would like to have a custom ROM installed in your device. There are various advantages of HTC unlock starting from gaining rights of control to installing latest custom ROMs in the phone and installing incompatible applications. Moreover, HTC unlock bootloader could boost the Poco C65 device speed and battery life and also help in making complete backups of the Poco C65 device. You could also have controls to remove bloatware from the HTC device. So, all in all, while there could be certain side effects, if not done properly, there are various advantages of unlocking HTC bootloader. If the process is carried out properly, the Android device could be the perfect smart phone you would like to have.
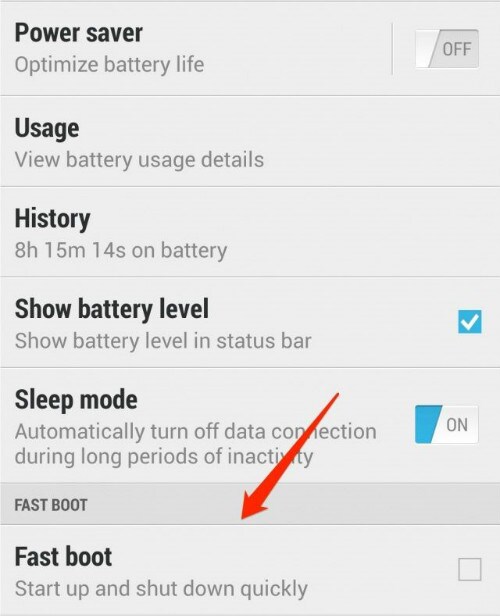
Part 2: How to Unlock Poco C65 Bootloader
Poco C65 is the flagship device of HTC by all means. With a world of features and offerings, Poco C65 truly is a beast. While the phone is very powerful without any modifications, the true potential is yet to be seen and that can only be done if the bootloader is unlocked. So, to have a complete control over the Poco C65 device, it is important to unlock the bootloader and the process has to be carried out diligently. One of the initial things that needs to be ensured is that the Poco C65 device is fully charged or atleast 80% mark. Make sure you have the fastboot drivers for the Poco C65 device configured on the windows machine and the Android SDK. Here are some of the steps which can be followed to unlock bootloader.
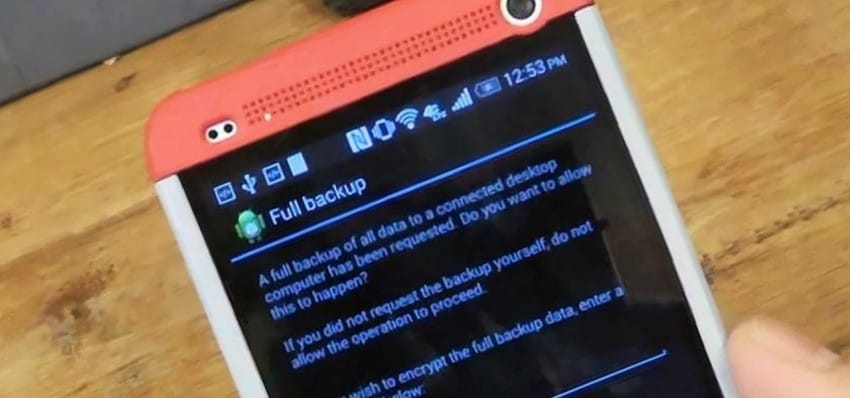
Step 1: It is always very important to keep the phone data backed up and more so when you are planning to unlock the bootloader.
As one of the initial measures, backup the Poco C65 device completely as bootloader unlocking process will wipe all the data off. So, backup all the data like photos, contacts, multimedia files, documents, etc.

Step 2: Go to htcdev.com/bootloader. Ensure that you are registered with HTC and once the sign up is done, log in to HTC dev.
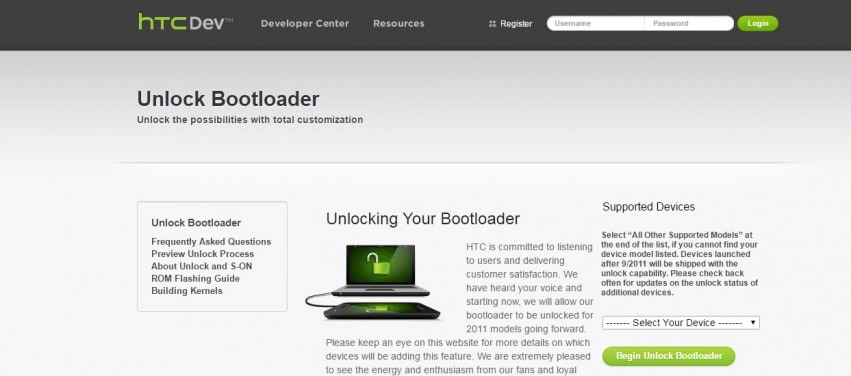
Now, ensure that HTC Sync Manager is installed on the PC.
Step 3: From the bootloader page, select your device using the drop down option as shown in the picture below.
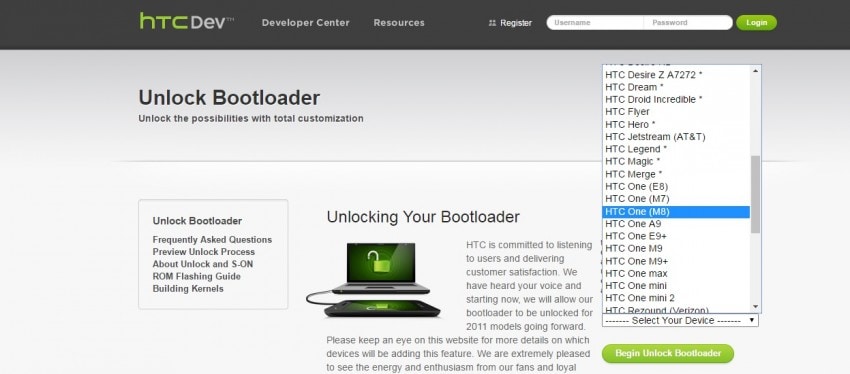After selecting the Poco C65 device, click on “Begin Unlock Bootloader”, and then confirm all the dialogue boxes which come your way on screen.
Step 4: Now, you will be presented with four steps to put the Poco C65 device in bootloader mode. Disconnect the Poco C65 device from the PC and turn the Poco C65 device off completely. Press the volume down button along with the power button to switch the Poco C65 device on in bootloader mode.
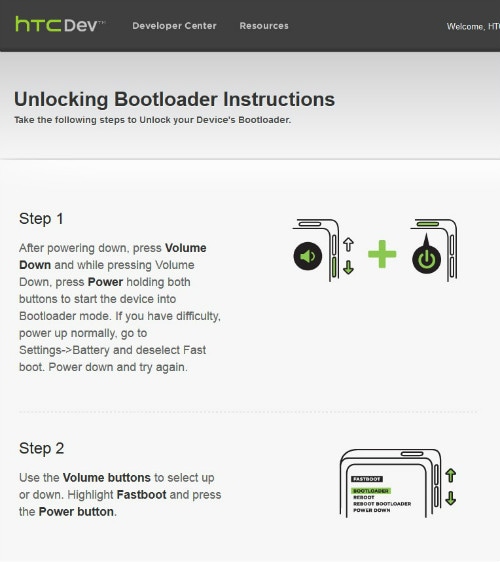
Step 5: Use the volume keys of the Poco C65 device to select Fastboot option along with pressing power button to confirm, after the Poco C65 device is in bootloader mode. Now, connect the Poco C65 device to the computer using a USB cable.
Step 6: Go to Fastboot folder on the PC and holding down the shift key, click on any empty space followed by a click on “Open command window here”.
Step 7: In the command prompt window, type “fastboot devices” and press enter. Poco C65 will show up in the command prompt.
Note: The drivers have to be installed correctly to see the Poco C65 device in the command prompt. So, if the Poco C65 device does not show up, reinstall HTC Sync Manager and try again after restarting the computer.
Step 8: On HTC Dev’s website third page, click on “proceed to Step 9”. Follow the steps listed and then click on submit. The unlock token code for the Poco C65 device will be mailed by HTC. Download the token and name it “Unlock_code.bin” and place the token in the fastboot folder.
Step 9: Now, in the command prompt window, type the following:
fastboot flash unlocktoken Unlock_code.bin
Step 10: On the Poco C65 , one message will appear asking if you want to unlock the Poco C65 device bootloader.
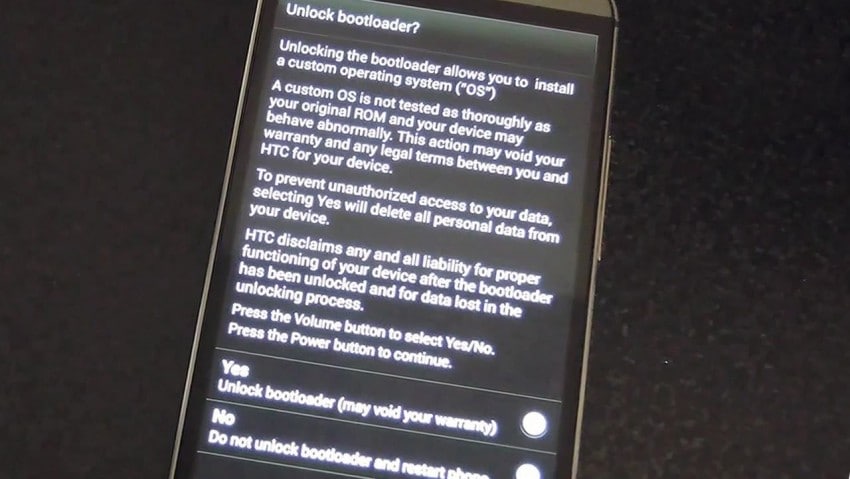
Use volume keys to select and power button to confirm. Once this is done, the Poco C65 device will restart once and it’s done. The device is now bootloader unlocked.

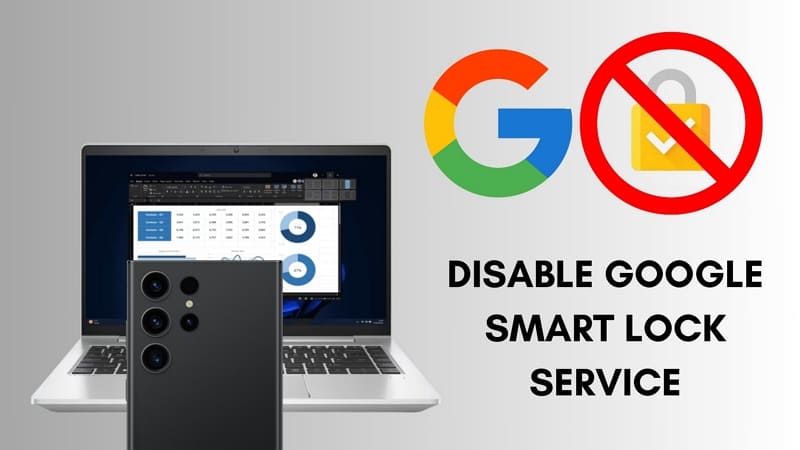
A Perfect Guide To Remove or Disable Google Smart Lock On Poco C65
Google services are pivotal in enhancing user experience and securing personal data. Among these services, Google Smart Lock stands out for its ingenious features. These are integrated into Android devices, simplifying access and bolstering security. However, there are instances where users seek to disable or remove Google Smart Lock.
This article goes through the details of Google Smart Lock and its significance. It offers a solution to address unexpected screen lock scenarios on Android devices.
Part 1. Understanding Google Smart Lock and How It Works?
Want to know what is Google Smart Lock? Google Smart Lock serves as a multi-purpose tool within the Google ecosystem. It is designed to streamline security measures and password management access across platforms. At its core, Google Smart Lock operates as a feature that manages passwords. Google Smart Lock aims to enhance authentication processes. Primarily, it operates across Android devices and computers.
It offers a unified approach to security, ensuring you don’t have to remember all the passwords. Google Smart Lock securely stores and manages passwords for websites and apps. It enables users to access these services without repeatedly entering login details. When you visit a familiar website or app, Google Smart Lock fills in the login credentials. It automatically provides the login ID and password, maintaining effortless access.
Part 2. Recognizing Some Top Features of Google Smart Lock
Google Smart Lock’s password management has revolutionized how users handle and secure their login credentials. It remains a cornerstone when handling Android devices and computer systems. The following are several notable features that significantly enhance user convenience and security:
1. Password Autofill
Google Smart Lock simplifies the login process across apps and websites. It does that by automatically filling in saved credentials. This eliminates the need for users to remember and manually input passwords.
2. Cross-Platform Synchronization
It synchronizes saved passwords across multiple devices using the same Google account. This ensures smooth access to credentials on Android devices and computers.
3. Secure Storage
Passwords stored within Google Smart Lock are encrypted and securely stored in the user’s Google account. This maintains confidentiality and safeguards sensitive login information.
4. Effortless Password Generation
It allows the creation of strong and unique passwords when signing up for new accounts. That enhances overall account security and allows users to have strong passwords.
These features significantly ease the burden of password management and enhance user security. Yet, Google Smart Lock does have limitations that prompt some users to consider removing it.
Part 3. Why Is It Essential To Remove Google Smart Lock?
Despite its array of benefits, there are times when users consider removing or disabling Google Smart Lock. Described below are these limitations to better grasp why users might choose to Google Smart Lock turn off:
1. Privacy Concerns
Some users focus on privacy and feel uncomfortable with Google Smart Lock’s access to their passwords. The reason behind this is how easily anyone can access the saved password. All they need to do is access “Manage Passwords” in Google Chrome, and all their passwords will be open. This leads them to opt for more private password management options.
2. Glitches and Technical Issues
Technical glitches in the functioning of Google Smart Lock can be frustrating. This is especially prominent when managing passwords with similar usernames across different websites. The same can happen when using similar passwords for different websites or apps. Users experiencing such issues can seek to remove it to restore regular operations.
3. No Updates
You should be aware that Google Smart Lock for Passwords has been deprecated. This indicates it no longer receives updates or support from Google. Developers are advised to opt for Google’s One Tap Sign-in feature as an alternative by Google. It provides a more efficient and secure method for signing in to apps and websites.
4. Preference for Third-Party Tools
Certain users might have a preference for specialized third-party password management tools. They can go for solutions that offer a wider array of features. Many users might want to find options better aligned with their specific needs. This prompts them to disable Google Smart Lock.
Part 4. Understanding Some Effective Ways To Disable or Remove Google Smart Lock
If you want to disable Google Smart Lock on your devices, it is a relatively easy thing to do. Several ways are available to disable or remove Google Smart Lock from devices. These approaches cater to users’ diverse needs and preferences. Here is how to turn off Google Smart Lock:
Way 1. Disabling Google Smart Lock on Your Android
To deactivate Google Smart Lock on your Android device, you can use Chrome. Google Chrome is the main hub for storing all your login credentials for websites and apps. This provides the quickest way to disable Google Smart Lock. To disable Google Smart Lock from the Chrome app on your Android device, follow these steps:
- Step 1. Begin by opening the Google Chrome app on your Android device. Then, tap the “three dots” icon from the top right corner and press “Settings.”

- Step 2. Within the Settings, choose “Passwords,” and on the following screen, look for the “Save passwords” and “Auto Sign-in” options. Toggle off both options to disable the Google Smart Lock feature from your Android.

Way 2. Removing Google Smart Lock From Android Settings
Google Smart Lock enables users to keep their phones unlocked under specific, pre-approved, and secure conditions. This simplifies device usage by eliminating the need to input passwords or security codes. The basic working of this aspect of Google Smart Lock, now known as “Extend Unlock,” is divided into three parts.
The first one is on-body detection, which keeps the Poco C65 device unlocked when it’s carried or held by the user. The other two are “Trusted Places” and “Trusted Devices.” Users can set specific locations, like home or work, as “Trusted Places.” When the Poco C65 device is within these locations, it remains unlocked and accessible. Smart Lock integrates biometric authentication methods to unlock devices.
As helpful as it is in managing access to your Android device, privacy concerns can cause users to disable this lock. The following are the steps you can take to disable Google Smart Lock/Extend Unlock via Android settings:
- Step 1. Access “Settings” on your Android device and scroll down to tap “Passwords & security.” Here, press the option labeled as “Privacy.”
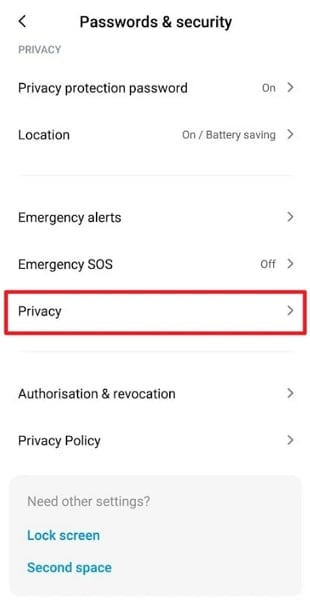
- Step 2. On the following screen, head to the “Trust agents” option and toggle off the “Smart Lock (Google)” option to disable the feature on your device.

Way 3. Disabling Google Smart Lock From Chrome
While you can manage this feature on Android devices, it is also available on Google Chrome on your computer. To disable Google Smart Lock from Google Chrome on your computer or laptop, you can follow these steps:
- Step 1. On your computer, access Google Chrome and click the “three dots” near the top right corner. From the context menu, choose “Settings” and tap “Autofill and passwords” from the left side.

- Step 2. Now, click “Google Password Manager” on the ensuing window, and choose “Settings” from the left side. Toggle off “Offer to save passwords” and “Sign in automatically” to disable Google Smart Lock.

Part 5. Forgot Google Smart Lock From Android Device? Recover Using Wondershare Dr.Fone
Disabling the Google Smart Lock can have a side effect, which is the danger of forgetting an important password. One of these important passwords is the screen lock on your Android device. These scenarios could involve forgetting the Poco C65 device’s PIN, pattern, or password. This could be essential for unlocking the phone or accessing its functionalities. It can lead to being locked out of the Poco C65 device, hindering normal operations.
In such instances, regaining access becomes crucial. Wondershare Dr.Fone offers a robust solution in these cases. This software specializes in unlocking Android devices when users forget their device passcodes. It offers a swift solution to eliminate Android lock screens within 5 minutes. If you own a Samsung or LG device, you can unlock it without data loss.
Notable Features of Wondershare Dr.Fone
- This tool bypasses the Android FRP lock without necessitating a PIN or Google account.
- It broadens its ability to unlock well-known Android brands like Samsung, Huawei, and LG.
- Additionally, its intuitive interface guarantees that no technical know-how is required.
Step-by-Step Guide To Unlock Android Smartphone via Wondershare Dr.Fone
Dr.Fone makes the process of unlocking an Android device a breeze. Here’s a step-by-step guide to recover an Android device using Wondershare Dr.Fone:
- Step 1. Unlocking an Android Device Using Wondershare Dr.Fone
To begin, install the most recent edition of Wondershare Dr.Fone and connect your Android device using a USB cable. Access the “Toolbox” menu and locate the “Screen Unlock” tool upon successful connection. Once opened, choose the “Android” option when prompted. Next, select “Unlock Android Screen” from the available options.

- Step 2. Device Brand Selection and Screen Unlock Initiation
Select your device brand and “100% Remove Screen Lock.” Selecting the Poco C65 device brand initiates access to the designated mode. It will trigger Dr.Fone to commence unlocking the Android screen. Note that entering specific modes varies depending on the Poco C65 device brand. Upon successfully unlocking your Android device screen, tap “Done.”
Tips: Forget your device password and can’t get access to it? No worries as Dr.Fone is here to help you. Download it and start a seamless unlock experience!
Conclusion
This comprehensive guide describes the significance of Google Smart Lock. It explains its features and various methods to disable it from Android devices and Chrome. Exploring scenarios of forgotten passcodes highlighted the critical need for a reliable solution. Wondershare Dr.Fone emerges as a savior in such situations. It offers a secure means to regain access when locked out of your device.
How To Enable USB Debugging on a Locked Poco C65 Phone
Unlocking your Android’s potential goes beyond its surface features. Understanding USB debugging is key to troubleshooting and maximizing your device’s capabilities. In simple terms, USB debugging allows deeper access to your phone’s functionalities, aiding in software development and data recovery.
However, enabling USB debugging becomes crucial yet challenging when your phone is locked. This article delves into this necessity, explaining how to enable USB debugging on locked phones, especially for Android users. Unravel the mystery behind this essential feature, empowering yourself to navigate through locked phone scenarios effortlessly.
Part I. Challenges in Enabling USB Debugging on a Locked Android Phone
USB debugging is a nifty tool that lets you peek behind the scenes of your Android phone’s software. It’s like having a secret key that unlocks deeper access to your device, enabling tasks like software tweaking, app testing, and even data recovery.

Challenges in Enabling USB Debugging on a Locked Phone
Outlined below are some of the barriers, scenarios, and limitations, shedding light on the challenges that make USB debugging seemingly impossible.
- **Locked-out access.**When your phone is locked, gaining access to the settings becomes a roadblock to enabling USB debugging.
- **Limited functionality.**The phone’s locked state restricts the usual methods of accessing developer settings and USB debugging options.
- **Security measures.**For security reasons, most devices limit access to sensitive settings when the phone is locked, making it tricky to enable USB debugging.
Scenarios Requiring USB Debugging on a Locked Phone
Unlocking your phone’s potential becomes crucial in moments of crisis. Explore below some of the scenarios where enabling USB debugging on a locked Android device becomes your beacon of hope:
- **Data recovery.**Imagine accidentally locking yourself out of your phone with important data inside. Enabling USB debugging could be your ticket to retrieve that precious information.
- **Software troubleshooting.**Sometimes, a locked phone might need software fixes or troubleshooting that requires USB debugging to access certain tools.
- **Device testing.**For developers or tech-savvy users, testing new apps or debugging software issues often demands enabling USB debugging, even when the phone is locked.

Part II. How To Enable USB Debugging on Locked Phones
This section outlines the traditional method of enabling USB debugging on an Android phone. Stay tuned and check out the steps below:
- Step 1: Unlock your device**.** If needed, enter your phone’s passcode or pattern to gain access to the Settings.
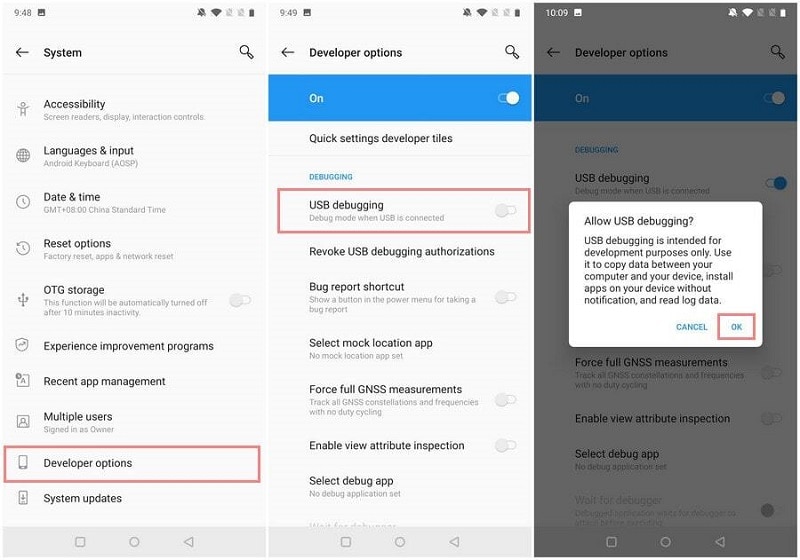
- Step 2: Go to Settings, scroll down to About Phone, and tap on Build number seven or eight times to unlock the Developer Options.

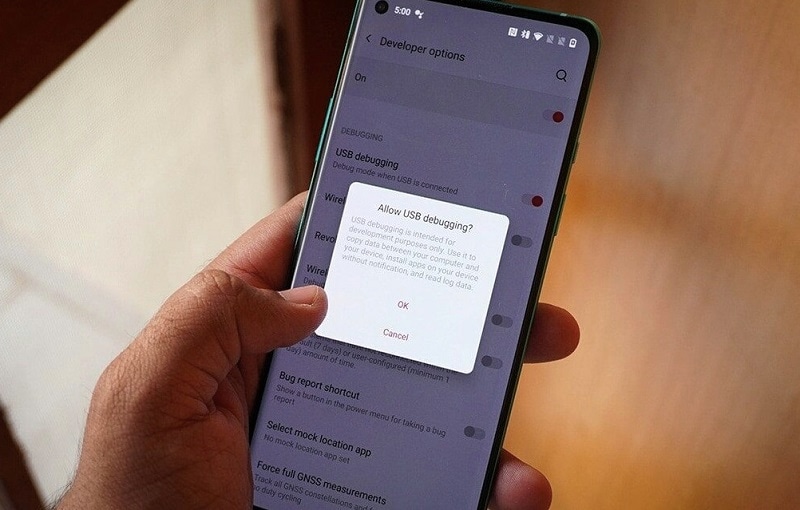
Step 3: Once unlocked, return to Settings, find Developer Options (usually at the bottom), and enter the menu. Enable USB Debugging by tapping OK once the Allow USB Debugging? message appears.
However, what if your phone remains locked, making these steps impossible? Such a case calls for an alternative solution. Fortunately, there is one tool that is fully reliable when it comes to unlocking locked mobile devices. Dr.Fone - Screen Unlock (Android) can help bypass these challenges and enable USB debugging on a locked Android phone effortlessly. So, buckle up as the next section unravels the secrets to unlock your device’s potential!
Part III. Seamlessly Unlock Your Android With a Professional Resolution
Enabling USB debugging on a locked phone can feel like navigating a maze with no clear exit. Sometimes, despite your best efforts, the traditional method fails to grant access. Fret not! There’s a smoother path that unlocks your phone and eases the USB debugging hurdle.

Why Unlocking First Makes Sense
Attempting to enable USB debugging on locked phones can hit roadblocks. That’s why unlocking your device first becomes a game-changer. Dr.Fone – Screen Unlock (Android) is the hero of this story, simplifying the process and ensuring a hassle-free experience.
Key Features and Benefits
Check out the amazing key features and benefits of Dr.Fone – Screen Unlock that fits Android devices:
- **Data safety and reliability.**Your data’s security remains paramount. With Dr.Fone – Screen Unlock, your device’s integrity and precious data stay safeguarded throughout the unlocking process.
- Dr.Fone - Screen Unlock is compatible with a wide range of Android devices, irrespective of brand or model, ensuring accessibility for various users.
- It’s not just about unlocking a locked screen; Dr.Fone offers multiple unlock modes tailored to different scenarios, whether a forgotten password, PIN, pattern, or fingerprint issue.
- **High success rate.**With a high success rate in unlocking locked screens, Dr.Fone - Screen Unlock provides a reliable solution, even for complex lock scenarios.
- **No data loss.**Users can rejoice in the fact that the unlocking process doesn’t compromise data integrity. Your photos, messages, and apps remain untouched and secure.
- **Ease of use.**The software is designed for simplicity, making the unlocking process accessible to users with varying levels of technical expertise.
Tips: Forget your device password and can’t get access to it? No worries as Dr.Fone is here to help you. Download it and start a seamless unlock experience!
Guide To Unlock Your Poco C65 With Dr.Fone – Screen Unlock (Android)
Below are the steps on how you can unlock your Android device using Dr.Fone:
Step 1: Get the most recent version of Wondershare Dr.Fone and connect your Android device to your computer via a USB cord. After connecting, access the unlock screen tool by going to the Toolbox and then selecting Screen Unlock.
Step 2: Once prompted, choose Android to unlock your Android screen lock. On the following screen, you’ll see two options; choose Unlock Android Screen.
- Step 3: After that, you’ll be taken to a new screen where you can choose the brand of your mobile device.


- Step 4: Once done, click the Remove without Data Loss button from the two options presented on the screen.

- Step 5: Unlocking the Android screen requires choosing the Brand, Device Name, and Device Model next. Enable the option that says I agree with the warning, and I am ready to proceed by clicking the corresponding checkbox. To proceed with unlocking the screen, click Next.

- Step 6: Type 000000 when asked to confirm the process. After entering the code, click Confirm to run the program.

- Step 7: Once you’ve recognized your Android device’s model, Dr. Fone will walk you through entering Download Mode. Following the on-screen prompts will take you directly to the next screen. It then depicts the progress of the screen unlocking procedure, in which the platform’s required drivers and configuration files are downloaded.

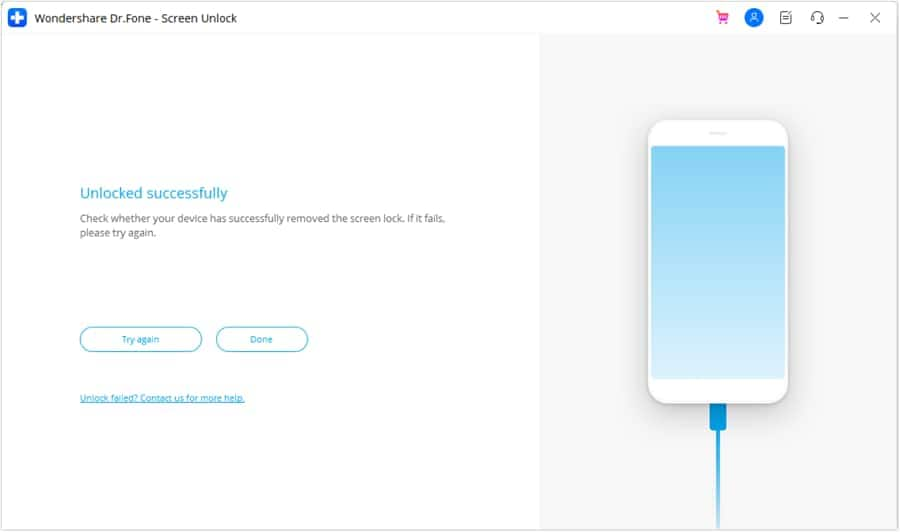
- Step 8: A new screen will appear, indicating the process has been completed. Click Done if your device’s screen unlock issue has been successfully fixed. If not, click the Try Again button.
Dr.Fone – Screen Unlock (Android) acts as your trusty guide, leading you through the maze of locked screens and inaccessible settings. It unlocks your phone first and enables USB debugging without the frustrating barriers.
Learn More About Android Unlock:
Samsung Unlock Codes to Unlock Samsung Phones [2024 Updated]
Unlocking Your Realme Phone Made Easy: No Data Loss!
The Best Android Unlock Software of 2024
Conclusion
In face of locked screens, USB debugging is a beacon of access and troubleshooting for your Android device. Remember, enabling USB debugging on a locked phone is crucial, opening doors to unforeseen solutions. However, what if you want to enable USB debugging on locked phones, but the process gets messy?
Then, it’s time to consider Dr.Fone - Screen Unlock (Android). It effortlessly paves the way to enable USB debugging on locked phones. By ensuring your device’s security and accessibility, even in locked states, Dr.Fone empowers you to navigate through obstacles, safeguarding your data while unlocking endless possibilities.
- Title: How to Unlock Poco C65 Bootloader Easily
- Author: Aaron
- Created at : 2024-07-15 20:20:22
- Updated at : 2024-07-16 20:20:22
- Link: https://easy-unlock-android.techidaily.com/how-to-unlock-poco-c65-bootloader-easily-by-drfone-android/
- License: This work is licensed under CC BY-NC-SA 4.0.