
How to Unlock Nokia G42 5G Bootloader Easily
How to Unlock Nokia G42 5G Bootloader Easily
Do you want to unleash the true power of your smart phone? Do you wish to have complete control over your smart phone? If yes, well, here is the answer; unlock bootloader. For people who are already into the tricks of hacking and rooting smart phones, might be aware of this. But still, there are exciting new developments. Bootloader is a code existing in all operating systems which usually comes pre-locked. So, it is important, if you wish to have a custom ROM installed on the Nokia G42 5G device, or if you wish to have other controls like installing applications which are incompatible, to have the Nokia G42 5G device bootloader unlocked. But going through with the process of unlocking bootloader and rooting the Nokia G42 5G device will not help and rather might break the warranty of the Nokia G42 5G device. This definitely calls for a diligent watch on how to unlock HTC bootloader. So, it is imperative as a user to know the process of HTC bootloader unlock. This article serves you with some ways you could follow to unleash the true power of your HTC device. Here’s how you can do it.
Part 1: Why We Want to Unlock HTC Bootloader
For people with HTC device, unlocking bootloader would mean complete authority over the smart phone and you have all the power to control the HTC device by all means. Since, bootloader usually comes pre-locked, unlocking the bootloader is the initial step if you would like to have a custom ROM installed in your device. There are various advantages of HTC unlock starting from gaining rights of control to installing latest custom ROMs in the phone and installing incompatible applications. Moreover, HTC unlock bootloader could boost the Nokia G42 5G device speed and battery life and also help in making complete backups of the Nokia G42 5G device. You could also have controls to remove bloatware from the HTC device. So, all in all, while there could be certain side effects, if not done properly, there are various advantages of unlocking HTC bootloader. If the process is carried out properly, the Android device could be the perfect smart phone you would like to have.
Part 2: How to Unlock Nokia G42 5G Bootloader
Nokia G42 5G is the flagship device of HTC by all means. With a world of features and offerings, Nokia G42 5G truly is a beast. While the phone is very powerful without any modifications, the true potential is yet to be seen and that can only be done if the bootloader is unlocked. So, to have a complete control over the Nokia G42 5G device, it is important to unlock the bootloader and the process has to be carried out diligently. One of the initial things that needs to be ensured is that the Nokia G42 5G device is fully charged or atleast 80% mark. Make sure you have the fastboot drivers for the Nokia G42 5G device configured on the windows machine and the Android SDK. Here are some of the steps which can be followed to unlock bootloader.
Step 1: It is always very important to keep the phone data backed up and more so when you are planning to unlock the bootloader.
As one of the initial measures, backup the Nokia G42 5G device completely as bootloader unlocking process will wipe all the data off. So, backup all the data like photos, contacts, multimedia files, documents, etc.
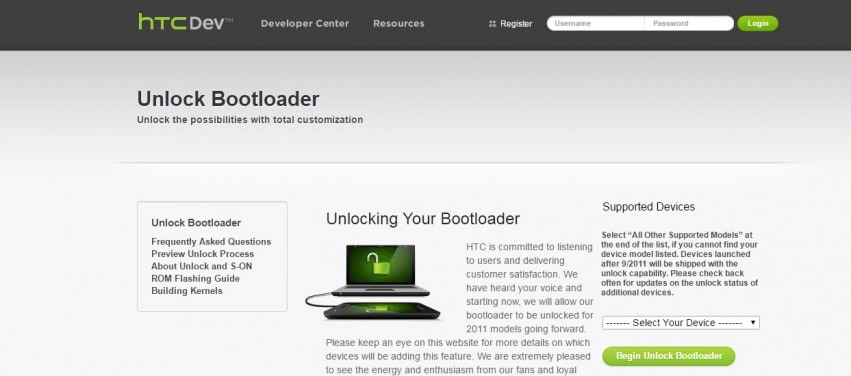
Step 2: Go to htcdev.com/bootloader. Ensure that you are registered with HTC and once the sign up is done, log in to HTC dev.
Now, ensure that HTC Sync Manager is installed on the PC.
Step 3: From the bootloader page, select your device using the drop down option as shown in the picture below.
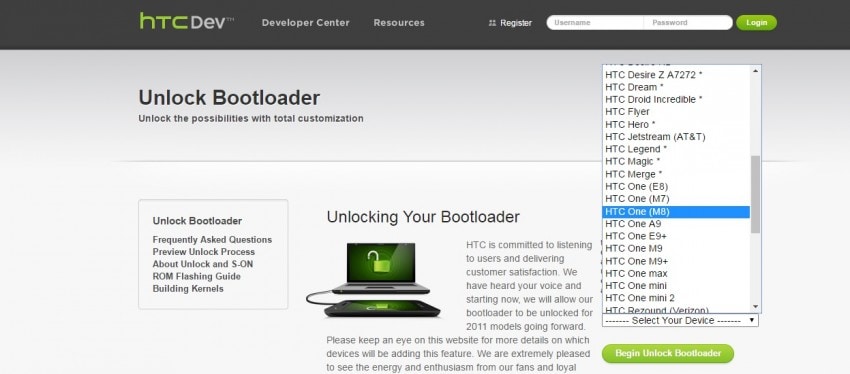
After selecting the Nokia G42 5G device, click on “Begin Unlock Bootloader”, and then confirm all the dialogue boxes which come your way on screen.
Step 4: Now, you will be presented with four steps to put the Nokia G42 5G device in bootloader mode. Disconnect the Nokia G42 5G device from the PC and turn the Nokia G42 5G device off completely. Press the volume down button along with the power button to switch the Nokia G42 5G device on in bootloader mode.
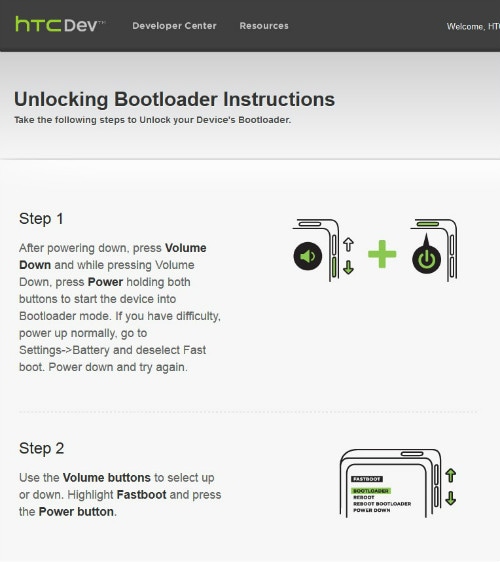
Step 5: Use the volume keys of the Nokia G42 5G device to select Fastboot option along with pressing power button to confirm, after the Nokia G42 5G device is in bootloader mode. Now, connect the Nokia G42 5G device to the computer using a USB cable.
Step 6: Go to Fastboot folder on the PC and holding down the shift key, click on any empty space followed by a click on “Open command window here”.
Step 7: In the command prompt window, type “fastboot devices” and press enter. Nokia G42 5G will show up in the command prompt.
Note: The drivers have to be installed correctly to see the Nokia G42 5G device in the command prompt. So, if the Nokia G42 5G device does not show up, reinstall HTC Sync Manager and try again after restarting the computer.
Step 8: On HTC Dev’s website third page, click on “proceed to Step 9”. Follow the steps listed and then click on submit. The unlock token code for the Nokia G42 5G device will be mailed by HTC. Download the token and name it “Unlock_code.bin” and place the token in the fastboot folder.
Step 9: Now, in the command prompt window, type the following:
fastboot flash unlocktoken Unlock_code.bin
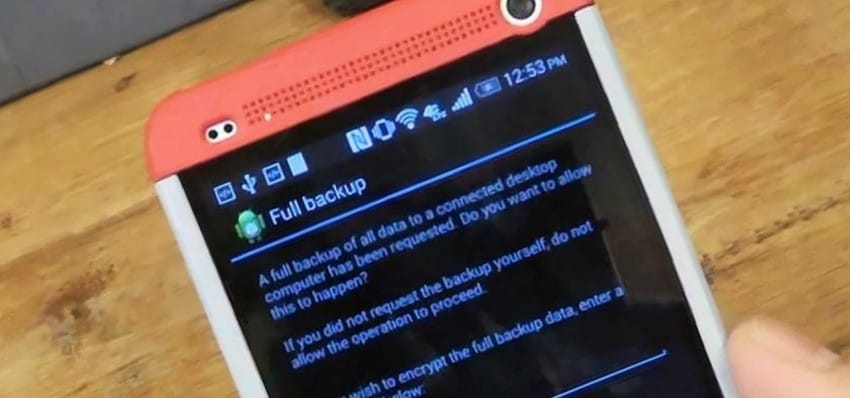
Step 10: On the Nokia G42 5G , one message will appear asking if you want to unlock the Nokia G42 5G device bootloader.
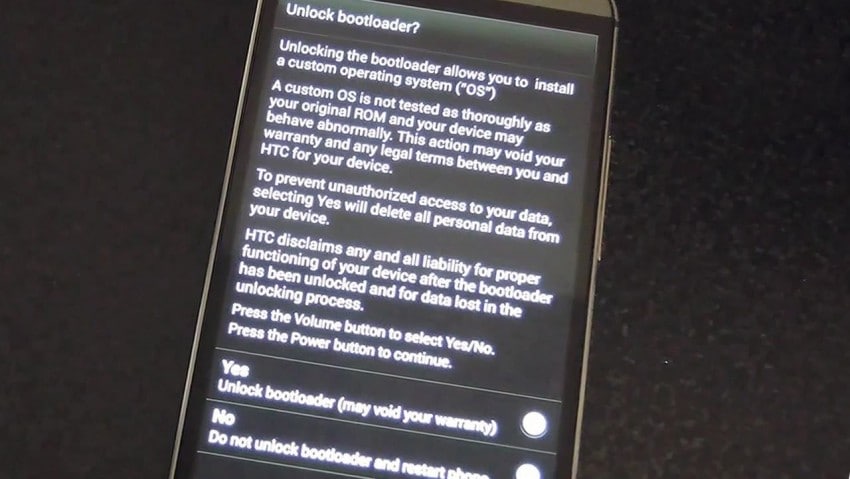
Use volume keys to select and power button to confirm. Once this is done, the Nokia G42 5G device will restart once and it’s done. The device is now bootloader unlocked.
How to Unlock Nokia G42 5G PIN Code/Pattern Lock/Password
I have forgotten the pattern, PIN, or password needed to unlock my Nokia G42 5G smartphone. What should I do?
If you have a Nokia G42 5G phone and have forgotten the screen unlock PIN code, pattern lock, or password, you can still access it using some tried and tested tricks and hacks. This article will discuss 5 different ways on how to unlock Nokia G42 5G smartphone. Some methods might work without erasing your data, while others, like factory resetting, may erase all content from your phone. Regardless of which method you use, you will be able to unlock your phone! So, let’s get started!
1. How to Unlock Nokia G42 5G With Google Find My Nokia G42 5G?
A way to unlock the Nokia G42 5G phone is via Google Find My Device feature. While this method can help unlock your phone, it erases all content from it.
For this method, you need a PC and your Google account details. Here are the steps for it:
Step 1: Open your browser and go to Google Find My Device on your PC.

Step 2: Log in to the Google account you used to set up your Nokia G42 5G phone.
Step 3: It will show you 3 options: Play Sound, Secure Device, and Erase Device.

And then select “**Erase Device.**”

Selecting this option will erase all content from your device, including screen unlock PIN, password, and pattern.
Step 4: Now, you can access your phone without an unlock PIN or pattern and set a new one.
Use this method only if your phone is backed up so you can restore all your data later.
2. How to Unlock Android device Using Lock Remove Tool?
Another foolproof method on how to unlock Android pattern lock is by using a lock removal tool like Dr.Fone - Screen Unlock (Android) .
 safe & secure
Dr.Fone - Screen Unlock is a screen unlock tool that can unlock your Android phone if you forget its screen unlock PIN, password, or pattern in just 5 minutes. It has a simple operation that requires just a few clicks to unlock your phone screen. Plus, this method is reliable, secure, and has a high success rate. However, there’s a possibility that it might not work with older phone models.
![]()
Dr.Fone - Screen Unlock (Android)
Unlock Android PIN Code/Pattern Lock/Password within Minutes
- Remove all Android screen locks (PIN/pattern/fingerprints/face ID) in minutes.
- Unlock 20,000+ models of Android phones & tablets.
- Everybody can handle it without any technical background.
- Save you from ending up with a locked phone after too many pattern attempts.
4,008,669 people have downloaded it
Here are the steps to unlock Android phone using Dr.Fone - Screen Unlock (Android):
Step 1: Launch Dr.Fone on your PC and select the “Screen Unlock” option from the main page.
Step 2: Connect your phone to your PC with a USB cable. Now click on the “Android” > “Unlock Android Screen” option.

Step 3: A device brand will appear. Select your phone’s brand, i.e., Samsung.

Step 4: Now, follow the instructions as you see to unlock your Android device.
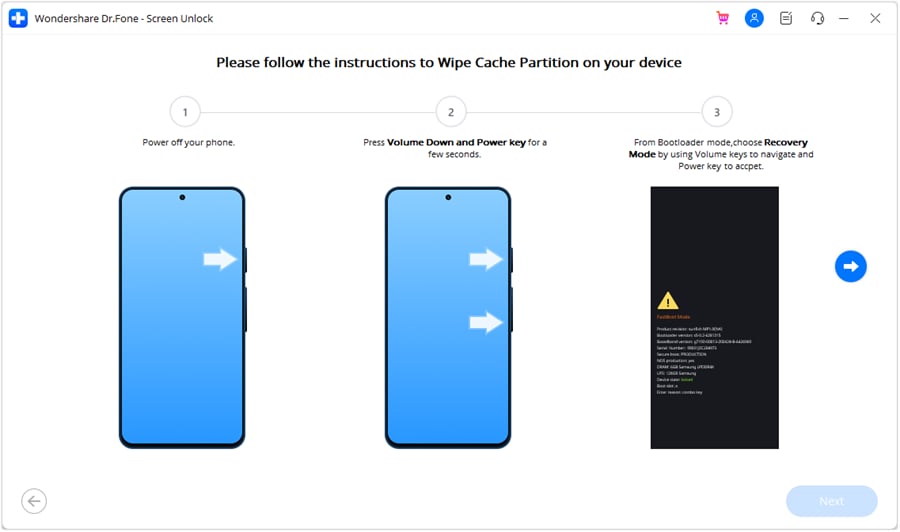
Your phone is now unlocked, and you can access it without entering a PIN, password, or pattern.

Now, if you don’t remember your Google account details and don’t have access to a PC to use a screen unlock tool, you can unlock Android phone using the conventional way.
How to Unlock Nokia G42 5G with Google Account?
Almost all Android smartphones, including Nokia G42 5G , require you to enter your Google account details when setting up your phone for the first time. This includes the email, password, and security question. These details come in handy later on in situations where your phone is lost or stolen or if you’re switching to another phone. However, they can also help with basic issues like unlocking your phone in case you forget your Nokia G42 5G screen unlock PIN, pattern, or password.
You can unlock your Nokia G42 5G phone with Google Account in the following two ways:
- Using Google account details
- Using Google security question

Using Google Account Details
Almost all Android smartphones, including Nokia G42 5G , require you to enter your Google account details when setting up your phone for the first time. This account comes in handy later on in situations where your phone is lost or stolen or if you’re switching to another phone. However, it can also help with basic issues like unlocking your phone in case you forget your Nokia G42 5G screen unlock PIN, pattern, or password. But to use this method successfully, you need to remember the email address bound to the Nokia G42 5G device and its password.
Here’s how to unlock the Nokia G42 5G pattern lock without losing data using your Google account:
- Step 1: Enter the incorrect PIN, pattern, or password 5 times, and click on “Forgot Password” or “Forgot Pattern.”
- Step 2: The interface will then ask you to enter your Google account details as an alternate option. Enter the Google account details you used when setting up your Nokia G42 5G phone.
- Step 3: This will unlock your phone. You can now reset the screen unlock PIN, password, or pattern.
If you don’t remember your Google account details, you can still unlock your Nokia G42 5G phone using a third-party tool.
Using Security Question
Another way to unlock your Nokia G42 5G phone using Google is by answering the security question. When we set up our Google account, we usually choose a security question and an answer. This comes in handy if you want to recover your Google account, reset the password, or if you want to unlock your phone’s screen.
For the latter, here are the steps:
- Step 1: Enter the incorrect PIN or pattern to unlock your screen several times till you see the “Forgot Pattern” or “Forgot Password” option. Click on it.
- Step 2: Now select the “Answer Security Question” option and type in the answer.
- Step 3: Click on “Unlock” after which you will be asked if you want to set a new PIN or pattern. Select “Yes.”
- Step 4: Your Nokia G42 5G phone will be unlocked, and you can set a new PIN or pattern for your screen.
How to Unlock Nokia G42 5G by Hard Reset?
Hard resetting your smartphone usually solves everything! Hence, it can also help you unlock your Nokia G42 5G phone; however, using this method will erase all the data on your phone. So, if you still want to unlock Nokia G42 5G phone using this method, only do so if you have backed up your device and have no other way to unlock your phone. This includes forgetting your Google account details or not having access to a PC to download and use Dr Fone - Screen Unlock (Android).
Here are the steps for it:
- Step 1: Power off your Nokia G42 5G phone.
- Step 2: Press and hold the power and volume down button until the Sony screen appears.
- Step 3: The “System Recovery” menu will appear. Use the volume up and down button to scroll to the “Factory Reset” option. Use the power button to select this option.
- Step 4: Select “Yes” when asked for confirmation.
Your Nokia G42 5G phone will be hard reset, and all the locks will be removed. When you turn it on again, you will have to set it up like a new phone using your Google account details.
How to Unlock Nokia G42 5G with Nokia Companion?
If you’ve forgotten the screen lock of your Nokia G42 5G device, you can use Sony’s official software, Nokia Companion, to unlock your device. Nokia Companion is a reliable method that can help you regain access to your Nokia without data loss. Here’s how to unlock your Nokia G42 5G using Nokia Companion:
Step 1: Install and launch Nokia G42 5G Companion from the official website and click “Support Zone.” Move to the “Phone/Tablet Software Update” option on the next screen and tap “Start.”

Step 2: Now, plug in your laptop to power, as the process will take some time, and choose “repair my phone/tablet.” Here, agree to the warning that you will lose your data and click “Next” to proceed.

Step 3: Allow the program to download files to prepare for the update process and choose your Nokia G42 5G model. Click “Next” and connect your Nokia G42 5G to the PC. Ensure that the phone is turned off, and press and hold the “Volume Down” button when connecting the cable to the phone.

Step 4: Once correctly connected to the PC, the program will download the necessary software and upload it to your device. After completing the process, you can unplug the Nokia G42 5G device and turn it on.

How to Remove Operator Lock on Nokia G42 5G ?
An operator lock, also called a carrier lock, constitutes a limitation imposed on a mobile phone by a network provider. This measure is implemented to guarantee that the Nokia G42 5G device exclusively functions with the services provided by that specific carrier. If you wish to remove the operator lock from your Nokia G42 5G device, you’ll need to follow specific steps and meet certain criteria. Here’s how to remove the operator lock on a Nokia G42 5G :
Step 1: Begin by checking whether your device can be unlocked or not from its network carrier restrictions. To do that, you need to dial the code “*#*#7378423#*#*” on your device, tap “Service Info” and select “SIM Lock.”

Step 2: Carefully check the information provided on the screen. If there is “X” before the “Network” option and the number in front of it is larger than 0, it means your device can be unlocked. If the number in front of “Network” is 0, your device can’t be unlocked as it is hard-locked.

Step 3: The next step involves getting your device’s IMEI number. To accomplish this task, simply input “*#06#” on your device. Once you have the IMEI number, use a reliable service from the internet to the unlocking code. Insert the SIM card of another network and provide the code you gained to unlock your Nokia G42 5G device.

Bonus Tip: How to Unlock Bootloader?
Unlocking the bootloader on your Android device provides significant advantages. These actions encompass obtaining root access, installing custom ROMs, configuring custom recoveries, and carrying out advanced procedures. Here’s an essential guide on unlocking the bootloader of your Sony device while keeping all precautions in mind:
Step 1: To start with the process, verify the bootloader status for your Sony smartphone. On opening the “Dialer” app, dial the number “*#*#7378423#*#*“ and access the “Rooting Status” option within the “Service Provider” settings.
Step 2: If the bootloader status displays “Yes,” ensure that the Sony USB drivers and ADB tools are installed on your computer. Enable “USB Debugging” and “OEM Unlocking” on your smartphone and switch it off.
Step 3: Connect the Nokia G42 5G smartphone with a USB cable and press the “Power + Volume Up” keys for a few seconds. Open the Windows computer and access the “Devices and Printers” directory. Right-click on the “fastboot driver” file, select “Update,” and select the location of the “android_winbus.inf” file. Verify the fastboot connectivity through the CMD command.
Step 4: Open the official “Sony Unlocking Site” and add in the IMEI number. On acknowledging, use the commands as follows: adb reboot bootloader
Unlock the bootloader with the following command: fastboot oem unlock 0x<insert your unlock code
Verify the bootloader is unlocked and use the command to reboot the system; if not done automatically: fastboot reboot
Conclusion
Forgetting your Nokia G42 5G screen unlock password, PIN, or pattern is quite common. For such instances, there are several methods that you can use to unlock your screen, 5 of which we have discussed in this article.
If you’re looking for ways that are time-effective and reliable, you can use your Google account or other ways to unlock Nokia G42 5G and set a new screen lock. However, with these methods, you can lose your data, so we only recommend using them if your device is backed up.
Rootjunky APK To Bypass Google FRP Lock For Nokia G42 5G
Factory Reset Protection (FRP) is a security feature built into Android devices running Android 5.1 Lollipop and later versions. It prevents someone from using your phone after a factory data reset without Google account login credentials. The FRP makes it much less attractive for thieves to steal Android phones, knowing they will need help to access them.
FRP automatically activates when you add a Google account to your Android phone. It links the Nokia G42 5G device to your account, making it the “trusted owner.” Once activated, FRP becomes embedded in the phone’s system.
While Google FRP is a valuable security feature, it’s vital to acknowledge that there are legitimate situations where bypassing it might be necessary. These instances include forgotten Google account credentials, buying a second-hand device, and device issues. In these cases, tools like RootJunky can help you bypass FRP Lock. We’ll explore how to use RootJunky APK later, but first, let’s define what it is and its role in FRP bypass.

The RootJunky APK is a free Android application also called RootJunky SDL or RootJunky FRP Bypass tool. This app’s primary function is to bypass the Google Account FRP lock on Samsung devices. Rootjunky uses the weaknesses in Android’s setup process to create a new user account or switch existing ones, letting you bypass the FRP and regain control of your phone.
You can complete this process using the app by connecting your phone to a computer through an OTG cable. RootJunky can be helpfu l if you’ve forgotten your Google account password or bought a second-hand phone locked to someone else’s account. However, only use it if you have legitimate reasons to bypass FRP lock, like accessing your device after forgetting your Google account details.

Downloading the RootJunky FRP bypass tool from unofficial sources can introduce malware risks, so stick to trusted sources like the official website. Additionally, when exploring RootJunky, it is vital to keep the following in mind:
- Not all Android devices are susceptible to the methods used by RootJunky. It is necessary to check compatibility with your specific device model and Android version.
- Using FRP bypass tools like RootJunkycan potentially compromise the security of your device. Be cautious and proceed if you fully understand the risks involved.
- Bypassing FRP may involve data loss.
- Download RootJunky FRP bypass APK from a reliable source to minimize the risk of malware or viruses. You can check the APK file from official websites or trusted forums.
- Google constantly updates its security measures, so these tools may not always work effectively.
Part 2: How To Use RootJunky To Bypass Google FRP?
Here are the general steps to use the FRP Bypass APK RootJunky app to bypass Google FRP lock. But remember that specific steps may vary depending on your device and Android version:
- Step 1: On your computer, download the Rootjunky RealTerm program from the official Rootjunky website.

- Step 2: On your phone, download the Rootjunky APK (com.rootjunky.frpbypass-1.0.apk) file from the official website or other reputable sites.

- Step 3: Go to Settings > Security and tap Install unknown apps. Then, enable unknown sources to allow installation of apps from outside the Play Store. Connect your device to a Wi-Fi network.

- Step 4: On your Android phone, open a file explorer app and install the downloaded RootJunky APK file.
- Step 5: Connect your smartphone to your computer using a USB cable.
- Step 6: Launch the Rootjunky RealTerm program on your computer. Under the Display tab, check the Half Duplex option.
- Step 7: On your computer, go to Device Manager > Modems. Locate your device’s port name (e.g., COM3).
- Step 8: On the RealTerm program, enter the correct port number under the Ports tab, then click Change.

Step 9: Click Send to establish a connection. Enter the two commands:
at + creg? \ r \ n
atd1234; \ r \ n
Step 10: Once connected, the Rootjunky APK on your phone will provide on-screen instructions to bypass FRP.
Step 11: If prompted, perform a factory data reset of your device.
While RootJunky offers a free method for FRP bypass, it can be incompatible with your device’s brand, requiring technical knowledge, tedious, and potentially risky. If you are looking for a simpler, safer, and more user-friendly solution, Wondershare Dr.Fone might be a better fit for you. If you want to learn how to use this tool to bypass FRP lock with minimal technical expertise, then keep reading.
Part 3: Easier Tool Than RootJunky APK To Bypass Google FRP
Google FRP adds an extra layer of security after a device reset. However, regaining access to the smartphone can be challenging if you forget your Google account details, forget your lock screen, or just buy a used device. While methods like the FRP RootJunky app exist, using it can be complex or risky.
Consider exploring third-party options like Dr.Fone for a potentially easier and safer FRP bypass solution. Dr.Fone Screen Unlock tool helps remove the Android FRP lock without requiring a PIN or Google Account.
Why Use Dr.Fone - Screen Unlock?
Here are some of the key features of Dr.Fone - Screen Unlock:
- **User-friendly:**Fone boasts an intuitive interface, eliminating the need for technical expertise. Even beginners can navigate the process with ease.
- **Widespread Brand Compatibility:**Fone supports mainstream brands, such as Samsung, Xiaomi, Oppo, Redmi, Realme, and Vivo, catering to a broader user base.
- **Fast and Efficient:**Regain access to your device in minutes without wasting time on tedious procedures.
Step-by-step Guide to Removing FRP Lock With Dr.Fone - Screen Unlock
Ready to leave the hassle of using RootJunky and easily bypass the FRP lock? Download and install Dr.Fone on your computer, then follow these steps to learn how to bypass Google FRP on your device:
- Step 1: Launch Dr.Fone on your computer and connect it to your Android device. Choose Screen Unlock from the Toolbox in the main interface.

- Step 2: Choose Android as your device type. This will take you to the next screen, where you can select Remove Google FRP Lock to proceed.
- Step 3: Select your device’s brand from the list and click Start to continue.

Note:
The next steps may vary depending on the brand you selected.
- Step 4: Select the OS version of your device and click Start to continue.

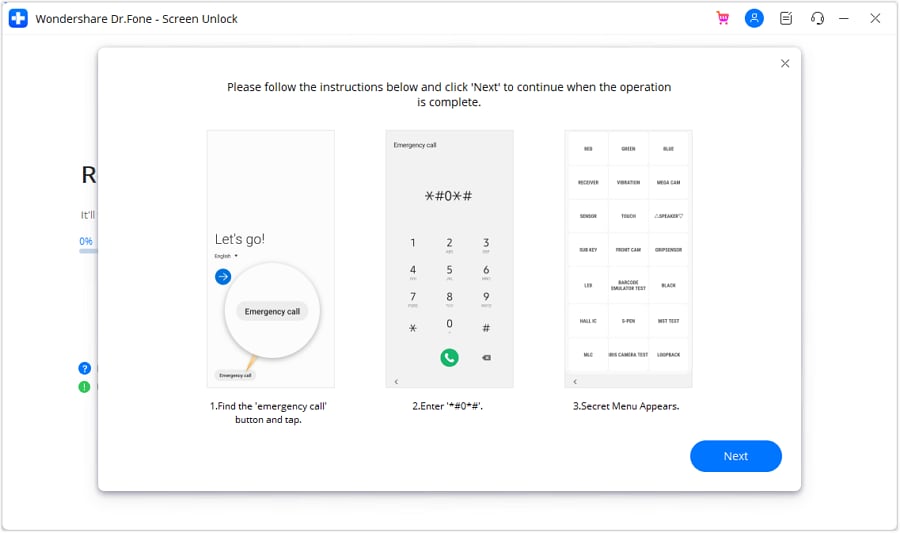
- Step 5: Access the secret menu on your phone using the on-screen instructions, then click Next to proceed to the next step.
- Step 6: When your Samsung prompts you to activate USB debugging, tap Allow. Then, on your computer screen, click Authorized to confirm.

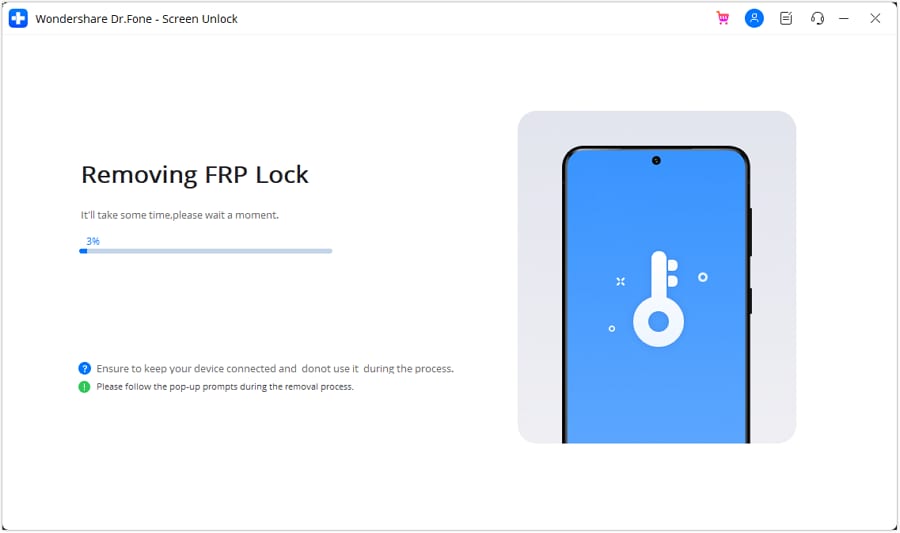
- Step 7: You will see the FRP lock being bypassed on your Android device on the next screen.
- Step 8: Click Done if the FRP lock removal was successful, otherwise, click Try Again to repeat the process.

That’s it! With Dr.Fone Screen Unlock, you can easily bypass Google FRP and regain access to your Android device, leaving the complexities of RootJunky behind.
Tips: Are you searching for a powerful FRP bypass tool? No worries as Dr.Fone is here to help you. Download it and start a seamless unlock experience!
Conclusion
Both RootJunky and Dr.Fone offer options for you to regain control of phones with Google FRP lock. FRP Bypass RootJunky tool excels with its free-to-use approach, perfect for tech-savvy users comfortable with APK installations. While requiring a paid subscription, Dr. Fone provides pre-rooted firmware installations and broader device compatibility, which is ideal for those seeking a more streamlined but supported experience.
The best choice boils down to your personal needs and budget. Remember, FRP bypass should only be utilized by rightful owners facing genuine lockouts. When used responsibly, these tools can help you access your phone after a factory reset even without your Google account credentials. Choose the tool that best fits your needs and proceed with caution. Use these tools responsibly and regain access to your device the right way.
Also read:
- [Updated] 2024 Approved Step-By-Step Guide on Using Gaming YouTube Banner Templates
- Expert Tips for Capturing Stunning Meta Quest 3 Images & Video Clips - ZDNet Guide
- Fixes for Apps Keep Crashing on Infinix Hot 40i | Dr.fone
- Flashing Lights of Olympic Speed
- In 2024, How to Use Google Assistant on Your Lock Screen Of Nokia 130 Music Phone
- In 2024, Lock Your Nokia C210 Phone in Style The Top 5 Gesture Lock Screen Apps
- In 2024, Still Using Pattern Locks with Nokia 130 Music? Tips, Tricks and Helpful Advice
- Navigating New Horizons in Console Gaming: Embarking on the 4K Odyssey
- The Ultimate Guide to OnePlus Nord CE 3 Lite 5G Pattern Lock Screen Everything You Need to Know
- Unveiling Critical Privacy Risks in Modern-Day Chatbots: 3 Key Concerns Revealed
- VN Video Editor PC Review Is It the Right Choice for You?
- Title: How to Unlock Nokia G42 5G Bootloader Easily
- Author: Aaron
- Created at : 2024-12-07 22:52:45
- Updated at : 2024-12-13 17:47:16
- Link: https://easy-unlock-android.techidaily.com/how-to-unlock-nokia-g42-5g-bootloader-easily-by-drfone-android/
- License: This work is licensed under CC BY-NC-SA 4.0.