
How To Unlock Any OnePlus Nord CE 3 5G Phone Password Using Emergency Call
How To Unlock Any OnePlus Nord CE 3 5G Phone Password Using Emergency Call
Today, smartphones are an extension of people. Securing them with a PIN, passcode, pattern, fingerprint, or face unlock has become the norm. It’s like putting a digital lock on our private world.
But you have to face it: sometimes, people forget the codes they set to protect their phones or can’t unlock them with their injured fingers or faces. Picture this: you’re staring at your phone screen, trying to recall that password, but it’s not coming to you.
That’s where emergency call bypass is a nifty little trick that can be a lifesaver. In this article, you’ll learn how to unlock any phone password using the emergency call technique. The article will also explore other methods for when your memory fails you. So, read through and never go through this trouble again.
Part 1: What Is the Emergency Call Bypass Method?
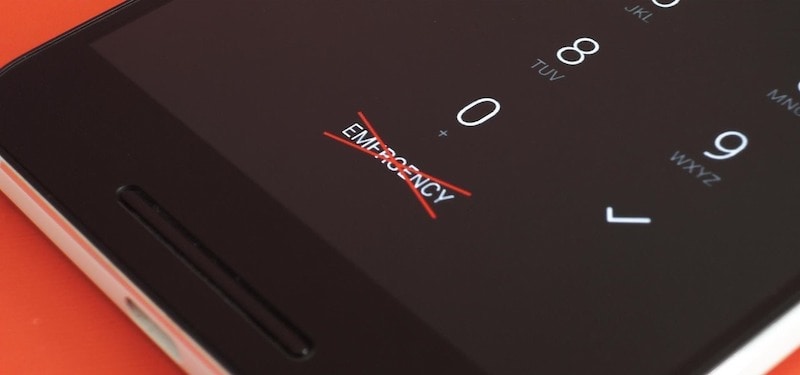
The Android emergency call bypass method is a lesser-known workaround for those unfortunate moments when you’re locked out of your phone. This method exploits a loophole in the phone’s lock screen, allowing you to access your device even when you’ve forgotten your password, PIN, or pattern. It’s like finding a secret backdoor when the front door is bolted shut.
“How can unlocking Vivo, Oppo, and Samsung phones using emergency calls be effective?” You may ask. Imagine you need to access important information on your phone but can’t remember your lock screen code. Instead of panicking or rushing to a technician, the emergency call bypass can be a quick and handy solution. It’s particularly useful when immediate access to your phone is crucial and you don’t have time to reset your password through official channels.
Limitations of the Emergency Call Bypass Method
However, it’s important to note that this method has its limitations. It primarily works on older Android devices, specifically those running Android 5.0 (Lollipop) and below. As smartphone technology has evolved, manufacturers have patched many loopholes to enhance security. So, this method might not work for you if you have a more recent Android version.
But don’t worry – if you’re locked out of a newer phone, you can try several other methods, which you will explore later in this article. Remember, the emergency call bypass can be a lifesaver in specific scenarios. However, it’s always best to use such methods responsibly and ethically. And, of course, you should always note your passwords.
Part 2: How To Perform Emergency Call Bypass To Unlock Screen
Unlocking your Android phone without a password using the Emergency Call Bypass method can be tricky, but it’s doable, especially on devices running Android OS 5.0 (Lollipop) and below. Here’s a step-by-step guide on how to unlock any phone password using the emergency call feature:
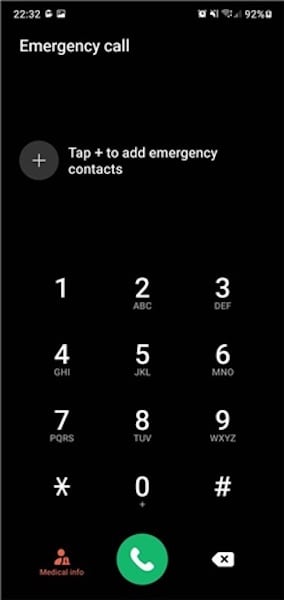
- Step 1: Start by tapping the Emergency Call button on your lock screen. This will bring up the emergency dialer screen.
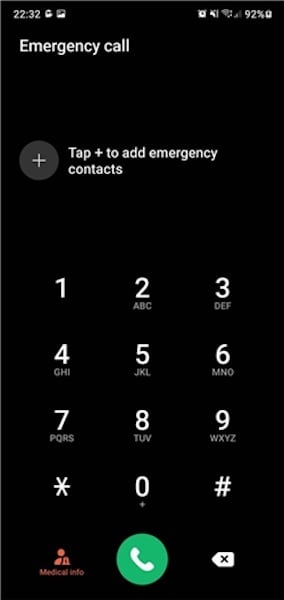
- Step 2: Type a series of special symbols on the dialer screen, such as asterisks (*). Do this several times in a row.
- Step 3: Double-tap the string of symbols to highlight them, then copy the string. Now, tap on the screen to paste the copied string. Repeat this process 10 to 11 times until you can no longer highlight the series.
- Step 4: Go back to the lock screen. Open the Camera app by tapping the camera icon or sliding left. Simultaneously, pull down the Notification Panel from the top.
- Step 5: In the Notification Panel, tap the gear icon to try and access your device’s settings.
- Step 6: When prompted for a password, long-press and paste the copied string into the password field. Repeat this several times until the option to paste is no longer available.
- Step 7: Keep pasting the string until the interface crashes. The lock screen should disappear, and the camera interface will expand. After some time, the camera app should also crash, and your device will unlock, displaying the home screen.
This method, while unconventional, has been known to work on various Android 5 devices, including Samsung models. However, using this technique responsibly and only on devices you own or have permission to access is important. Remember, this method exploits a security flaw and should be used as a last resort.
Part 3: Other Ways To Unlock Your Screen
While the emergency call bypass for Android method is interesting, it’s largely unreliable and outdated, mainly effective on older Android versions. Modern devices have significantly improved security, making this method obsolete. There are other, more reliable methods for those needing to unlock their phone’s screen.
Method 1: Wondershare Dr.Fone – Screen Unlock
Wondershare Dr.Fone is a comprehensive software solution for various mobile issues, including screen unlocking. It’s especially useful when you’ve forgotten your password, pattern, or PIN. Here’s how you can use Dr.Fone to unlock your screen:
![]()
Dr.Fone - Screen Unlock (Android)
The Best UnlockJunky Alternative to Bypass FRP and Solve Your Screen Locks
- Completely unlinked from the previous Google account, it won’t be traced or blocked by it anymore.
- Remove all Android screen locks (PIN/pattern/fingerprints/face ID) in minutes.
- Compatiable with various Android models.
- Provide specific removal solutions to promise good success rate.
4,008,670 people have downloaded it
- Step 1: Launch the Dr.Fone toolkit and go to Toolbox > Screen Unlock. Connect your Android device to your PC.

- Step 2: On the next page, choose Android.

- Step 3: Select Unlock Android Screen, as this is specifically for bypassing the lock screen

- Step 4: Select the brand of your device.

- Step 5: Click Remove without Data Loss to ensure your data stays intact.

- Step 6: Confirm device details. Then, enter “000000” to confirm and initiate the unlocking process.

- Step 7: The software will provide specific instructions to put your device into download mode. Follow them.

- Step 8: Once the process is complete, click Done. If it doesn’t work the first time, try again.

Method 2: Using “Forgot PIN/Passcode” and Google Account
You can use the Forgot PIN/Passcode feature if you’ve linked your phone to a Google account. After multiple failed attempts to unlock your phone, you’ll see a prompt to reset the password via your Google account credentials.
Method 3: Forcing a Data Reset on Your Android Phone
As a last resort, you can perform a factory reset. This will erase all data on your device but remove the lock screen. Access the recovery mode by pressing a combination of keys (usually volume up/down and the power button) and then selecting Wipe data/Factory reset.
Method 4: Booting Into Safe Mode
Booting into safe mode can bypass third-party lock screens. This method won’t work on the default lock screen but can be helpful if an app sets the lock.
In summary, while the emergency call bypass is a thing of the past, there are still various ways to unlock your phone. There’s always a solution, whether through a sophisticated tool like Wondershare Dr.Fone or built-in Android features.
Conclusion
This guide explored how to bypass the Android lock screen using an emergency call. It mainly focused on outdated Android emergency call bypass and more reliable alternatives. Key takeaways include understanding that while older methods like the emergency call bypass are largely ineffective on modern devices, tools like Wondershare Dr.Fone offer a safe and trusted solution.
Learning to unlock your phone screen ensures you’re never locked out of your device, keeping it within your reach. Consider using Dr. Fone- Screen Unlock for a secure and effective way to bypass phone lock screens. It’s an excellent tool for regaining access to your device without risking your data.
Delete Gmail Account With/Without Password On OnePlus Nord CE 3 5G
Email accounts have proven their worth in digital devices beyond sending emails. Lately, Android devices have only operated with a Gmail account. This is because most of the data, such as contact information, messages, and other details, are saved across the storage space offered with the email. Against all recognizable uses of Gmail accounts, users look for ways how to delete Gmail accounts.
To this day, it is known that Gmail accounts can be removed with or without a password. However, one should know that if they consider deleting their Gmail account, they won’t be able to send or receive emails. With that, let’s proceed to reveal all essential methods that can be used to delete a Gmail account permanently. This article will also focus on a perfect tool that assists in making the process easier.
Part 1. Synopsis: Things To Know Before Deleting Gmail Account
Although the process of deleting a Gmail account sounds basic, there are many pointers connected to it. For that, this part is putting up a discussion on the important things that a user should know before they delete their Gmail account permanently:
- No Going Back: If you delete a Gmail account, the process is irreversible. All details and information will be lost, and the email won’t be trackable ever again.
- Cannot Reset Passwords if Connected: If the Gmail account is connected to any other service, make sure that you remember their passwords. Since the account will be deleted, you cannot reset their passwords.
- Access to Other Services: Although you are deleting your Gmail account, you can still access Google Photos, Google Drive, and other services.
- Lookout For Emails: Ensure that the emails in your account are saved. You can easily download them anywhere before deleting the Gmail account.
Part 2. Delete Your Gmail Account Using Your Password: Desktop Solution
For the first method, we will discuss how to delete a Google account with your password. You will use your computer for this process and access the Google Account services. The service helps you save all your essential Gmail data before you remove it. To understand how it makes it possible, look through the steps provided below:
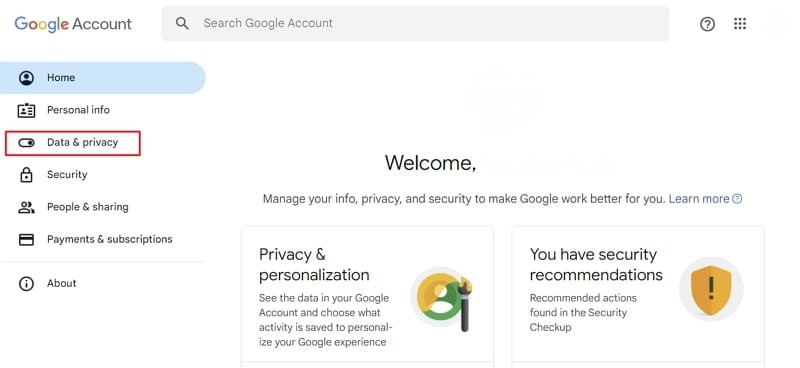
- Step 1. Access the website https://myaccount.google.com/ on your desktop browser and log in with your credentials. Proceed to the “Data & privacy” section from the left panel.
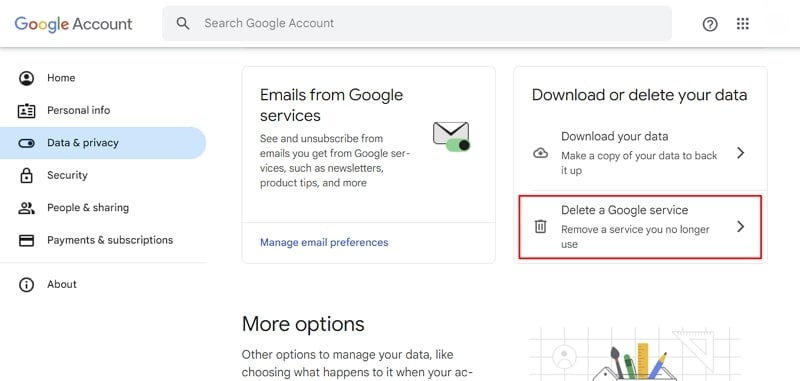
- Step 2. On the following window, scroll down and look for the “Delete a Google service” option. Accessing this would allow you to delete your Gmail account permanently.
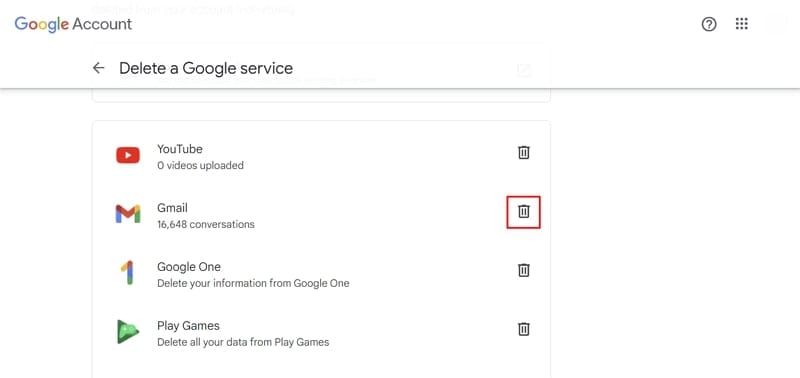
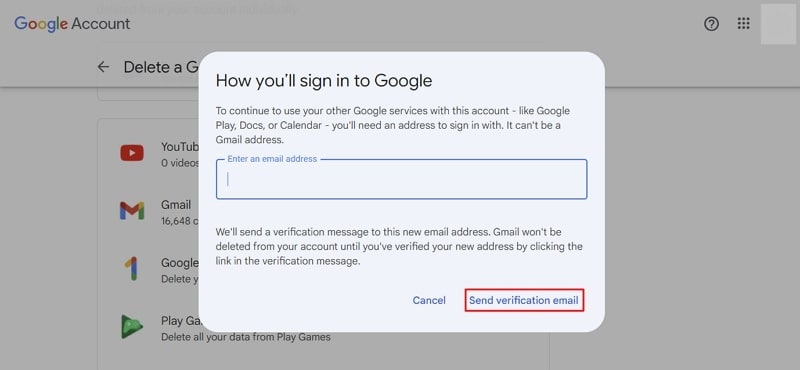
- Step 3. You will be led to a new screen where you need to provide your password credentials again. On successfully providing your password, look for the “Gmail” option on the next screen. Click the “Trash” icon to continue deleting the Gmail account.
- Step 4. A new pop-up window opens, demanding another email address that can help connect to other Google services. Provide the email address and continue to click “Send verification email .” The Gmail account won’t be deleted until the user verifies the email sent to the new address.
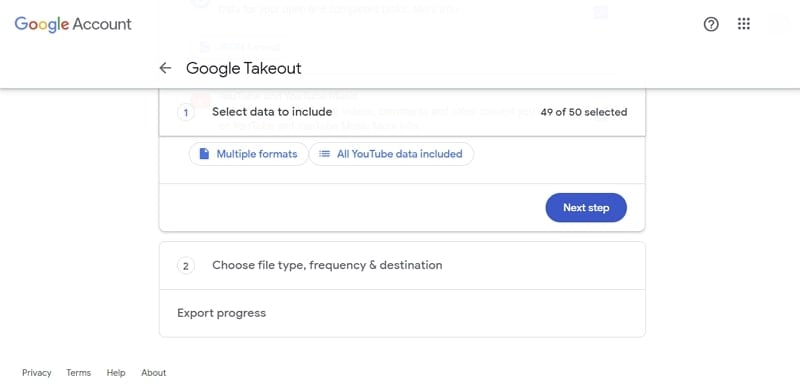
- Step 5. For those who want to save their email data, look for the “Download your data” option in the same window. This leads you to the Google Takeout window, where you need to select the data to include. After selecting the data, define the file type, frequency, and destination for exporting all important data.
Part 3. Delete Your Gmail Account From Your Smartphone: Android & iOS
If you use a smartphone device and want to delete your Gmail account from that particular device, you are at the right place. The following methods will help you understand how to delete Gmail from your Android and iOS devices:
Android Devices
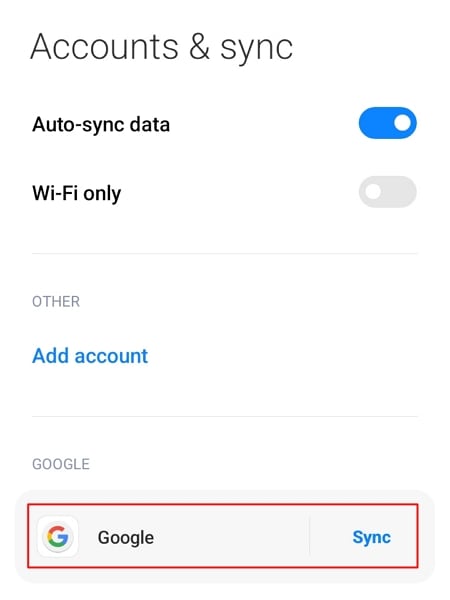
- Step 1. Look for “Settings” on your Android and continue to the “Accounts & sync” option in the list. As you proceed into the next window, look for the Google account and select it.
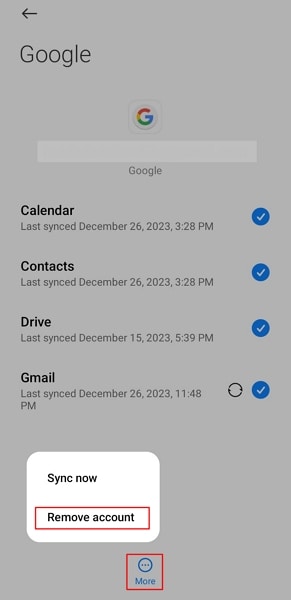
- Step 2. Select the “More” option at the bottom on the following screen. Choose the “Remove account” option in the pop-up menu and provide your credentials to execute the deletion of your Gmail account.
iOS Devices
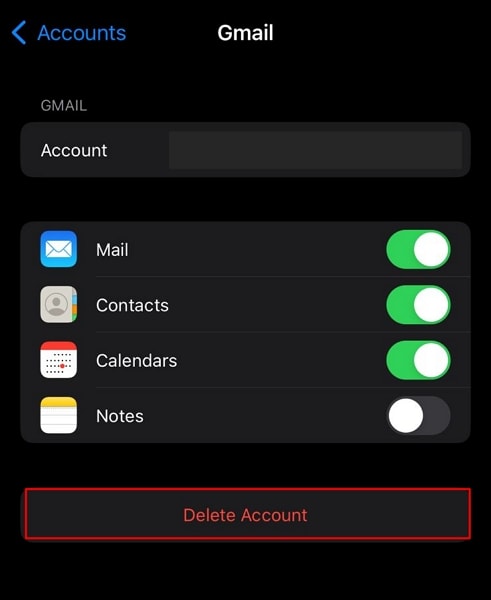
- Step 1. Open your iPhone’s “Settings” app and scroll down to the “Mail” option. You will find the “Accounts” option on the following screen, which you need to tap to proceed.
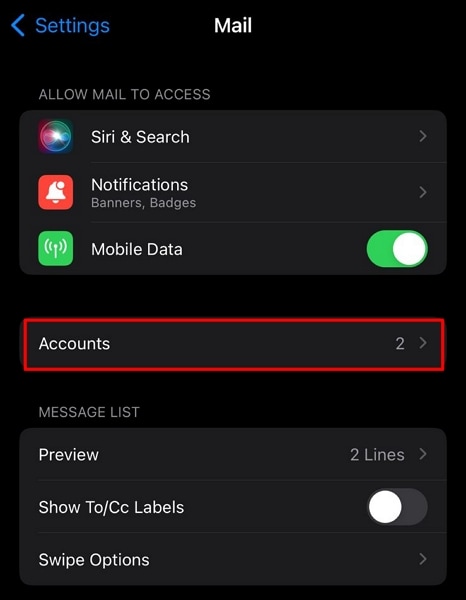
- Step 2. Discover the option of “Gmail” in the list of signed-in accounts and continue to the next screen. Select “Delete Account” to remove the account from your iOS device.
Part 4. Don’t Know Password of Device? Reset To Delete Gmail Account
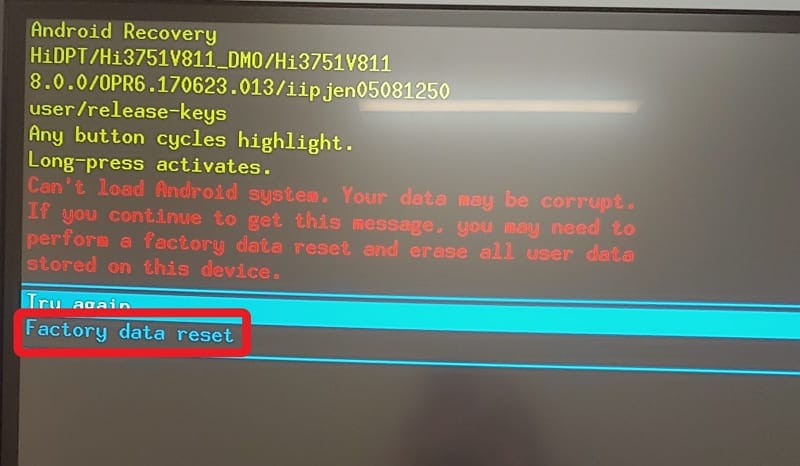
What if you’ve forgotten the password to your smartphone device, and you have to delete your Gmail account permanently? In such cases, you are left with the option of accessing the OnePlus Nord CE 3 5G device’s Recovery Mode and factory resetting the OnePlus Nord CE 3 5G device, where possible. To know how it is done flawlessly, look through the steps provided next:
Android Devices
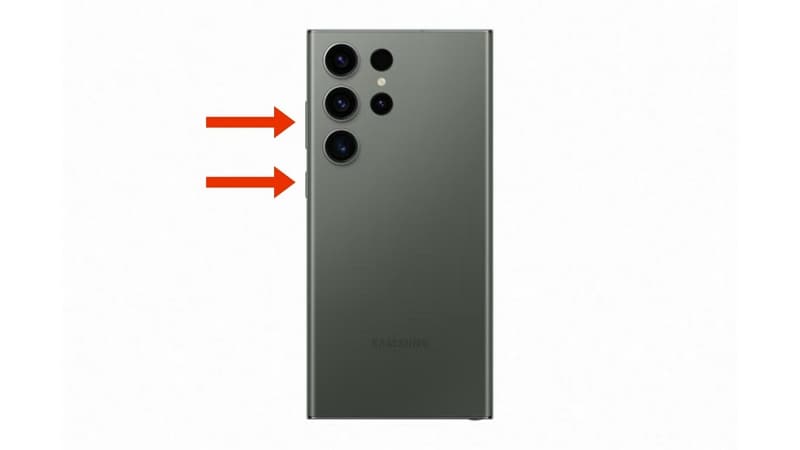
- Step 1. Those owning an Android device need to put it in Recovery Mode first. For that, use the combination of the “Power” and “Volume” keys to put the OnePlus Nord CE 3 5G device in Recovery Mode.
- Step 2. Once you boot into the Recovery Mode, use the Power and Volume buttons to scroll through the menu. Scroll down with the Volume buttons and select the “Wipe data/factory reset” option with the Power button.
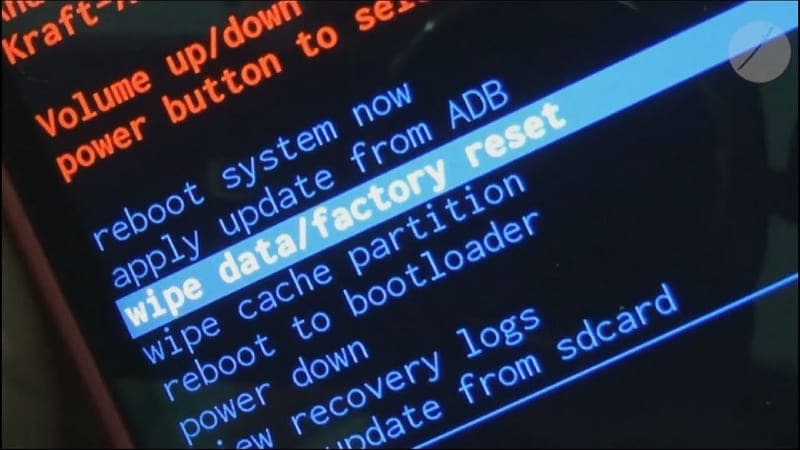
- Step 3. Select “Factory data reset” on the next screen and confirm that factory reset your Android device successfully. The device automatically gets out of Recovery Mode and starts normally after resetting.
iOS Devices
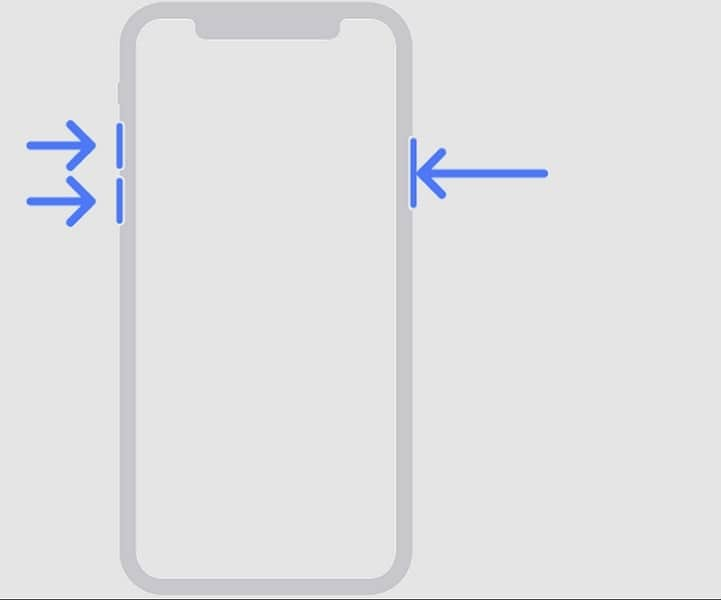
Step 1. You need to turn on Finder if you own a macOS Catalina or later device. Conversely, use iTunes if you have a macOS Mojave or earlier version or if you are using Windows. Connect your iPhone to the computer using the lightning cable and put it in Recovery Mode.
For iPhone X or Later Models: Press and release the “Volume Up” button, followed by the “Volume Down” button. Hold the “Side” button until the Recovery Mode screen appears.
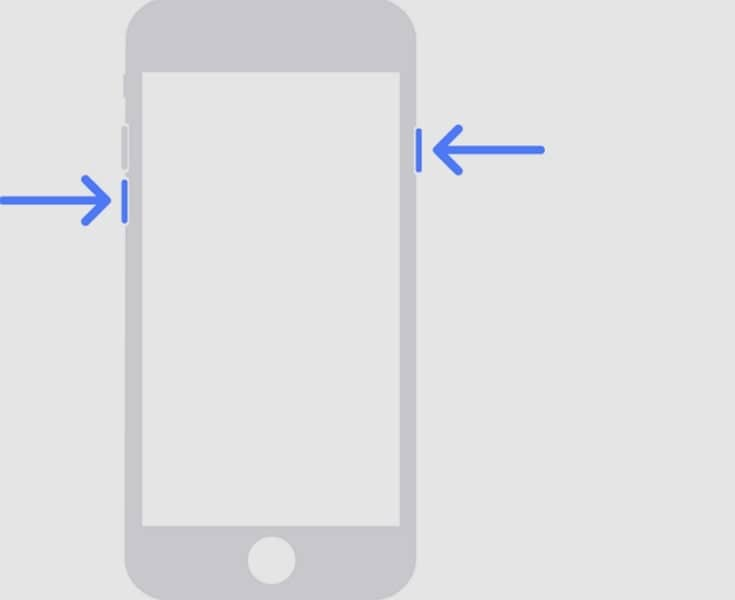
- For iPhone 7 Models: Hold the “Side” and “Volume Down” button until the Recovery Mode screen appears.
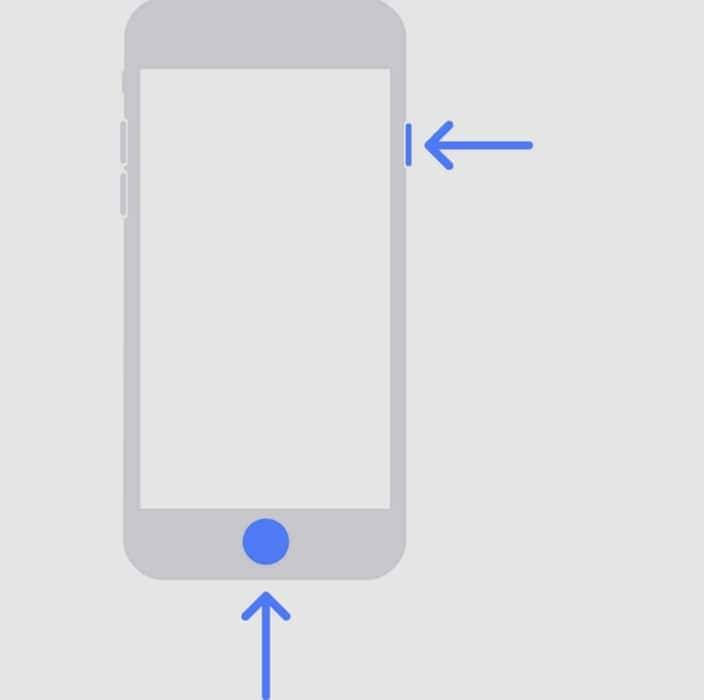
- For iPhone 6 and Earlier Models: Hold the “Side” and “Home” buttons simultaneously until the Recovery Mode screen appears.
- Step 2. The device automatically gets detected on Finder/iTunes, and a pop-up appears on the screen. Click “Restore” to reset your iOS device to factory settings.
Part 5. Remove Gmail Account From Device Without Password: Using Wondershare Dr.Fone
While you seek some appropriate way to close a Gmail account from a device whose password you’ve forgotten, you might get into Wondershare Dr.Fone. This all-in-one service offers a unique Screen Unlock feature that helps you restore your device. If you have forgotten the lock screen password of your Android device, Dr.Fone – Screen Unlock (Android) makes it exceptionally easy to recover.
Key Features of Wondershare Dr.Fone
![]()
Dr.Fone - Screen Unlock (Android)
The Best UnlockJunky Alternative to Bypass FRP and Solve Your Screen Locks
- Remove all Android screen locks (PIN/pattern/fingerprints/face ID) in minutes.
- Bypass the FRP lock of Samsung without a PIN or Google account.
- Everyone can handle the lock screen without any tech knowledge.
- Provide specific removal solutions to promise good success rate.
4,008,671 people have downloaded it
Whether it is your latest Samsung or other Android smartphone, the process is easy to work with. You might look for more details about this unique tool, for which some important features are highlighted as follows:
- It removes all major types of screen locks from your Android devices.
- Provides support to the latest Android devices, along with all mainstream brands.
- You can recover your device with and without data loss, according to your discretion.
Steps To Remove Google Account While Removing Screen Lock
The following steps highlight the way to remove screen lock from your Android device, which would also cover removing the Google Account automatically:
- Step 1.Launch Screen Unlock Feature
To start with the process, launch Dr.Fone on your computer and navigate to the “Toolbox” section. Proceed to the “Screen Unlock” feature, which opens a new window. After selecting “Android” as your device type, select “Unlock Android Screen” from the available options.
- Step 2.Select Device Brand and Unlock Mechanism
As you direct into the next window, select the brand of your Android device. Continue to select “100% Remove Screen Lock” from the following window.
- Step 3. Follow the Instructions and Successfully Remove the Screen Lock
According to your selected device brand, Dr.Fone provides guidelines for entering the specific mode. Follow the on-screen instructions to start unlocking the screen of your device. If the process is successful, click “Done” to conclude using Dr.Fone – Screen Unlock.
Conclusion
This article has specifically provided you with some important details on how to delete a Gmail account with ease. The article explains everything from the methods of deleting it from the computer to removing it from the OnePlus Nord CE 3 5G device. Furthermore, it also serves as a guidance for those who have forgotten their device passwords. For that, they’ve provided an insight into Wondershare Dr.Fone – Screen Unlock and its unique functions.
5 Solutions For OnePlus Nord CE 3 5G Unlock Without Password
One out of three people forget their phone’s password every day or make continuous wrong attempts that lock their phone. However, you can’t unlock your phone without the screen lock pattern or password. If you are an OnePlus Nord CE 3 5G user, and you can’t remember your device’s pattern or password, we have the best solution or you. Here, you will find the easiest and foolproof methods for an OnePlus Nord CE 3 5G pattern unlock.
Here is the complete guide with five methods to unlock an OnePlus device that works in various situations. Every method is easy to use, and you can unlock your phone as long as you follow each step precisely. With our guide, you can remove your OnePlus ‘s pattern, PIN, or password with your Google account. We also have various ways to unlock OnePlus Nord CE 3 5G without your Google account.
Here is a video for you to learn how to unlock OnePlus Nord CE 3 5G without password:
Part 1: Lock System About OnePlus Nord CE 3 5G
1: Lock Types
Before we move towards the OnePlus Nord CE 3 5G pattern unlock, let’s talk about its lock types and security system. OnePlus Nord CE 3 5G is one of the older versions of OnePlus android phones that was released in 2016. At that time, only flagship phones from each brand came with features like fingerprint sensors and facial unlock. OnePlus Nord CE 3 5G doesn’t offer these lock types. You can only set up a screen lock as a password, pattern, and PIN. You can also lock apps on OnePlus Nord CE 3 5G with its privacy password settings.
2: How to Set Them up?
Follow these steps to set up any type of lock on your OnePlus Nord CE 3 5G .
- Open “Settings” on your mobile and select “Lockscreen and Password”.
- The lock system menu would appear if your device had no screen locks. If your device has a screen lock, you will have to enter the password to enter the settings.
- Select the “Lockscreen Password” option at the top and tap on the “Enable Lock Screen” button.
- Select the type of lock you want to set and create a password.
3: How to Remove Them with Password or Pattern?
You can easily remove the lock screen of your OnePlus Nord CE 3 5G if you remember your password or pattern.
- Go to “Settings” and follow the previous steps to open the “Lockscreen Password” settings.
- Disable the lock screen by tapping on the “Enable Lock Screen” button once.
- Enter your password or pattern and wait for the system to remove the screen lock.
Part 2: 5 Solutions to Unlock OnePlus Nord CE 3 5G Without Password or Pattern
1: Google Find My Device
You can use the Google Find My Device for your OnePlus Nord CE 3 5G pattern unlock. It is a simple privacy and security Google feature that enables users to reset their android phones. Most people use it to factory reset their phones when someone steals their phones. Although Google Find My Device works every time, it is not the ideal solution if you don’t want to lose your data. With a hard reset, you lose all your data and settings. It is not worth it if all you want to do is unlock your screen. Here are the steps to unlock OnePlus Nord CE 3 5G with Find My Device.
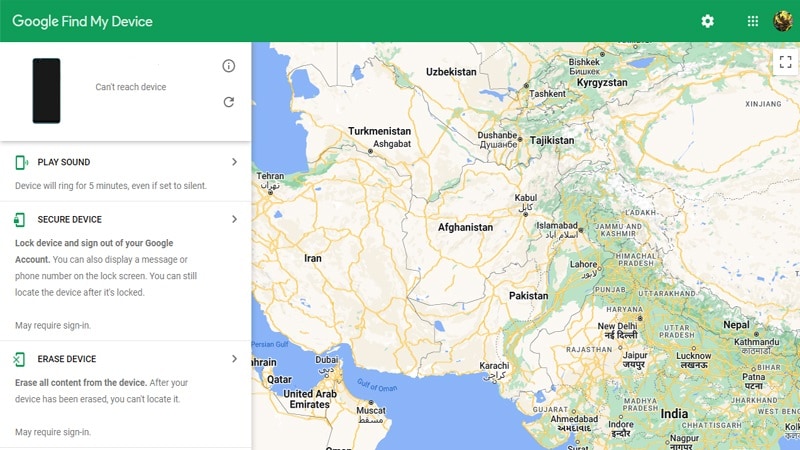
- Open any browser on your PC and visit “Google Find My Device.”
- Make sure your phone is connected to the internet.
- Select the “Erase Device” option and log in with your Google account.
- After verification, click on “Ok” and wait for the system to factory reset.
- Power on your device and enter it without any pattern or password.
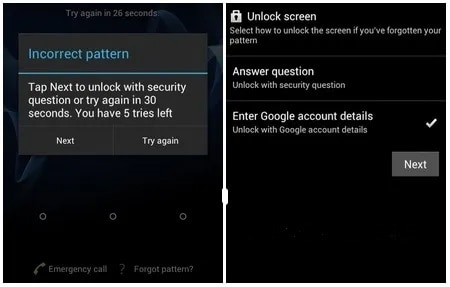
2: Google Account
Here is how you can do an OnePlus Nord CE 3 5G pattern unlock without PC. You don’t need any third-party software or device for this method. Every step is easy to follow, and it only takes a few minutes for you to unlock your phone. This method requires your Google account and password. Don’t use this method if you don’t know your Google password. If you are a beginner, it is better to use other methods because this method involves the risk of blocking your device. Follow these steps to unlock your OnePlus device using your Google Account.

- Enter a random password or PIN on your phone’s lock screen five times.
- Wait for the system to give the alert message after you enter the wrong password five times.
- Now, wait for 30 seconds until the system asks you to enter your lock screen password.
- At the bottom left corner, tap the “Forgotten Password” option.
- Now the system will ask for your Google account and password.
- After you verify your Google account, you can enter your device.
3: Answer Security Questions
If you want to unlock your OnePlus phone, you can also answer some security questions and reset the password. This method does not work on all OnePlus devices, but you can use it for OnePlus Nord CE 3 5G screen unlock without PC. You will see various questions if your Google account is linked with the OnePlus Nord CE 3 5G device. All questions are based on your profile and credentials. You have to answer precisely with proper spaces. Here are the steps to unlock OnePlus Nord CE 3 5G with security questions.
- Use a random password or PIN five times and wait for the 30 seconds alert message.
- Tap on the “Forgot Pattern” option and move to the next screen.
- Select the “Answer Question” option if you want to unlock security questions. You can also select “Enter Google account details” if you know your Google account password.
- Tap on the “Next” button and answer every question that comes up.
- If you give correct answers, the system will open the screen lock.
4: Hard Reset (data loss)
A hard reset would be the best solution if you forgot your phone’s lock screen password or pattern. However, you can unlock your phone with your Google account as well. Do a hard reset if you can’t remember your Google account password and don’t want to use third-party tools. The only problem with hard resetting is that you lose all your data, images, files, settings, and personalization. That is why you can’t recover any of your data after the hard reset if you don’t have a data backup. The process of hard reset is different for every device. Here are the steps for OnePlus Nord CE 3 5G pattern unlock without a PC through a hard reset.
- Switch off your OnePlus Nord CE 3 5G with the power button.

- Press and hold the Volume down + Power buttons together for a few seconds. Hold the keys until you see the OnePlus logo on the screen.

- Select the Language using the volume keys to navigate and the power key to select.

- Go to the “Wipe Data and Cache” option and select twice using the power key.

- For confirmation, select the “OK” option and wait for the system to reboot.

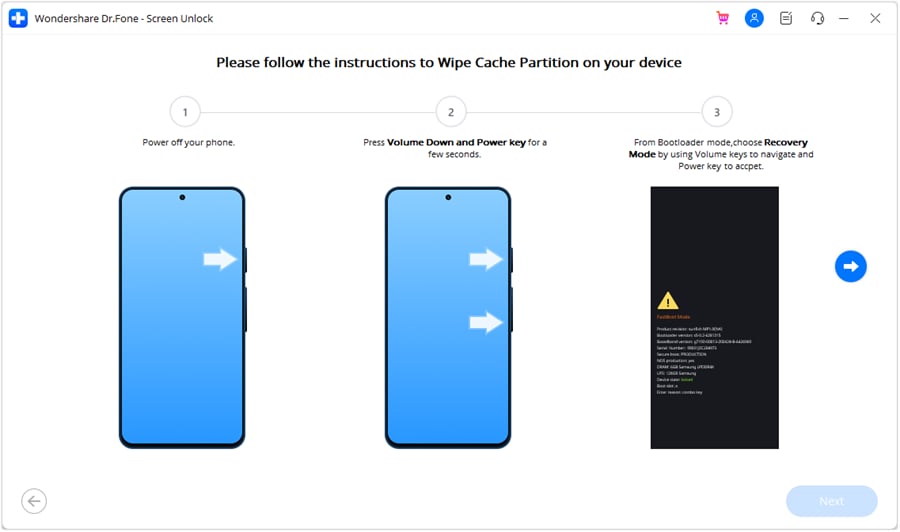
5: Dr.Fone - Screen Unlock
You can easily unlock your OnePlus device without your Google account password and losing data. The best way is to use an OnePlus Nord CE 3 5G pattern lock removal tool. If you want an easy-to-use tool with fast and safe working, we recommend Dr.Fone - Screen Unlock. Dr.Fone enables users to unlock any android device within five minutes without password, Google account. You can unlock your OnePlus Nord CE 3 5G without effort. With Dr.Fone, you can also back up and restore your data , do a system repair for your mobile, and transfer WhatsApp with a few clicks. Here are the steps to remove the pattern lock from OnePlus Nord CE 3 5G with Dr.Fone – Screen Unlock.
![]()
Dr.Fone - Screen Unlock (Android)
The Best Tool to Unlock OnePlus Nord CE 3 5G Without Any Hassle!
- Remove all Android screen locks (PIN/pattern/fingerprints/face ID) in minutes.
- Remove the lock screen without data loss for part of Samsung and LG devices.
- Everyone can handle the lock screen without any tech knowledge.
- Provide specific removal solutions to promise good success rate.
4,008,672 people have downloaded it
Step 1. Click the “Start Download” button to download the software on your PC.
Open Dr.Fone on the PC with a USB cable connected to your phone > click “Screen Unlock” from the home page.
Step 2. Select Unlock Android Screen
With the button “Unlock Android Screen”, you can unlock your OnePlus Nord CE 3 5G via this part.
Step 3. Select Unlock mode: 100% Remove Screen Lock
When you’re on this page, “100% Remove Screen Lock” can unlock most phone brands’ screens. Because of the different recovery modes of different phone models, selecting the OnePlus Nord CE 3 5G device brand plays a great role in removing the lock.
Step 4. Now, it’s time to start removing the lock screen
Follow the guide step by step to complete all steps, these steps are important to unlock your OnePlus Nord CE 3 5G .
Now, no password or pattern to stop you from using your OnePlus Nord CE 3 5G !

Conclusion
If you know your Google account password, then you can easily unlock your phone after verification. If you don’t know the password, you can use a hard reset to erase all data and settings from your device. Use the Dr.Fone - Screen Unlock (Android) if you don’t want to lose your data. Dr.Fone allows you to unlock your OnePlus Nord CE 3 5G within minutes with easy-to-follow steps. It works for all old and new OnePlus models, and the procedure is the same for every device. You can also use Dr.Fone to recover data, repair android software problems, and fix other issues.
Also read:
- [New] 2024 Approved 29 Cost-Free YouTube Sound Extractors Free YouTube Audio Downloads
- [New] Perfect Picture Spotlights How to Zoom in & Out on Insta Stories
- 10 Easy-to-Use FRP Bypass Tools for Unlocking Google Accounts On Realme 12 Pro+ 5G
- 2024 Approved USB-C Revolution in Monitors HP Envy 27'S Journey
- 最新のセキュリティと耐久性でWindows 7-11の古いバックアップイメージを適切に廃棄する手順
- All You Need To Know About Mega Greninja For Oppo A1x 5G | Dr.fone
- Fixing the Total War: Three Kingdoms Game Crash Problem
- How to Reset a Locked Oppo Reno 9A Phone
- In 2024, How to Unlock Poco M6 Pro 5G Phone Password Without Factory Reset?
- In 2024, Lock Your Poco X6 Pro Phone in Style The Top 5 Gesture Lock Screen Apps
- Latest Version of Zexmte Bluetooth Adapters with Cross-Platform Support (Win 10/7/8)
- プロ録音MP3を大切に - WinPC/Android上で失われたものが無料復元可能
- Title: How To Unlock Any OnePlus Nord CE 3 5G Phone Password Using Emergency Call
- Author: Aaron
- Created at : 2024-12-08 18:17:46
- Updated at : 2024-12-13 23:52:51
- Link: https://easy-unlock-android.techidaily.com/how-to-unlock-any-oneplus-nord-ce-3-5g-phone-password-using-emergency-call-by-drfone-android/
- License: This work is licensed under CC BY-NC-SA 4.0.