How To Unlock a Nokia G310 Easily?
How To Unlock a Nokia G310 Easily?
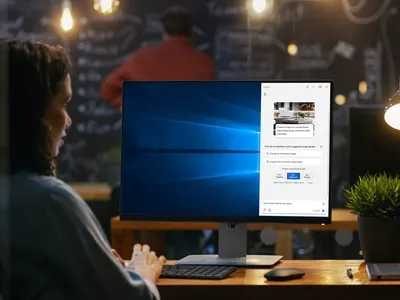
The Nokia series has made a significant splash in the smartphone market. It captivated users with its blend of innovative features and sleek design. The Nokia G310 have recently been the go-to choice for people following the phone series. If you’re a proud owner of Nokia G310 , this guide is your go-to reference for unlocking the full potential of your device.
It will cover various ways toperform a Nokia G310 unlock, no matter the context of what you need unlocking for. This ensures you can enjoy every aspect of your shiny new Pixel to the fullest. Whether you’re a tech enthusiast or a casual user, these tips and tricks will help you master your Nokia device.
![]()
Part 1: Ways That Nokia Lets You Unlock Your Nokia G310
Nokia G310 are more than just smartphones; they are gateways to a personalized and secure user experience. To access the myriad of features these devices offer, Google provides several unlocking methods, ensuring both convenience and security. Here are these options:
- A Personal Identification Number (PIN) is a simple yet effective way to secure your phone. It’s a numeric code that you enter on the lock screen. Setting up a PIN is straightforward via the Nokia G310 device’s security settings, and unlocking your phone is as easy as tapping in the correct sequence of numbers.
- Similar to a PIN but potentially more secure due to the allowance of a longer combination of numbers and letters. A passcode is ideal for those who seek an extra layer of security. You set it up in the security settings and use it to unlock your phone just like a PIN but with the added complexity of alphanumeric characters.
- Face Unlock.Pixel’s Face Unlock uses advanced facial recognition software. It scans your face to grant access, offering a hands-free and quick way to unlock your Pixel. This feature can be activated in the security settings and requires a simple glance at your phone to unlock.
![]()
- Fingerprint Unlock. This method uses your unique fingerprint as a key. It’s fast, secure, and convenient. The Pixel 6a, 6, and 7 fingerprint scanners are actually under the display. Register your fingerprint in the settings, then touch the sensor to gain access.
- Pattern. If you prefer a more visual method, the pattern lock lets you draw a specific shape or pattern on the screen to unlock your phone. It’s a fun and interactive way to secure your device. Create your pattern in the security settings, and unlock your phone by replicating it on the lock screen.
In essence, each unlocking method offered by the Nokia G310 provides a blend of security and ease. Whichever unlocking method you prefer, Google ensures that accessing your phone is secure and convenient. All you need to do is set up your preferred method in the Nokia G310 device’s settings and use it to unlock your phone.
Part 2: What To Do if You Forgot Your Screen Unlock Method
Forgetting the screen unlock method on your Nokia G310 , whether it’s a PIN, passcode, pattern, or encountering face or fingerprint recognition issues, can be a frustrating experience. Fortunately, there are methods to regain access to your device. This section will show you your options, from third-party tools to other methods like Safe Mode and force resetting.
Learn different ways to unlock a Nokia G310, from forgotten screen locks here.
Method 1: Wondershare Dr.Fone
Wondershare Dr.Fone is a comprehensive software suite that manages various aspects of your mobile device. It’s especially renowned for its ability to address common smartphone issues, including forgotten screen unlocks.
Dr.Fone offers a range of features, including data recovery, data transfer between devices, backup and restore functions, and a screen unlock feature. The Screen Unlock feature of Dr.Fone stands out for its ability to bypass your Nokia’s screen lock without losing data. It supports PIN, pattern, password, fingerprint, and face lock.
To do this, perform the steps below:
- Step 1: Download and install Dr.Fone on your computer. Then, connect your Pixel phone to it with a cable.
Step 2: Go to Toolbox > Screen Unlock. Then, use a connector to connect your Pixel device to the PC.

- Step 3: Select Android on this page.

- Step 4: Choose Unlock Android Screen, and select your phone’s brand (Google) in the following brand list.

- Step 5: Now, choose Remove without Data Loss.

- Step 6: Ensure the correctness of your device details. Then, type in “000000” to proceed.

- Step 7: Follow on-screen instructions to put your device into download mode.

- Step 8: Click Done after the process has finished.

Tips: Is your Pixel locked accidently? Are you searching for a powerful tool? No worries as Dr.Fone is here to help you. Download it and start a seamless unlock experience!
Method 2: Entering Into Safe Mode
Safe Mode is a diagnostic mode in Android that can help bypass third-party lock screen apps. It’s useful if you’ve used a third-party app for your lock screen.
To do this, press the power button, then long-press on the Power off option. Tap OK when Reboot to safe mode option appears. In Safe Mode, third-party apps are disabled. Thus, you can now access your device if a third-party app is causing lock issues.
Method 3: Force Resetting a Device/Flashing a New ROM
Force resetting or flashing a new ROM can be considered a last resort. They involve erasing all data on your device or installing a new operating system.
- Force resetting your device. To force reset your Nokia, press and hold the Power and Volume Down buttons simultaneously to enter recovery mode. Use the volume buttons to navigate to Wipe data/factory resetand select it with the power button. This will get rid of existing password locks.
- Flashing a new ROM. This is more complex and typically requires downloading a new firmware and flashing tool. It’s only recommended for advanced users or as a last resort.
Remember, while these methods can effectively unlock your device, they also come with risks. Always back up your data regularly, and use these methods responsibly, considering their potential to erase your data or affect your device’s warranty.
Bonus: How To Perform a SIM Unlock on Nokia
Unlocking the SIM on your Nokia, particularly the Nokia G310 , opens up a world of flexibility, especially for those who frequently travel or wish to switch carriers. This process can be accomplished for free through your carrier, provided certain conditions are met. Dive into the steps and considerations for performing a SIM unlock on your Nokia.
Understanding the Prerequisites
Before proceeding with the SIM unlock, ensure you’re in good standing with your carrier. This means:
- No outstanding bills.
- Your contract for the phone has expired.
- The device has been in your possession for at least 60-90 days.
Different carriers have varying requirements for a SIM unlock, so your first move should be to contact them for specific details.
Steps for SIM Unlock Through Your Carrier
Here are the steps to SIM unlock your Nokia G310,These generally involve the following steps but are still subject to the official instructions of your carrier:
![]()
- Step 1: Open the Phone app and dial *#06# on your Nokia. This will display your phone’s IMEI number. Note this number down for future reference.
- Step 2: Call your carrier and request a SIM unlock code. You’ll likely need to provide your Nokia’s IMEI number.
- Step 3: If you meet your carrier’s requirements, they will email you the SIM unlock code within 2-5 days.
- Step 4: Once you receive the code, replace your current SIM with one from a different carrier. When prompted, enter the SIM unlock code you received via email.
Alternative Method: Android SIM Unlock
If your carrier cannot unlock your Nokia G310 ’s SIM, or if you prefer a quicker solution, consider using network unlocking services. This may be websites like UnlockBase, Mobile Unlocks, etc.
This generally involves the following steps:
- Step 1: Like the previous method, retrieve your IMEI number by dialing *#06# on your Pixel.
- Step 2: Go to the Android SIM unlock provider’s website and enter your device’s IMEI number.
- Step 3: Follow through with the checkout process, providing payment and contact information.
- Step 4: Once the payment is processed, you’ll receive the unlock code via SMS or email. Insert a SIM from a different carrier into your Pixel, then enter the received unlock code when prompted.
By following these steps, you can successfully unlock the SIM of your Nokia device, ensuring you can enjoy your phone with the carrier of your choice, wherever your travels may take you.
Important Considerations
Remember, unlocking the SIM doesn’t absolve you from your carrier contract. You’re still obligated to make timely payments as per your agreement. The primary advantage of unlocking your SIM is the freedom to use your Nokia G310 with any carrier’s SIM card, offering greater flexibility and control over your mobile experience. Thus, it is encouraged not to do anything illegal to avoid future complications.
Conclusion
This article explored various methods to unlock Nokia G310,It delved into standard unlocking features like PIN, passcode, face and fingerprint recognition, pattern unlock, and how to handle situations where you forget your screen unlock method. It also highlighted that learning to unlock your screen, especially on Nokia phones, is crucial to ensure continuous access to your device.
Wondershare Dr.Fone is a reliable tool for those challenging moments when you forget your passcode. It offers a straightforward solution for screen unlocking and ensures you keep your phone functional and handy at all times.
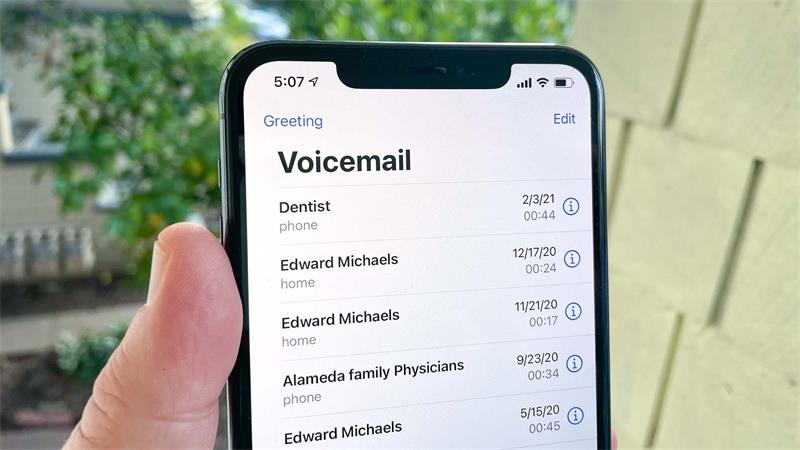
Forgotten The Voicemail Password Of Nokia G310? Try These Fixes
You can always stay in touch with friends, family, and coworkers thanks to voicemail support, which is provided by most cell phones. However, forgetting the voicemail passcode is simple when we must remember many codes to open various devices. Fortunately, there are workarounds you can use to get back into your voicemail mailbox. Keep reading to find out what to do if you forget your voicemail password.
Part 1: 3 Easy Ways To Reset Or Change Your Lost Voicemail Password
1. Contact your carrier
Your carrier can also unlock your voicemail. Get in touch with your carrier and ask for an unlock. For unlocking, your account may need to satisfy certain conditions. The request can take a few days to be processed after you submit it.
Get in touch with your carrier to find out the status of your unlock request.
The actions following should be followed when your carrier certifies that the voicemail has been reset.
- Take your SIM card out.
- Put the new SIM card in. Your gadget will turn on, and you will be able to generate a new voicemail password.
2. Use your code to reset password
To change your Voicemail password, use star codes. Fortunately, this process is quick and easy, and you won’t need to contact customer care to change your password.
Use the star code as follows:
- Type #793# into the dialer app on your phone.
- Press the Call key.
- Await the instructions.
This will change your voicemail password to your phone’s last four digits.
You can also reset your voicemail password, which means that you can generate a new code by resetting it from the settings. Let’s have a look at how you can do this.
- Open My Wireless from your account summary.
- Select the Nokia G310 device you wish to manage by scrolling to My Devices & Add-ons.
- Choosing Manage my device.
- Look under Device choices & settings, choose Reset voicemail password, then adhere to the on-screen instructions.
3. User carriers’ apps or websites
All of the apps/websites below enable you to reset a voicemail password because they are purely user carrier apps or websites that are recommended officially.
- Vxt
Their voicemail is visually shown via the app.
Your voicemails will be converted to text by Vxt, which will then provide a preview on your lock screen.
Carrier: US Cellular, AT&T, MetroPCS, T-Mobile, Verizon, Alltel, Cricket
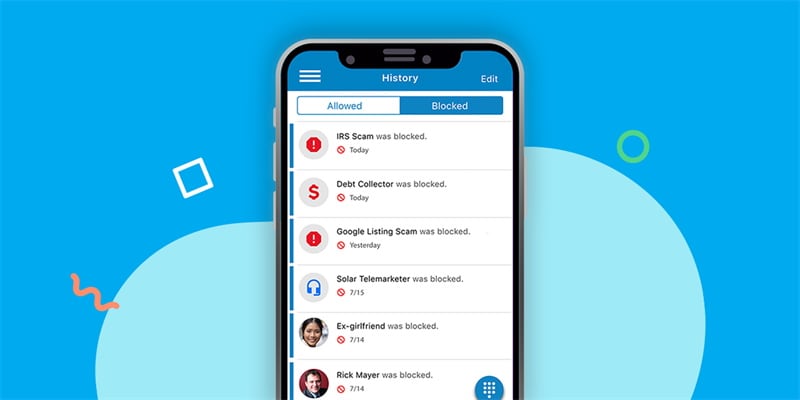
- YouMail
YouMail is an Android app that helps you to control visual voicemail. Additionally, it provides some great call-blocking features. With the help of this program, unsolicited calls will never longer ever reach you.
Carrier: US Cellular, AT&T, MetroPCS, T-Mobile, Verizon, Alltel.
- Visual voicemail from AT&T
You can view the caller’s name and phone number before listening to their message, which makes monitoring your voicemail incredibly simple.
Carrier: US Cellular, AT&T, MetroPCS, T-Mobile, Verizon, Alltel, Cricket
Part 2: FAQs
1. How To Know My Default Voicemail Password?
Depending on your carrier, the default voicemail password is either the last seven or final four digits of your phone number. Your voicemails should be accessible if you dial the number without the area code. In this way, you can quickly get your default voicemail password.
2. Can I Remove My Voicemail Password?
From your mobile device, dial 123 to see the password for your voicemail. To enable (add) or disable (delete) your voicemail password, choose option 4. To enable or disable the screen password, select option 1. If your password has been deactivated, dialing 123 will not ask you to enter one.
3. How Can I Receive Voicemail Messages From Another Device?
You may access your mailbox on another phone if your phone is out of reach or the battery is dead. Make a call to your phone number from a different one. Tap the pound key (#) on the phone’s dial pad after the prerecorded “Please leave a message” greeting has begun to play. Enter the pin from your voicemail to start receiving messages from another device.
Bonus Tip: Best Tool When You Forgot The Phone Password
![]()
Dr.Fone - Screen Unlock (Android)
The Best Tool to Remove the Phone Screen!
- Completely unlinked from the previous Google account, it won’t be traced or blocked by it anymore.
- Remove all Android screen locks (PIN/pattern/fingerprints/face ID) in minutes.
- Almost all Samsung phones and tablets are supported (Currently for Android 6-14).
- Provide specific removal solutions to promise good success rate.
4,008,670 people have downloaded it
Dr.Fone - Screen Unlock (Android) is the ultimate solution when you are sort of a person who always forgets passwords and does not even have any technical knowledge. We always recommend you use easy and safe tools; Dr.Fone - Screen Unlock (Android) is one of them. Here’s how you can use this tool when you forget the phone password and want to recover it on your own.
Step 1: Connect your phone
Installing Dr.Fone on your computer is the first step. From the list of available tools, select “Screen Unlock” from the drop-down menu.

When connecting your locked phone to the PC you wish to save the wallpapers after unlocking it, you should think about utilizing a USB cord. You must select the “Unlock Android Screen” option on the program.
Step 2. Select Unlock Android Screen
In this interface of Dr.Fone, please select “Unlock Android Screen” to keep your unlock process, or your phone cannot be unlocked as you wish.
Step 3. Select device model
Besides a part of Samsung and LG models, “100% Remove Screen Lock” includes most Android phone brands. Please choose your phone brand, and don’t make it wrong!

Here is the brand list; you can check it and find your phone brand.

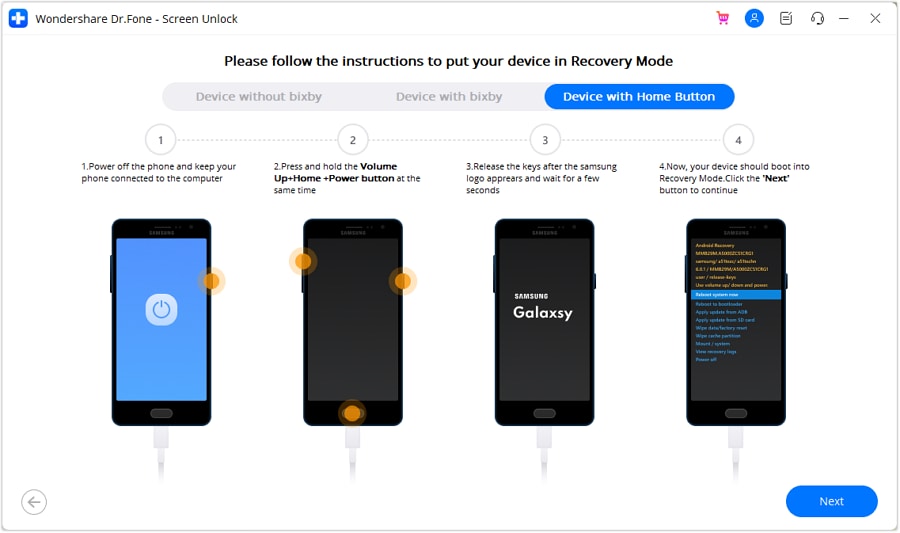
Step 4. Enter into Recovery Mode
Then follow the instructions on the program to get the Android phone into Recovery Mode. Here we take 3 different models of Samsung phones as examples.
Note: Different brands have different steps to enter the Recovery Mode.
Go to the Recovery Mode on Samsung phone with Bixby
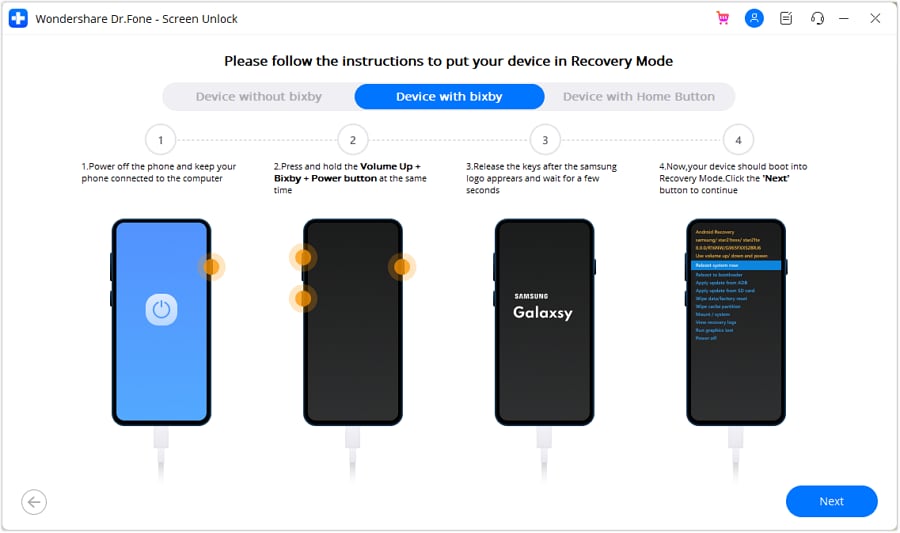
Go to the Recovery Mode on Samsung phone without Bixby

Go to Recovery Mode on Samsung phone with Home Button
Step 5. Instructions to Wipe Cache Partition
Good! You’re now in the final step, be careful to choose the correct options so that the whole process will be perfectly over.
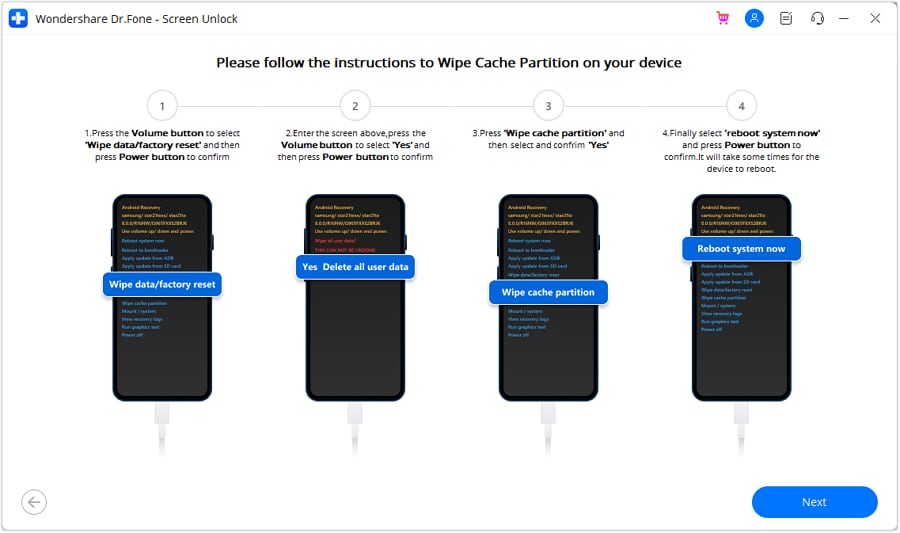
Now no pattern or password is on your phone screen to bother you!

This is how you can easily get rid of phone lock issues.
The Bottom Line
The voicemail function on your mobile device is a crucial tool for improving your interpersonal relationships. You must always have access to it because of this. You may use your iPhone or Samsung smartphone to receive a temporary code even if you forget your password. Alternatively, you can follow instructions for resetting your passcode on the carrier’s app or website.
Have you ever experienced voicemail lockout? Which technique did you employ to fix the issue? Did you know how to reset voicemail password on Android? Comment below with your thoughts and let us know.
7 Ways to Unlock a Locked Nokia G310 Phone
“How to get into a locked phone? I have been locked out of my Android device and lost my passcode!”
If you are also facing the same issue, then you have come to the right place. There are plenty of ways to learn how to get into a locked Android phone when it comes to Android devices. From using a third-party tool to Google’s native solution – the sky is the limit. This post will make you familiar with different ways to unlock a device without knowing its passcode. Read on and learn how to get into a locked Android device.
 safe & secure
Part 1: How to get into a locked phone with Dr.Fone?
Dr.Fone - Screen Unlock (Android) provides a hassle-free solution to unlock an Android device in minutes. It can remove a device’s PIN, password, pattern, and even fingerprint security without causing any harm to it. Therefore, you would be able to unlock your device without losing your data while using some Samsung or LG Android phones. If you want to break the locked screen with Dr.Fone from other brand phones, including iPhone, Huawei, and Oneplus, it will wipe out your phone’s data after unlocking successfully.
![]()
Dr.Fone - Screen Unlock (Android)
Get into Locked Phones within Minutes
- 5 screen lock types are available: pattern, PIN, password, fingerprints & Face ID.
- Easily remove the lock screen; No need to root your device.
- Everybody can handle it without any technical background.
- Provide specific removal solutions to promise good success rate.
4,008,669 people have downloaded it
To learn how to get into a locked phone using Dr.Fone, follow these steps:
- Step 1. Go to the official website of Dr.Fone - Screen Unlock (Android) and download the tool on your computer. After installing it, launch the interface and click on the option of “Screen Unlock” from the home screen.
- Step 2. Connect your Android device to the computer. Click “Android” > “Unlock Android Screen” and select the Nokia G310 device brand on the list. If your device is listed in the supported list , you can unlock locked phone without data loss.
- Step 3. Now, you need to put your Android device in Download mode. To do this, you need to turn your device off by pressing the Power button. Afterward, press the Home, Power, and Volume Down buttons together. After a while, let go of these buttons and press the Volume Up button to enter the Download Mode.
- Step 4. As soon as your device is not in the Download Mode, Dr.Fone will automatically start downloading its respective recovery packages.
- Step 5. Sit back and wait as the application downloads the package and performs the required steps to unlock your device. In the end, it will notify you by displaying the following message.
That’s it! By following these steps, you would be able to learn how to get into a locked Android phone without losing any data.
Tips: Cannot find your device model in the supported list or your phone is not Samsung? Worry not, as Wondershare Dr.Fone can also help you to unlock other device models (inlcluding Huawei, LG, Xiaomi, etc) in a matter of seconds. Just install this tool on your computer and connect your phone to start the unlock process!
Part 2: How to get into a locked phone with Android Device Manager?
Google’s Android Device Manager (also known as Find My Device) can be used to locate a lost phone, erase it remotely, ring it, and change its lock. You can access it from any other device and use its features remotely.
- Step 1. Firstly, go to the Android Device Manager’s website right here . Log in with the Google account that is already linked to your Android device.
- Step 2. Once the interface is loaded, you can select your phone. It will locate the Nokia G310 device automatically and provide various options.

- Step 3. Choose the “Lock” option to proceed.
- Step 4. This will display a new prompt. From here, you can get the new password for your device and confirm it.

- Step 5. Additionally, if your device is lost, you can display an optional message and contact number on the lock screen. Click on the “Lock” button to save changes and exit the screen.
Part 3: How to get into a locked phone with Samsung Find My Mobile?
If you are using a Samsung device, you can also use its Find My Mobile service to unlock your device remotely. It is an excellent tool that can be accessed remotely and perform a wide range of operations that can be performed on the Nokia G310 device. Follow these easy instructions to learn how to get into a locked Android Samsung device.
- Step 1. Open Samsung’s Find My Mobile website right here on any device of your choice.
- Step 2. Login using the credentials of the Samsung account linked to your existing device that is needed to be unlocked.
- Step 3. On its dashboard, you can access various features associated with your device. If you have multiple devices linked to your account, you can select it from the top-left panel.

- Step 4. From the provided options on the left panel, click on the “Unlock My Screen” option.
- Step 5. Click on the “Unlock” button again to move past the lock screen of your device.

- Step 6. After waiting for a while, you will get the following prompt. From here, you can set up a new lock for your mobile or can click on the “Lock My Screen” option to do the same.
Part 4: How to get into a locked phone using the ‘Forgot Pattern’ feature?
If your device is based on Android 4.4 and earlier versions, you may also use its native “Forgot Pattern” feature to unlock it. Though, you should have access to the Google account credentials linked to the Nokia G310 device beforehand. To learn how to get into a locked phone with this technique, follow these steps:
- Step 1. To get the Forgot Pattern option, enter the wrong PIN/pattern on your device.
- Step 2. This will display the “Forgot Pattern” button on the bottom of the screen. Just tap on it to continue.

- Step 3. On the next screen, you can unlock your device by providing the backup PIN of your device or sign in using the Google credentials of the account linked to the Nokia G310 device.

- Step 4. After bypassing this feature, you can unlock your device and set up a new PIN or pattern.
Part 5: How to get into a locked phone by factory reset?
If nothing else seems to work, then you can also choose to factory reset your device. Even though this will unlock your device, it would also erase its content and saved settings. To know how to get into a locked Android phone, follow these steps:
- Step 1. Turn off your device by pressing the Power button.
- Step 2. Now, you need to put your device into recovery mode. This can be done by applying the correct key combinations, which can differ from one device to another. Some common combinations are: Volume Up + Home + Power, Home + Power, Volume Up + Power + Volume Down, and Volume Down + Power button.
- Step 3. Once your phone has entered the recovery mode; you can navigate with the Volume up and down button and use the Power button to make a selection.

- Step 4. Select the option of “wipe data/factory reset.
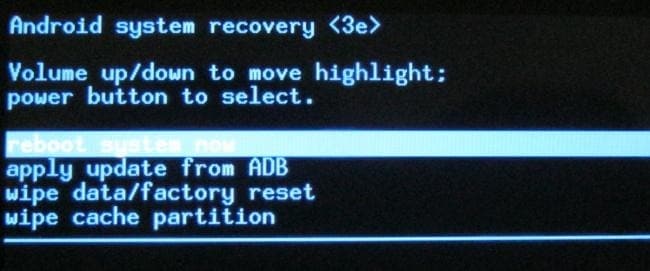
- Step 5. This will display the following prompt. Confirm your choice by selecting the “Yes” option.

- Step 6. Wait for a while as your phone will be restarted with factory settings.
Part 6: How to get into a locked phone in Safe Mode?
If you are using a third-party application to lock your device, you can easily disable it by restarting your phone in safe mode. In this way, you can get rid of the respective app without causing any damage to the Nokia G310 device. You can learn how to get into a locked Android phone by following these steps:
- Step 1. Long-press the Power button to activate the Power option on the screen.
- Step 2. If you don’t get the option to restart the phone in Safe Mode, then long tap the “Power off” option.
- Step 3. It will provide the following prompt regarding Safe Mode. Just tap on the “Ok” button to confirm your choice.

Part 7: How to get into a locked phone using Custom Recovery?
Since custom recovery provides a third-party recovery environment, it can learn how to get into a locked Android device. Additionally, you need to flash it via an SD card since you won’t access the phone storage on a locked device.
- Step 1. To start with, you need to download the password/pattern disable file from right here and copy it onto your SD card.
- Step 2. Mount the SD card on your device and restart it in recovery mode by providing the correct key combinations.
- Step 3. From the provided options, choose to install zip from the SD card.
- Step 4. Confirm your selection and let your phone be restarted with no lock screen.

Bonus Tip: General tips for unlocking phone successfully
By following these tips, you can increase the chances of successfully unlocking your phone while safeguarding your data and security.
- Data Backup: Regularly back up your data that ensures you have a recent backup of all your important data, such as contacts, photos, videos, and documents. This will prevent data loss in case the unlocking process results in a factory reset.
- Reputable Methods: Use reputable and official unlocking methods whenever possible, such as Dr.Fone - Screen Unlock.
Conclusion
By following these simple steps, you would learn how to get into a locked phone. If you are looking for a trouble-free way to unlock an Android device, then give Dr.Fone - Screen Unlock a try. It is a highly reliable solution to learn how to get into a locked Android phone and unlock your device in minutes with no complications.
Also read:
- [New] 2024 Approved Parrot AR Drone Elite Edition – Expert Evaluation
- [Updated] 2024 Approved 9 Best Video Calling Applications Safety & Simplicity Focus
- 2024 Approved Must-Know Facts for ASMR Content Lovers
- Enhance Your Livestreams Using ManyCam: The Leading Solution for Video Software and Online Cam Features
- Forgot Pattern Lock? Heres How You Can Unlock Nokia C12 Pattern Lock Screen
- Free Graphic Hubs Best Websites for Quality Vector Art for 2024
- How to Perform Hard Reset on Motorola Moto G34 5G? | Dr.fone
- How to Repair a Damaged video file of Realme Narzo 60 Pro 5G?
- How To Unlock a Poco C50 Easily?
- In 2024, Full Guide to Unlock Your Oppo Find X6 Pro
- In 2024, How To Track IMEI Number Of Realme 11X 5G Through Google Earth?
- In 2024, Top Apps and Online Tools To Track Poco F5 Pro 5G Phone With/Without IMEI Number
- In 2024, Unlock Nubia Red Magic 8S Pro Phone Password Without Factory Reset Full Guide Here
- Pattern Locks Are Unsafe Secure Your Realme GT 5 Phone Now with These Tips
- Removing Spotify Connections with Facebook: Instructions Here
- Snapchat Comeback Strategies: Reactivating Your Dormant Account Effortlessly
- Still Using Pattern Locks with Poco M6 5G? Tips, Tricks and Helpful Advice
- Title: How To Unlock a Nokia G310 Easily?
- Author: Aaron
- Created at : 2024-12-10 21:07:12
- Updated at : 2024-12-13 23:57:09
- Link: https://easy-unlock-android.techidaily.com/how-to-unlock-a-nokia-g310-easily-by-drfone-android/
- License: This work is licensed under CC BY-NC-SA 4.0.