
How to Show Wi-Fi Password on Nokia C02
How to Show Wi-Fi Password on Nokia C02
Since the invention of Android OS in 2008 by Andy Rubin, our world has faced a dramatic change. Android seems to be controlling a considerably high portion of our life. We have bought many gadgets that use this amazing OS and most of which are phones. But how much can you do with your Android phone? Developers are always making it more interesting to use this interface.
Most of the time, we use Android phones, we get faced with the need to access the internet. The Wi-Fi capability of these Android gadgets makes it super easy for us to surf the web. Throughout using Wi-Fi, we connect to a number of them. This could be at school, a sub-way café, the gym, buses, hospitals, hotels, towns, and the list is endless. A password secures most of this. Needless to say, our brain is weak to store all these passwords for future use, especially if you would want to connect with a different gadget you have recently bought or even your laptop. In this article, we will introduce you to how to find wifi password on rooted and also unrooted Android devices.
Part 1: Show Wifi Password on Rooted Android Device
What is Rooting?
First of all, what does rooting mean? You have probably used a Windows computer or even Linux. For the case of Windows, when installing a new program or software, it always prompts a dialog box saying, “Administrator permission required to run this program.” If you don’t have the administrator permission, you won’t install the program. In Android, this is called rooting. In simple terms, it means having the root permission to your phone. Some Android apps will require you the root permission, e.g., flashing your ROM. In this part, we will explain how you can show the Wi-Fi password on your Android with root.
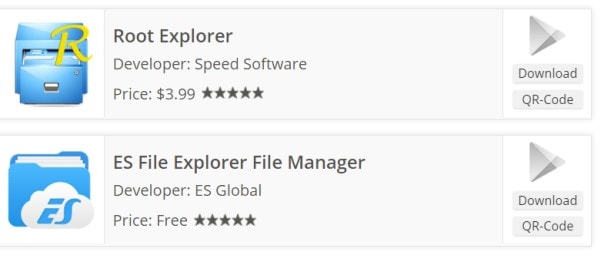
To find the Wi-Fi passwords on your Android phone, you need to have an app to explore files which also supports a root user. In this case, ES FileExplorer or Root Explorer will come in handy. However, it turns out that the latter is offered at $3. Let’s use the free ES File Explorer.

Steps of getting Wi-Fi password on Android with root
In only four steps, we, at this moment, learn how we can find the password of a Wi-Fi on an Android phone.
Step 1: Install the ES File Explorer
Download the ES File Explorer from your play store, install it, and open it.

Step 2: Enable Root Explorer
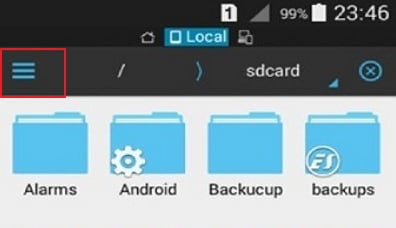
The root explorer needs to be enabled so that you can reach the root folders of the Wi-Fi passwords you need. By default, the root feature in this ES explorer is not enabled. To enable it, just tap on the list menu on the top left corner.:
This will drop down a list of controls. Scroll down and find the Root Explorer option and enable it.

Step 3: Get the passwords’ file.
Go back to ES file explorer, and this time, find the folder named data.

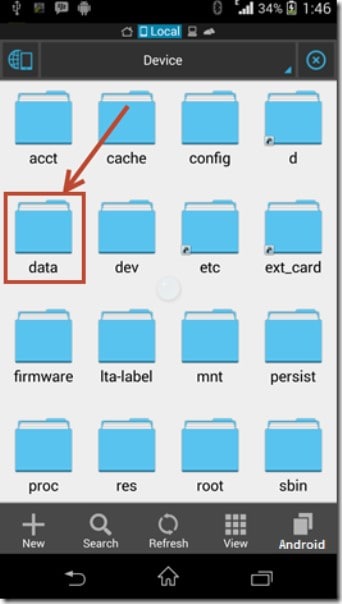
When this folder opens, find another one named misc. Open it and find another one named wifi. Here, find a file named wpa_supplicant.conf.

Step 4: Retrieve the wifi password on Android
Make sure that you don’t edit anything in the file. You might mess up with important data and fail to access the Wi-Fi(s) in the future.
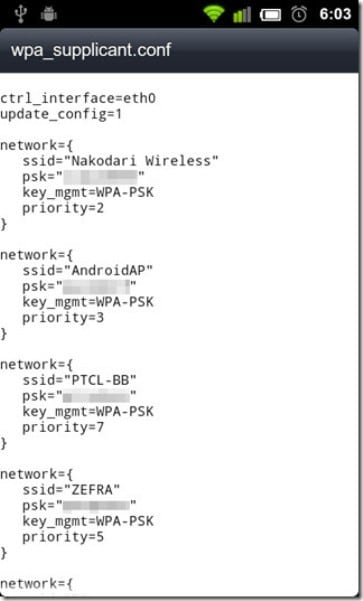
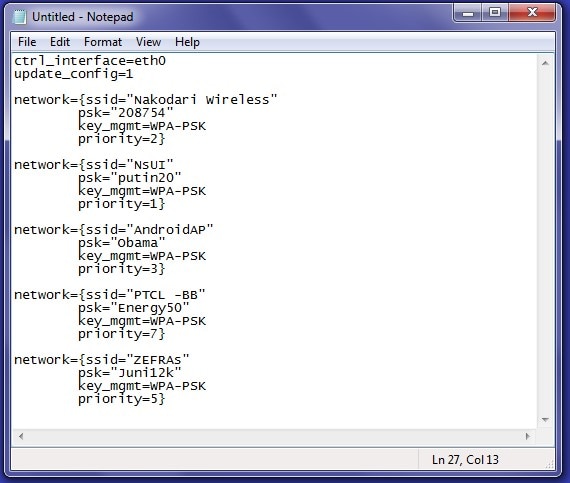
As you can see above, we have found the Wi-Fi passwords on the android device. On each network profile, we have the name of the network represented by name (ssid=”{the name}”), the network’s password represented by psk, the network’s access point represented by key_mgmt=WPA-PSK and its priority represented by priority.
Part 2: Show Wifi Password on Android without Root
What if I don’t have root access to my Android, can I still see Android Wi-Fi password? The short answer is yes. However, this is a bit involving but simple. You don’t need to be a computer guru to do it, but you need to have a computer and some internet access of course. The key thing is to find a way through which we can fetch the password file from the phone without using a root access protocol in the Android. This is made possible by some little programming insight using the Windows Command prompt.
Steps to show Wi-Fi password on Android without root
Step 1: Access the Developer authority
To access the files that Android uses to run passwords, you must first become a developer. This is very simple.
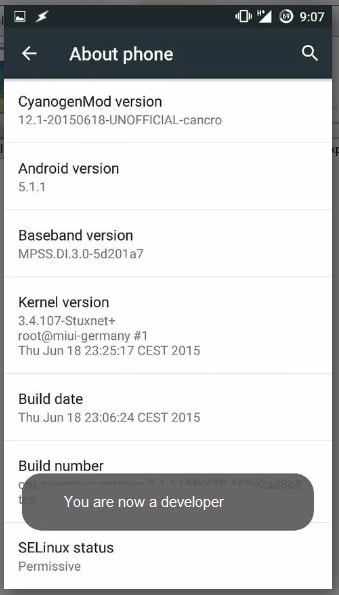
Get your Android phone and go to settings. Scroll down and find “About phone.” Tap on it and scroll down again to find Build number.

Tap on this “build number” 5 to 6 times until a message pops up, saying, “You are now a developer”.
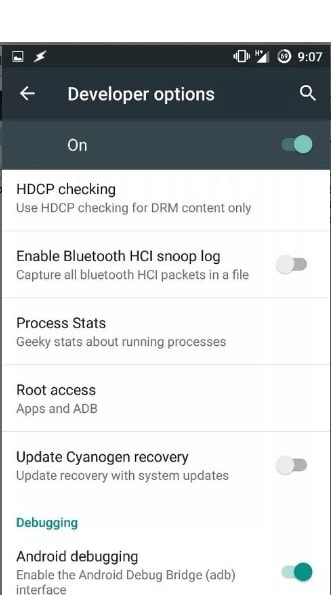
Step 2: Enable the debugging.
Go back to Settings. Scroll down for developer options. Turn on the button for “Android/USB debugging”.
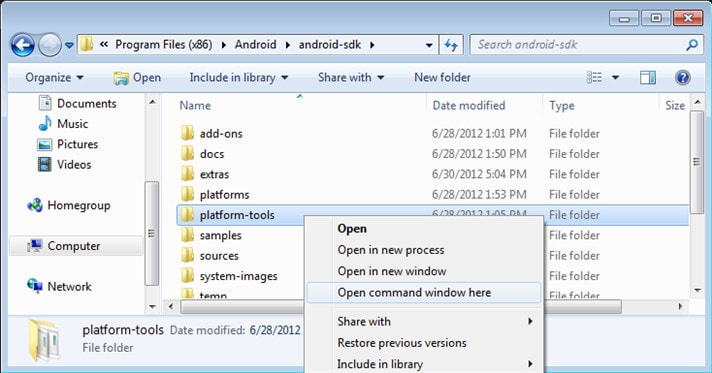
Step 3: Install ADB drivers.
Now, open your Windows desktop. Download and install ADB drivers. (Use this download link adbdriver.com ). You need to download and install platform tools (minimal ADB and fastboot) from http://forum.xda-developers.com/... Now open the folder where you’ve installed the above tools. By default, it is in the Local disc C\windows\system32\platform_tools location. However, you might want to locate them by searching on the windows search engine. You have to hold the Shift key and right-click inside the folder to click on”Open Command Window Here.”
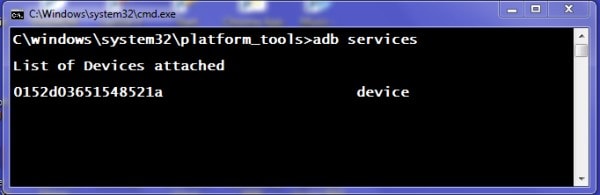
Step 4: Test the ADB
Here, we would like to test whether the ABD is working properly. To do this, connect your phone to the PC using a USB. In the command prompt, type adb services and then press enter. If it’s working properly, you should see a device on this list.
Step 5: Find the Android wifi password.
Now, it is time to type the given command in the command prompt and type: adb pull /data/misc/wifi/wpa_supplicant.conf c:/wpa_supplicant.conf. This will fetch the file from your phone to the local disc C drive of the PC.
Step 6: Get the wifi passwords.
Lastly, open the file with a notepad, and there you go.
Now you learned how to show the wifi password on your Android device.
How to Reset your Nokia C02 Lock Screen Password
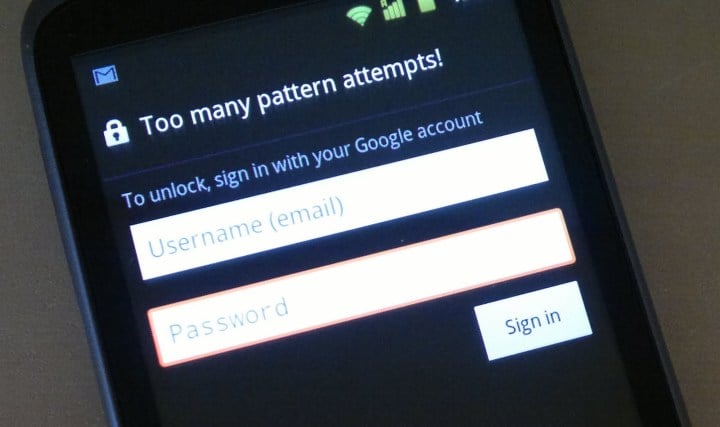
Android phones have the option of locking the screen using a PIN, pattern, or password. This is meant to keep the phone secure and prevent any unwanted intrusion. PINs and patterns are somewhat easy to remember, but it is common to forget the Android lock screen password. The phone gets locked if someone consecutively enters the wrong password multiple times. Then it is a common question to ask, “How to reset your Android password?”
The device becomes inaccessible and requires an Android password reset. But there is no easy way to do that. Either one needs their Gmail account or has to forget about getting back the Android data. Today we will deliver how to reset Android passwords and teach 6 useful ways. They can be used to reset the Android password and use the phone again. But if someone has to perform a factory restore, they need to depend on backups to get back the data. Now let’s begin with the first way and learn how to reset your Android phone password.
 safe & secure
Using Dr.Fone - Screen Unlock (Android) is a direct way to Android reset the password and unlock the phone. There is no tension of data loss, and this phone unlocking software works for different lock systems. It can reset the Android password, pattern, PIN, and fingerprint lock in under 5 minutes. It is straightforward to operate and does not require any technical knowledge.
Wondershare offers you 100% security as it only authorizes you access. It is simple and user-friendly and keeps all the data on the Android device (Samsung and LG only) intact.
![]()
Dr.Fone - Screen Unlock (Android)
Get into Locked Android Phones Within Minutes
- 4 screen lock types are available: pattern, PIN, password & fingerprints.
- Easily remove the lock screen; No need to root your device.
- Unlock 20,000+ models of Android phones & tablets.
- Provide specific removal solutions to promise good success rate
4,008,669 people have downloaded it
How to reset an Android phone password with Dr.Fone - Screen Unlock (Android)
Step 1: Select “Screen Unlock”
Open the program. After that, select and click on “Screen Unlock” on the right side of the window. With this option, you can Android reset your password and remove the lock screen of PIN, password, pattern, and fingerprints.

Now get the Android phone connected to the PC and select the Nokia C02 device model in the list to proceed.

Step 2: Activate download mode
You have to put your device into download mode. For that, follow the instructions given by Wondershare:
- 1. Switch off the Android device
- 2. Tap and keep holding the volume decrease button along with the power and home button simultaneously
- 3. Now tap the volume increase button to initiate download mode

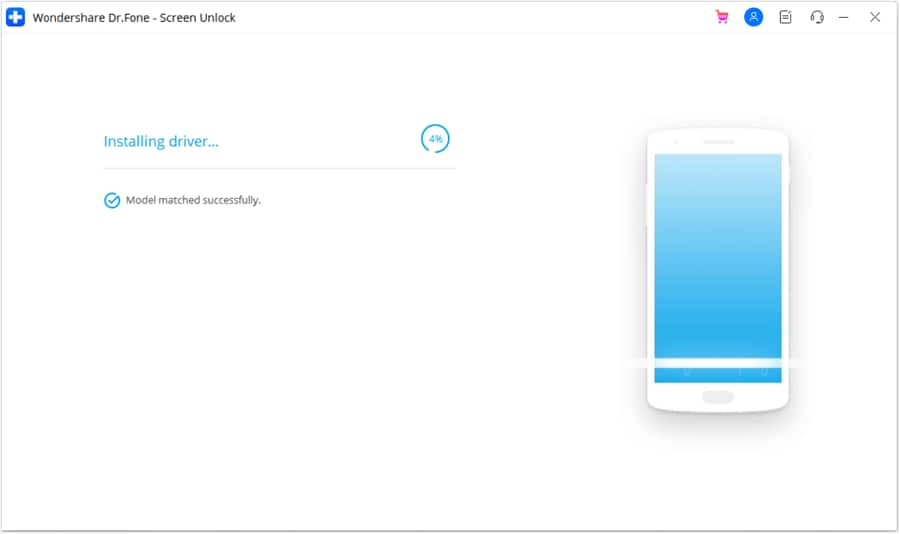
Step 3: Download the recovery package
After the download mode has been entered, the program will begin to download the recovery package automatically. You have to hold your horses until it is complete.
Step 4: Remove the Android password without data loss
Soon the recovery package finishes downloading. Then the program begins to remove the lock screen. After the process is over, you can access all your data on your Android device and reset your Android password.

These simple steps will ensure that you can secure your Android lock screen easily, without any worries. You do not have to worry about data loss, and you will reset your Android phone. Even if you have forgotten your Android password and are thinking about starting your Android phone again, these simple tips will help.
Solution 2: How to reset Android Phone Password with Smart Lock?
Setting up Smart Lock on your Android device adds a convenient and straightforward method for unlocking your screen. Smart Lock provides different alternatives to bypass the lock screen based on specific situations.
These alternatives encompass trusted locations, connected devices, or facial recognition. For devices operating on Android 14, it’s now referred to as Extend Unlock. Here’s a guide on utilizing Smart Lock to unlock your Android device:
Step 1. Set a pattern, PIN, or password for your screen lock if you haven’t already. Open the Settings on your Android device and tap on “Security & Privacy.” Here, tap “More Security & Privacy” and select “Trust agents.”

Step 2. Within “Trust agents,” toggle on “Extend Unlock” and then return to the previous screen. Select “Extend Unlock” and input your pattern, PIN, or password to confirm. Next, pick your desired Smart Lock type and follow the on-screen prompts to activate.

Solution 3: How to Unlock Samsung Phone with SmartThings?
Unlocking an Android phone using SmartThings is an option available for Samsung devices. SmartThings offers remote control and management of Samsung devices. It also includes the ability to unlock your phone under specific conditions. Here’s a general guide on how to use SmartThings to unlock your Samsung phone:
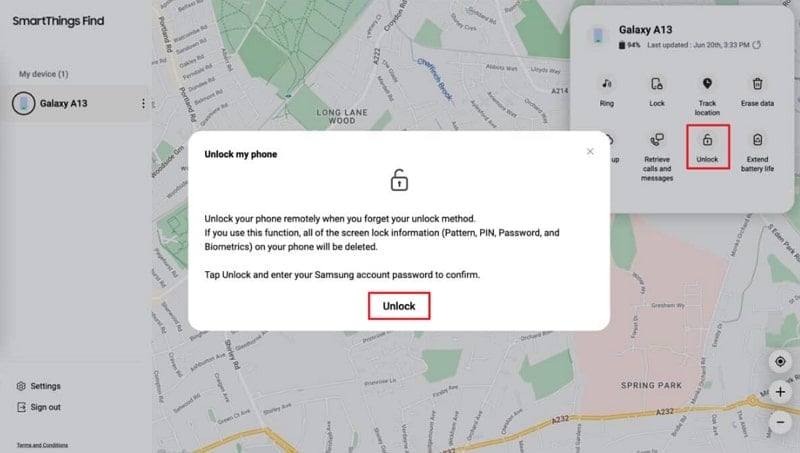
Step 1. Access the SmartThings website, where you should click on the “Sign In” button. Now log in using your Samsung Account, and you’ll be directed to a new screen displaying a map pinpointing your phone’s location.


Step 2. Select the “Unlock” button located in the top right corner of the menu. Then, proceed by clicking “Unlock,” and entering your Samsung password. Finally, confirm by clicking Unlock once more. This action will reset all your lock settings, comprising biometric security, PIN, password, and swipe pattern.
Solution 4: How to Reset Android Password using Google?
To reset the Android password using Google, it is necessary to remember the Google password and ID. Google account must also be activated on the phone. Also, this method only works on devices running Android 4.4 or below. Follow the steps below for the Android password reset.
Step 1: Access Google login
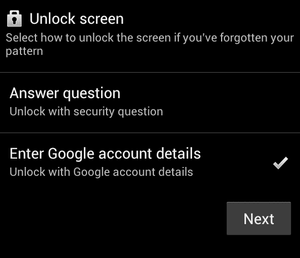
Enter the wrong password 5 times till the Android device gives you a “Forgot password?” prompt. Click on the tab and choose “Enter Google Account details.”
Step 2: Enter credentials and do an Android reset password
Now enter the Google ID and password and log in. You will be able to Android reset your password and get access to your phone.
Solution 5: How to Reset Android Password using Android Device Manager?
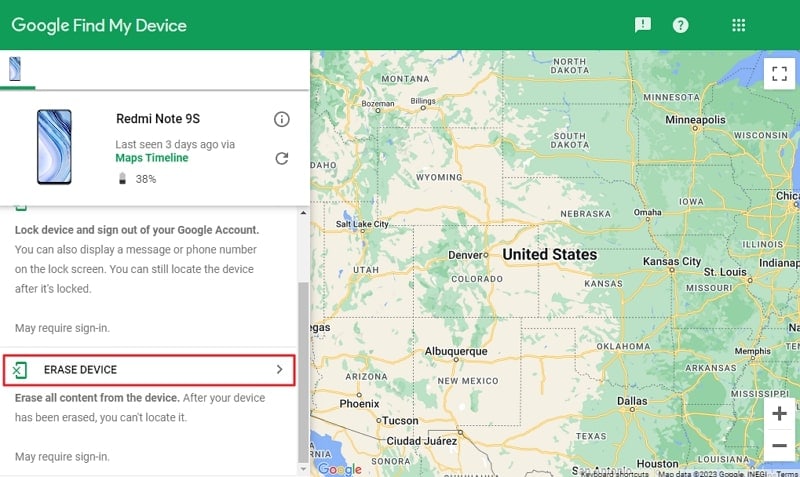
Familiar with Android Device Manager? Well, it has been renamed now as Find My Device. This service provided by Google helps you find, lock, or wipe your Android device. Plus, if you have enabled Find My Device, it might prove very helpful to assist you in unlocking your device. Check out these easy-to-follow steps for unlocking your Android device. For this, you need to use Find My Device, the upgraded Android Device Manager:
Instructions. On a computer or another device, go to the “Google Find My Device ” website. Here, sign in using your Google account linked to the locked Android device. Once you’ve logged in, the website will present a map revealing the most recent location of your device. Next, navigate to the left side and select “Erase Device.” Follow the prompts on the screen to finalize the process.

Solution 6: How to reset Android Phone Password using Factory Reset?
This method can be used when no other means of Android password reset works. This will erase all your data, so it is better to have backups created before. Now perform the steps to Android reset the password.
Step 1: Initiate factory restore.
Turn your Android device off. Press and hold the power button + home button + volume up button. This will bring up the recovery mode to initiate factory restoration.
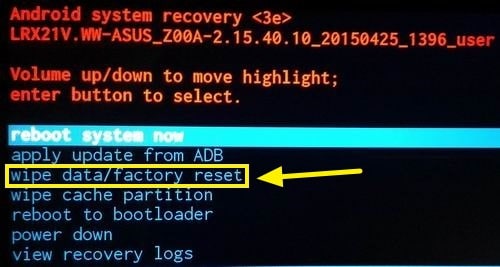
Step 2: Factory restore
Now use the volume +/- button to navigate to the “Wipe Data / Factory Reset” option and press the power button to select it. Wait till the process complete.
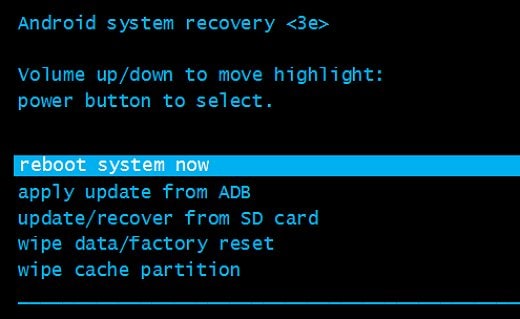
Step 3: Reboot and reset the password.
From the available options, choose “Reboot System Now.” After the Android device powers on, you will be able to do the Android password reset.
Bonus Part: Useful Tips to Prevent Future Lockouts on Android
Here are some helpful tips to prevent future lockouts on your Android device and ensure better password management.
- 1. Use Password Managers: Consider using reputable password manager apps that securely store and manage your passwords. These apps often have features to generate strong, unique passwords for different accounts and help you remember them.
- 2. Set up Biometric Authentication: In case your device supports it, use biometric authentication methods for a better experience. These can be fingerprints or facial recognition. These methods can be more convenient than remembering passwords and offer added security.
- 3. Create Memorable Passwords: If you opt against using a password manager, craft robust yet easily remembered passwords. To improve your security, try to use a sequence of lowercase and uppercase letters, numbers, and symbols. Plus, avoid easily guessable details like birthdays or common phrases to make your password strong.
- 4. Enable Two-Factor Authentication (2FA): Enable two-factor authentication whenever possible for your accounts. Likewise, this provides an added layer of security by requiring a secondary verification method. It could be a text message code or authentication app in addition to your password.
- 5. Regularly Back Up Your Data: Make it a habit to consistently back up your device data . To prevent potential data loss from forgotten passwords or unexpected issues, take precautions. Safeguard your crucial data by creating backups, whether in the cloud or on an external storage device.
Conclusion
This article guided all the possible ways available in 2024 to reset your Android lock screen password, such as using the Smart Lock, Google Find My, Samsung SmartThings, and Wondershare Dr.Fone - Screen Unlock (Android). The most recommended method out of these methods is Dr.Fone because it can handle all Android brands without restrictions.
On the other hand, other methods have their limitations. For example, SmartThings can only work for Samsung smartphones. Moreover, Wondershare Dr.Fone - Screen Unlock (Android) is compatible with Android 14 and can unlock the screen within 2 minutes.
Rootjunky APK To Bypass Google FRP Lock For Nokia C02
Factory Reset Protection (FRP) is a security feature built into Android devices running Android 5.1 Lollipop and later versions. It prevents someone from using your phone after a factory data reset without Google account login credentials. The FRP makes it much less attractive for thieves to steal Android phones, knowing they will need help to access them.
FRP automatically activates when you add a Google account to your Android phone. It links the Nokia C02 device to your account, making it the “trusted owner.” Once activated, FRP becomes embedded in the phone’s system.
While Google FRP is a valuable security feature, it’s vital to acknowledge that there are legitimate situations where bypassing it might be necessary. These instances include forgotten Google account credentials, buying a second-hand device, and device issues. In these cases, tools like RootJunky can help you bypass FRP Lock. We’ll explore how to use RootJunky APK later, but first, let’s define what it is and its role in FRP bypass.

The RootJunky APK is a free Android application also called RootJunky SDL or RootJunky FRP Bypass tool. This app’s primary function is to bypass the Google Account FRP lock on Samsung devices. Rootjunky uses the weaknesses in Android’s setup process to create a new user account or switch existing ones, letting you bypass the FRP and regain control of your phone.
You can complete this process using the app by connecting your phone to a computer through an OTG cable. RootJunky can be helpfu l if you’ve forgotten your Google account password or bought a second-hand phone locked to someone else’s account. However, only use it if you have legitimate reasons to bypass FRP lock, like accessing your device after forgetting your Google account details.

Downloading the RootJunky FRP bypass tool from unofficial sources can introduce malware risks, so stick to trusted sources like the official website. Additionally, when exploring RootJunky, it is vital to keep the following in mind:
- Not all Android devices are susceptible to the methods used by RootJunky. It is necessary to check compatibility with your specific device model and Android version.
- Using FRP bypass tools like RootJunkycan potentially compromise the security of your device. Be cautious and proceed if you fully understand the risks involved.
- Bypassing FRP may involve data loss.
- Download RootJunky FRP bypass APK from a reliable source to minimize the risk of malware or viruses. You can check the APK file from official websites or trusted forums.
- Google constantly updates its security measures, so these tools may not always work effectively.
Part 2: How To Use RootJunky To Bypass Google FRP?
Here are the general steps to use the FRP Bypass APK RootJunky app to bypass Google FRP lock. But remember that specific steps may vary depending on your device and Android version:
- Step 1: On your computer, download the Rootjunky RealTerm program from the official Rootjunky website.

- Step 2: On your phone, download the Rootjunky APK (com.rootjunky.frpbypass-1.0.apk) file from the official website or other reputable sites.

- Step 3: Go to Settings > Security and tap Install unknown apps. Then, enable unknown sources to allow installation of apps from outside the Play Store. Connect your device to a Wi-Fi network.

- Step 4: On your Android phone, open a file explorer app and install the downloaded RootJunky APK file.
- Step 5: Connect your smartphone to your computer using a USB cable.
- Step 6: Launch the Rootjunky RealTerm program on your computer. Under the Display tab, check the Half Duplex option.
- Step 7: On your computer, go to Device Manager > Modems. Locate your device’s port name (e.g., COM3).
- Step 8: On the RealTerm program, enter the correct port number under the Ports tab, then click Change.

Step 9: Click Send to establish a connection. Enter the two commands:
at + creg? \ r \ n
atd1234; \ r \ n
Step 10: Once connected, the Rootjunky APK on your phone will provide on-screen instructions to bypass FRP.
Step 11: If prompted, perform a factory data reset of your device.
While RootJunky offers a free method for FRP bypass, it can be incompatible with your device’s brand, requiring technical knowledge, tedious, and potentially risky. If you are looking for a simpler, safer, and more user-friendly solution, Wondershare Dr.Fone might be a better fit for you. If you want to learn how to use this tool to bypass FRP lock with minimal technical expertise, then keep reading.
Part 3: Easier Tool Than RootJunky APK To Bypass Google FRP
Google FRP adds an extra layer of security after a device reset. However, regaining access to the smartphone can be challenging if you forget your Google account details, forget your lock screen, or just buy a used device. While methods like the FRP RootJunky app exist, using it can be complex or risky.
Consider exploring third-party options like Dr.Fone for a potentially easier and safer FRP bypass solution. Dr.Fone Screen Unlock tool helps remove the Android FRP lock without requiring a PIN or Google Account.
Why Use Dr.Fone - Screen Unlock?
Here are some of the key features of Dr.Fone - Screen Unlock:
- **User-friendly:**Fone boasts an intuitive interface, eliminating the need for technical expertise. Even beginners can navigate the process with ease.
- **Widespread Brand Compatibility:**Fone supports mainstream brands, such as Samsung, Xiaomi, Oppo, Redmi, Realme, and Vivo, catering to a broader user base.
- **Fast and Efficient:**Regain access to your device in minutes without wasting time on tedious procedures.
Step-by-step Guide to Removing FRP Lock With Dr.Fone - Screen Unlock
Ready to leave the hassle of using RootJunky and easily bypass the FRP lock? Download and install Dr.Fone on your computer, then follow these steps to learn how to bypass Google FRP on your device:
- Step 1: Launch Dr.Fone on your computer and connect it to your Android device. Choose Screen Unlock from the Toolbox in the main interface.
- Step 2: Choose Android as your device type. This will take you to the next screen, where you can select Remove Google FRP Lock to proceed.

- Step 3: Select your device’s brand from the list and click Start to continue.

Note:
The next steps may vary depending on the brand you selected.
- Step 4: Select the OS version of your device and click Start to continue.

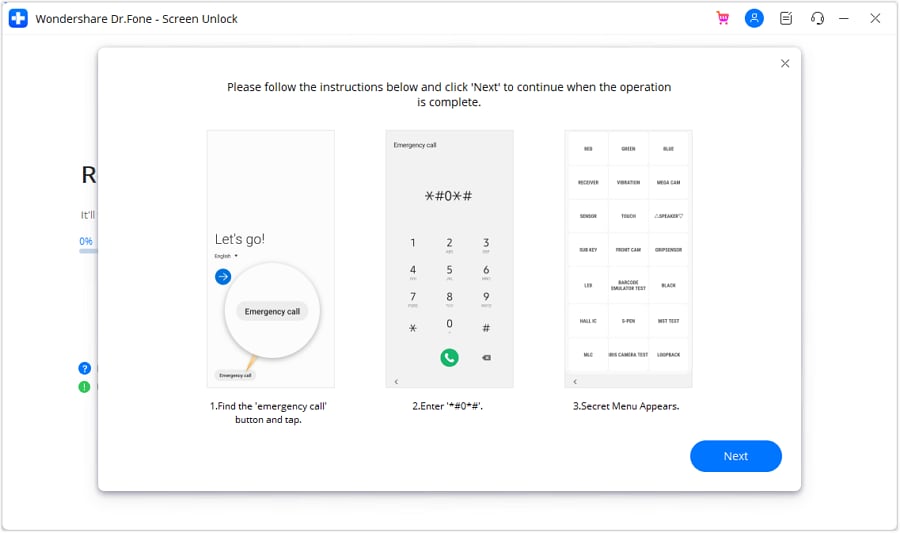
- Step 5: Access the secret menu on your phone using the on-screen instructions, then click Next to proceed to the next step.
- Step 6: When your Samsung prompts you to activate USB debugging, tap Allow. Then, on your computer screen, click Authorized to confirm.

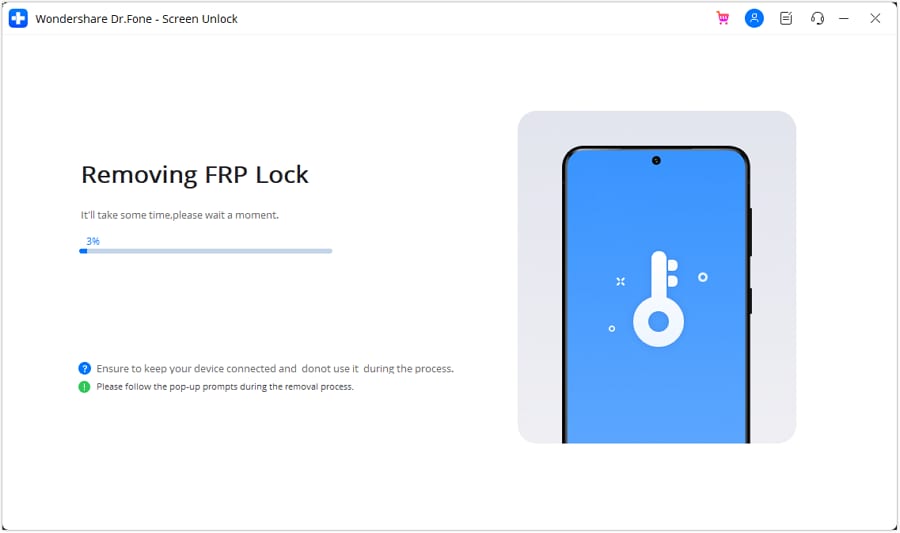
- Step 7: You will see the FRP lock being bypassed on your Android device on the next screen.
- Step 8: Click Done if the FRP lock removal was successful, otherwise, click Try Again to repeat the process.
That’s it! With Dr.Fone Screen Unlock, you can easily bypass Google FRP and regain access to your Android device, leaving the complexities of RootJunky behind.
Tips: Are you searching for a powerful FRP bypass tool? No worries as Dr.Fone is here to help you. Download it and start a seamless unlock experience!
Conclusion
Both RootJunky and Dr.Fone offer options for you to regain control of phones with Google FRP lock. FRP Bypass RootJunky tool excels with its free-to-use approach, perfect for tech-savvy users comfortable with APK installations. While requiring a paid subscription, Dr. Fone provides pre-rooted firmware installations and broader device compatibility, which is ideal for those seeking a more streamlined but supported experience.
The best choice boils down to your personal needs and budget. Remember, FRP bypass should only be utilized by rightful owners facing genuine lockouts. When used responsibly, these tools can help you access your phone after a factory reset even without your Google account credentials. Choose the tool that best fits your needs and proceed with caution. Use these tools responsibly and regain access to your device the right way.
- Title: How to Show Wi-Fi Password on Nokia C02
- Author: Aaron
- Created at : 2024-07-15 18:57:00
- Updated at : 2024-07-16 18:57:00
- Link: https://easy-unlock-android.techidaily.com/how-to-show-wi-fi-password-on-nokia-c02-by-drfone-android/
- License: This work is licensed under CC BY-NC-SA 4.0.