
How to Reset Gmail Password on Nokia C32 Devices
How to Reset Gmail Password on Nokia C32 Devices
Nowadays, along with Windows or Apple devices, Android devices are starting to take its place as one of the most popular, reliable, and efficient technical equipment brands. As a result, the use of Android as an operating system for both PC and portable tools is becoming an extremely hot trend.
Android devices pride themselves on providing their customers with the best features possible. Not only do they support offline features, but Android devices are also capable of offering users with several services online. One of them is the ability to make use of Gmail - a very famous email site nowadays.
Gmail being used directly by an Android tool is a great advantage, but it still contains some small drawbacks that users may have to go through. According to a recent survey, the majority of Android users were likely to wonder if they were able to reset Gmail password on Android devices.
Luckily for you, this performance is possible. In this article, a very informative and detailed description will be delivered to you to help you solve the problem of resetting your Gmail password.
Part 1: Reset Gmail Password When you Forget it
There will be times when you come into the situation of not knowing what your Gmail password is, or you just simply forget it. You want to change your password but you don’t have access to a computer or laptop to perform this task. Now with the help of Android, you can do it through your own Android devices.
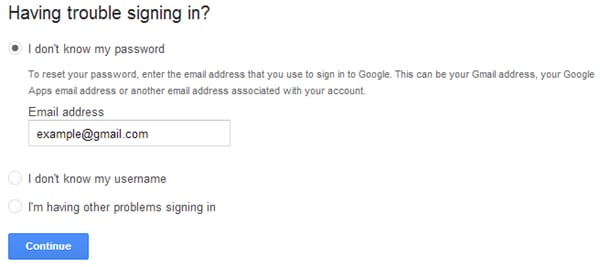
Step 1: Visit the Gmail login page from your Android device. Click on the Need helpline, which is highlighted in blue.

Step 2: After that, you will be moved to the Google Account Recovery page. There will be 3 main options which indicate 3 frequent problems. Select the first one, which is entitled “I don’t know my password”. Once you have chosen it, you will be required to fill in your Gmail address in the bar provided. Click on the Continue button as long as you have made sure to finish all these tasks.
Step 3: In this step, you may be asked to fill in a CAPCHA form. Just simply do it and move to the next page. There you had better type in the last password that you are still able to recall if possible, then click on the Continue button to move. Or else, you can skip this step by clicking on I don’t know button.

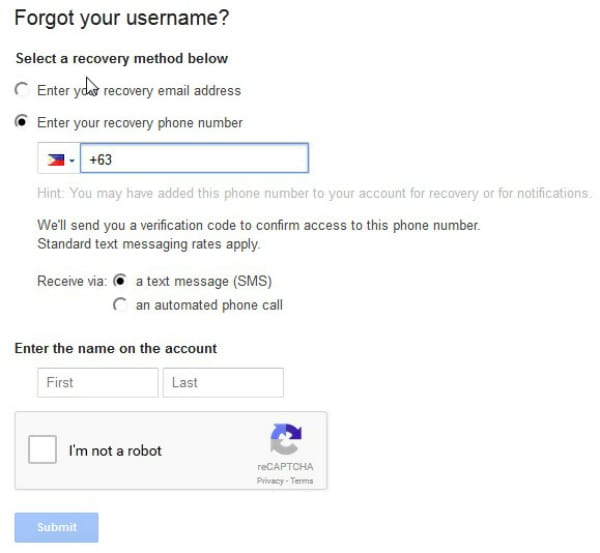
Step 4: Finally, you will be shown a list of options on how to reset your Gmail password on Android devices. You can either use your alternative email address or your phone number to receive a verification code. Bear in mind to fill in any required information and put a check in the CAPCHA box to submit the process.

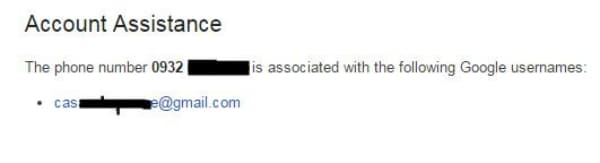
Step 5: In this step, a blank bar will appear and it will demand you to type in your verification code. Just do it carefully to make sure there is no error. Once you have done it, a new screen will appear to tell you.


Step 6: After you have done all the previous steps, you will know how to reset your Gmail password directly from your Android device.
Part 2: Change Gmail Password When You Still Know it
Besides not knowing your password, there are still circumstances when you wish to change your current password for various reasons. Just simply follow these steps.
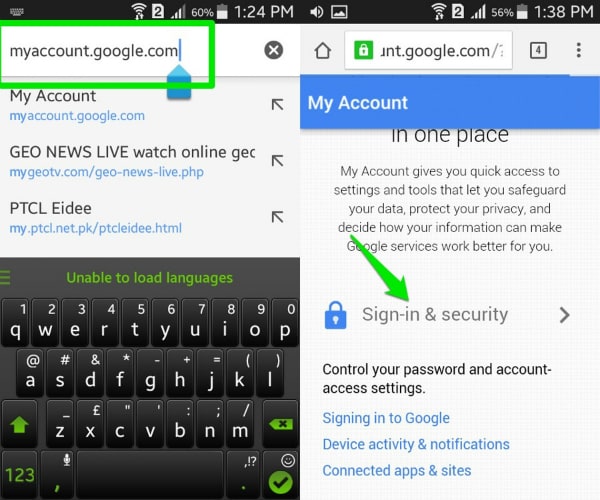
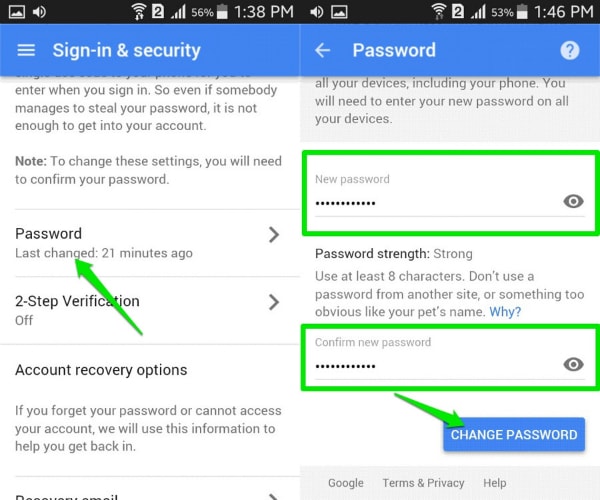
Step 1: Make sure your Android device is connected with the Internet. Then get access to the link myaccount.google.com. After logging into your account (or maybe you have already done this), scroll down, find the Sign-in and security option and choose it.
Step 2: Find the Password option in the list. Tap on it to be moved to another screen. In the menu, type in your new password that you wish to exchange, confirm it and then click on the Change password button.
Part 3: Bonus Tips
Gmail is undoubtedly a marvelous tool to use on Android devices, but have you really understood all the tips and tricks to take the best advantage of it? Below are the 5 most helpful tips that we want to offer you.
- Far from your imagination, Gmail on Android devices is capable of allowing you to make use of several accounts at the same time, even if it’s not a Gmail account. This performance not only helps you to organize your work better, but it also increase the efficiency of your job. Just simply log in your Gmail account on Gmail app, click on the down arrow which is placed next to your avatar and name, then choose Add account. You will be moved to another page, choose Personal (IMAP/POP) choice and follow the detailed guide on the screen.
- If your Android device is used by only one user, and you are guaranteed about the security of it, try to keep the Gmail logged in. It would help you to avoid wasting unnecessary time to sign in your account every time you need, not to mention that it prevent you from being confused of not knowing your account/password.
- You are capable of sorting your mails with a certain level of accuracy once you are fully aware of the features of Gmail app on Android devices. Just click on the email, then choose Settings menu and mark it as “Mark as not important”, “Mark important” or “Report to spam” owing to the priority of your email.
- Gmail app provided you with the ability to have conversations online, and whenever a message comes, there will be a sound. In case you are in a vital conference, or you don’t want to be disturbed by the noise, you can mute it. All you have to do is to tap into the conversation, choose the three dots icon then click on the Mute option in the menu.
- Enhance the speed and the accuracy of your search with the use of certain phrases. Let’s take an instance to see what Gmail can do for you in this case. If you want to search for the mails which have been sent by a certain person, typefrom:(name of the person on Gmail) in the searching bar. And in case you would love to look for a private message from that person, please type is:chat:(name of the person on Gmail) .
Part 4: Video on How to Reset Gmail Password on Android Devices
How To Change Nokia C32 Lock Screen Clock in Seconds
The initial glimpse of your phone often involves the lock screen. This essential feature is customizable based on your Android device. With the advent of Android 12, a double-line clock has stirred some controversy among users. It’s because the Android lock screen clock veered from the one-line design of the previous version.
The larger clock style appears when there’s no notification. It will only switch to the old one-line format when a notification pops up. Discover how to change the lock screen clock on your Android and tweak its appearance. Explore the article to learn more.
Part 1. How Do I Put a Clock on My Android Lock Screen?
Android devices running version 12 or later come with the clock feature activated by default. Take note that its appearance may change under specific circumstances. It can change when there are unread notifications visible on the lock screen.
For devices running Android 11, changing the lock screen clock is still available. In some instances, you can even customize its style by following these simple steps:
- Step 1: For users with Android 11 or older, go to Settings > Lock screen & security. Depending on your phone model, tap Lock screen or Security.

- Step 2: Go to Customize Lock screen > Clock. Next, customize or activate the lock screen clock.
Note
The exact names of settings may change depending on the manufacturer and version of Android. But the navigation should be similar.
Part 2. How To Change Lock Screen Clock on Android [5 Methods]
Currently, there isn’t an official method to change the lock screen clock on Android 12. However, there are several workarounds you can do. Let’s explore these techniques and see which works best for you.
Method 1: Change Your Wallpaper
In Android 11, adjusting your wallpaper is accessible through the Android Settings menu.
- Step 1A: Navigate to the “All Apps” screen and select Settings. For Samsung Galaxy devices on Android 11, access the Wallpaper option within the settings menu.

In Android 12, the process remains consistent.
- Step 1: Locate the Wallpaper & style button within the Settings menu**.**

- Step 2: Follow the provided instructions to transform your lock screen experience. Replace the oversized clock with dynamic, changing wallpapers.
Method 2: Turn Off the Always-On Display
An alternative to avoid the Android lock screen clock is disabling the Always-on Display (AOD).
- Step 1: Access the Settings menu on your Android device. Scroll down and choose Lock screen > Always On Display.

- Step 2: Toggle off to deactivate the Always On Display.
_Note_
While this won’t alter the lock screen clock itself, it will turn off the display. It will prevent the constant presence of the lock screen clock. Instead, the clock will only become visible when you press the power button.
Method 3: Disable the Double-Line Clock
Originally, there was no provision to change the lock screen clock in Android 12. With the release of a new update, Google introduced an option to deactivate the clock, bringing relief to users. Follow the steps below to disable the double-line clock on your Android.
- Step 1: Go to Settings > Display. Next, choose Lock screen.

- Step 2: Toggle the Double-line clock off.
_Note_
If you want to display a digital or analog clock, open the _Clock_ app. Tap the _three dots_ > _Settings_ > _Style_****.
Method 4: Turn On Screensaver
An alternative method to modify the Android lock screen clock involves activating Android’s screen saver. There are options where it’s more pleasing than the default lock screen clock. If you want to change the lock screen clock, follow the steps.
- Step 1: Open the Clock app and tap the three dots in the upper-right corner. Select Screensaver and toggle it on.

- Step 2: If you want to customize the screensaver clock’s appearance, go to Settings > Display > Screensaver. Choose analog, digital, or night mode.
Method 5: Keep Unread Notifications
To avoid adjusting your Android device settings, you can make the lock screen clock smaller by maintaining unread notifications. The clock occupies less space when there are unread notifications. It shifts back to the top-left corner when you receive a new notification. Simply leave notifications unread to keep the clock smaller.
Bonus
For users who prefer not to have a lock screen clock, follow these steps:
- Step 1: Open Settings > Lock screen or Security & lock screen.
- Step 2: Look for Clock and FaceWidgets or a similar option. Disable or toggle off the Clock or Show clock setting. Save changes, and your lock screen should no longer display the clock.
Part 3. An Exception: Change the Lock Screen Clock on Samsung Phones
Changing the lock screen clock on Samsung phones is similar to the general Android process. However, the steps are quite different, offering Samsung users a unique customization experience. If you wish to personalize your lock screen clock, here’s how:
- Step 1: Go to Settings > Lock screen or Lock screen & security. Choose Customize lock screen > Clock, Clock style, or Lock screen clock.

- Step 2: Choose between different styles, such as digital, analog, or others. Some Samsung models offer extra settings like color, size, and more to enhance your lock screen further. Select the one that suits your taste.
If you’d rather remove the lock screen clock on your Samsung device, follow these steps:
- Step 1: Go to Settings > Lock screen or Lock screen & security.Choose Customize lock screen > Clock, Clock style, or Lock screen clock.
- Step 2: Disable or toggle off this setting to remove the clock from your lock screen.
If you ever find yourself locked out of your Android device due to a mishap while changing your lock screen clock or any other reason, don’t fret. Wondershare Dr.Fone– Screen Unlock - Android can effortlessly bypass the lock screen and unlock your device without a hassle.
Read More About Android Lock Screen:
9 Ways to Bypass Samsung Lock Screen without Data Loss [2024]
How To Easily Unlock Nokia Screen: 4 Effective Methods
How to Change Lock Screen Wallpaper on Android
Part 4. How To Unlock Accidentally Locked Android Screen
Accidentally locking yourself out of your Android device can be a stressful experience. Dr.Fone provides a hassle-free solution to unlock your Android screen without losing any data. Whether you’ve locked yourself out or forgot your PIN, Dr.Fone ensures a straightforward and secure unlocking process. Here’s a step-by-step guide to using the tool:
![]()
Dr.Fone - Screen Unlock (Android)
The Best UnlockJunky Alternative to Bypass FRP and Solve Your Screen Locks
- Completely unlinked from the previous Google account, it won’t be traced or blocked by it anymore.
- Remove all Android screen locks (PIN/pattern/fingerprints/face ID) in minutes.
- Compatiable with various Android models.
- Provide specific removal solutions to promise good success rate.
4,008,670 people have downloaded it
- Step 1: Download and install Dr.Fone on your computer. Launch the program after installation and go to Toolbox > Screen Unlock.

- Step 2: Choose Android in the next window and click on Unlock Android Screen.

- Step 3: Choose your device brand and click Remove without Data Loss. Select the Brand, Device Name, and Device Model of your smartphone. Once done, toggle the checkmark on I agree with the warning, and I am ready to proceed button.

- Step 4: Follow the on-screen instructions. Once they’re done, Dr.Fone will automatically proceed with the unlocking process. There will be a new screen showing the completion if done correctly. If it fails, click on Try again. Otherwise, click Done to finish.

What Else Can Dr.Fone Do for Android Owners?
Dr.Fone Screen Unlock for Android is a comprehensive tool that goes beyond unlocking screens. It also provides a range of features to address various Android device-related issues, such as:
Bypass Factory Reset Protection (FRP)
You can bypass Factory Reset Protection on your Android device with Dr. Fone. It allows you to set it up without the original Google account credentials.
Unlock Samsung/LG without data loss
Whether you own a Samsung or LG device, Dr.Fone allows you to unlock your phone without compromising any data stored on the Nokia C32 device.
Supports 2000+ Android models
Dr.Fone is compatible with a vast array of Android models. It supports over 2000 devices, making it a versatile solution for Android users.
Conclusion
Knowing how to change the lock screen clocks on your Android offers a personalized touch. Android 12 users can effortlessly adjust settings, while Android 11 and older versions require a manual setup. Samsung owners, meanwhile, enjoy a similar but unique customization process. Follow the steps outlined above for those seeking to remove the lock screen entirely.
On the other hand, if you accidentally lock yourself out of your smartphone, Dr.Fone is a go-to solution, ensuring a smooth unlocking process. Whether tweaking your Android lock screen clock or facing accidental lockouts, explore these methods to tailor your Android experience.
How to Unlock a Network Locked Nokia C32 Phone?
Revolutions in the telecommunication industry have introduced advancements in smartphone features and utilities. The other side of the coin is, however, not as appealing. Thanks to the different carrier services, network locking is the commonest issue of recent mobile launches. Users have reported of Nokia C32 phones refusing to work with different carriers.
The issue limits the smartphone’s functioning to the specific carrier from whom the Nokia C32 device is purchased. Consequently, there are annoying connectivity problems that restrict seamless mobile usage. The problem aggravates in geo-restricted regions where the carrier options are quite limited. This scenario puts forward the need for Nokia C32 network unlock solutions.
Part 1: What Does It Mean When Your Nokia C32 Phone is Network Locked?
In the simplest words, a network-locked Nokia C32 phone means that your device has become carrier-specific. It will now work only with the network provider from where the phone was purchased. Another problem is that there is no automatic unlocking even after the expiry of your contract with the carrier service. Having a network-locked Nokia C32 phone poses undesired connectivity issues.
1. Why is my phone locked to the network carrier?
Smartphones are network locked by carrier services to prevent customers from switching to a different carrier. Reasons for switching can be the availability of better plans, discounts, etc. Another cause of locking the phones to specific carriers is preventing them from theft and unauthorized usage.
2. Is it legal to unlock it?
Unlocking your network-locked phone is legal in every sense. It is however advisable to contact your service provider for addressing the concern. The only downside of unlocking such phones is the loss of device warranty assured at the time of purchase.
Part 2. How to Unlock a Network Locked Nokia C32 Phone?
When looking for affordable solutions to address the Nokia C32 SIM unlock task, you can follow the methods discussed below:
Method 1: Use Network Unlock Code
The safest way to unlock a network-locked Nokia C32 phone is through the network unlock code provided by the carrier service. Here’s what you should do:
- Contact Your Network Provider
Contact your network provider to receive the network unlock code if you are the actual buyer of the Nokia C32 device. Your carrier’s customer service will guide you with the Nokia C32 unlocking process using the code. Drop your worries about the expired contract as that’s not a problem in unlocking your phone.
Listed below are some popular carrier service providers in the USA with the applicable phone models. You can have a look to find out yours:
| Carrier Providers | Mobile Phones |
|---|---|
| Verizon | Nokia C32 8, Nokia C32 8 Pro |
| T-Mobile US | Nokia C32 Nord N10, Nokia C32 9 |
| AT & T Mobility | Nokia C32 7T, Nokia C32 Nord N200 |
| Dish Wireless | Nokia C32 8, Nokia C32 Nord N10 |
| US Cellular | Nokia C32 8, Nokia C32 8 Pro |
- How to Use Your Network Unlock Code
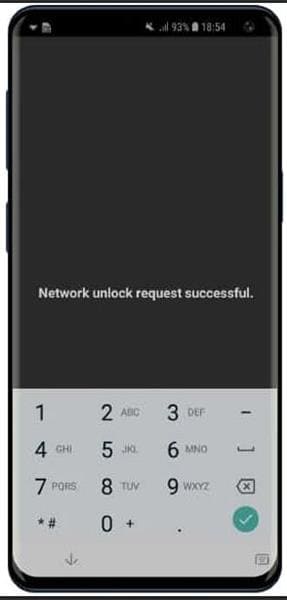
Take the following steps to unlock your Nokia C32 phone with the network unlock code:
- 1. Shut down your Nokia C32 smartphone.
- 2. Insert a different carrier’s SIM card into the Nokia C32 device.
- 3. Power on your Nokia C32 phone.
- 4. One of the SIM lock/unlock code/ SIM network unlock PIN/NCK prompts will pop up.

- 5. Enter the network unlock code received from your carrier service provider. The device is unlocked and can work with all GSM network services.

Method 2: With a Third-Party Service
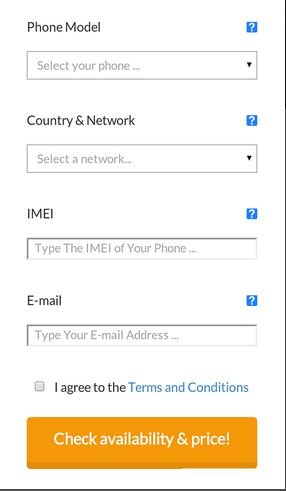
If you don’t wish to use the carrier unlock code, several third-party services can be availed to unlock a network-locked Nokia C32 device. The UnlockScope application is one such utility to proceed with the process. The tool helps to unlock your network-locked Nokia C32 phone by sending an unlock code on request. Here’s how you can work with the tool:
Step 1: Download and launch the application on your Nokia C32 phone.

Step 2: Select the details of brand, phone model, IMEI number, country, and network. Then, enter your email address and agree to the app’s terms and conditions to continue.

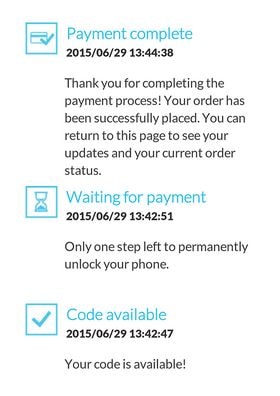
Step 3: Click on the ‘Check Availability and Price’ tab; followed by choosing the price and payment method. Finally, tap ‘Go to Payment’.

Step 4: Make the payment and wait for its acknowledgment. You will receive the code once the payment is successful.
Dr.Fone - Screen Unlock (Android)
Unlock Your Nokia C32 Phone in a Flash
- Pattern, PIN, password, fingerprints & face screen lock can all be unlocked.
- Bypass Android FRP lock without a PIN or Google account.
- Unlock mainstream Android brands like Samsung, Huawei, OnePlus, Xiaomi, etc.
- No tech knowledge required, Simple, click-through, process.

3,981,454 people have downloaded it
Part 3. What to ask Before Signing a New Nokia C32 Phone Contract?
Signing in a new Nokia C32 contract has many factors to consider for affordable purchases and consumer safety. When entering into such deals, you should pay head-to-data allowances, upfront costs, price hikes, carrier coverage, roaming charges, contract length, flexibility, etc. A low price is not the only thing that should be taken care of.
Part 4:Bonus Tips: iPhone SIM Unlock to Work on Any Carrier Worldwide
Working with the Dr.Fone - Screen Unlock (iOS) application is advisable to quickly unlock your network-locked iPhone. The tool uses a simple and intuitive method to sort out the issue in just a few simple steps. In addition, the app’s responsive interface guides you at every step of the process and ensures complete information security.
Dr.Fone - Screen Unlock (iOS)
iPhone SIM Unlock to Work on Any Carrier Worldwide
- Support newly released models from iPhone 5S to iPhone X.
- Move to any network operator within minutes aimlessly without data loss.
- You can unlock an iPhone without an R-SIM.
- Compatible with most carriers, T-Mobile, Sprint, Verizon, etc.
3,981,454 people have downloaded it
How to Unlock Network Locked iPhone with Dr.Fone - Screen Unlock (iOS)
To unlock your network-locked iPhone with the aforesaid app, you can take the following steps:
Visit the official Dr.Fone website and download the app to your PC. Install the program by adhering to the on-screen instructions.
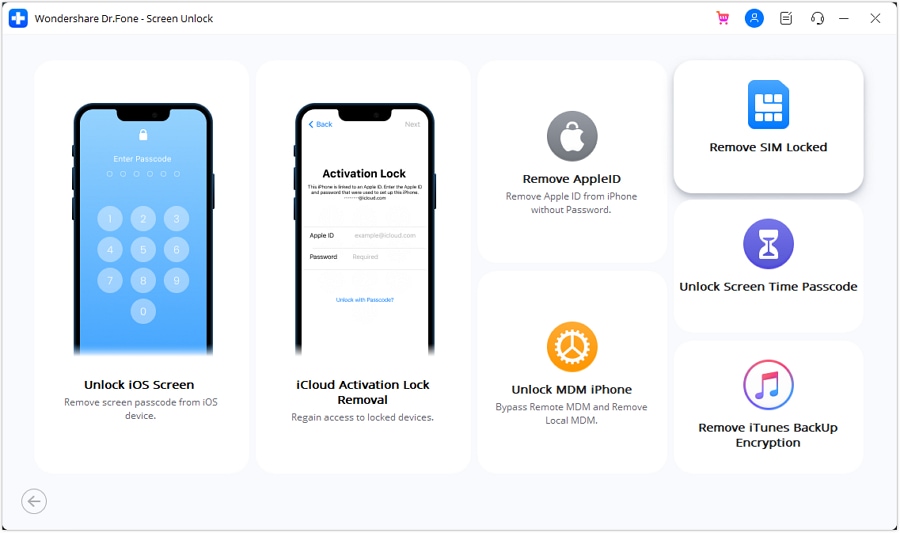
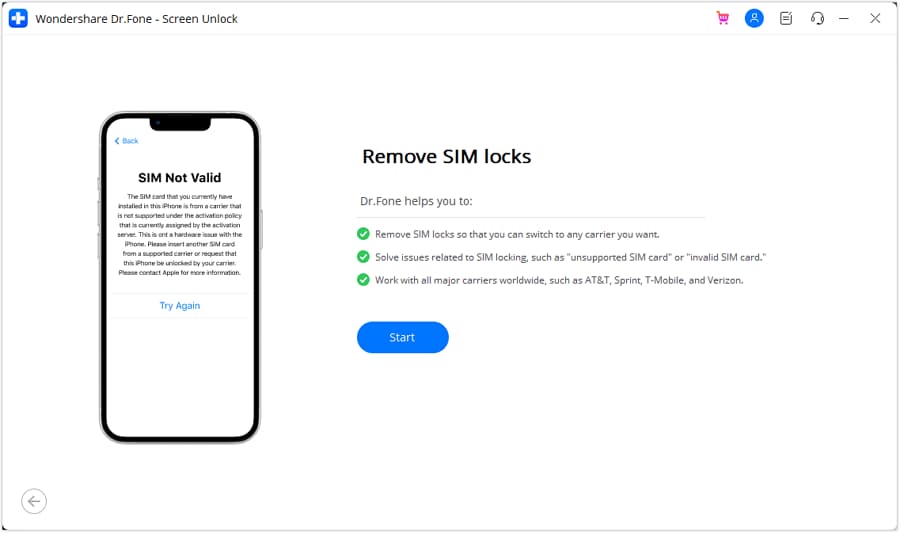
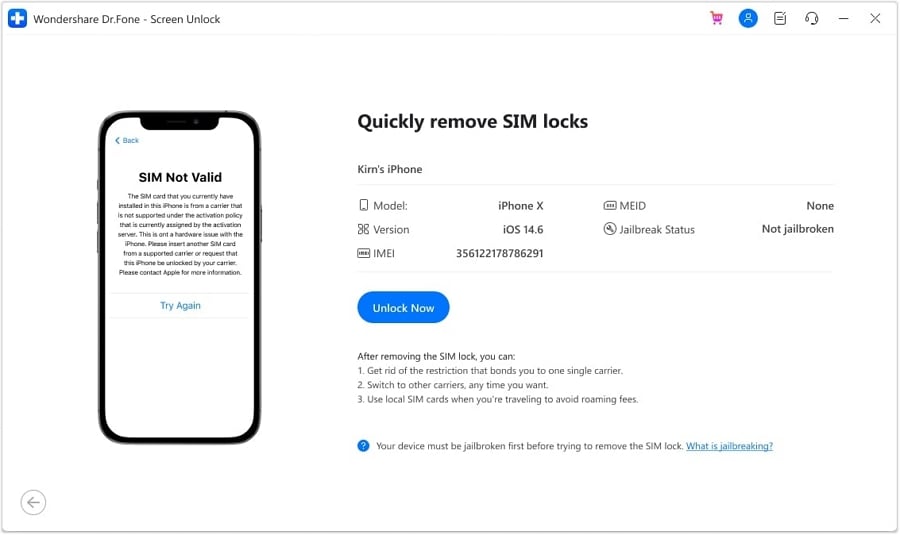
Step 1: Launch the app and tap on the ‘Remove SIM Locked’ function in the main interface.
Step 2: Tap ‘Start’ to initiate the authorization and verification process. Next, connect your iPhone to the PC and hit the ‘Confirmed’ button to proceed further.
Step 3: Follow the instructions in the configuration profile sent by Dr.Fone to unlock the iPhone screen. It is necessary to jailbreak your iPhone to remove the SIM lock.
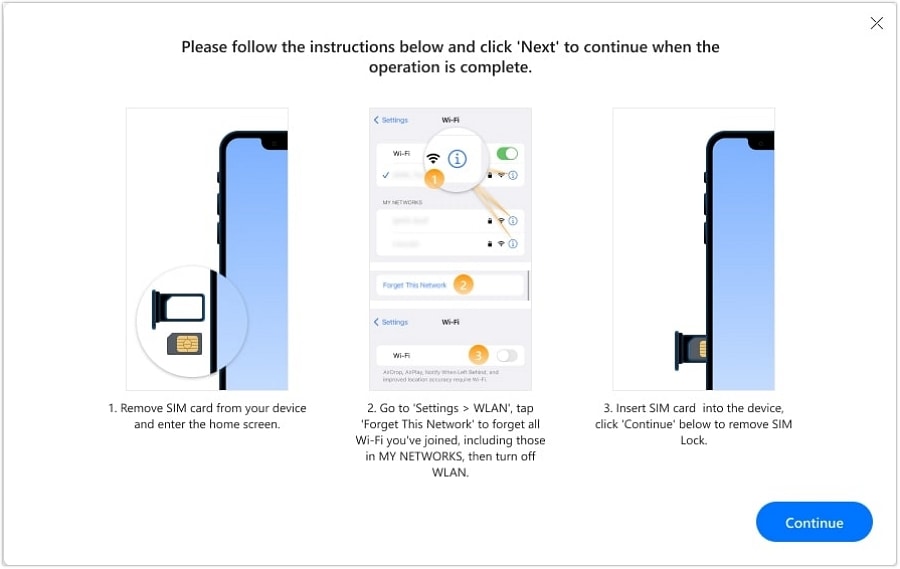
Step 4: Take the following steps for remove all Wi-Fi networks.
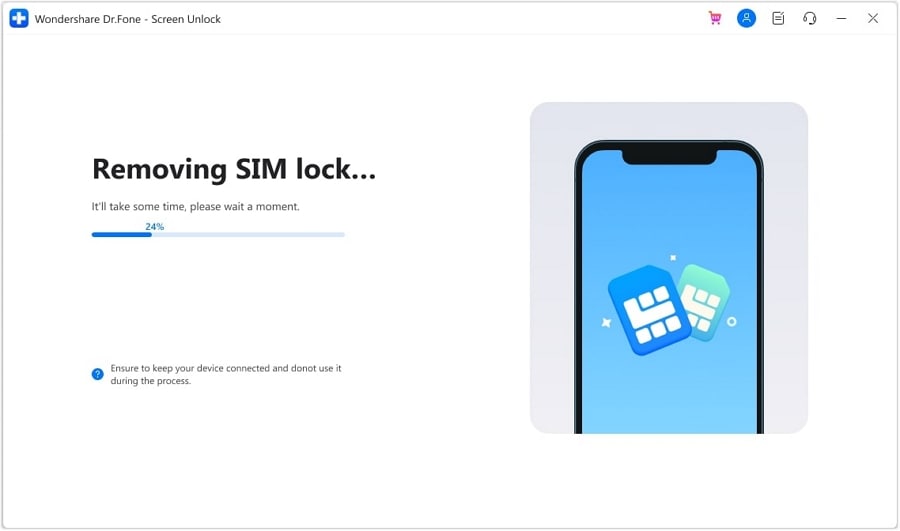
Step 5: The following screen displays the prompt window featuring the SIM unlocking process’s progress. After that, you are free to use your choice’s SIM plan and carrier network.
Parental Control Software
 safe & secure
Conclusion
Technology has a pivotal influence on today’s high-tech lifestyles, which is rewarding in several ways, but there are glitches too. The latest ones are the network-locked Nokia C32 devices that have become carrier-specific. When looking for effective solutions to resolve the issue, getting in touch with your service provider is the safest option. You will receive an unlock code to make your device work with different carriers. Another way is to use third-party apps to address the concern. If you want to unlock your iPhone. Searching for a reliable one, you can trust the Dr.Fone - Screen Unlock (iOS) application for a quick and convenient solution.
- Title: How to Reset Gmail Password on Nokia C32 Devices
- Author: Aaron
- Created at : 2024-07-15 19:03:03
- Updated at : 2024-07-16 19:03:03
- Link: https://easy-unlock-android.techidaily.com/how-to-reset-gmail-password-on-nokia-c32-devices-by-drfone-android/
- License: This work is licensed under CC BY-NC-SA 4.0.