
:max_bytes(150000):strip_icc():format(webp)/hexadecimal-code-security-key-krzysztof-zmij-e-plus-getty-images-57c76b825f9b5829f4bd185e.jpg)
How to Reset a Nokia C12 Phone that is Locked?
How to Reset a Nokia C12 Phone that is Locked?
We all have been there when put a tough to crack the lock on the smartphone and forget the password all along. Such circumstances can be tedious at times, but there is a way around it. If you have spent countless hours on how to reset a Nokia C12 phone that is locked, or how to get into a locked Nokia C12 phone quickly with or without Factory Reset. This is the right article for you. Here we will describe all the different ways in which you can reset your phone with the convenience of software to even reset it manually. So, without making further due, let’s jump right into it.
Part 1: What should I be aware of before resetting a Nokia C12 Phone that is locked?
Before you go to reset your locked Nokia C12 phone, it’s crucial to learn about a few key factors. These factors will enable you to make a well-informed choice and help avoid potential complications during the factory reset process.
1. Data Loss
Resetting your locked Nokia C12 phone typically involves performing a factory reset. The process erases all data and settings on the Nokia C12 device. This includes your files, apps, contacts, and other information stored on the phone. You can easily restore these data if you have backed up data before. It’s crucial to back up essential data regularly to avoid data loss.
2. Factory Reset Protection (FRP)
Nokia C12 , like many other Android manufacturers, implements Factory Reset Protection. It acts as a preemptive safeguard against unauthorized access to a device after a reset. If your phone is linked to a Google account, you will need to input the accurate login credentials after a reset.
Failing to do so may lead to your device being locked. Understanding how to bypass or recover from FRP lock is essential if you find yourself in this situation.
Part 2: How to Reset a Nokia C12 Phone That is Locked With Google Find My Device?
Resetting a locked Nokia C12 phone through Google Find My Device presents a convenient solution. It, however, needs you to have activated this functionality on your device. To initiate the reset, please adhere to the following steps:
Step 1: Open a web browser on any computer or alternative device and navigate to the Google Find My Device website. Sign in with the same Google account associated with your locked Nokia C12 phone.
Step 2: Upon successful login, a list of devices linked to your Google account will be displayed. Locate your locked Nokia C12 phone from the list and select it. Select the “Erase Device” option from the left-hand panel, and it will trigger a remote factory reset for your locked phone.
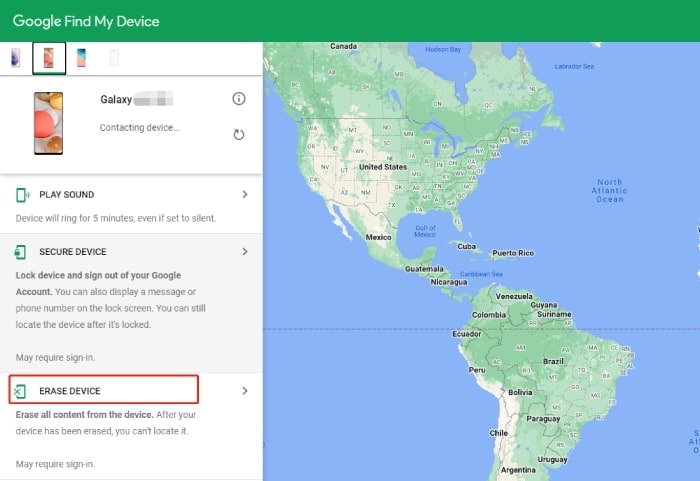
Step 3: A confirmation dialog will appear, prompting you to input your Google account password. Finally, click the “Erase” button to initiate the factory reset process.
Part 3: How to reset a Nokia C12 phone that is locked without a password?
In order to reset your Nokia C12 phone without a password, you need to have a single software known as Dr.Fone - Screen Unlock (Android) . It’s a powerful and versatile software tool designed to help you unlock your devices under various circumstances. Whether you’ve forgotten your device’s password, PIN, pattern, or fingerprint, or you’re dealing with a locked device due to a broken screen, Dr.Fone - Screen Unlock (Android) can assist you. In order to reset phone correctly, go through the steps given below:
Before resetting your Nokia C12 phone that is locked, you can install the Dr.Fone application on your Windows PC or Mac first.
![]()
Dr.Fone - Screen Unlock (Android)
The Best Unlock Tool to Reset a Nokia C12 Phone That Is Locked Without a Password!
- Remove all Android screen locks (PIN/pattern/fingerprints/face ID) in minutes.
- Work for forgotten passwords, second-hand Nokia C12 devices, etc.
- Everyone can handle the lock screen without any tech knowledge.
- Provide specific removal solutions to promise good success rate.
4,008,671 people have downloaded it
Step 1: Launch the Program
First of all, launch the Dr.Fone Screen Unlock on your computer, and you will be greeted with a welcome screen like this. Now, head over to the “Screen Unlock” section.

Step 2: Connect Device
Now, you need to connect your Nokia C12 phone to the computer via a USB cable and select “Android” > “Unlock Android Screen.” This particular step is an application for all the Android phones out there.

Step 3: Choose Device Model
Here you need to select the exact brand of your phone. In your case, you can just tap “Nokia C12 .” The program then will start the process for the lock screen removal.

Step 4: Unlock Screen
Go along with the instructions on the screen and remove all the settings of the Nokia C12 device. Within a short while, the screen will be unlocked.

After the entire process is completed, you can easily access your Nokia C12 Phone without the need to enter your password. All the restrictions that were set properly to unlock will be removed so that you can use your phone as intended.
Part 4: How to reset a Nokia C12 phone that is locked with a hard reset
Disclaimer: Only perform this step if you are well accustomed to the Android recovery system or at least know your way around your Nokia C12 phone.
That being said, you should only resort to using a hard reset if you don’t have any important data on your phone. Further including, resetting your phone with the hard reset option will wipe out any data that’s been stored in it. Now, proceed forward will all the steps are given below:
Step 1: Charge Device
Charge your Nokia C12 Phone so that it has a batter of at least 30% or higher. Then turn off the phone.
Step 2: Press keys
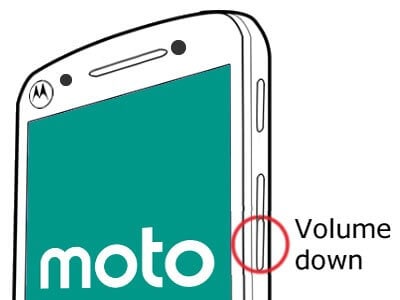
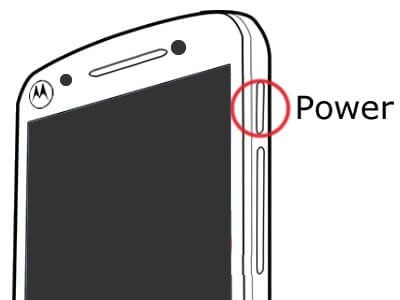
Now, you need to press the Volume Down + Power button simultaneously until the Nokia C12 device logo shows up on the screen.
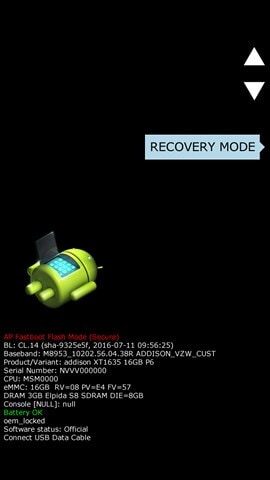
Step 3: Enter Recovery Mode
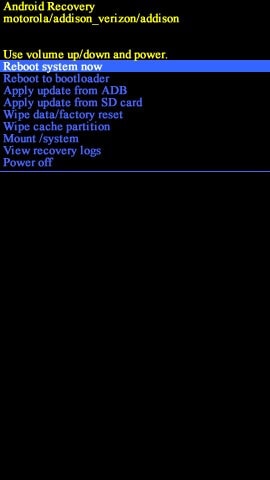
Now, press the Volume Down button to navigate to the Recovery Mode.
Step 4: Factory Reset
Use the buttons to navigate to the “Wipe data/factory reset” option and select it by pressing the Power button. Now, choose the option ”Factory data Reset” and wait for a few seconds till it is completed.

Step 5: Reboot Now
Again use the Volume buttons and select the “Reboot system now.”
After you have successfully reset your Nokia C12 phone, it would take a few minutes to boot up. Once that is done, you are left with a clean slate, just like a completely new smartphone.
Part 5: Unlock locked Nokia C12 phone with Gmail ID and password
It is imperative to understand that unlocking your Nokia C12 Phone using a Gmail ID and password should be your last resort and especially if you are using an older version of Android. Among all the tricks of how to reset a Nokia C12 phone that is locked, it only works if you are running around version 4.4 KitKat or older than that. Neither less to say, in order for the step to work properly, you need your Gmail account to be properly configured with the Nokia C12 device.
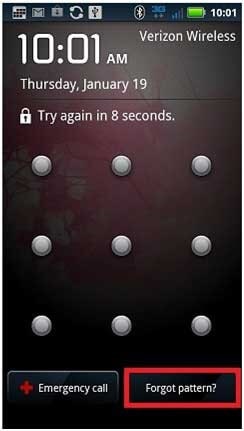
Step 1: Attempt Passwords
At first, you need to make five attempts to unlock your device. Whether you have used a PIN or Pattern lock, Android will always give you five attempts to get the password right. Once you get that, it will trigger the “Forget Password/Pattern” option on Your Nokia C12. This way, you can sneak back into the system once again.
Step 2: Enter Credentials
Once you hit the option, you will be redirected to another page, where you need to enter your Gmail id and password. Make sure that you get the information right, and select “Sign in.”
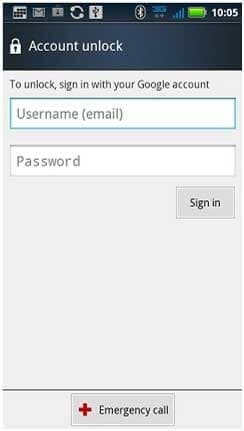
Once you get everything right, this will bypass any password or pattern you once had put on your Phone. Just remember, you need to have a stable internet connection in order for the step to work seamlessly.
Bonus Tip: Are There Preventive Measures To Avoid Future Lockouts?
Want to prevent future lockouts and ensure a smoother smartphone experience? Consider implementing the following preventive measures:
1. Setting Up Alternative Lock Methods
One way to avoid getting locked out of your Nokia C12 phone is to set up alternative lock methods. In addition to PINs, passwords, and patterns, you can use biometric methods. These include fingerprint recognition or facial recognition if your device supports them. Such options provide convenient and secure ways to unlock your phone.
2. Regularly Backing Up Your Data
Regular data backups are crucial to safeguarding your essential files and information. Utilize cloud backup services or local backup solutions to routinely save your data. In case of a lockout or a factory reset, you can quickly restore your data without loss.
3. Using Secure and Memorable Passwords
When setting up lock methods, opt for strong, unique, and memorable passwords. Avoid using easily guessable information like birthdays or simple patterns. Strong passwords can enhance security while minimizing the chances of forgetting your credentials.
Conclusion
There is no point in arguing that looking through how to reset a Nokia C12 phone that is locked after you have forgotten the password is indeed a hectic process. But, there is a way around it too. By going through all the steps mentioned above, you can always get an unlocked phone with ease.
To our recommendation, we would suggest going through Dr.Fone - Screen Unlock (Android) so that you can make the entire process as seamless as possible. It is by far the easiest and most convenient process to work around. Neither less to say, there are a ton of video tutorials that can assist you in case you get stuck in the middle of the process.
Unlocking the Power of Smart Lock: A Beginner’s Guide for Nokia C12 Users
Google constantly comes up with features to simplify the way users interact and complete tasks on the Android platform. One of the most important features that techies loved to debate about was the Smart Lock Android, a secure password manager functioning in sync with a Google account on the Android phone.
Part 1: What is Android Smart Lock?
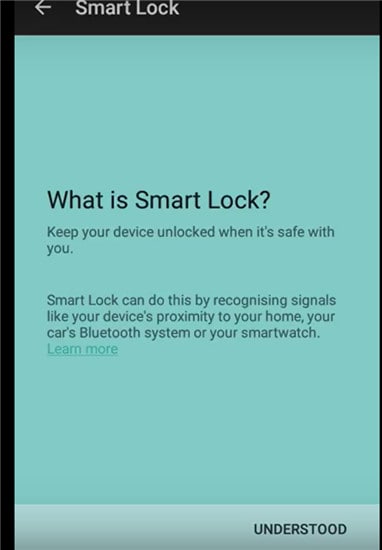
Android Lollipop added a feature called Smart Lock, and the feature was devised as a smart tool to prevent the Android phone from locking once it was initially unlocked. In other words, the feature overrides an Android phone’s Lock Screen feature, thereby saving users the need to enter passwords every time the Nokia C12 device locks.
If you’re at home, it’s likely your android phone is locked out if you haven’t accessed at for some time. Smart Locks solves the problem in many ways. It allows you to allocate trusted places. Once you within range of the trusted places, your phone won’t lock. Trusted devices come next. Smart Lock is assigned to Bluetooth and Android NFC unlock devices.
Finally, trusted face unlocking is the ultimate face recognition system that unlocks your Android device as soon as you look at it across the front-facing camera. A face unlock first introduced with Android Jelly Bean and has been significantly improved in later versions.
Turning On Smart Lock
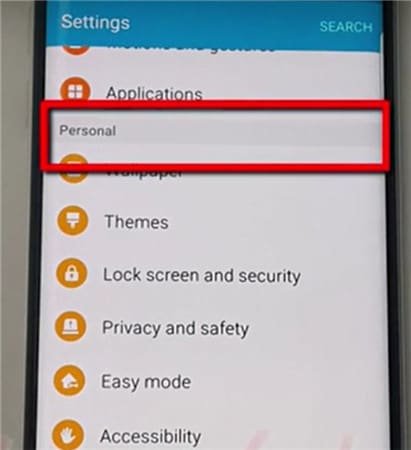
The feature is enabled by first accessing settings. For example, in a Samsung Galaxy S6:
Tap on Settings, which is the gear symbol.
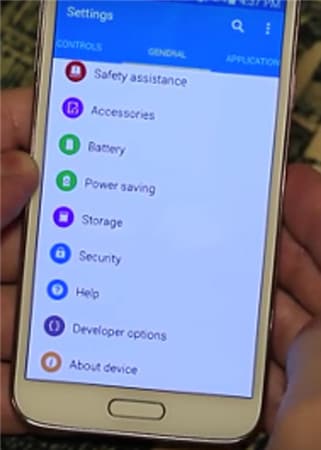
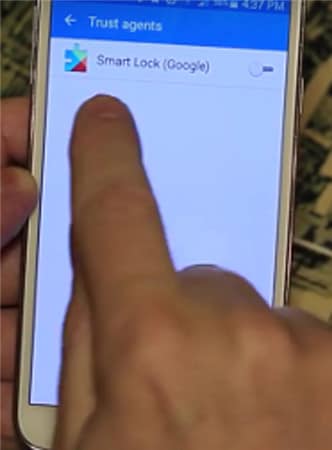
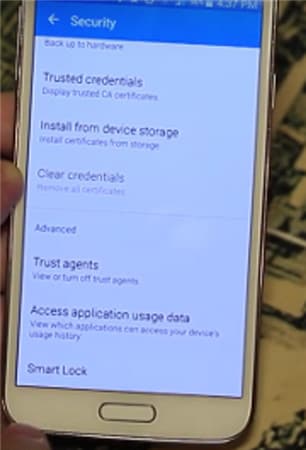
- • Click on Personal and tap on Security.
- • Go to Advanced and tap on Trust agents and make sure Smart Lock is turned on.
- • Under Screen Security tap Smart Lock.
- • Here, you need to enter your Screen Lock. If you haven’t done so, set up a password and PIN by following the on-screen prompts. The screen Lock is needed every time you have to change the Smart Lock settings.
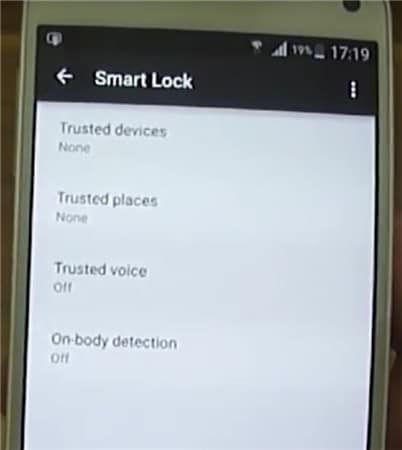
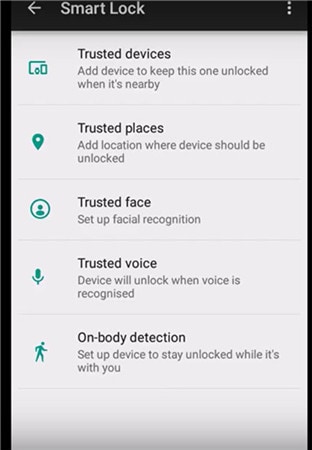
Within Smart Lock, there are three options for setting the system. You can set up trusted devices, trusted face, and trusted places individually, combining two or all three at the same time. You can choose just one trusted face, but you have the option to set up as many trusted devices and trusted places as needed.
Part 2: Turn On Smart Lock For Android with Trusted Devices
You can decide on a trusted device to be paired with Smart Lock Android.
For example, you can set up a Smart Lock for Bluetooth in your Android Bluetooth settings. It can also be done for Android NFC unlock devices. Examples include the Bluetooth system in your car, NFC unlocks, android sticker on the car’s phone dock, or Bluetooth in your watch.
- • Go to Settings.
- • Tap on Security and then Smart Lock.
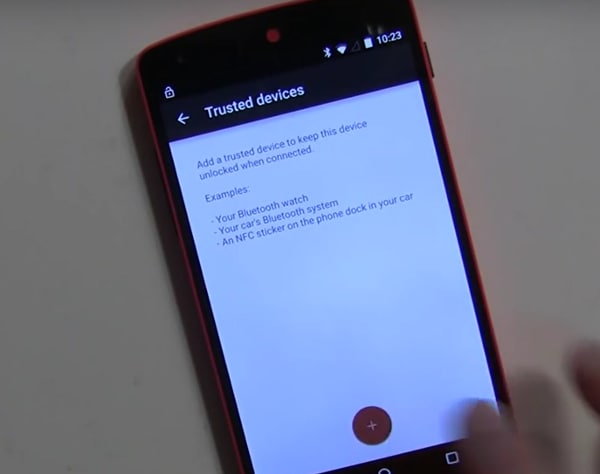
- • Existing paired options are listed under Trusted Devices.
- • Initially, trusted devices will show None.
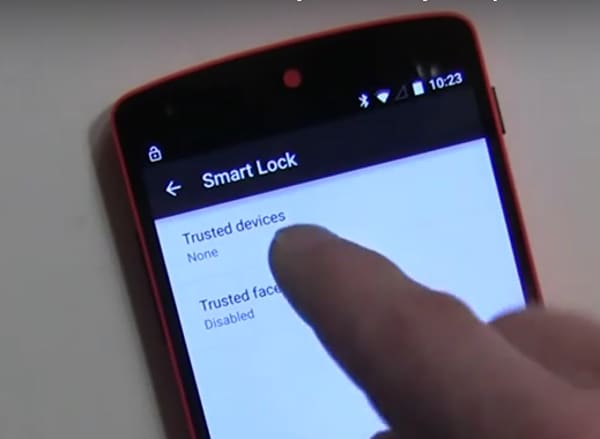
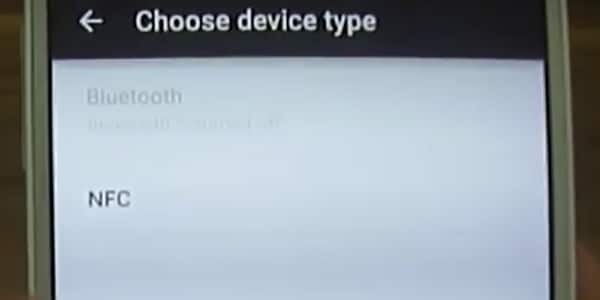
Tap on Add Trusted Devices.
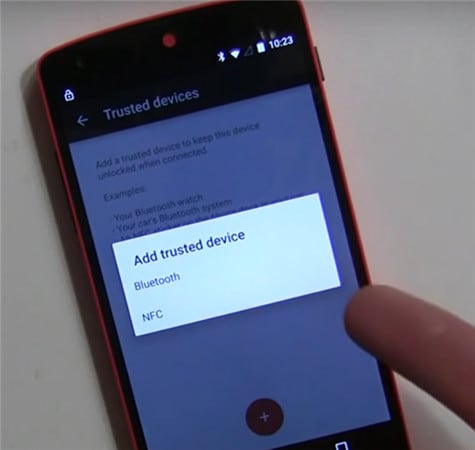
The next screen is the Choose Device Type.

Since you have already paired Bluetooth, it will ask you to choose the Nokia C12 device from the list.
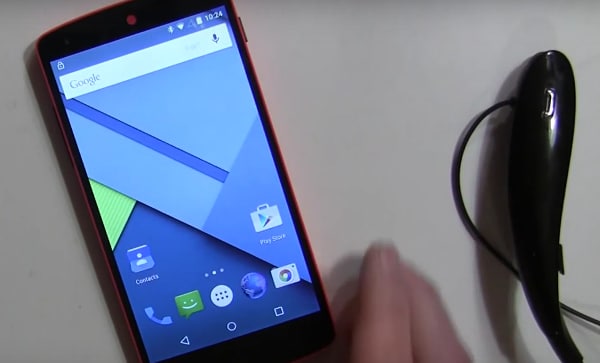
- • As an example, let’s take the case of LG HBS800. It may show Not connected until you add it.
- • It will show up under Trusted devices in the Smart Lock menu.
- • When you turn the added device on, Smart Lock now unlocks the Android mobile.
Similarly, other Bluetooth and NFC unlock android supported gadgets can be added under the list of Trusted Devices.
Part 3: Turn On Smart Lock For Android With Trusted Locations
You can also add locations or addresses to Smart Lock Trusted Locations, and the phone unlocks automatically as soon as you arrive at the desired location. For example, you can set up your home or work address under Trusted Locations.
Check current settings first.

On a new Android phone, visit Settings>Personal.
Then Lock Screen and Security.
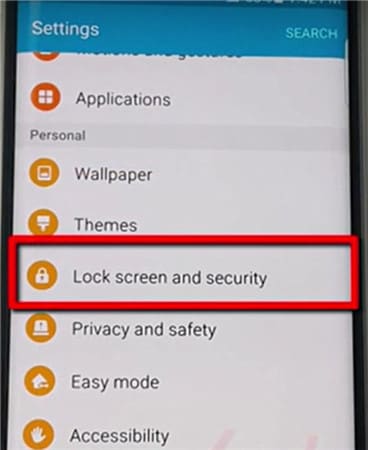
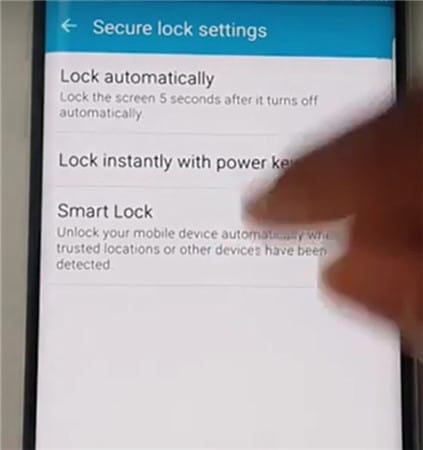
Then Secure Lock Settings.
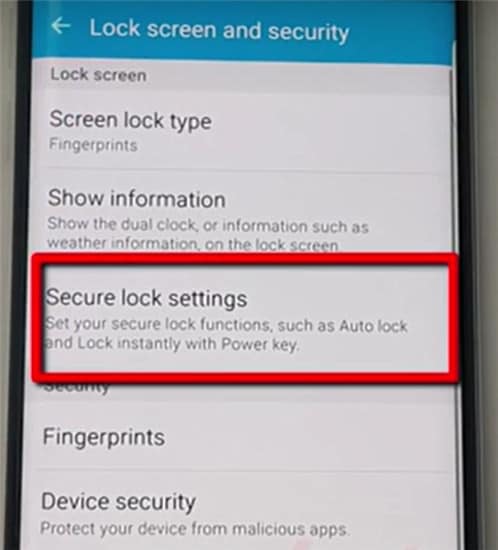
Tap Smart Lock.
Tap on Trusted Places.
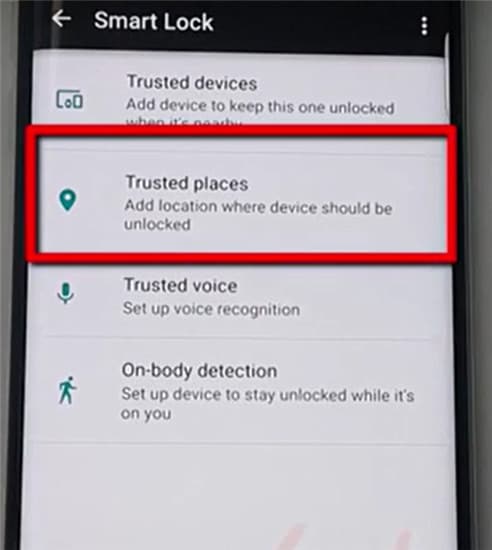
Tap on Add Trusted Places
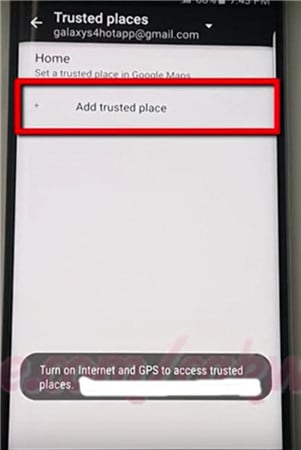
- • Initiate the Google Maps app on the Android phone. Make sure the Internet and GPS are on.
- • Pick a place.
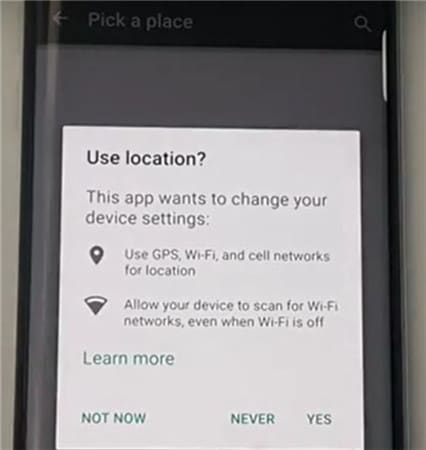
- • Click on Settings.
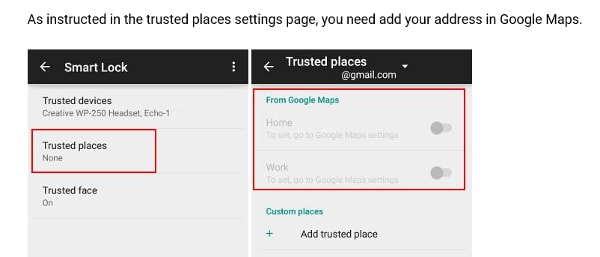
- • Click on Edit home or work. You can now add or edit the required addresses.
- • As an example, click on the Enter work address.
- • You now have the option to type in the address or use the address listed on Google Maps as the required work address.
- • A successful addition is listed and can be edited under the Edit work address.
- • Close the Google Maps app.
- • The work address is automatically propagated and configured with Smart Lock settings.
- • Go back to Settings> Security> Smart Lock> Trusted Places.
- • The work address you added is now listed under Work.
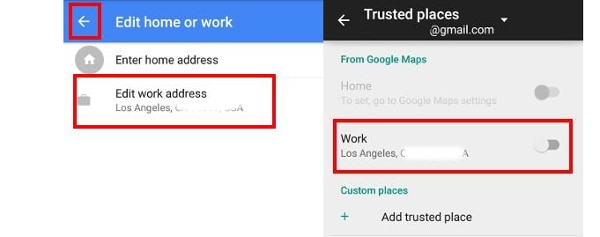
- • However, it is not yet configured as a Smart Lock option. Tap the location once, and it is enabled.
- • The switch along the address to the right turns blue, indicating it is enabled.
- • The work address is now listed under Trusted places for Work.
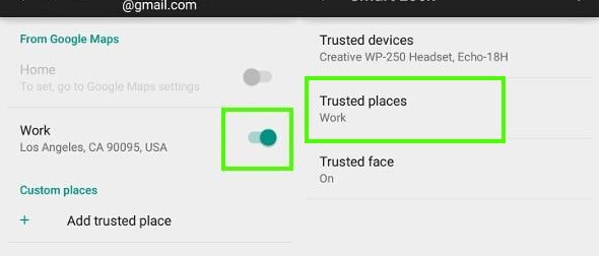
- • The phone is now configured for the work address and will unlock whenever you are at the location.
- • Since it works on Google Maps, the feature works through an Internet connection.
Part 4: Turn On Smart Lock For Android With Trusted Face
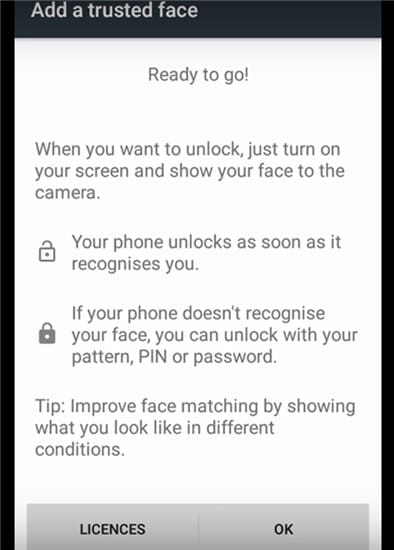
The feature recognizes your face and then unlocks the Nokia C12 device. Once you set up the Nokia C12 device to recognize your face as a trusted face, it will unlock the Nokia C12 device as soon as it recognizes you.
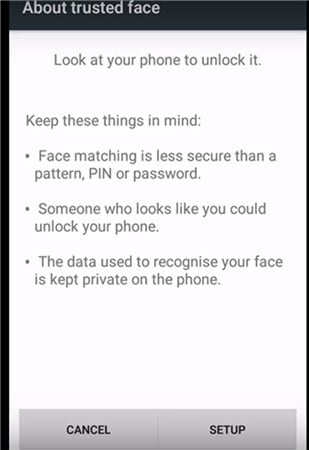
PRECAUTION: At best, this can be the first level of security, as one who resembles you to some extent can unlock the Nokia C12 device. Photographs are not stored in the system. The device does hold necessary data to recognize your face, and the security level is determined by how good the Nokia C12 device is configured. The data is not accessed by any app or loaded onto a Google server for backup.
Setting Up Trusted Face
- • Go to Smart Lock and tap Trusted Face.
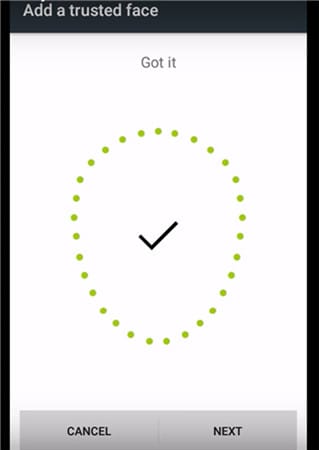
- • Tap on Setup. Follow on-screen instructions.
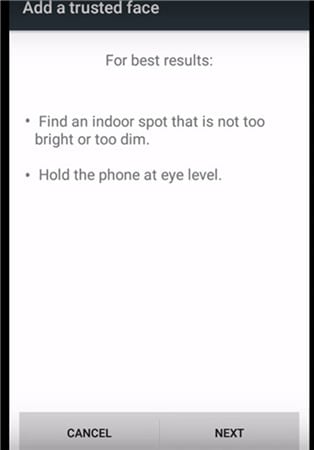
The device begins to gather data about your face. The trusted face icon appears. As a backup, in case Smart Lock does not recognize your face, use the manual system by applying the PIN or password to unlock the Nokia C12 device.
In case Trusted Face is not required, tap on reset Trusted Face appearing under the Trusted Face menu. Tap on Reset to reset the option.
How To Improve Facial Recognition In Your Bluetooth and Android NFC Unlock Devices
- • If you feel facial recognition is not up to the mark, go to Smart Lock and tap on a Trusted face.
- • Tap on Improve face matching.
- • Tap on Next and follow instructions on the screen to complete the task.
Smart Lock Android is a great feature and is only going to improve on time. With added security measures being introduced by Google for Bluetooth and NFC unlock android devices, including configuration to Google maps and Gmail, the feature may be one of the most important features to overcome constant blocking of devices even in protected places.
Video on How to Remove Android Lock Screen Without Data Loss
How to Unlock Nokia C12 Phone with Broken Screen
Seeing as the only way to control your Nokia C12 deviceis the touch screen, a broken device can cause you a lot of worries. Most people think that there is no way to get their device to work again let alone be able to unlock it if the screen is broken or cracked . It is, however, important to find a way to unlock the broken device so that you can gain access to your data and create a backup to restore to a new device.
In this article, we are going to look at a few simple ways you can unlock an Android device with a broken screen.
Here is a video for you to learn how to unlock Android phone or access phone with broken screen:
Method 1: Using Android Debug Bridge (ADB)
For this method, you will need your device and access to a PC. It is the most powerful method to unlock a broken Android device. It will however only work if you have enabled USB debugging on your android phone. If you haven’t, skip this method and see if method 2 or 3 might be of help.
ADB creates a bridge between the PC and your device which can then be used to unlock the Nokia C12 device. Here’s how to use this bridge.
Step 1: Download the Android SDK package on your PC. You can download it here: http://developer.android.com/sdk/index.html . Extract the ZIP file on your PC.
Step 2: Download the necessary drivers for your device. The USB drivers for your device can be found on the manufacturer’s website.
Step 3: Launch Command Prompt on your PC and change the location of the ADB file. Type in the following into Command Prompt; cd C:/android/platform-tools
Step 4: Connect the Nokia C12 device to your PC using USB cables. Enter the command “ ADB _device_” (without quotation marks). If your phone is recognized, you will see numbers in the Command Prompt message.
Step 5: Type in the following two commands. You will need to type in the second one immediately after the first. Replace 1234 with your password.
ADB shell input text 1234
Shell input key event 66
Step 6: Your phone will now be unlocked and you can proceed to back up its contents.
![]()
Dr.Fone - Screen Unlock (Android)
The Best Tool to Reset Phones Without Android Factory Reset Codes
- It enables your Android phones to get safe, simple, and trustful after reset.
- It is still helpful even though you don’t know the OS version of your devices.
- Everybody can handle it without any technical background.
- Provide specific removal solutions to promise good success rate.
4,008,670 people have downloaded it
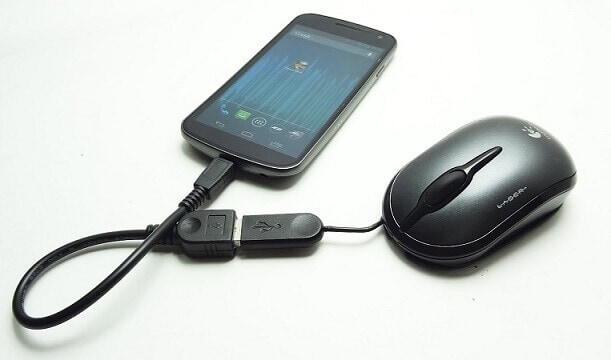
Method 2: Using a USB Mouse and the On the Go Adapter
This is a great solution if you don’t have USB debugging enabled on your device. You will need your device, an OTG adapter and a USB mouse. It involves connecting the Nokia C12 device to the USB mouse using the OTG adapter. Check if your device can be connected to a USB mouse. You can find an OTG adapter online, they are relatively inexpensive and very useful.
Before we begin, it is a good idea to ensure your device is sufficiently charged because the Mouse may drain your battery.
Step 1: Connect the Micro USB side of the OTG adapter to your device and then plug in the USB mouse to the adapter.
Step 2: As soon as the Nokia C12 devices are connected, you will be able to see a pointer on your screen. You can then use the pointer to unlock the pattern or enter the Nokia C12 device’s password lock.
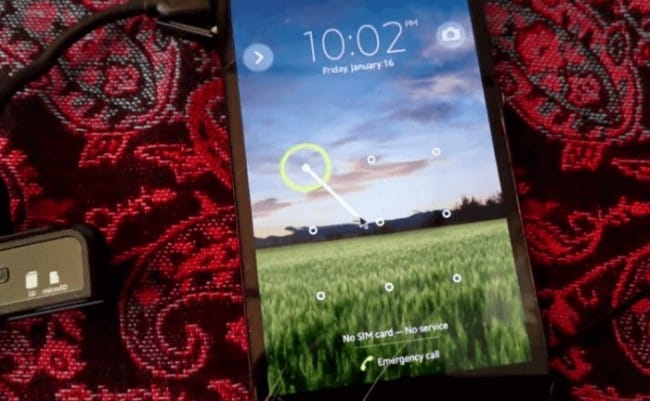
You can then go about backing up the contents of your device.
Method 3: Using your Samsung Account
This method is a reliable way to unlock a Samsung device that has a broken screen or is not working correctly. While it is highly effective you will need to have a Samsung account registered with your device. The problem is that not many Samsung device users have registered their devices with the service. If you are among the lucky few who have, here’s how to use your account to unlock your device.
Step 1: Visit the https://findmymobile.samsung.com/login.do on your PC or any other device and log in with your account information.
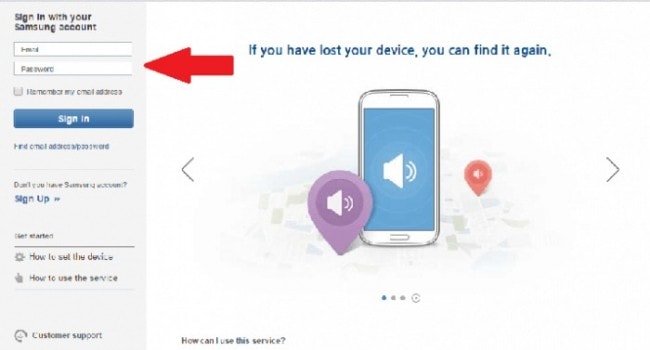
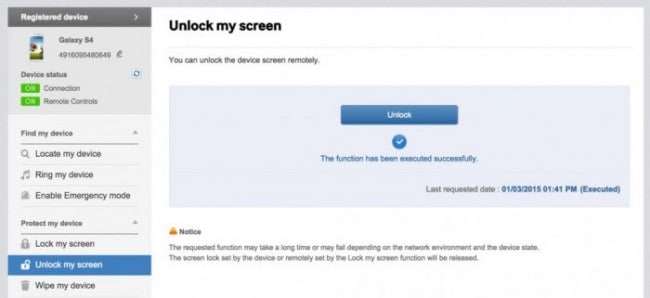
Step 2: Select your device from the menu on the left-hand side of the screen.
Step 3: You should see the option “Unlock my screen” on the sidebar. Click on it and you will get instructions on how to access your device.
Conclusion
Being unable to unlock your device is never a good place to be. We hope one of the above solutions will work for you. You can then gain access to your device and back up the files and contacts. This way your life doesn’t have to be disrupted- you can just restore the backup on a new device or the old one once the screen is fixed.
Also read:
- In 2024, Pattern Locks Are Unsafe Secure Your Realme 11 5G Phone Now with These Tips
- In 2024, Top 10 Fingerprint Lock Apps to Lock Your Nubia Red Magic 8S Pro Phone
- In 2024, How to Unlock Motorola Edge 40 Neo Phone Password Without Factory Reset?
- In 2024, The Top 5 Android Apps That Use Fingerprint Sensor to Lock Your Apps On Nokia C12 Plus
- In 2024, How to Unlock Motorola Moto G04 Phone Password Without Factory Reset?
- In 2024, How To Track IMEI Number Of Nokia C12 Pro Through Google Earth?
- How To Unlock Realme Narzo 60 5G Phone Without Password?
- In 2024, Mastering Lock Screen Settings How to Enable and Disable on Honor X9b
- Everything You Need to Know about Lock Screen Settings on your Motorola Moto G24
- Tips and Tricks for Setting Up your Nubia Red Magic 8S Pro Phone Pattern Lock
- Delete Gmail Account With/Without Password On Honor Magic 6 Pro
- How to Unlock a Network Locked Poco C65 Phone?
- Mastering Android Device Manager The Ultimate Guide to Unlocking Your Realme 12 Pro+ 5G Device
- Mastering Android Device Manager The Ultimate Guide to Unlocking Your Nokia C22 Device
- Mastering Lock Screen Settings How to Enable and Disable on Realme Narzo N53
- iPogo will be the new iSpoofer On Oppo A78? | Dr.fone
- How To Bypass iCloud Activation Lock on Mac For iPhone 14?
- Possible solutions to restore deleted photos from Tecno Camon 20 Pro 5G.
- How to Recover Files after iPhone 14 Factory Reset? | Stellar
- Play Store Not Working On Asus ROG Phone 7 Ultimate? 8 Solutions Inside | Dr.fone
- Here are Some of the Best Pokemon Discord Servers to Join On Vivo X Flip | Dr.fone
- Solved Photos Disappeared from iPhone Suddenly | Stellar
- Google Play Services Wont Update? 12 Fixes are Here on Infinix Hot 40 | Dr.fone
- In 2024, Full Guide to Fix iToolab AnyGO Not Working On Oppo Find N3 | Dr.fone
- In 2024, How to Change Lock Screen Wallpaper on Samsung Galaxy Z Fold 5
- Realme Note 50 Messages Recovery - Recover Deleted Messages from Realme Note 50
- Title: How to Reset a Nokia C12 Phone that is Locked?
- Author: Aaron
- Created at : 2024-05-19 09:20:12
- Updated at : 2024-05-20 09:20:12
- Link: https://easy-unlock-android.techidaily.com/how-to-reset-a-nokia-c12-phone-that-is-locked-by-drfone-android/
- License: This work is licensed under CC BY-NC-SA 4.0.
