
How To Remove Screen Lock PIN On Nokia G310 Like A Pro 5 Easy Ways
How To Remove Screen Lock PIN On Nokia G310 Like A Pro: 5 Easy Ways
When protecting personal information on your phone, setting up a lock screen is essential. If you’ve ever forgotten your screen lock PIN on Android, you know how frustrating it can be to get back into your device. If you’ve ever tried to remove the screen lock PIN on an Android device, you know it’s not that easy.
It depends on your phone and the type of lock code you have set up. Note that this will erase all your data from the phone, so be sure to back it up first. This post will teach you how to remove the screen lock PIN on Android devices using several methods. So if you cannot use your device, keep reading for the steps!
Part 1: How To Remove Screen Lock PIN On Nokia G310? 5 Simple Ways
If you’ve forgotten your screen lock pin, there’s no need to worry. Here are quick and easy ways to remove the screen lock PIN on your Android device.
1. Change or Remove in Settings
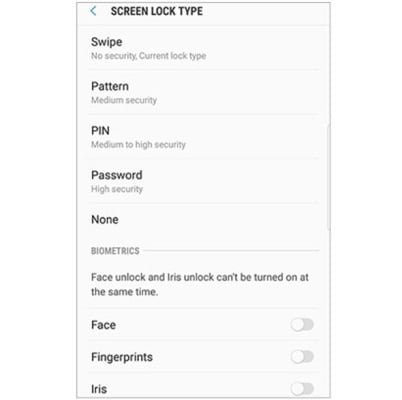
When you go to Settings > Lock Screen > Screen lock type, several lock screen options are available. These options are given below:
Swipe:
You can unlock your phone by swiping in any direction on its screen.
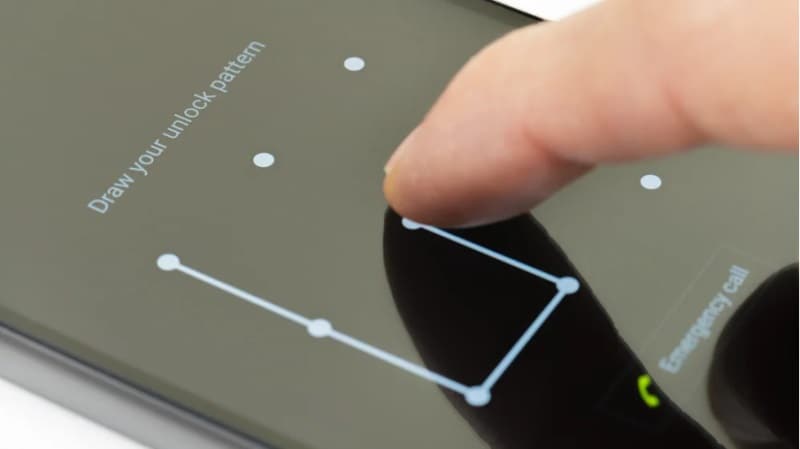
Pattern:
You will draw a pattern on a 3-by-3 grid of dots to unlock your phone this way. To do this, you’ll need to use your finger to connect the dots in the pattern.
Phone Pin:
When you choose a PIN, make sure it’s something easy to remember. But choose wisely- a PIN that’s too easy to guess can put your account at risk.
Password:
It is the highest level of security available for your phone. Passwords should contain seven characters, of which at least one must be a letter. They should also be both unique and memorable.
Face recognition:
By holding your face directly in front of the phone screen, you can unlock your phone and verify yourself in apps.
Fingerprints:
Touch your phone to open it quickly and easily.
Iris:
Verify that only the contents of your phone are visible to your eyes.
Intelligent Scan:
Unlock your device with both facial and iris recognition.
If you’ve forgotten your lock PIN on your Android device, don’t worry - there are a few ways to reset it. Here’s how:
Step 1: Select Lock Screen > Screen lock type from the Settings menu.
Step 2: When prompted, enter your current lock screen code.
Step 3: Select None from the list.
2. Disable Android Device Manager
It is not possible to remove the PIN from some Android devices. The Android device administrator can be disabled in this situation. Here’s how to universal unlock a PIN for Android:

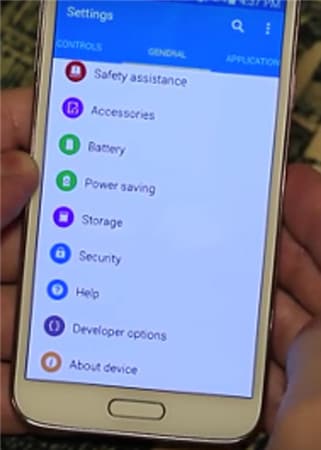
Step 1: From the “Settings” option, select the “Security” option and click on it to begin.
Step 2: Select “Device Administrators” from the menu, and you will see a list of apps that may restrict your ability to change the settings.
Step 3: Choose the Android device manager from the list.
Step 4: Click on “Disable.”
3. Remove PIN from Google Find My Device
Even if you don’t remember your Android lock PIN, you can use Find My Device to eliminate your Android lock PIN. Sign in to Google Play, turn on Find My Device and Location, and connect your locked phone to the internet.
Here’s the guide to universal unlock PIN for Android:
Step 1: Log into your Google account on your computer and visit Google Find My Device.
Step 2: Tap the “ERASE DEVICE” icon on your device and enter your account information again.
Step 3: To remove Android phone settings and data, click the “Erase” icon. Once that is done, you will erase the phone PIN.

4. Factory Reset Your Nokia G310 (Data Loss)
A factory reset in Recovery mode can also be used to remove the forgotten phone PIN lock on an Android device. It is important to note that you will lose everything on your device if you universal unlock your PIN for android.
Steps to get rid of forgotten phone PIN via factory reset:
Step 1: Turn off your Android phone by pressing and holding the Power button.
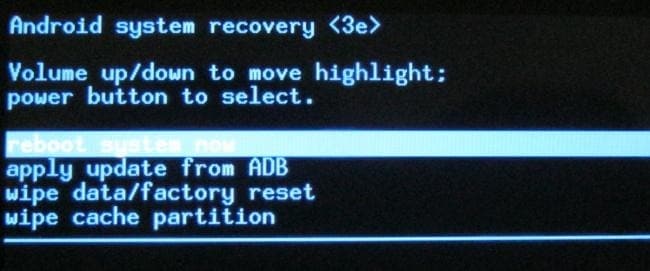
Step 2: To enter Recovery mode, press and hold the Volume Down + Power buttons simultaneously. Hold the buttons until the Start menu appears.
Step 3: After selecting Recovery mode with the Volume Down button, press the Power button to confirm.
Step 4: Select Wipe data/factory reset using the Volume buttons. Press Yes to confirm the operation.
Step 5: Once your device has been factory reset, you need to restart it by selecting the Reboot system now option.
Part 2: Is There Any Universal Unlock PIN For Android?
![]()
Dr.Fone - Screen Unlock (Android)
Remove the Screen Lock Pin Without Any Hassle!
- Completely unlinked from the previous Google account, it won’t be traced or blocked by it anymore.
- Remove all Android screen locks (PIN/pattern/fingerprints/face ID) in minutes.
- Almost all Samsung phones and tablets are supported (Currently for Android 6-12).
- Provide specific removal solutions to promise good success rate.
4,008,671 people have downloaded it
While there is no “universal unlock pin” for Android devices, Dr.Fone - Screen Unlock can bypass the lock screen on many popular phone models, including Samsung, LG, Motorola, Sony, HTC, Huawei, and more. Its simple interface makes it easy to use, even for those who are not tech-savvy.
Step 1: Select “Screen Unlock” from all the tools in Dr.Fone.

Step 2. Select Unlock Android Screen
We provide 2 options for you, and to unlock screen, you should select “Unlock Android Screen”.

Step 3. Select device model
There are still 2 buttons to choose, “100% Remove Screen Lock” is for most Android brands, but please back your device up before you pick it.

Check the brands’ list and make sure your unlock process keeps.

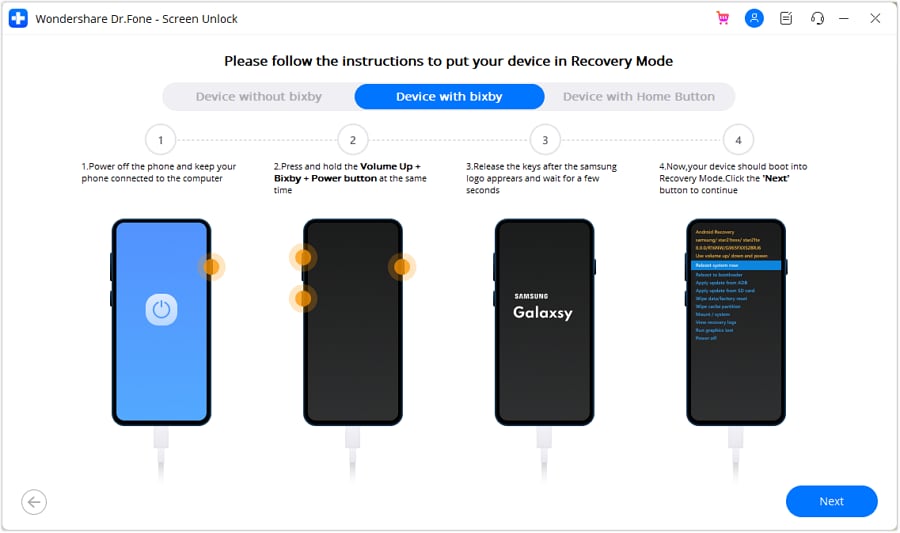
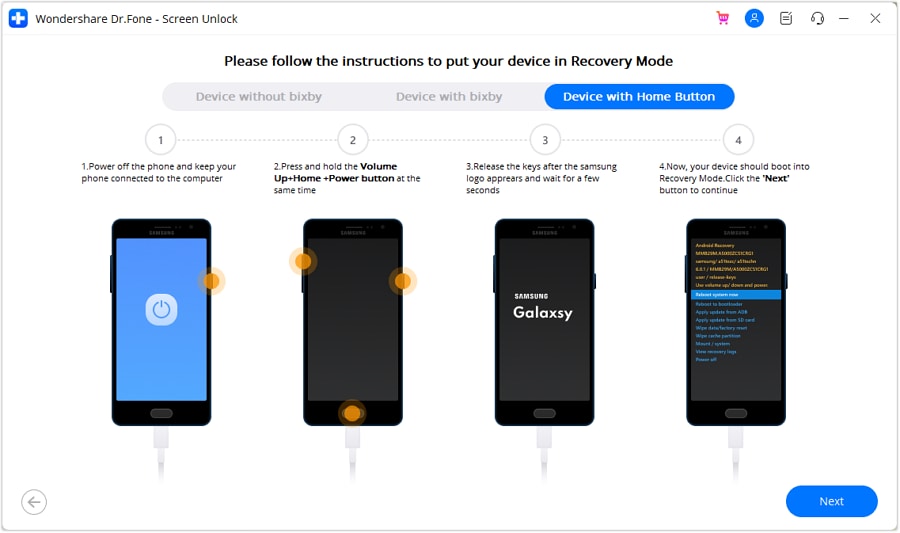
Step 4. Enter into Recovery Mode
With examples of Samsung phones, it’ll be clearer to understand how to unlock your Android phone via Recovery Mode.
Note: The specific processes are various according to different brands.
Recovery Mode in Samsung phone with Bixby
Recovery Mode in Samsung phone without Bixby

Recovery Mode in Samsung phone with Home Button
Step 5. Instructions to Wipe Cache Partition
Steps in Recovery Mode are really important. Find the correct options and your locked screen will be removed.
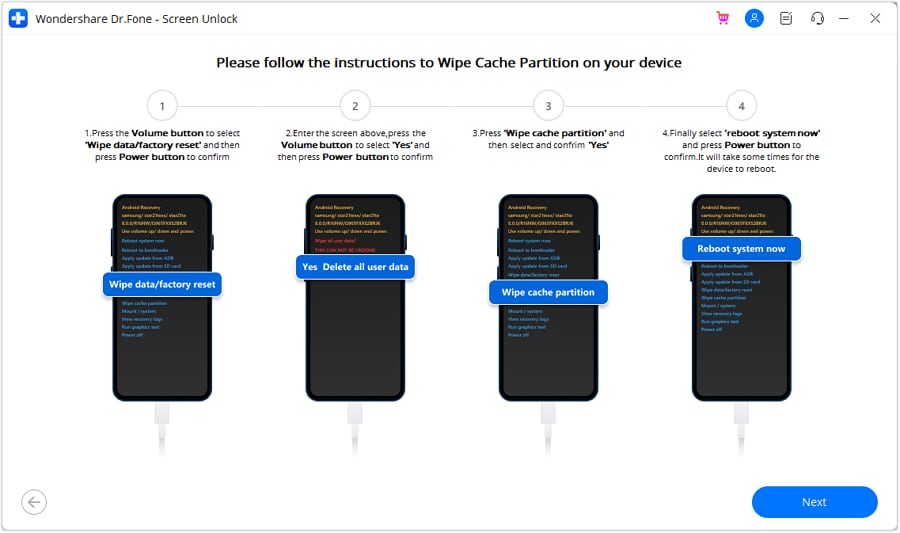
Now it’s a phone everyone can access without a password or pattern.

Part 3: In What Cases Should We Remove PIN On Our Android Phone?
There are a few reasons why you might want to remove the phone PIN from your Android:
1. Failed Attempts
If you’ve tried to unlock your phone with a pin too many times and failed, your phone will become locked. In this case, you’ll need to remove the PIN to unlock it.
2. Buy a Used Android phone
When you buy a second-hand Android phone, it’s best to remove the previous owner’s pin for security reasons. You can enter the phone’s settings and remove the PIN under the security section.
The Bottom Line
It can be frustrating when you forget your screen lock pin. You’re stuck staring at your phone, unable to use it or access any of your important data. But don’t worry; there are a few ways you can try to remove the screen lock pin on your Android device.
Luckily, Wondershare Dr.Fone - Screen Unlock is a powerful and easy-to-use lock screen removal tool that can help you bypass your lock screen in just a few minutes. Plus, it’s compatible with a wide range of Android devices, so you can use it regardless of what type of phone you have.
Unlocking the Power of Smart Lock: A Beginner’s Guide for Nokia G310 Users
Google constantly comes up with features to simplify the way users interact and complete tasks on the Android platform. One of the most important features that techies loved to debate about was the Smart Lock Android, a secure password manager functioning in sync with a Google account on the Android phone.
Part 1: What is Android Smart Lock?
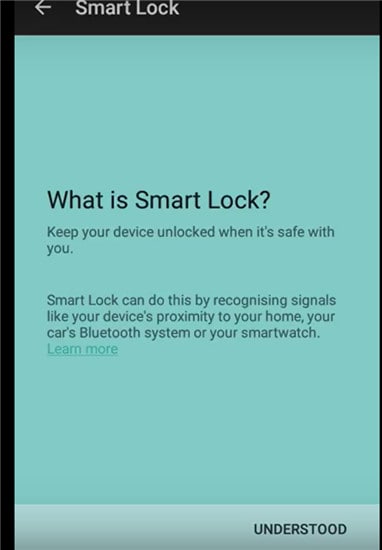
Android Lollipop added a feature called Smart Lock, and the feature was devised as a smart tool to prevent the Android phone from locking once it was initially unlocked. In other words, the feature overrides an Android phone’s Lock Screen feature, thereby saving users the need to enter passwords every time the Nokia G310 device locks.
If you’re at home, it’s likely your android phone is locked out if you haven’t accessed at for some time. Smart Locks solves the problem in many ways. It allows you to allocate trusted places. Once you within range of the trusted places, your phone won’t lock. Trusted devices come next. Smart Lock is assigned to Bluetooth and Android NFC unlock devices.

Finally, trusted face unlocking is the ultimate face recognition system that unlocks your Android device as soon as you look at it across the front-facing camera. A face unlock first introduced with Android Jelly Bean and has been significantly improved in later versions.
Turning On Smart Lock
The feature is enabled by first accessing settings. For example, in a Samsung Galaxy S6:
Tap on Settings, which is the gear symbol.
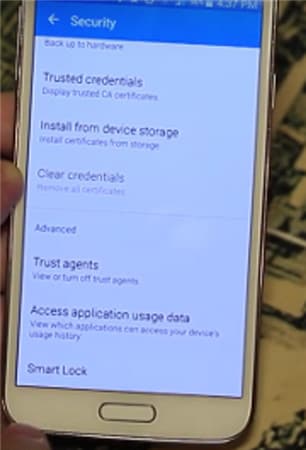
- • Click on Personal and tap on Security.
- • Go to Advanced and tap on Trust agents and make sure Smart Lock is turned on.
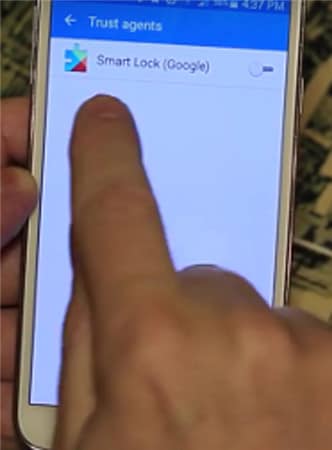
- • Under Screen Security tap Smart Lock.
- • Here, you need to enter your Screen Lock. If you haven’t done so, set up a password and PIN by following the on-screen prompts. The screen Lock is needed every time you have to change the Smart Lock settings.
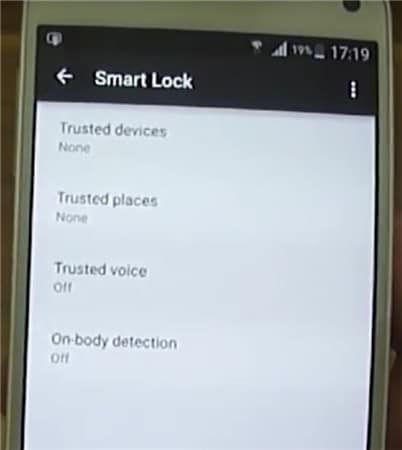
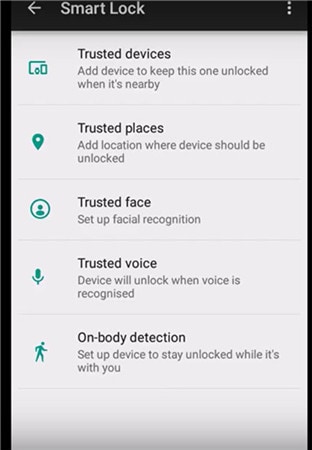
Within Smart Lock, there are three options for setting the system. You can set up trusted devices, trusted face, and trusted places individually, combining two or all three at the same time. You can choose just one trusted face, but you have the option to set up as many trusted devices and trusted places as needed.
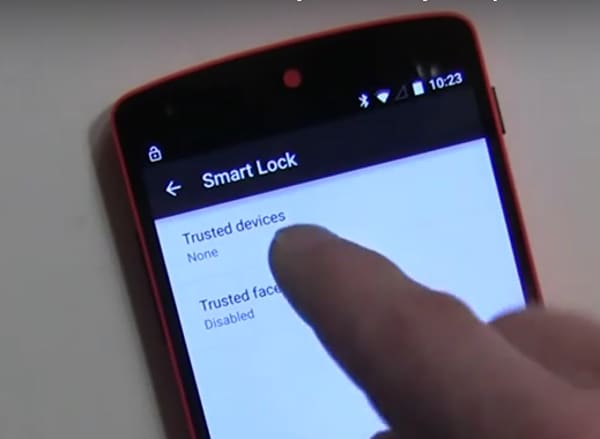
Part 2: Turn On Smart Lock For Android with Trusted Devices
You can decide on a trusted device to be paired with Smart Lock Android.
For example, you can set up a Smart Lock for Bluetooth in your Android Bluetooth settings. It can also be done for Android NFC unlock devices. Examples include the Bluetooth system in your car, NFC unlocks, android sticker on the car’s phone dock, or Bluetooth in your watch.
- • Go to Settings.
- • Tap on Security and then Smart Lock.
- • Existing paired options are listed under Trusted Devices.
- • Initially, trusted devices will show None.
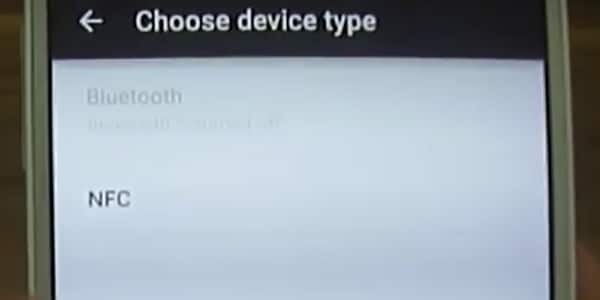
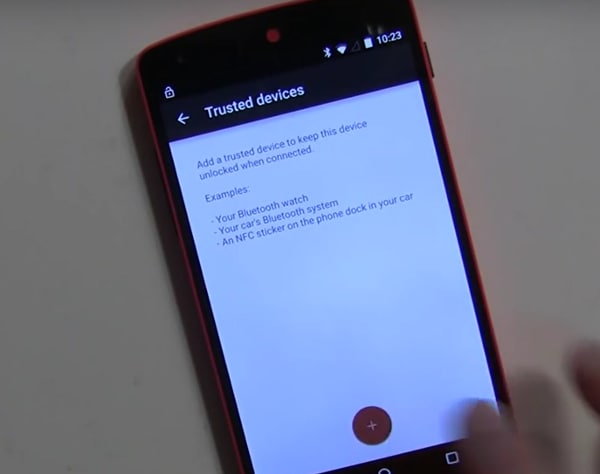
Tap on Add Trusted Devices.
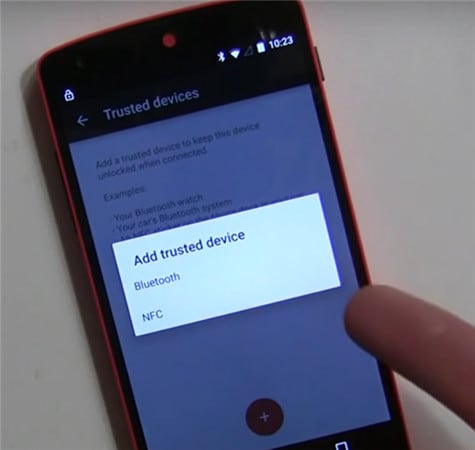
The next screen is the Choose Device Type.

Since you have already paired Bluetooth, it will ask you to choose the Nokia G310 device from the list.
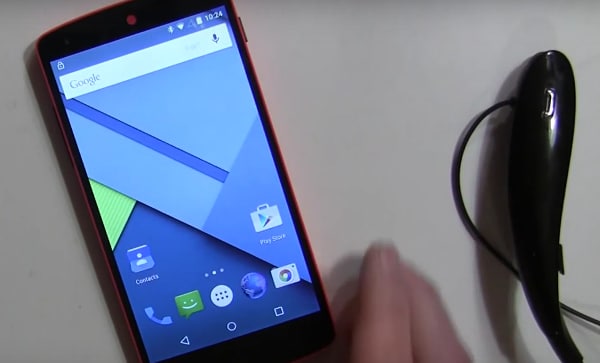
- • As an example, let’s take the case of LG HBS800. It may show Not connected until you add it.
- • It will show up under Trusted devices in the Smart Lock menu.
- • When you turn the added device on, Smart Lock now unlocks the Android mobile.
Similarly, other Bluetooth and NFC unlock android supported gadgets can be added under the list of Trusted Devices.
Part 3: Turn On Smart Lock For Android With Trusted Locations
You can also add locations or addresses to Smart Lock Trusted Locations, and the phone unlocks automatically as soon as you arrive at the desired location. For example, you can set up your home or work address under Trusted Locations.
Check current settings first.

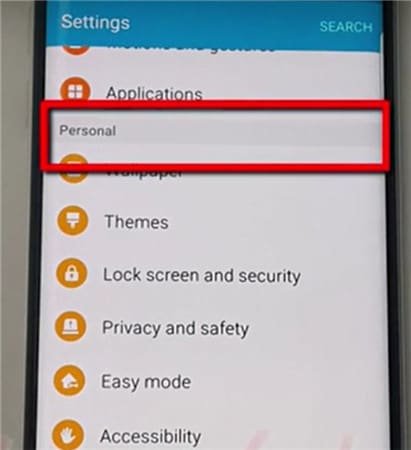
On a new Android phone, visit Settings>Personal.
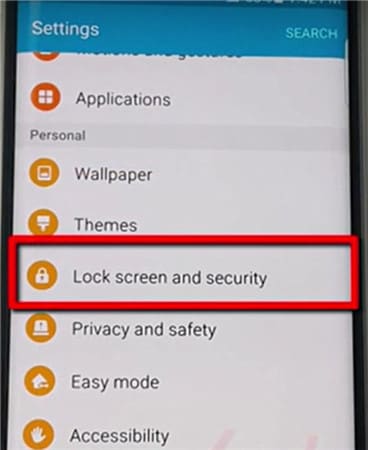
Then Lock Screen and Security.
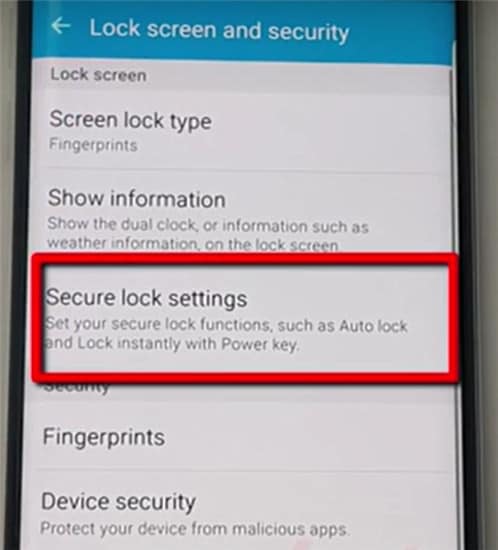
Then Secure Lock Settings.
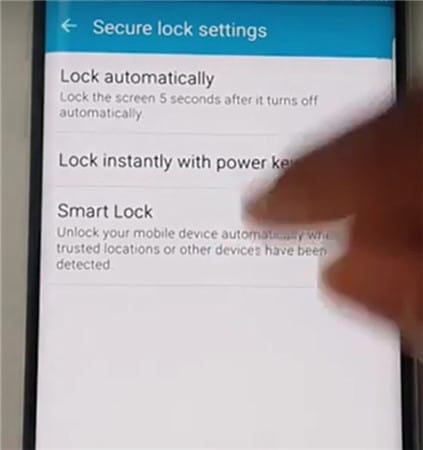
Tap Smart Lock.
Tap on Trusted Places.
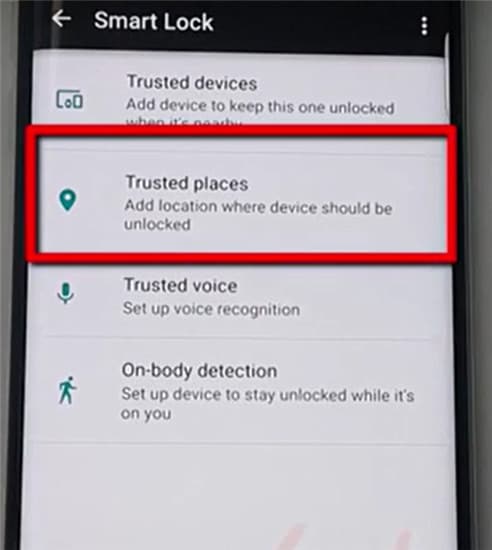
Tap on Add Trusted Places
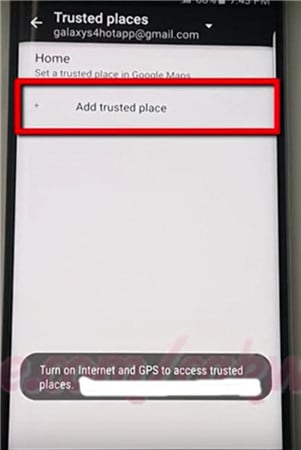
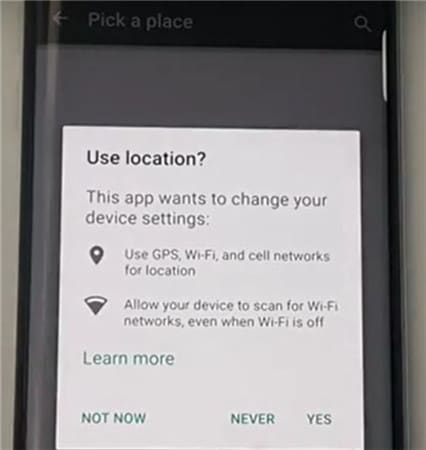
- • Initiate the Google Maps app on the Android phone. Make sure the Internet and GPS are on.
- • Pick a place.
- • Click on Settings.
- • Click on Edit home or work. You can now add or edit the required addresses.
- • As an example, click on the Enter work address.
- • You now have the option to type in the address or use the address listed on Google Maps as the required work address.
- • A successful addition is listed and can be edited under the Edit work address.
- • Close the Google Maps app.
- • The work address is automatically propagated and configured with Smart Lock settings.
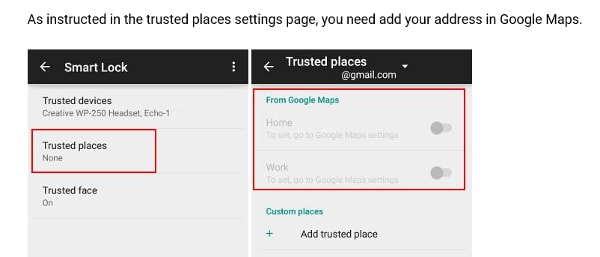
- • Go back to Settings> Security> Smart Lock> Trusted Places.
- • The work address you added is now listed under Work.
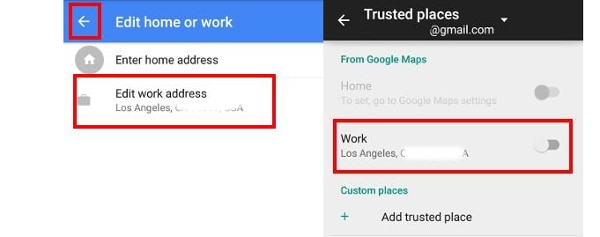
- • However, it is not yet configured as a Smart Lock option. Tap the location once, and it is enabled.
- • The switch along the address to the right turns blue, indicating it is enabled.
- • The work address is now listed under Trusted places for Work.
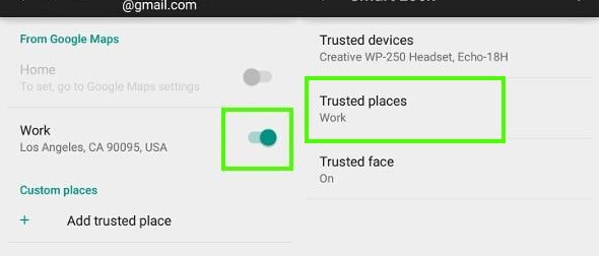
- • The phone is now configured for the work address and will unlock whenever you are at the location.
- • Since it works on Google Maps, the feature works through an Internet connection.
Part 4: Turn On Smart Lock For Android With Trusted Face
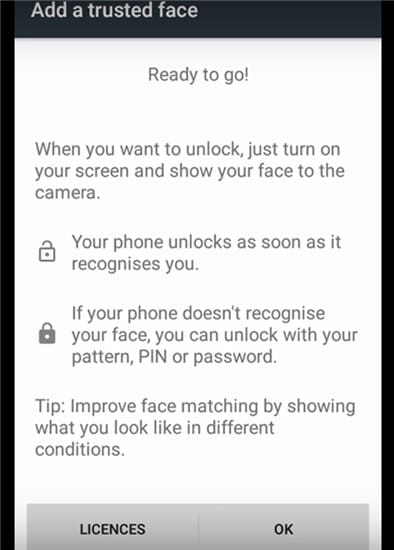
The feature recognizes your face and then unlocks the Nokia G310 device. Once you set up the Nokia G310 device to recognize your face as a trusted face, it will unlock the Nokia G310 device as soon as it recognizes you.
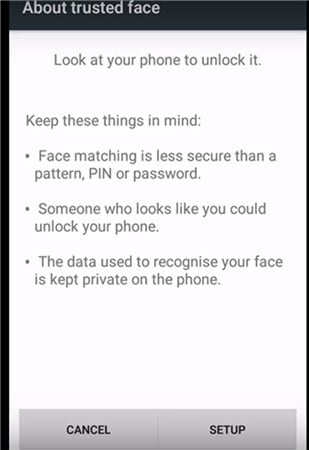
PRECAUTION: At best, this can be the first level of security, as one who resembles you to some extent can unlock the Nokia G310 device. Photographs are not stored in the system. The device does hold necessary data to recognize your face, and the security level is determined by how good the Nokia G310 device is configured. The data is not accessed by any app or loaded onto a Google server for backup.
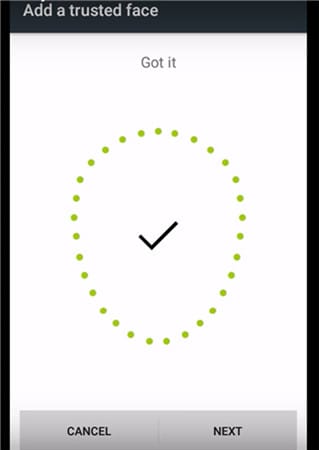
Setting Up Trusted Face
- • Go to Smart Lock and tap Trusted Face.
- • Tap on Setup. Follow on-screen instructions.
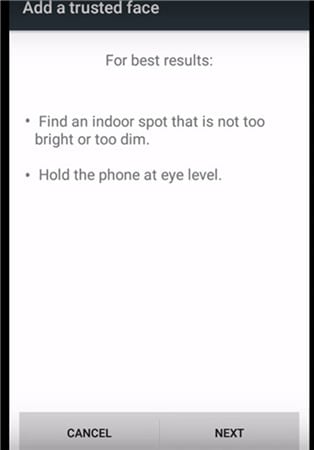
The device begins to gather data about your face. The trusted face icon appears. As a backup, in case Smart Lock does not recognize your face, use the manual system by applying the PIN or password to unlock the Nokia G310 device.
In case Trusted Face is not required, tap on reset Trusted Face appearing under the Trusted Face menu. Tap on Reset to reset the option.
How To Improve Facial Recognition In Your Bluetooth and Android NFC Unlock Devices
- • If you feel facial recognition is not up to the mark, go to Smart Lock and tap on a Trusted face.
- • Tap on Improve face matching.
- • Tap on Next and follow instructions on the screen to complete the task.
Smart Lock Android is a great feature and is only going to improve on time. With added security measures being introduced by Google for Bluetooth and NFC unlock android devices, including configuration to Google maps and Gmail, the feature may be one of the most important features to overcome constant blocking of devices even in protected places.
Video on How to Remove Android Lock Screen Without Data Loss
7 Ways to Unlock a Locked Nokia G310 Phone
“How to get into a locked phone? I have been locked out of my Android device and lost my passcode!”
If you are also facing the same issue, then you have come to the right place. There are plenty of ways to learn how to get into a locked Android phone when it comes to Android devices. From using a third-party tool to Google’s native solution – the sky is the limit. This post will make you familiar with different ways to unlock a device without knowing its passcode. Read on and learn how to get into a locked Android device.
 safe & secure
Part 1: How to get into a locked phone with Dr.Fone?
Dr.Fone - Screen Unlock (Android) provides a hassle-free solution to unlock an Android device in minutes. It can remove a device’s PIN, password, pattern, and even fingerprint security without causing any harm to it. Therefore, you would be able to unlock your device without losing your data while using some Samsung or LG Android phones. If you want to break the locked screen with Dr.Fone from other brand phones, including iPhone, Huawei, and Oneplus, it will wipe out your phone’s data after unlocking successfully.
![]()
Dr.Fone - Screen Unlock (Android)
Get into Locked Phones within Minutes
- 5 screen lock types are available: pattern, PIN, password, fingerprints & Face ID.
- Easily remove the lock screen; No need to root your device.
- Everybody can handle it without any technical background.
- Provide specific removal solutions to promise good success rate.
4,008,669 people have downloaded it
To learn how to get into a locked phone using Dr.Fone, follow these steps:
- Step 1. Go to the official website of Dr.Fone - Screen Unlock (Android) and download the tool on your computer. After installing it, launch the interface and click on the option of “Screen Unlock” from the home screen.
- Step 2. Connect your Android device to the computer. Click “Android” > “Unlock Android Screen” and select the Nokia G310 device brand on the list. If your device is listed in the supported list , you can unlock locked phone without data loss.
- Step 3. Now, you need to put your Android device in Download mode. To do this, you need to turn your device off by pressing the Power button. Afterward, press the Home, Power, and Volume Down buttons together. After a while, let go of these buttons and press the Volume Up button to enter the Download Mode.

- Step 4. As soon as your device is not in the Download Mode, Dr.Fone will automatically start downloading its respective recovery packages.
- Step 5. Sit back and wait as the application downloads the package and performs the required steps to unlock your device. In the end, it will notify you by displaying the following message.

That’s it! By following these steps, you would be able to learn how to get into a locked Android phone without losing any data.
Tips: Cannot find your device model in the supported list or your phone is not Samsung? Worry not, as Wondershare Dr.Fone can also help you to unlock other device models (inlcluding Huawei, LG, Xiaomi, etc) in a matter of seconds. Just install this tool on your computer and connect your phone to start the unlock process!
Part 2: How to get into a locked phone with Android Device Manager?
Google’s Android Device Manager (also known as Find My Device) can be used to locate a lost phone, erase it remotely, ring it, and change its lock. You can access it from any other device and use its features remotely.
- Step 1. Firstly, go to the Android Device Manager’s website right here . Log in with the Google account that is already linked to your Android device.
- Step 2. Once the interface is loaded, you can select your phone. It will locate the Nokia G310 device automatically and provide various options.

- Step 3. Choose the “Lock” option to proceed.
- Step 4. This will display a new prompt. From here, you can get the new password for your device and confirm it.

- Step 5. Additionally, if your device is lost, you can display an optional message and contact number on the lock screen. Click on the “Lock” button to save changes and exit the screen.
Part 3: How to get into a locked phone with Samsung Find My Mobile?
If you are using a Samsung device, you can also use its Find My Mobile service to unlock your device remotely. It is an excellent tool that can be accessed remotely and perform a wide range of operations that can be performed on the Nokia G310 device. Follow these easy instructions to learn how to get into a locked Android Samsung device.
- Step 1. Open Samsung’s Find My Mobile website right here on any device of your choice.
- Step 2. Login using the credentials of the Samsung account linked to your existing device that is needed to be unlocked.
- Step 3. On its dashboard, you can access various features associated with your device. If you have multiple devices linked to your account, you can select it from the top-left panel.

- Step 4. From the provided options on the left panel, click on the “Unlock My Screen” option.
- Step 5. Click on the “Unlock” button again to move past the lock screen of your device.

- Step 6. After waiting for a while, you will get the following prompt. From here, you can set up a new lock for your mobile or can click on the “Lock My Screen” option to do the same.
Part 4: How to get into a locked phone using the ‘Forgot Pattern’ feature?
If your device is based on Android 4.4 and earlier versions, you may also use its native “Forgot Pattern” feature to unlock it. Though, you should have access to the Google account credentials linked to the Nokia G310 device beforehand. To learn how to get into a locked phone with this technique, follow these steps:
- Step 1. To get the Forgot Pattern option, enter the wrong PIN/pattern on your device.
- Step 2. This will display the “Forgot Pattern” button on the bottom of the screen. Just tap on it to continue.

- Step 3. On the next screen, you can unlock your device by providing the backup PIN of your device or sign in using the Google credentials of the account linked to the Nokia G310 device.

- Step 4. After bypassing this feature, you can unlock your device and set up a new PIN or pattern.
Part 5: How to get into a locked phone by factory reset?
If nothing else seems to work, then you can also choose to factory reset your device. Even though this will unlock your device, it would also erase its content and saved settings. To know how to get into a locked Android phone, follow these steps:
- Step 1. Turn off your device by pressing the Power button.
- Step 2. Now, you need to put your device into recovery mode. This can be done by applying the correct key combinations, which can differ from one device to another. Some common combinations are: Volume Up + Home + Power, Home + Power, Volume Up + Power + Volume Down, and Volume Down + Power button.
- Step 3. Once your phone has entered the recovery mode; you can navigate with the Volume up and down button and use the Power button to make a selection.

- Step 4. Select the option of “wipe data/factory reset.
- Step 5. This will display the following prompt. Confirm your choice by selecting the “Yes” option.

- Step 6. Wait for a while as your phone will be restarted with factory settings.
Part 6: How to get into a locked phone in Safe Mode?
If you are using a third-party application to lock your device, you can easily disable it by restarting your phone in safe mode. In this way, you can get rid of the respective app without causing any damage to the Nokia G310 device. You can learn how to get into a locked Android phone by following these steps:
- Step 1. Long-press the Power button to activate the Power option on the screen.
- Step 2. If you don’t get the option to restart the phone in Safe Mode, then long tap the “Power off” option.
- Step 3. It will provide the following prompt regarding Safe Mode. Just tap on the “Ok” button to confirm your choice.

Part 7: How to get into a locked phone using Custom Recovery?
Since custom recovery provides a third-party recovery environment, it can learn how to get into a locked Android device. Additionally, you need to flash it via an SD card since you won’t access the phone storage on a locked device.
- Step 1. To start with, you need to download the password/pattern disable file from right here and copy it onto your SD card.
- Step 2. Mount the SD card on your device and restart it in recovery mode by providing the correct key combinations.
- Step 3. From the provided options, choose to install zip from the SD card.
- Step 4. Confirm your selection and let your phone be restarted with no lock screen.

Bonus Tip: General tips for unlocking phone successfully
By following these tips, you can increase the chances of successfully unlocking your phone while safeguarding your data and security.
- Data Backup: Regularly back up your data that ensures you have a recent backup of all your important data, such as contacts, photos, videos, and documents. This will prevent data loss in case the unlocking process results in a factory reset.
- Reputable Methods: Use reputable and official unlocking methods whenever possible, such as Dr.Fone - Screen Unlock.
Conclusion
By following these simple steps, you would learn how to get into a locked phone. If you are looking for a trouble-free way to unlock an Android device, then give Dr.Fone - Screen Unlock a try. It is a highly reliable solution to learn how to get into a locked Android phone and unlock your device in minutes with no complications.
Also read:
- [New] Android & iPhone's Hottest Social Tools to Increase FB Likes for 2024
- [Updated] 2024 Approved Dynamic Duo Display YouTube’s Way of Creative Splitting
- 2024 Approved Top Free Audio Samples for YouTube Creators!
- Forgotten The Voicemail Password Of Realme C67 5G? Try These Fixes
- Harnessing YouTube & FB Techniques for Maximum Engagement for 2024
- How to Change Lock Screen Wallpaper on Realme C51
- How To Enable USB Debugging on a Locked Nokia 105 Classic Phone
- In 2024, Best Poco C65 Pattern Lock Removal Tools Remove Android Pattern Lock Without Losing Data
- In 2024, Downloading SamFw FRP Tool 3.0 for OnePlus Nord N30 5G
- In 2024, Excellence in Expression Top Talkers on Google Podcasts
- Our Favorite LGBTQ Shows on Netflix Right Now (July 2024)
- Top Free DVD to MP3 Converter Tools Para Windows & Mac – Guia Completo 2023
- Title: How To Remove Screen Lock PIN On Nokia G310 Like A Pro 5 Easy Ways
- Author: Aaron
- Created at : 2024-12-17 23:41:26
- Updated at : 2024-12-22 21:58:46
- Link: https://easy-unlock-android.techidaily.com/how-to-remove-screen-lock-pin-on-nokia-g310-like-a-pro-5-easy-ways-by-drfone-android/
- License: This work is licensed under CC BY-NC-SA 4.0.