
How To Enable USB Debugging on a Locked OnePlus 12R Phone
How To Enable USB Debugging on a Locked OnePlus 12R Phone
Unlocking your Android’s potential goes beyond its surface features. Understanding USB debugging is key to troubleshooting and maximizing your device’s capabilities. In simple terms, USB debugging allows deeper access to your phone’s functionalities, aiding in software development and data recovery.
However, enabling USB debugging becomes crucial yet challenging when your phone is locked. This article delves into this necessity, explaining how to enable USB debugging on locked phones, especially for Android users. Unravel the mystery behind this essential feature, empowering yourself to navigate through locked phone scenarios effortlessly.
Part I. Challenges in Enabling USB Debugging on a Locked Android Phone
USB debugging is a nifty tool that lets you peek behind the scenes of your Android phone’s software. It’s like having a secret key that unlocks deeper access to your device, enabling tasks like software tweaking, app testing, and even data recovery.

Challenges in Enabling USB Debugging on a Locked Phone
Outlined below are some of the barriers, scenarios, and limitations, shedding light on the challenges that make USB debugging seemingly impossible.
- **Locked-out access.**When your phone is locked, gaining access to the settings becomes a roadblock to enabling USB debugging.
- **Limited functionality.**The phone’s locked state restricts the usual methods of accessing developer settings and USB debugging options.
- **Security measures.**For security reasons, most devices limit access to sensitive settings when the phone is locked, making it tricky to enable USB debugging.
Scenarios Requiring USB Debugging on a Locked Phone
Unlocking your phone’s potential becomes crucial in moments of crisis. Explore below some of the scenarios where enabling USB debugging on a locked Android device becomes your beacon of hope:
- **Data recovery.**Imagine accidentally locking yourself out of your phone with important data inside. Enabling USB debugging could be your ticket to retrieve that precious information.
- **Software troubleshooting.**Sometimes, a locked phone might need software fixes or troubleshooting that requires USB debugging to access certain tools.
- **Device testing.**For developers or tech-savvy users, testing new apps or debugging software issues often demands enabling USB debugging, even when the phone is locked.
Part II. How To Enable USB Debugging on Locked Phones
This section outlines the traditional method of enabling USB debugging on an Android phone. Stay tuned and check out the steps below:
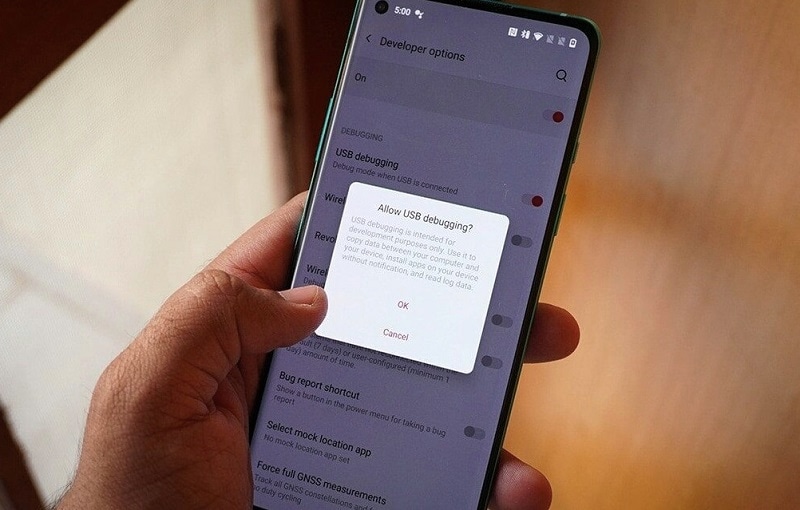
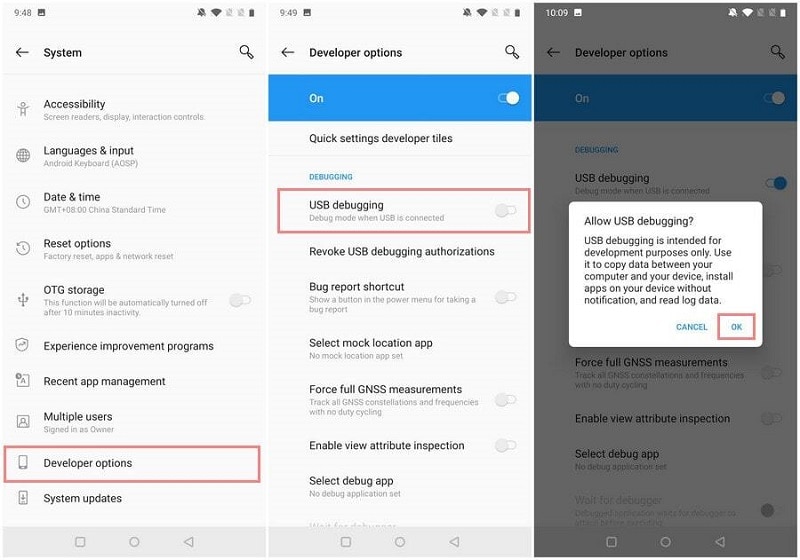
- Step 1: Unlock your device**.** If needed, enter your phone’s passcode or pattern to gain access to the Settings.
- Step 2: Go to Settings, scroll down to About Phone, and tap on Build number seven or eight times to unlock the Developer Options.

Step 3: Once unlocked, return to Settings, find Developer Options (usually at the bottom), and enter the menu. Enable USB Debugging by tapping OK once the Allow USB Debugging? message appears.
However, what if your phone remains locked, making these steps impossible? Such a case calls for an alternative solution. Fortunately, there is one tool that is fully reliable when it comes to unlocking locked mobile devices. Dr.Fone - Screen Unlock (Android) can help bypass these challenges and enable USB debugging on a locked Android phone effortlessly. So, buckle up as the next section unravels the secrets to unlock your device’s potential!
Part III. Seamlessly Unlock Your Android With a Professional Resolution
Enabling USB debugging on a locked phone can feel like navigating a maze with no clear exit. Sometimes, despite your best efforts, the traditional method fails to grant access. Fret not! There’s a smoother path that unlocks your phone and eases the USB debugging hurdle.

Why Unlocking First Makes Sense
Attempting to enable USB debugging on locked phones can hit roadblocks. That’s why unlocking your device first becomes a game-changer. Dr.Fone – Screen Unlock (Android) is the hero of this story, simplifying the process and ensuring a hassle-free experience.
Key Features and Benefits
Check out the amazing key features and benefits of Dr.Fone – Screen Unlock that fits Android devices:
- **Data safety and reliability.**Your data’s security remains paramount. With Dr.Fone – Screen Unlock, your device’s integrity and precious data stay safeguarded throughout the unlocking process.
- Dr.Fone - Screen Unlock is compatible with a wide range of Android devices, irrespective of brand or model, ensuring accessibility for various users.
- It’s not just about unlocking a locked screen; Dr.Fone offers multiple unlock modes tailored to different scenarios, whether a forgotten password, PIN, pattern, or fingerprint issue.
- **High success rate.**With a high success rate in unlocking locked screens, Dr.Fone - Screen Unlock provides a reliable solution, even for complex lock scenarios.
- **No data loss.**Users can rejoice in the fact that the unlocking process doesn’t compromise data integrity. Your photos, messages, and apps remain untouched and secure.
- **Ease of use.**The software is designed for simplicity, making the unlocking process accessible to users with varying levels of technical expertise.
Tips: Forget your device password and can’t get access to it? No worries as Dr.Fone is here to help you. Download it and start a seamless unlock experience!
Guide To Unlock Your OnePlus 12R With Dr.Fone – Screen Unlock (Android)
Below are the steps on how you can unlock your Android device using Dr.Fone:
Step 1: Get the most recent version of Wondershare Dr.Fone and connect your Android device to your computer via a USB cord. After connecting, access the unlock screen tool by going to the Toolbox and then selecting Screen Unlock.
Step 2: Once prompted, choose Android to unlock your Android screen lock. On the following screen, you’ll see two options; choose Unlock Android Screen.

- Step 3: After that, you’ll be taken to a new screen where you can choose the brand of your mobile device.

- Step 4: Once done, click the Remove without Data Loss button from the two options presented on the screen.

- Step 5: Unlocking the Android screen requires choosing the Brand, Device Name, and Device Model next. Enable the option that says I agree with the warning, and I am ready to proceed by clicking the corresponding checkbox. To proceed with unlocking the screen, click Next.

- Step 6: Type 000000 when asked to confirm the process. After entering the code, click Confirm to run the program.

- Step 7: Once you’ve recognized your Android device’s model, Dr. Fone will walk you through entering Download Mode. Following the on-screen prompts will take you directly to the next screen. It then depicts the progress of the screen unlocking procedure, in which the platform’s required drivers and configuration files are downloaded.

- Step 8: A new screen will appear, indicating the process has been completed. Click Done if your device’s screen unlock issue has been successfully fixed. If not, click the Try Again button.
Dr.Fone – Screen Unlock (Android) acts as your trusty guide, leading you through the maze of locked screens and inaccessible settings. It unlocks your phone first and enables USB debugging without the frustrating barriers.
Learn More About Android Unlock:
Samsung Unlock Codes to Unlock Samsung Phones [2024 Updated]
Unlocking Your Realme Phone Made Easy: No Data Loss!
The Best Android Unlock Software of 2024
Conclusion
In face of locked screens, USB debugging is a beacon of access and troubleshooting for your Android device. Remember, enabling USB debugging on a locked phone is crucial, opening doors to unforeseen solutions. However, what if you want to enable USB debugging on locked phones, but the process gets messy?
Then, it’s time to consider Dr.Fone - Screen Unlock (Android). It effortlessly paves the way to enable USB debugging on locked phones. By ensuring your device’s security and accessibility, even in locked states, Dr.Fone empowers you to navigate through obstacles, safeguarding your data while unlocking endless possibilities.
Bypassing Google Account With vnROM Bypass For OnePlus 12R
Encountering the need to bypass a Google account can be crucial nowadays. This is especially true during device resets or when locked out due to forgotten credentials. Such a need also arises when users encounter factory resets , buy a second-hand device, or forget their login details. In such scenarios, specialized tools like vnROM Bypass come into play. They offer solutions to bypass Google’s verification process.
This article will provide a detailed review of vnROM Bypass, exploring its efficacy and usability. Additionally, alternatives to this tool will be examined. The aim is to provide users with a comprehensive understanding towards this tool and guide them to use. Ultimately, we will determine the best options for bypassing Google account security.
Part 1. A Comprehensive Introduction to vnROM Bypass and What It Does?
The vnROM Bypass tool is crafted to bypass Google account verification on Android devices. Its primary utility lies in scenarios where users face an FRP lock after a factory reset or forgotten login credentials. The tool operates through the exploitation of Android OS weaknesses. It empowers users to reclaim entry to their devices without needing the Google account details.
The tool provides a straightforward and user-friendly interface. This makes it relatively easy for users to navigate and perform the necessary steps for bypassing the FRP lock . Moreover, it offers compatibility with a range of Android devices. The app specifically targets those running on Android OS versions 5.0 to 8.1.
How To Download vnROM Bypass
Downloading vnROM FRP Bypass involves obtaining the tool from reputable sources online. The following are the steps you need to follow to download vnROM Bypass:
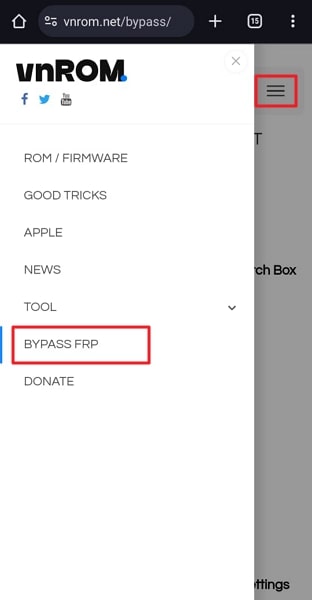
- Step 1. On your Android device, open a web browser and visit the vnROM official website. Now tap the three lines icon from the top left corner and press “Bypass FRP.”
- Step 2. You will be guided to the vnROM Bypass tool, and by tapping “Download,” the download process begins. Ensure you have enabled installations from unknown sources on your device before moving forward.
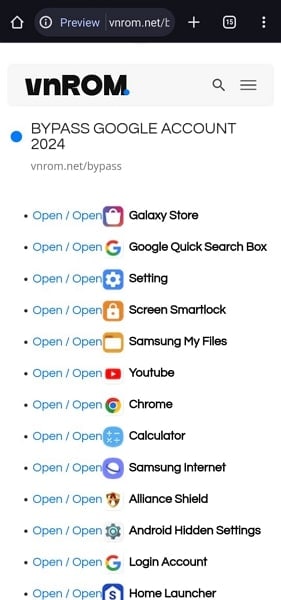
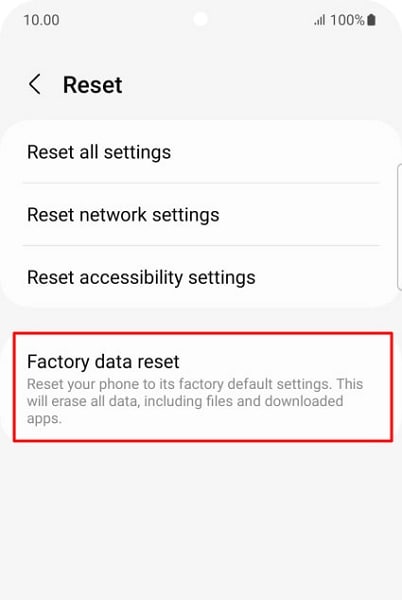
- Step 3. After you’ve downloaded the tool, proceed with its installation. Once installed, open the “Settings” app and find the “General Management” option. Now select the “Reset” option and head to the next step.

- Step 4. Following this, choose “Factory Data Reset.” Confirm the choice by hitting the “Reset” button and afterward restart your device and input your Google account information.
Steps To Use vnROM Bypass
Using the vnROM Bypass on your devices turns out to be a simple procedure. Below are the steps for utilizing the vnROM Bypass:
- Step 1. Access vnROM’s official website via your browser and download the APK file onto a USB drive. This APK serves as the primary application for initiating the bypass. Power up the locked phone and follow the on-screen instructions to set up the mobile device. During the setup process, connect the USB drive to your phone using an OTG cable when prompted to verify your account.
- Step 2. Install the vnROM bypass APK from the USB drive onto the OnePlus 12R device. Once the APK is installed, navigate to the OnePlus 12R device’s “Settings” menu and perform a factory reset. Upon completion of the factory reset, the OnePlus 12R device will automatically restart. Proceed to set up your phone without providing your Google account credentials.
Part 2. Some Prominent Limitations of vnROM Bypass
vnROM Bypass offers a solution for bypassing FRP lock on certain Android devices. Yet, it comes with several notable limitations that necessitate exploring alternative options. The following are some of the limitations of vnROM Bypass:
1. Limited Compatibility
vnROM Bypass primarily supports Android versions 5.0 to 8.1 (Lollipop to Oreo). Hence, it fails to function on devices operating on more recent Android versions. Android 9 through 14 users might encounter compatibility issues and inefficacy when utilizing this tool.
2. Security Risks
Using bypass tools like vnROM Bypass can potentially expose devices to security risks. One significant factor contributing to this situation is the absence of an official website for the tool. Furthermore, it has not received updates for quite a while. This makes it a potential security risk for newer Android models.
3. Functional Restrictions
This tool has not received updates for some time, so its proper functionality cannot be guaranteed. It seems primarily compatible with older Android devices running on versions 5 through 8.1. Moreover, serious concerns exist about the tool’s effectiveness, even for older devices.
4. Complexity and Reliability Issues
The bypass process using vnROM Bypass can be complex. For users unfamiliar with such tools, it could lead to potential errors. The reliability of the tool’s effectiveness varies across different devices and firmware versions. This results in inconsistent outcomes.
Part 3. Listing Some Quick APK Alternatives of vnROM Bypass
In situations requiring the bypassing of FRP lock via APK services, several alternatives to vnROM Bypass exist. They offer unique functionalities and capabilities catering to different user preferences. The following notable alternatives provide users with different approaches to bypassing Google account locks:
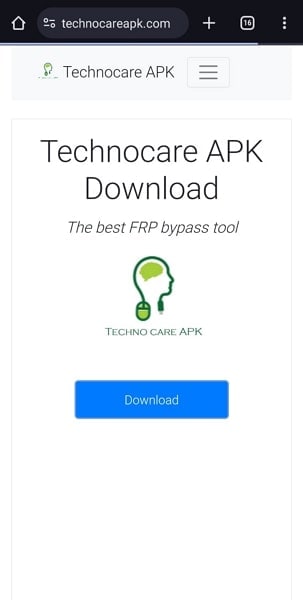
1. Technocare APK
Technocare APK offers a simplified approach to bypassing Google account verification. This tool specializes in bypassing FRP (Factory Reset Protection) locks. It aids users in regaining access to their devices without the original Google account credentials. Its ease of use and compatibility with many Android devices make it notable.
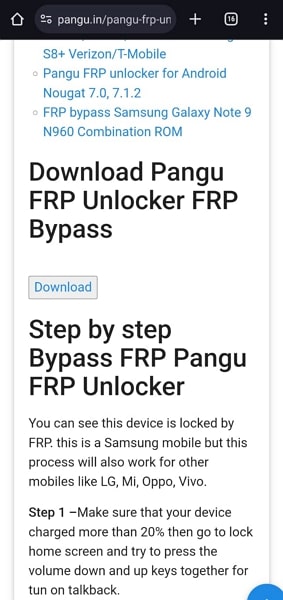
2. Pangu FRP Bypass APK
Pangu FRP Bypass APK provides an effective solution for bypassing Google account verification. This tool bypasses FRP locks caused by factory resets or forgotten credentials. It offers a straightforward process to bypass the FRP lock. The tool’s compatibility with various Android versions makes it a suitable choice. This app is especially handy for users encountering Google account lock issues.
3. Realterm FRP Bypass APK
Realterm FRP Bypass APK offers an alternative method to bypass Google account verification. It does so by leveraging Realterm software. This tool assists users in overcoming FRP locks and gaining access to their Android devices. Yet, it’s important to note that Realterm FRP Bypass might need more technical know-how. This is the case for successful implementation compared to other alternatives.
4. Wondershare Dr.Fone - Screen Unlock (Android)
Wondershare Dr.Fone distinguishes itself as an extensive and easily navigable utility. Crafted to bypass Google account verification and unlock Android devices, it excels as a user-friendly tool. With its intuitive interface, this software assists users in bypassing various screen locks. These include PIN, pattern, password, and Google account locks. Dr.Fone’s effectiveness lies in its compatibility with various Android devices and OS versions.
This guarantees an increased likelihood of bypassing Google account verification successfully. Furthermore, it bypasses the Android FRP lock without requiring a PIN or Google account. Moreover, it supports well-known Android brands such as Samsung, Huawei, LG, Xiaomi, and others. However, Wondershare Dr.Fone – Screen Unlock does not come as an APK but offers a comprehensive platform.

 safe & secure
Part 4. [Effective Alternative] Wondershare Dr.Fone Making Google Account Bypass Easy
Do you own an Android with version higher than 8.1? Or do you have a specific Android brand which cannot be bypassed by vnROM Bypass? At such a stage, you might feel stuck with the need to bypass your Google account. While there seems to be no way, Dr.Fone - Screen Unlock (Android) emerges as the perfect remedy in such a situation. This intuitive toolkit provides a comprehensive system of bypassing FRP lock.
With its diversified OS support, it offers better functionality than tools like vnROM Bypass. Along with that, you can also find dedicated support for a huge variety of Android brands. This provides versatility in bypassing Google FRP (Factory Reset Protection) locks. Its intuitive interface makes it accessible even to users with limited technical expertise.
![]()
Dr.Fone - Screen Unlock (Android)
The Best UnlockJunky Alternative to Bypass FRP and Solve Your Screen Locks
- Remove all Android screen locks (PIN/pattern/fingerprints/face ID) in minutes.
- Bypass Android FRP lock without a PIN or Google account.

- Everyone can handle the lock screen without any tech knowledge.
- Provide specific removal solutions to promise good success rate.

4,008,669 people have downloaded it
Step-by-Step Guide To Bypass Google FRP Account in Dr.Fone
Dr.Fone makes bypassing Google FRP lock a breeze and effortless process. Here are the detailed steps you need to follow to complete this procedure:
How To Bypass FRP on Samsung Devices?
- Step 1. Samsung Device Connection and Google FRP Lock Removal Setup
To begin, initiate Wondershare Dr.Fone on your computer and connect the Samsung device. Next, navigate to “Screen Unlock” in “Toolbox”, and on the next screen, opt for “Android”. Select “Remove Google FRP Lock” on the following screen. Afterward, select “Samsung” and proceed by clicking the “Start” button.
- Step 2. OS Version Selection and Hidden Menu Access
Choose the Android OS version on your Samsung device. If you want to use the quickest way to remove Google Lock, opt for the “All Android versions (One-Click Removal)” option. Now, click “Start”, locate and tap the “Emergency Call” button on your Android device. Then input #0# to access a hidden menu and click “Next”.

- Step 3. Authorization and FRP Lock Removal Confirmation
Next, an activation prompt for USB debugging will appear on your Android screen. Upon allowing this on your Samsung device, click “Authorized.” Subsequently, the following screen on your computer will indicate the removal of the FRP lock from your Android device. A prompt window will confirm completion once the FRP lock removal is successful. Click “Done” to conclude the process.

safe & secure
How To Bypass FRP on Xiaomi/Redmi/OPPO/RealMe/Vivo Devices?
Dr.Fone got you covered if you use a device other than a Samsung device. You can follow these steps to bypass FRP lock on Xiaomi/Redmi/OPPO/RealMe/Vivo Devices:
- Step 1: Unlocking FRP on Android Devices Using Wondershare Dr.Fone
Open Wondershare Dr.Fone on your computer, navigate to the Toolbox and click Screen Unlock. To bypass the FRP lock, opt for the Android option once the screen appears. Then, choose ‘Remove Google FRP Lock’ from the provided options. Next, select your specific Android phone brand from the options displayed on the screen.
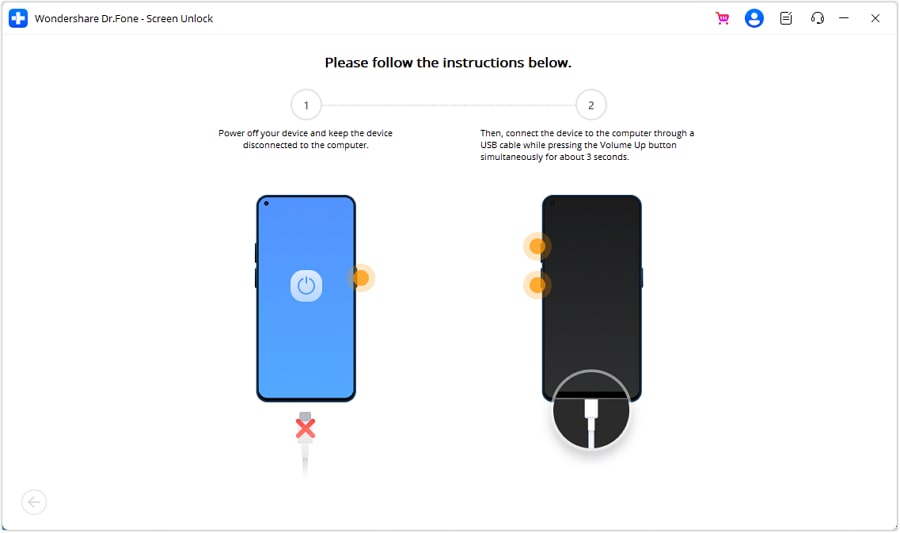
- Step 2: FRP Lock Removal Initialization
Upon selecting your device brand, Dr.Fone initiates the download of the necessary driver. Once downloaded, turn off your device and connect it to the computer. While connecting, press the Volume Up and Down buttons for approximately 3 seconds. The FRP lock removal process will commence and may take a few minutes. Once the lock is removed, simply tap “Done” to finalize the process.
Conclusion
In summary, this article explored bypassing Google account verification on Android devices. We explored vnROM Bypass, highlighting its functionalities and limitations. Additionally, we presented various APK alternatives, emphasizing the need for a more effective solution. Wondershare Dr.Fone - Screen Unlock (Android) emerged as a standout option for its support for all Android versions and user-friendly interface.
Everything You Need to Know about Lock Screen Settings on your OnePlus 12R
Everybody of you is well familiar with Android lock screen and it can be undoubtedly said that lock screen does a great job for an Android user. It really works as the main gate of your Android device. It also works as a safeguard of your device from unauthorized access if you enable some sort of protection. By the way, activating the lock screen is optional as you can customize or deactivate it from android lock screen settings.
Here’s a charm that’s you can unlock your lock screen by many ways and you’ve to set the ways from android lock screen settings. Now you’ll come to know how to set different types of screen lock, customize Android lock screen, and even unlock your android phone without resetting it as all the ways of unlocking is related to the OnePlus 12R device when it’s switched on.
Different Ways of Unlocking Your OnePlus 12R
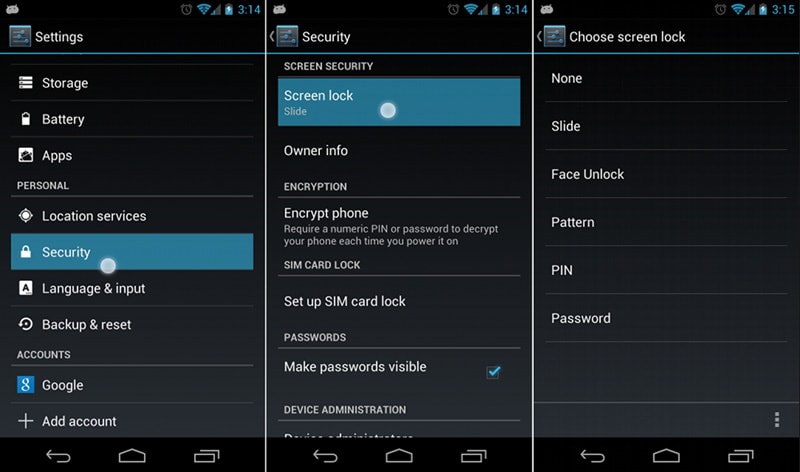
First look at the procedures on how you can enable the lock screen functionality from android lock screen settings. To reach the lock screen settings android, you’ve to follow the path:
Options – Security – Screen Lock – Choose Screen Lock.
Now see how to unlock your lock screen in different ways.
1.Slide
This is the most common method of unlocking an android lock screen. On all most all the android device, you’ll notice a lock mostly on the right side (sometimes on top) of a round charm. You just have to direct towards the lock and then the lock screen will be unlocked in no time. This method doesn’t provide any security (it just protects your device from sudden access by tapping on screen or any of the button) to your device as no password or PIN is required to set the “Slide” unlock.
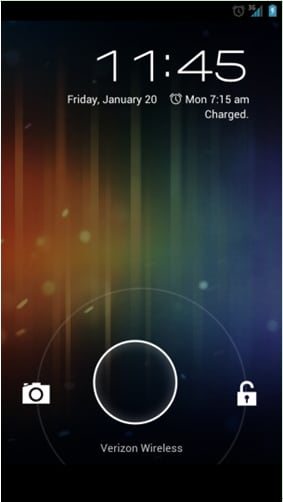
Keep your any finger on the middle of the round charm and by keeping your finger pressed, reach on the lock icon. The lock screen will be unlocked just after reaching your finger to the lock icon.
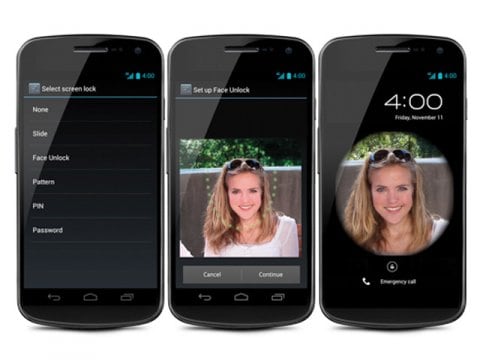
2.Face Unlock
This method of unlocking your lock screen needs your Android device to snap a photo of your with its camera. After you set the snapped photo as the unlocking recognition, you could unlock your device through showing your face on the screen.
Capture a picture of your face with your Android device’s camera and then set it for logging in into your device. From the lock screen, by just by holding your face, you can log in. It’s very interesting, but you should never rely on this method for strong security as this method of unlocking is prone to break easily as an intruder can unlock your device by putting a photo of you in front of your device. Moreover, this method sometimes doesn’t work properly. So it’s better to go for some other highly secured options for locking your screen.
3.Pattern
This is a way of setting pattern for lock screen from a grid of nine dots. You can select the pattern like some letter like Z, L or C etc, but nothing guarantees high security as the set pattern can be easily guessed or be seen while you are unlocking your device. Another problem is that by unlocking with the same pattern, your finger leaves some marks for the pattern’s path. By following the path, a stranger can unlock your device. So for little security, you can use pattern unlock method on your Android device.
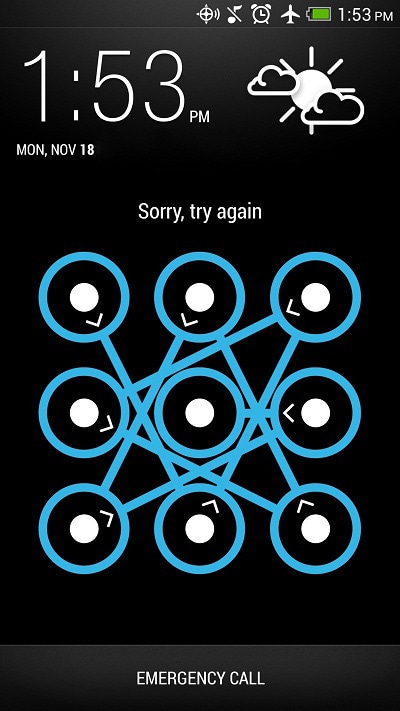
Go to the lock screen setting for Pattern and then set the pattern by sliding your finger from one dot to another, then another and like that way. Remember which pattern you’ve set in order to unlock your device in the next time.
4.PIN
You might be troubled by thinking about the difference between PIN and Password. A little distinction is there for a PIN and that is it consists of numbers only whereas for password, you can associate some alphabetical letters or signs along with numbers.
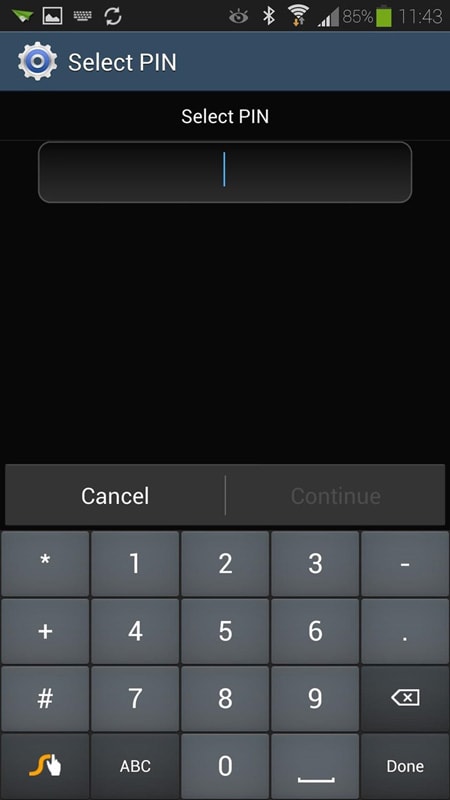
Go to the lock screen setting for PIN and then set a PIN that consists of minimum 4 digits. It’s your choice to use 4 or more digit PIN. After setting the PIN, you can access your Android device by putting the PIN in a box from the lock screen. PIN protected lock screen is highly protected if the PIN is set strongly.
5.Password
In addition to PIN protection, you can consider it as password by adding some letters, special characters with the previously selected PIN codes. It’s also very much highly protected method of locking screen though you might be bored with tapping for the password again and again. But never ignore the value of your device’s files, so a password can be a well-sought lock screen protection for many users.
6.Fingerprint
In some of the modern Android device, you’ll find the feature of fingerprint unlocking. You can find the option through the screen or any dedicated button. By setting your fingerprint, you can unlock your device by tapping your finger on the OnePlus 12R device’s screen or the dedicated button.
7.Voice
This is also a fun way of unlocking Android lock screen as you can unlock by saying the same voice that you’ve saved as the unlocking recognition.
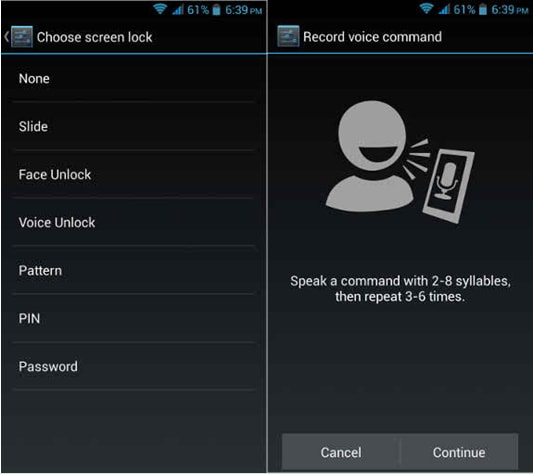
Go to the setting from “Voice Unlock” button and record your voice such as “Open My OnePlus 12R” or as per your choice with clear sound. Repeat the voice a few more times as to match well. Then set and unlock your device from the lock screen by using the same voice command.
Customize Android Lock Screen
Lock Screen Widgets
Widgets can be used from Android lock screen without unlocking the OnePlus 12R device first. Also, because of this, any one who can access your phone can see your information from widgets. But since Lollipop update, widgets has been changed to Notifications on Android. Here, let’s see how to set customize widgets on Android running OS before lollipop. You can also find some useful alternatives to lock screen widgets here.
For devices running Android 4.2 or 4.3, lock screen widgets are enabled by default. So you can use them directly. For users of KitKat, you can go to Settings, select Security, and find Enable Widgets option. To add a new widget to the lock screen, swipe the screen from left to right until there is a plus on the screen. Tap the plus and select the widget you would like to add. You can also drag the widgets to repalce it.
Smart Lock on Android
Smart Lock is a new feature introduced in Lollipop. It helps you keep your device unlocked when it’ safe with you, by recognizing locations, bluetooth system, or smartwatch etc. To know more about Smart lock settings , just follow the information here.
Customize Lock Screen Wallpaper
Except all the different types lock method to protect your phone, there are also many wallpapers to make your lock screen lool beautiful or cool. Click here to check out how to change lock screen wallpapers and download more beatiful wallpapers from different sites.
Bypass your Samsung Phone’s Lock Screen using Dr.Fone - Screen Unlock (Android)
This is an easy way to unlock your Samsung device if you forgot your Samsung’s lock screen pattern, PIN or password.It’s named Dr.Fone - Screen Unlock (Android) ,which is the best tool to solve your problems with simple steps.
Note: If your are using Samsung or Lg, then this tool can perfectly remove the locked screen while keeping all the data. As for thoes users who are using Andriod phone, this tool still can help you unlock the screen while you will lose all your data after unlocking.
Dr.Fone - Android Lock Screen Removal
Remove 4 Types of Android Screen Lock without Data Loss
- It can remove 4 screen lock types - pattern, PIN, password & fingerprints.
- Only remove the lock screen, no data loss at all.
- No tech knowledge asked, everybody can handle it.
- Work for Samsung Galaxy S/Note/Tab series, and LG G2/G3/G4, etc .
3,587,277 people have downloaded it
Follow the steps on how to bypass your Samsung Phone’s lock screen by Dr.Fone - Screen Unlock (Android)
Step 1. Run Dr.Fone and choose “Screen Unlock”.
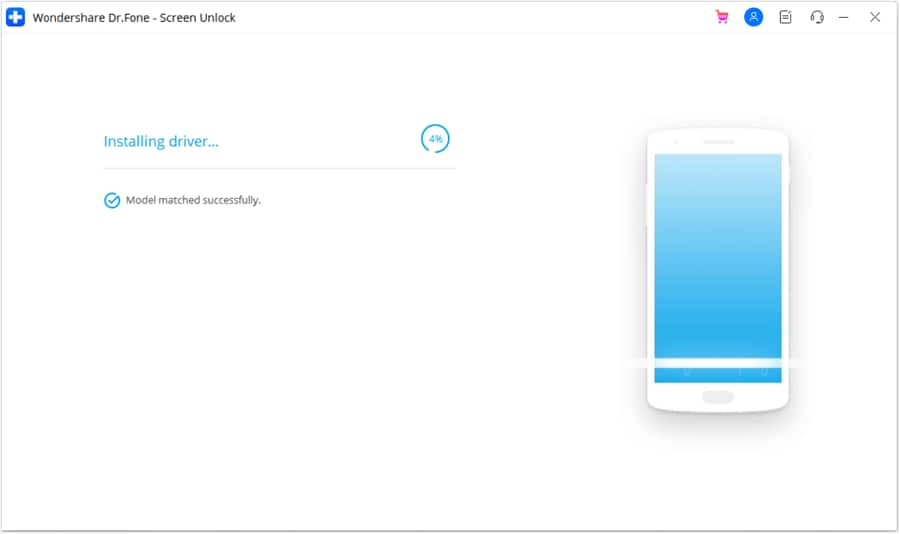
Step 2. Connect your Samsung with USB on computer,then you will see the windows as follow,and select phone model in the list.
Step 3. Enter the download mode on your Samsung device. Follow the guide of the windows.
- 1.Power off the phone.
- 2.Press and hold volume down + home button + power button at the same time.
- 3.Press the volume up to enter download mode.
Step 4. Download the recovery package after your device model matched successfully.
Step 5. When the recovery package is downloaded completed,you can start the process of unlock,the whole process won’t lose any data on your device.You can access your device without entering any password or PIN after the process is finished.

Video on How To Remove Android Lock Screen
Also read:
- [New] 2024 Approved Dissecting Dell's Engineering Mastery in The P2715Q Review
- [New] In 2024, Secrets of Earning Big Reddit's 13 Money Makers
- [Updated] In 2024, Building a Brand on Instagram Establishing a Business Entity
- [Updated] In 2024, Saving Screen Scenes PC/Mac & Mobile Devices Walkthrough
- [Updated] In 2024, Unlocking Top Five Transformative Facebook Traits
- 2024 Approved Streaming Software Showdown Wirecast vs OBS Explored
- How to Unlock Poco M6 5G Phone with Broken Screen
- In 2024, How to Bypass Android Lock Screen Using Emergency Call On Nokia 105 Classic?
- In 2024, How To Easily Unlock Nubia Screen?
- In 2024, How to Remove a Previously Synced Google Account from Your Realme Narzo N53
- In 2024, How To Unlock a Poco C55 Easily?
- In 2024, Mastering Lock Screen Settings How to Enable and Disable on Realme 12 5G
- Sim Unlock OnePlus Ace 2 Pro Phones without Code 2 Ways to Remove Android Sim Lock
- Understanding the Initial Confusion: How Elden Ring Finally Hit Shelves
- Unlock Poco C50 Phone Password Without Factory Reset Full Guide Here
- Title: How To Enable USB Debugging on a Locked OnePlus 12R Phone
- Author: Aaron
- Created at : 2024-12-26 16:04:14
- Updated at : 2024-12-28 16:05:56
- Link: https://easy-unlock-android.techidaily.com/how-to-enable-usb-debugging-on-a-locked-oneplus-12r-phone-by-drfone-android/
- License: This work is licensed under CC BY-NC-SA 4.0.