
How To Enable USB Debugging on a Locked Nokia C12 Pro Phone
How To Enable USB Debugging on a Locked Nokia C12 Pro Phone
Unlocking your Android’s potential goes beyond its surface features. Understanding USB debugging is key to troubleshooting and maximizing your device’s capabilities. In simple terms, USB debugging allows deeper access to your phone’s functionalities, aiding in software development and data recovery.
However, enabling USB debugging becomes crucial yet challenging when your phone is locked. This article delves into this necessity, explaining how to enable USB debugging on locked phones, especially for Android users. Unravel the mystery behind this essential feature, empowering yourself to navigate through locked phone scenarios effortlessly.
Part I. Challenges in Enabling USB Debugging on a Locked Android Phone
USB debugging is a nifty tool that lets you peek behind the scenes of your Android phone’s software. It’s like having a secret key that unlocks deeper access to your device, enabling tasks like software tweaking, app testing, and even data recovery.


Challenges in Enabling USB Debugging on a Locked Phone
Outlined below are some of the barriers, scenarios, and limitations, shedding light on the challenges that make USB debugging seemingly impossible.
- **Locked-out access.**When your phone is locked, gaining access to the settings becomes a roadblock to enabling USB debugging.
- **Limited functionality.**The phone’s locked state restricts the usual methods of accessing developer settings and USB debugging options.
- **Security measures.**For security reasons, most devices limit access to sensitive settings when the phone is locked, making it tricky to enable USB debugging.
Scenarios Requiring USB Debugging on a Locked Phone
Unlocking your phone’s potential becomes crucial in moments of crisis. Explore below some of the scenarios where enabling USB debugging on a locked Android device becomes your beacon of hope:
- **Data recovery.**Imagine accidentally locking yourself out of your phone with important data inside. Enabling USB debugging could be your ticket to retrieve that precious information.
- **Software troubleshooting.**Sometimes, a locked phone might need software fixes or troubleshooting that requires USB debugging to access certain tools.
- **Device testing.**For developers or tech-savvy users, testing new apps or debugging software issues often demands enabling USB debugging, even when the phone is locked.
Part II. How To Enable USB Debugging on Locked Phones
This section outlines the traditional method of enabling USB debugging on an Android phone. Stay tuned and check out the steps below:
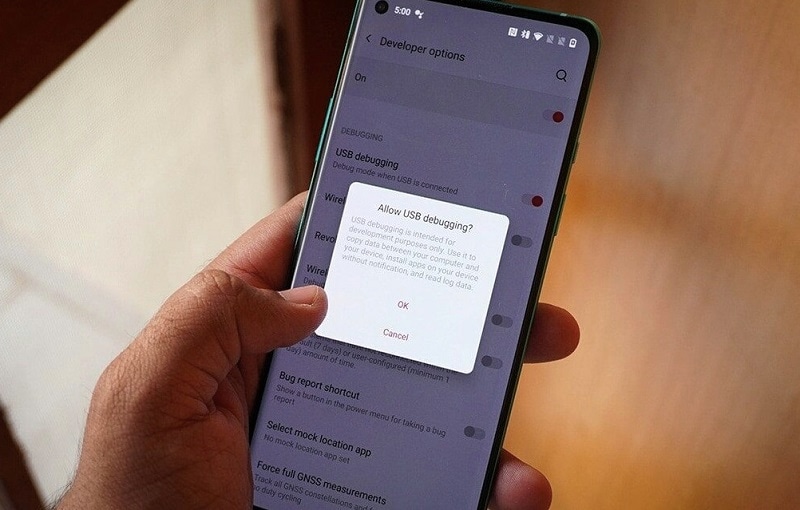
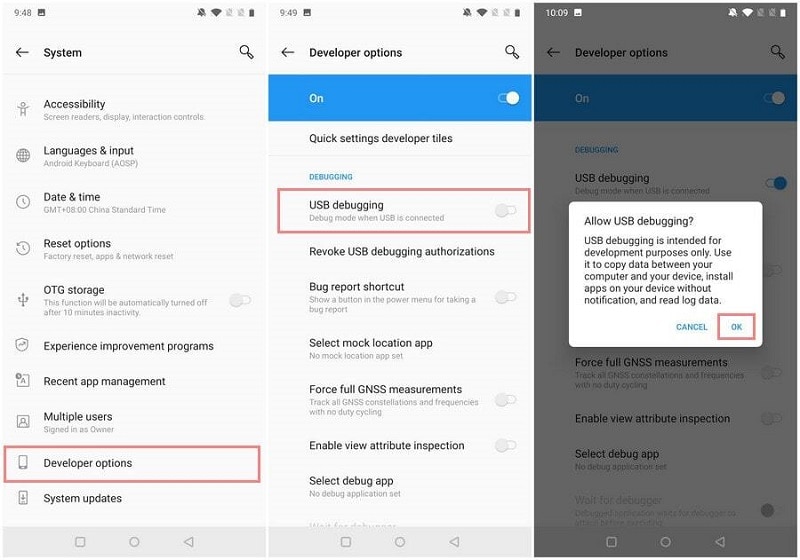
- Step 1: Unlock your device**.** If needed, enter your phone’s passcode or pattern to gain access to the Settings.
- Step 2: Go to Settings, scroll down to About Phone, and tap on Build number seven or eight times to unlock the Developer Options.

Step 3: Once unlocked, return to Settings, find Developer Options (usually at the bottom), and enter the menu. Enable USB Debugging by tapping OK once the Allow USB Debugging? message appears.
Parental Control Software
However, what if your phone remains locked, making these steps impossible? Such a case calls for an alternative solution. Fortunately, there is one tool that is fully reliable when it comes to unlocking locked mobile devices. Dr.Fone - Screen Unlock (Android) can help bypass these challenges and enable USB debugging on a locked Android phone effortlessly. So, buckle up as the next section unravels the secrets to unlock your device’s potential!
Part III. Seamlessly Unlock Your Android With a Professional Resolution
Enabling USB debugging on a locked phone can feel like navigating a maze with no clear exit. Sometimes, despite your best efforts, the traditional method fails to grant access. Fret not! There’s a smoother path that unlocks your phone and eases the USB debugging hurdle.


Why Unlocking First Makes Sense
Attempting to enable USB debugging on locked phones can hit roadblocks. That’s why unlocking your device first becomes a game-changer. Dr.Fone – Screen Unlock (Android) is the hero of this story, simplifying the process and ensuring a hassle-free experience.
Key Features and Benefits
Check out the amazing key features and benefits of Dr.Fone – Screen Unlock that fits Android devices:
- **Data safety and reliability.**Your data’s security remains paramount. With Dr.Fone – Screen Unlock, your device’s integrity and precious data stay safeguarded throughout the unlocking process.
- Dr.Fone - Screen Unlock is compatible with a wide range of Android devices, irrespective of brand or model, ensuring accessibility for various users.
- It’s not just about unlocking a locked screen; Dr.Fone offers multiple unlock modes tailored to different scenarios, whether a forgotten password, PIN, pattern, or fingerprint issue.
- **High success rate.**With a high success rate in unlocking locked screens, Dr.Fone - Screen Unlock provides a reliable solution, even for complex lock scenarios.
- **No data loss.**Users can rejoice in the fact that the unlocking process doesn’t compromise data integrity. Your photos, messages, and apps remain untouched and secure.
- **Ease of use.**The software is designed for simplicity, making the unlocking process accessible to users with varying levels of technical expertise.
Tips: Forget your device password and can’t get access to it? No worries as Dr.Fone is here to help you. Download it and start a seamless unlock experience!
Guide To Unlock Your Nokia C12 Pro With Dr.Fone – Screen Unlock (Android)
Below are the steps on how you can unlock your Android device using Dr.Fone:
Step 1: Get the most recent version of Wondershare Dr.Fone and connect your Android device to your computer via a USB cord. After connecting, access the unlock screen tool by going to the Toolbox and then selecting Screen Unlock.
Step 2: Once prompted, choose Android to unlock your Android screen lock. On the following screen, you’ll see two options; choose Unlock Android Screen.

- Step 3: After that, you’ll be taken to a new screen where you can choose the brand of your mobile device.

- Step 4: Once done, click the Remove without Data Loss button from the two options presented on the screen.

- Step 5: Unlocking the Android screen requires choosing the Brand, Device Name, and Device Model next. Enable the option that says I agree with the warning, and I am ready to proceed by clicking the corresponding checkbox. To proceed with unlocking the screen, click Next.

- Step 6: Type 000000 when asked to confirm the process. After entering the code, click Confirm to run the program.
- Step 7: Once you’ve recognized your Android device’s model, Dr. Fone will walk you through entering Download Mode. Following the on-screen prompts will take you directly to the next screen. It then depicts the progress of the screen unlocking procedure, in which the platform’s required drivers and configuration files are downloaded.

- Step 8: A new screen will appear, indicating the process has been completed. Click Done if your device’s screen unlock issue has been successfully fixed. If not, click the Try Again button.
Dr.Fone – Screen Unlock (Android) acts as your trusty guide, leading you through the maze of locked screens and inaccessible settings. It unlocks your phone first and enables USB debugging without the frustrating barriers.
Learn More About Android Unlock:
Samsung Unlock Codes to Unlock Samsung Phones [2024 Updated]
Unlocking Your Realme Phone Made Easy: No Data Loss!
The Best Android Unlock Software of 2024
Conclusion
In face of locked screens, USB debugging is a beacon of access and troubleshooting for your Android device. Remember, enabling USB debugging on a locked phone is crucial, opening doors to unforeseen solutions. However, what if you want to enable USB debugging on locked phones, but the process gets messy?
Then, it’s time to consider Dr.Fone - Screen Unlock (Android). It effortlessly paves the way to enable USB debugging on locked phones. By ensuring your device’s security and accessibility, even in locked states, Dr.Fone empowers you to navigate through obstacles, safeguarding your data while unlocking endless possibilities.
How to Remove Forgotten PIN Of Your Nokia C12 Pro
Users of Android phones can benefit from data and file protection tools like passwords, patterns, and PINs. But there are also some significant hazards. For instance, your children may have repeatedly used the wrong password to access your Android phone, or you may have forgotten PIN on your device, pattern, or PIN.
We can use various valuable techniques to remove the Android phone password. According to you, the most typical or initial option must be factory reset. However, if you try to use the factory reset, you will lose all the data on your Android phone.
Read the information below, but first, let’s talk about Android phone passwords and how they operate before moving on to the ways.
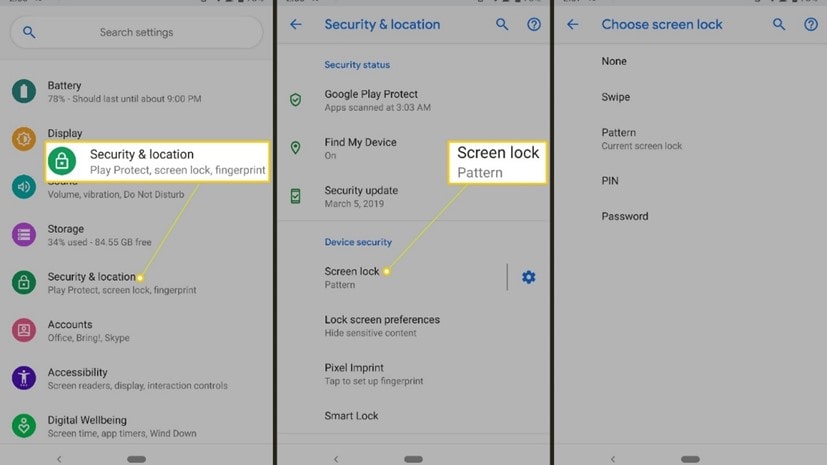
The Importance of the Android Lock System
In general, phone passwords are used to secure your device against unauthorized access and shield your files and data from it. You can try using a pattern, password, PIN, or another method to unlock your device. Although it has many benefits, there are also hazards. Risk in the sense that if you lose your device’s password or pattern, you will be unable to access it and will be stuck somewhere.
Several firms are making Android phones, so why shouldn’t more? Because Android phones are in high demand, numerous new businesses are now producing them. We can see that more people than any other operating system use mobile devices with Android. With an Android phone, we can do many functions, be constantly connected to the outside world, and everything runs smoothly.
This is an important issue that needs to be resolved right away. Therefore, some methods can assist you in getting out of it, one of which is doing a factory reset. They believe this is the most effective and secure way; thus, many try it. What about the information you have on the Nokia C12 Pro device, though? What should you do next because a factory reset will destroy your data?
Methods to Recover Forgotten Password or PIN

1. Google Smart Lock
If you have added a trusted area or device in Google Smart Lock, you can go to that trusted area and reset your password. Alternatively, you can also use trusted devices to unlock your device.
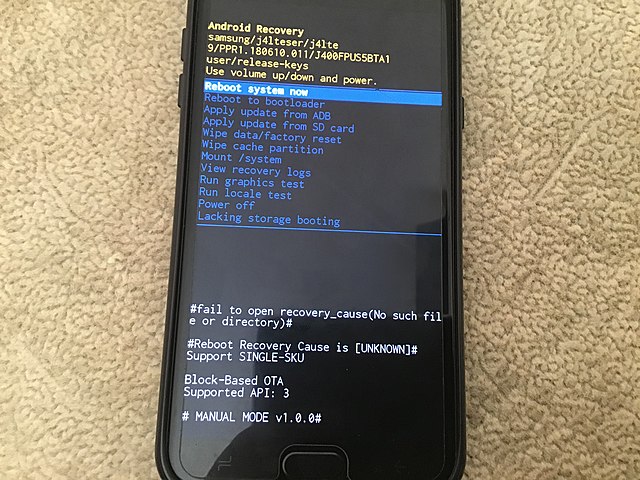
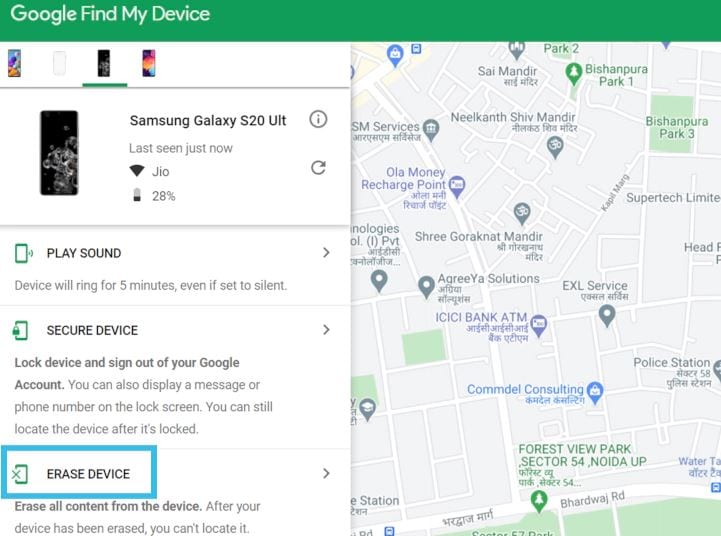
2. Google Find My Device
As you are likely aware, every Android device is connected to a Google account. As a result, if you’d like, you may also use it to unlock Android. You’ll need to know your Google account login information for this. When you’re ready, use these instructions to find out how to unlock a phone password.
- Login using your Google credentials by going to the official Google Find My Device website.
- You will see the gadgets connected to your Google account as you enter the interface and a map of where they are.
- To wipe the Nokia C12 Pro device, click the ERASE DEVICE option on the left side panel. You will then be required for your password.
- Once more, select “Erase.” This will reset the Nokia C12 Pro device and get rid of the forgot pattern lock.
3. Recovery Mode
Users of Android smartphones and tablets can troubleshoot various issues with their devices using a feature known as Android Recovery Mode. If you discover that your device is functioning strangely, it might be helpful. Recovery Mode Android technically refers to a unique bootable partition with a recovery application installed inside it.
However, users can also use it to reset the android password if it is forgotten. The instructions for resetting android devices through recovery mode differ for every android device.
4. Dr.Fone - Screen Unlock
On most Android handsets, it is wise to give it a try on Dr.Fone to unlock the screen lock easily. It allows you to remove the password, PIN, pattern, and fingerprint from an Android phone.
Step 1. Select Unlock Android Screen
Please select “Unlock Android Screen” to ensure you have the correct unlock process.
Step 2. Select device model
If you see this page, please choose the option fitting your phone, otherwise, you can’t unlock your device as you wish.
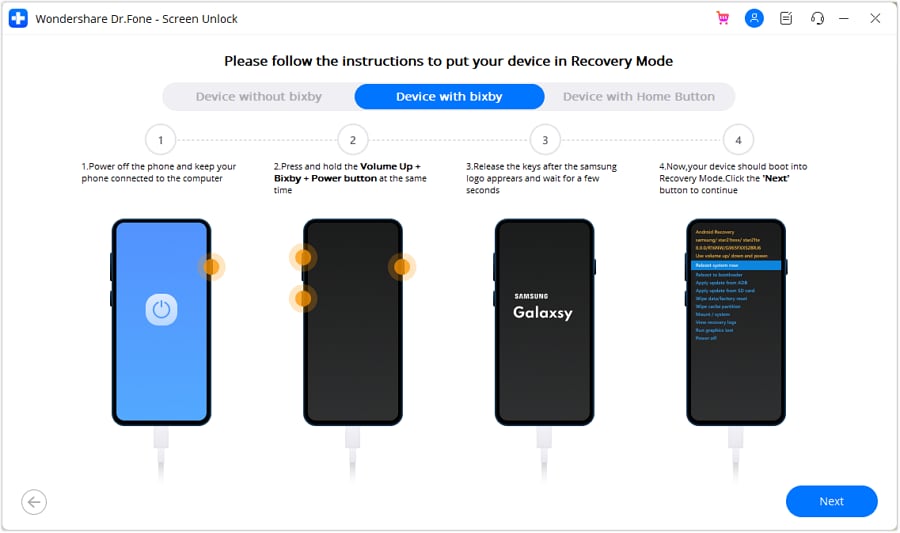
(Enter Recovery Mode via the Samsung phone with Bixby)

(Enter Recovery Mode via the Samsung phone without Bixby)
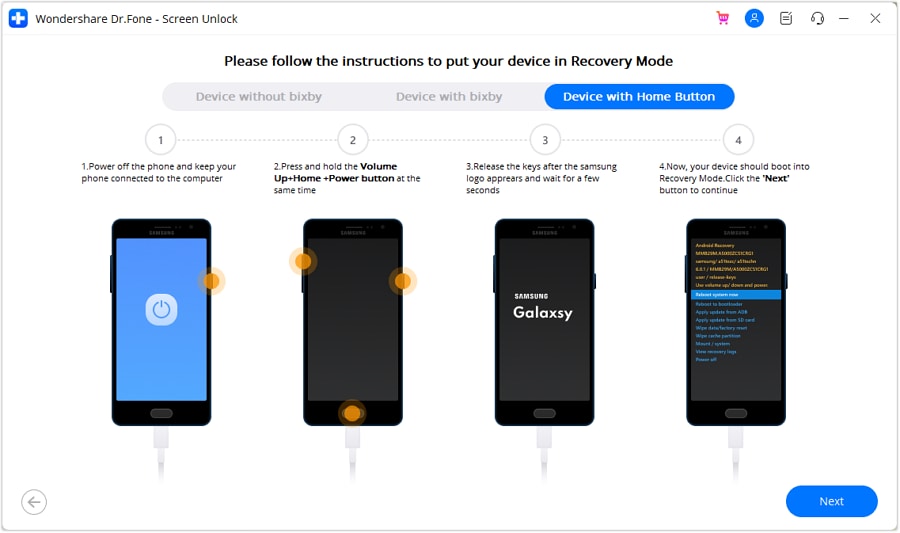
(Enter Recovery Mode via the Samsung phone with the Home button)
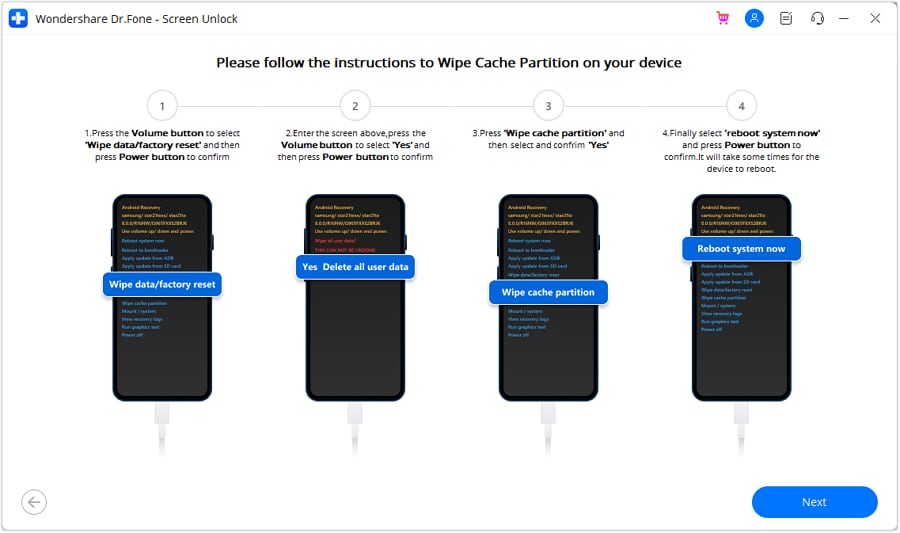
Step 3. Instructions to Wipe Cache Partition
On the page Recovery Mode, it’s the most important step to unlock your device. Please click the right buttons.
Congratulations! Now you can access your phone again, and there’re no obstacles when you do anything on your phone.

FAQs
- Will Dr.Fone - Screen Unlock Do Harm To My Nokia C12 Pro?
Answer: No, Dr.Fone is safe for your device, all hardware will be safe, and you can still use your phone as usual when you try our products, but for devices other than Samsung and LG, you may have to face data loss. So, if you want to keep your data safe, please have a backup on your phone.
- How To Keep My Data Safe?
Answer: Dr.Fone - Phone Backup is a good option for backing up the sensitive data on your device. If you want to know more, don’t hesitate and find any required information on our website.
Conclusion
Any methods mentioned above can work to overcome the obstacle of unlocking the screen with your Android handset. The best thing about all methods we said is that you just need some easy ways to complete the tasks.
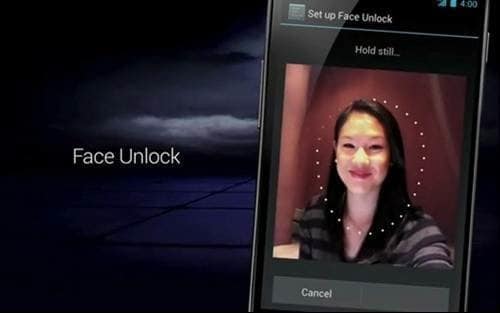
Full Tutorial to Bypass Your Nokia C12 Pro Face Lock?
Your android phone face unlock may be buggy, or the camera may be damaged. It can’t recognize your face. When you try multiple times in such cases, it will lock your device permanently. Are you stuck with a locked phone? And you’re still confused about what just happened. Face unlock may face problems such as
- Face unlock app may be buggy
- Your face unlock settings may be unstable
- Your phone camera or face unlock sensor may be damaged
- Someone else may have registered their face without your permission
Whatever the reason, they are equally big obstacles for you to use your phone as usual; trying to unlock your device can lead to a permanently locked phone. So how do you bypass face unlock?
Follow the guide below to bypass the face unlock settings and choose the best one for yourself.
How To Bypass Android Face Lock by Ourselves?
If you want to bypass face lock by yourself, then different methods can help you. These are all tested and work well.
1. A Picture Possibly Bypasses Face Lock
You can use your photo to manipulate the face lock app. Simply use your photo to unlock the phone, which should work fine. If your phone doesn’t recognize your face from a photo, try again.
If it still doesn’t recognize your face, try a different photo or even change the camera’s lighting settings or the angles to see if that helps.
Anyway, this method is still unstable because of many uncontrollable factors. If everything fails, consider the following methods to bypass the face lock.
2. Hard Reset your phone
To get around the Android lock screen, perform a factory reset. While resetting your phone allows you to set a new password, it also erases all data from your device. This method works like a charm, but it also requires more technical knowledge. To bypass screen lock via factory reset, follow these steps.
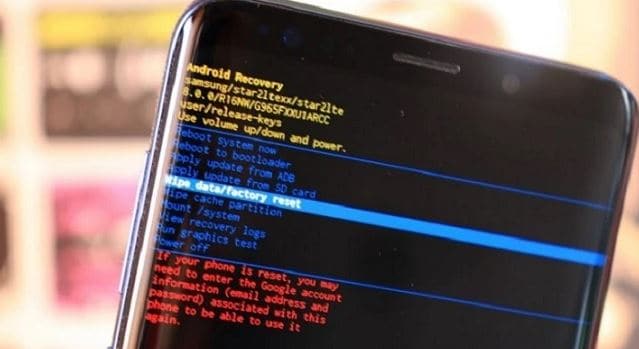
Step 1: Turn off your phone and hold the Power and Volume-down buttons simultaneously until the recovery mode screen appears. There are minor variations depending on the brand and model.
Step 2: Select the Wipe data/Factory Reset option using the volume buttons. To confirm the option, press the Power button.
Step 3: Choose Yes > Delete All User Data, then press the power button to continue. When the process is complete, turn on your phone.
So, before facing such awkward cases, like data loss, we suggest you have a backup habit of keeping your data safe.
3. Google Find My Device
Google Find My Device is a service that lets you remotely lock, track, and wipe data from stolen or lost phones. With a Google account and the password, it won’t be complicated to remove any locks on your phone. You can bypass the Android lock screen by following the steps below:
Step 1: Navigate to Find My Device and sign in with your Google account.
Step 2: Your phone receives a notification.
Step 3: Select Erase Device, confirm, and click Erase as a warning pops up on the screen.
Step 4: The factory reset process on your phone begins. When it’s finished, choose My Google Account instead of using your phone as if it were brand new.
Just like the hard reset, after using Google Find My Device, all your data and settings will be erased. Please make everything well prepared before you decide to unlock your device.
Easiest Way to Unlock Your Android Face Recognition Using Dr.Fone-Screen unlock
The methods mentioned above may be hard for you, and you don’t know any technical skills. If you are looking for an easy tool that can face unlocking for you, then Dr.Fone - Screen Unlock is all you need.
Dr.Fone by Wondershare has many useful tools, and Screen Unlock is one of them. It is the easiest and safest method to bypass the Android face lock. It is safe, secure, and easy to use.
The following guide explains how to use Dr.Fone-Screen unlock to bypass the Android face lock.
Step 1: Install and open Dr.Fone on your computer
Step 2: Run Dr.Fone on your PC and select “Screen Unlock” from the tools
Step 3: Select Unlock Android Screen
Please select” Unlock Android Screen” for the rest process.
Step 4: Select device model
Please click the button fitting your phone.

When arriving at this page, we have a lot of options to unlock your device screen for most phone brands, like Samsung, Nokia, LG, OPPO, etc.
Step 5: Enter into Recovery Mode
Here are examples of Samsung phones via its Recovery Mode to unlock your Android device screen.
(Recovery Mode When the Samsung phone with Bixby)
(Recovery Mode When the Samsung phone without Bixby)
(Recovery Mode When the Samsung phone with Home button)
Step 6: Instructions to Wipe Cache Partition
This step in Recovery Mode is the most important to unlock your screen. Please click the buttons as instruction.
Now you can see your device is unlocked successfully
Conclusion
There are various methods to bypass Android face lock, but Dr.Fone-Screen Unlock is the easiest and safest method. Dr.Fone offers Screen Unlock and many other handy tools to help you recover, remove and unlock your Android phone without geeky knowledge. Dr.Fone-Screen Unlock is a step-by-step process, and you do not need to do anything; Dr.Fone will do all you want to do on your phone!
- Title: How To Enable USB Debugging on a Locked Nokia C12 Pro Phone
- Author: Aaron
- Created at : 2024-07-15 19:14:35
- Updated at : 2024-07-16 19:14:35
- Link: https://easy-unlock-android.techidaily.com/how-to-enable-usb-debugging-on-a-locked-nokia-c12-pro-phone-by-drfone-android/
- License: This work is licensed under CC BY-NC-SA 4.0.