
How to Bypass Android Lock Screen Using Emergency Call On Oppo Reno 8T 5G?
How to Bypass Android Lock Screen Using Emergency Call On Oppo Reno 8T 5G?
The main reason why we keep our smartphone locked is to prevent children (or stalkers) checking out our private photos or messages. You don’t want anyone to access your pictures, emails, or other important data. What if you forget your pattern or PIN and cannot access your phone? Or someone changes lock screen pattern to leave you annoyed?
To avoid such types of conditions, we have tried and tested the following methods to bypass the Oppo lock screen pattern, PIN, password, and fingerprint.
Method 1. Use ‘Find My Mobile’ feature on Oppo Phone
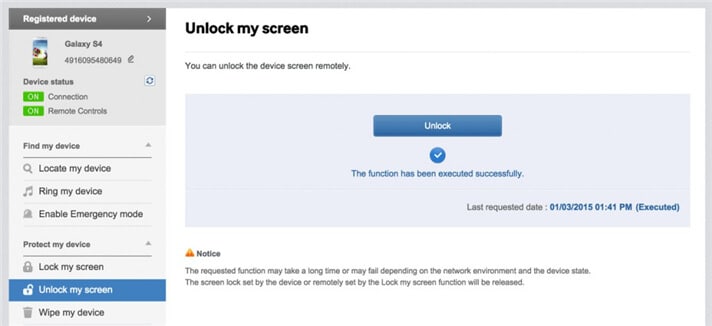
All Oppo devices come with the “Find My Mobile” feature. To bypass the Oppo lock screen pattern, PIN, password, and fingerprint, you can just follow the below steps to get it done.
- Step 1. First, set up your Oppo account and log in.
- Step 2. Click the “Lock My Screen” button.
- Step 3. Enter a new PIN in the first field
- Step 4. Click the “Lock” button at the bottom
- Step 5. Within a few minutes, it will change the lock screen password to the PIN so that you can unlock your device.
Method 2. Use Android Device Manager to Bypass Oppo Password
To know how to unlock a Oppo phone lock password with Android device manager, make sure the Android Device Manager is enabled on your device.
- Step 1. Visit google.com/android/devicemanager on other smartphones or PC.
- Step 2. Log into your Google account that you used on your locked device.
- Step 3. Choose the Oppo Reno 8T 5G device you want to unlock in ADM interface
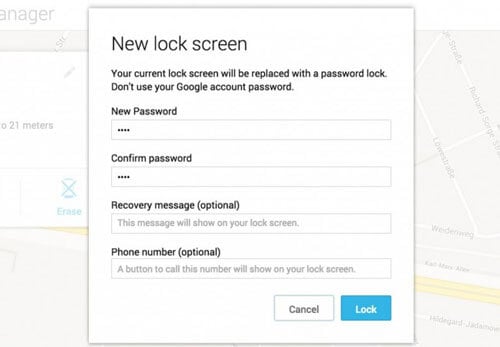
- Step 4. Click on the “Lock” option.
- Step 5. Enter a password. There is no need to enter any recovery message. Select “Lock” again.
- Step 6. You would see a confirmation below if it is successful, with “Ring, Lock and Erase” buttons.
- Step 7. Now you must get the password field on your phone where you can enter your new password, and your phone will be unlocked.
- Step 8. Go to lock screen settings on your device and disable the temporary password.
Method 3. Google Login (Supports Only Android 4.4 or Lower)
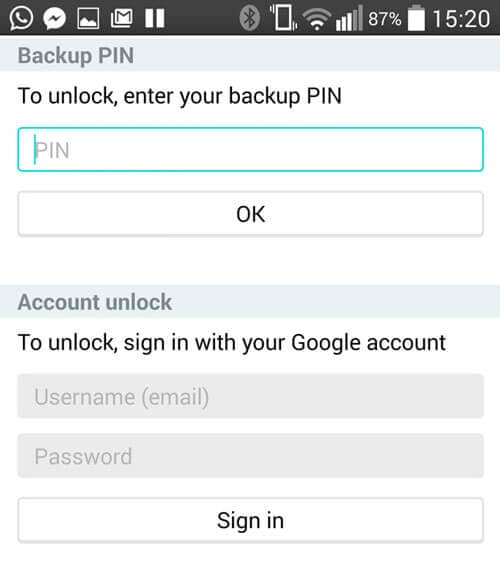
If your device is still running on Android 4.4 or lower, here’s how to bypass the Oppo lock screen fast.
- Step 1. Enter the wrong pattern for five times
- Step 2. Choose “Forgot Pattern”
- Step 3. Enter your Google account login or backup PIN
- Step 4. Now your phone would be unlocked.
Method 4. ‘Pattern Password Disable’ and Custom Recovery (SD Card needed)
To bypass the Oppo lock screen in this method, you ought to be an advanced user who knows what are “custom recovery” and “rooting”. You have to install any kind of customer recovery, and you should have an SD card on your phone. SD card is required to move a ZIP file to the phone, and it is the only way to transfer the file when the Oppo Reno 8T 5G device is locked.
- Step 1. Download a zip file named “Pattern Password Disable” on your computer and move it to the SD card of your Oppo device.
- Step 2. Insert the card on your device
- Step 3. Restart your device into recovery mode.
- Step 4. Flash the file on your card and restart the phone.
- Step 5. Now your phone would boot up without lock screen. Don’t worry if you had a gesture lock or password. All you need to do is to input a random gesture or password, and it will be unlocked.
Method 5. Delete the Password File Using ADB
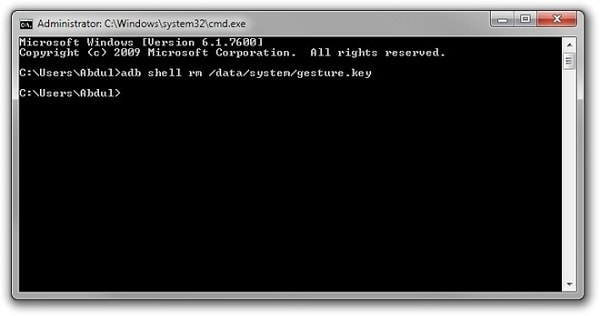
It is yet another option that will work only when you have enabled USB Debugging previously on your device, and your PC is allowed to connect via ADB. If you meet such requirements, it is ideal to use this method to unlock the Oppo lock screen.
- Step 1. Connect your device to the PC using USB cable and open command prompt in the adb directory. Type the command “adb shell rm /data/system/gesture.key” and then press “Enter”.
- Step 2. Restart your phone, and a secure lock screen must be gone, and you can access your device. Be sure to set a new PIN, pattern, or password before rebooting again.
Method 6. Factory Reset to Bypass Oppo Lock Screen
A factory reset is the best option in almost any case if one of these solutions couldn’t work. According to your device type, the process may vary. In most devices, you have to turn off the Oppo Reno 8T 5G device completely to start the process. But this method will delete all the precious data on the Oppo Reno 8T 5G device after the factory reset.
- Step 1. Hold the power button and volume down at the same time. It will open the Bootloader menu.
- Step 2. Press the volume down button two times to choose “Recovery Mode” and select it by pressing the “Power” button.
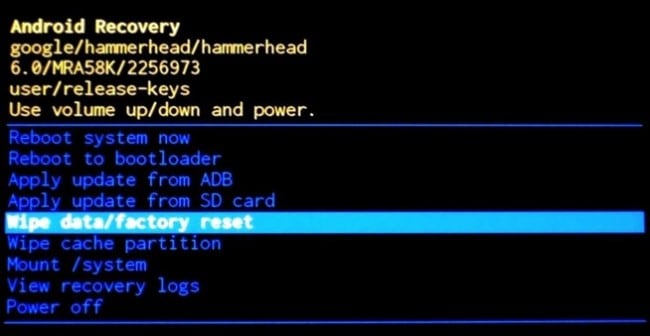
- Step 3. Hold down the power button and tap “Volume Up” once, and you would enter “recovery” mode.
- Step 4. Choose “Wipe Data/Factory Reset” option by using volume buttons.
- Step 5. Select it by pressing the Power button.
- Step 6. Select “Reboot System Now” once the process is done.
Backup your Oppo phone regularly in case of any data loss in the future.
Method 7. Boot into Safe Mode
Chances may be that you are using a third-party lock screen app. Then lucky for you, this way works best to bypass the Oppo lock screen. Specifically, you can boot your Oppo device into Android Safe Mode .
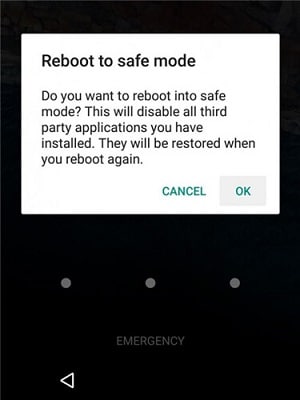
- Step 1. Open up the Power menu from the lock screen and press and hold the “Power Off” option.
- Step 2. It will ask if you want to boot in safe mode. Tap “OK”
- Step 3. Once the process finishes, it will temporarily disable the lock screen activated by the third-party app.
- Step 4. Uninstall the third-party lock screen or just reset the data.
- Step 5. Reboot your device and get out of safe mode.
- Step 6. Now the irritating lock screen app is removed completely.
Method 8. Other Methods
- Step 1. Take your friend’s phone to call on your locked phone.
- Step 2. Accept the call and press the back button without disconnecting.
- Step 3. Now you can access the Oppo Reno 8T 5G device completely
- Step 4. Go to the security settings of the Oppo Reno 8T 5G device and remove the pattern or pin.
- Step 5. It will ask you the correct pin that you don’t know, guess, and try various combinations you can recall.
To avoid forgetting your password or PIN next time, be sure to write the pattern or numbers on a text file or paper to keep them safe. If you have to bypass the Oppo lock screen pattern, PIN, password, and fingerprint, you may consider using Dr.Fone - Screen Unlock (Android). It is a professional tool that can remove all the fingerprints, pattern, and password lock screens without losing any data on your phone.
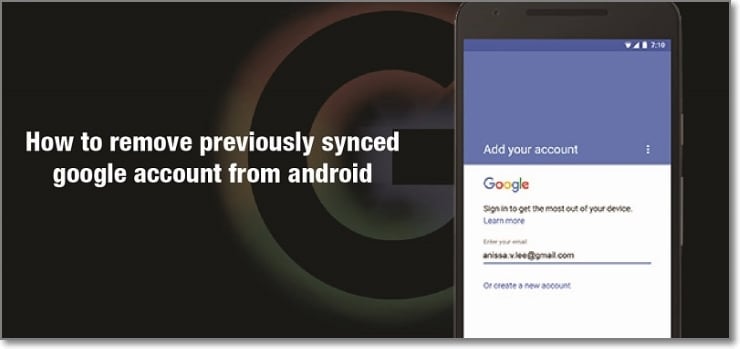
How to Remove a Previously Synced Google Account from Your Oppo Reno 8T 5G
The setting up process of a new Android phone requires you to add a Google account that saves all activities and data of the phone like search history, details of online shipping, play store purchases, and more. Once the account is set, it cannot be changed till you delete everything from your phone. Moreover, with the introduction of FRP lock, even a factory reset will not remove the synced Google account.
So, now what if you want to sell your phone or have purchased a second-hand device that is still associated with the previous owner’s Google account? No, worries as there are workarounds available that will help you remove your previously synced google account from your Android device.
Keep reading to know more in detail about how to bypass previously synced google accounts.
Heres a full guide on how to remove google account from android, click to know more!
Part 1: Remove Previously Synced Google Account from Android Phone Without Phone Reset
In this part, we will discuss the methods that can be used for removing the previously synced account from your Android phone without a phone reset.
Method 1: Removing Google Account using the Android Settings Menu
If you just plan to reset your phone, maybe because of the lag caused by the phone cache, and you know the inconvenience of Google FRP as a protection mechanism, then you can remove Google FRP through the Settings menu.
The steps for this method are listed below.
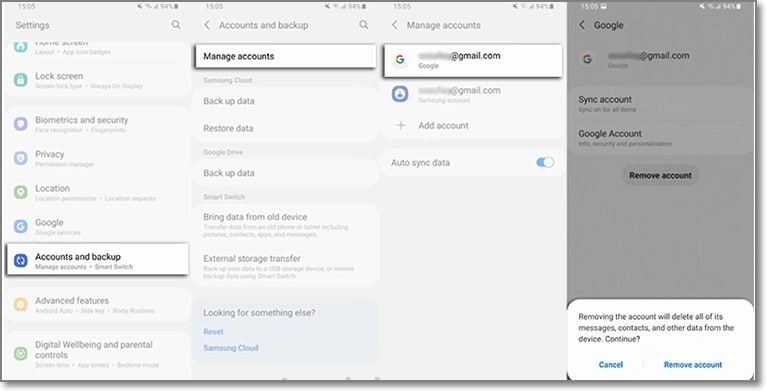
- Step 1: On your Android phone go to the Settings option and choose Accounts & Backup.
- Step 2: Select the Manage Accounts option now and the list of the associated Google Devices will appear.
- Step 3: Choose and click on the Google Account that you want to remove and a pop-up message will appear to inform you that all the account data will be deleted with this action.
To confirm the removal of the account, click on the Remove account button.
Method 2: Remove the Google account from the Android phone using the computer
There is another method using which you can remotely remove the Google account associated with your phone. The steps for the method are listed below.
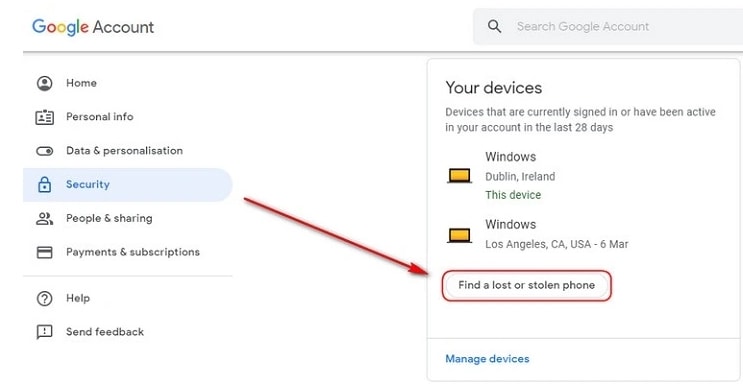
- Step 1: Using another device or a PC, sign in to your Google account that was previously synced on this device and choose the Security option.
- Step 2: Next scroll down and then tap on the Your devices option and choose to Manage devices.
- Step 3: You will now see the list of devices linked to your Google account. Next, tap on Find a lost or stolen phone and then select the Remove option present next to Account access.
- Step 4: You will be again asked if you want to delete the account. Select the Remove option.
- Step 5: The account will be removed successfully and the confirmation message will appear.
Note: This method will actually sign out you from the Google account and will not delete it permanently. To again get access to the account, a notification will appear on your phone to enter the password.
Part 2: How to Disable Factory Reset Protection to Bypass Google Account Verification After Factory Reset
The Factory Reset Protection (FRP) is a security feature for the Android device that allows factory reset only after the associated Google ID and password are entered correctly. With multiple accounts and passwords to remember there is quite a possibility that you may forget your Android phone Google account details and here the need to bypass Google account verification arises.
Though there are multiple tools available we recommend Dr. Fone - Screen Unlock (Android) as the best and the most reliable option. Using this excellent Windows and Mac-based software, FRP lock on all popular Android devices including Samsung, LG, HTC, and others. The tool is simple to use and requires no technology. There is also an option where you can unlock your device if you do not know the OS version.
![]()
Dr.Fone - Screen Unlock (Android)
Get into Locked Phones within Minutes
- 4 screen lock types are available: pattern, PIN, password & fingerprints.
- Easily remove the lock screen; No need to root your device.
- Everybody can handle it without any technical background.
- Provide specific removal solutions to promise good success rate
4,008,669 people have downloaded it
Steps to remove FRP lock using Dr. Fone-Screen Unlock (Android)
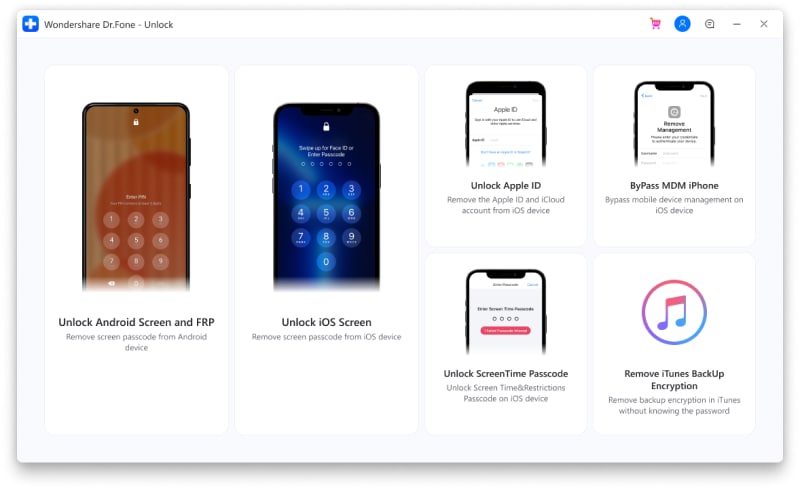
Step 1: Download, install and run the software on your system, and from the main interface choose the Screen Unlock option. Make sure that your phone is connected to WiFi.

Step 2: Next, choose Unlock Android Screen/FRP and then select the Remove Google FRP Lock option.
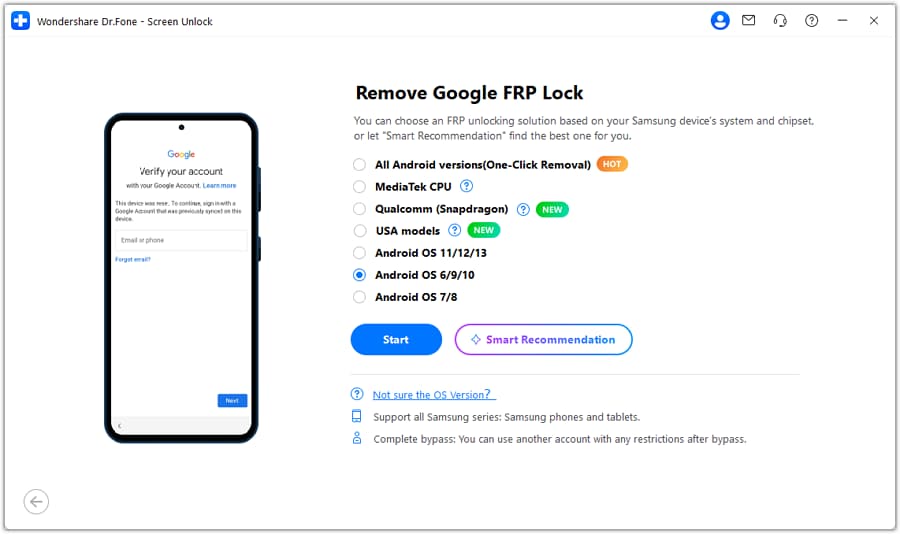
Step 3: Next, choose the OS version of your device from the given options, and then using a USB cable, connect your phone to your system.
Step 4: After the Oppo Reno 8T 5G device is connected, the Oppo Reno 8T 5G device information will appear on the software for you to confirm and the notification for the same will be sent to your Android phone.
Step 5: Now follow the notifications for removing the FRP lock and in the browser enter drfonetoolkit.com.
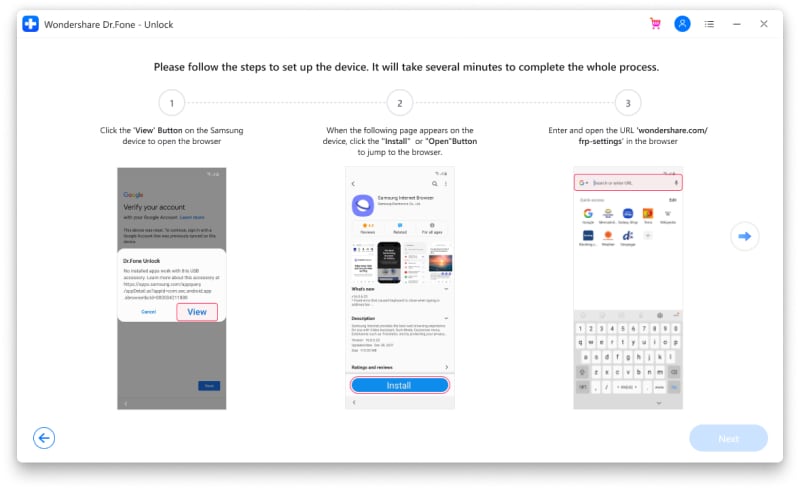
Step 6: Next, click on the Android 6/9/10 button, choose Open Settings and select the PIN option to set a PIN to be used in the further steps.
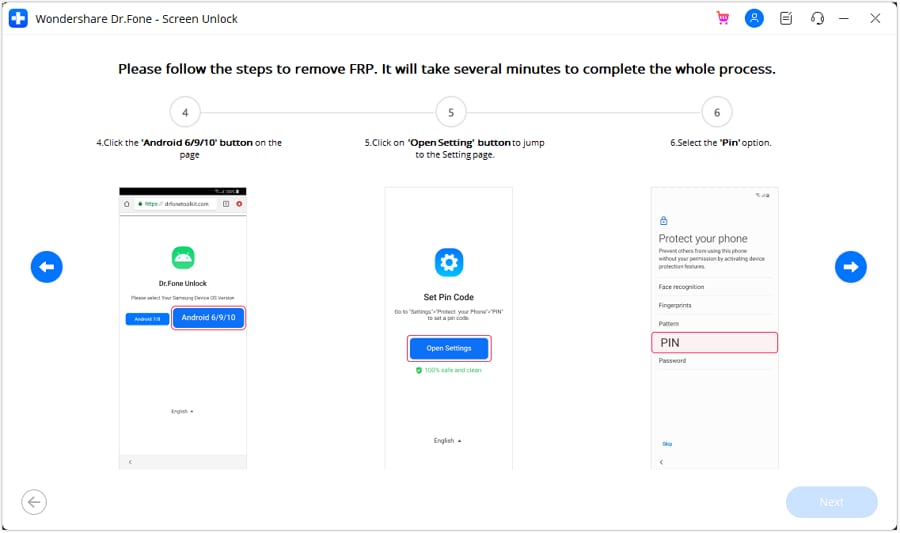
Step 7: Keep following the steps as they appear till you reach the Google Account Sign-In page. Here click on the Skip option that will successfully remove and bypass the Google Account.

The above given are the brief steps for the FRP bypass process. To learn about the entire process in detail, check Dr.Fone-Screen Unlock (Android) guide .
Part 3: Hire a Remote FRP Removal Service to Bypass ZTE/Motorola After Factory Reset
To bypass the FRP lock on your ZTE, Motorola, and Samsung device, there is also an online service called UnlockJunky.com that claims to remove the FRP lock and previously linked account on your Android device within 5-15 minutes. This is a paid service that also claims that if they are unable to remove the lock, they will refund the amount to their customers.
So, if you cannot sign in with a Google account that was previously synced, you can give this, method a try.
Step 1: Open the official service page Unlockjunky on your browser.
Step 2: Next, choose the Oppo Reno 8T 5G device’s brand, model, and unlock type from their respective drop-down menus. Click on Unlock Now button after entering the details.
Step 3: Now you need to initiate the order by providing the details asked and completing the payment.
Step 4: Next, the software needs to be downloaded and installed on your system, and using a USB cable, connect your phone to your computer.
Step 5: Connect with one of the support provider members through the live chat and they will help you remove the FRP lock on your Android phone.
With the steps above, you can remove the account previously synced on this device.

Limitations of using the Unlockjunky method:
- This is a paid service.
- Works only with Motorola, ZTE, and Samsung devices.
- There is no surety that the service will work for removing the FRP lock on your devices.
- If you have to remove the FRP lock from multiple devices, a separate payment for each device has to be done.
Conclusion
Above we have listed several ways to remove a previously synced Google account on your Android device. The best of all the listed solutions is Dr. Fone - Screen Unlock (Android) as it supports bypassing FRP lock on multiple Android devices in a hassle-free manner. Once the license is purchased, you can unlock as many numbers of devices as you want without any worries.
The Ultimate Guide: How to Bypass Swipe Screen to Unlock on Oppo Reno 8T 5G Device
Nowadays, the security mode is enabled in almost all digital devices, which is the case with our smartphones. However, when we repeatedly change our password, we might be in a state of confusion to remember it. Such instances are highly schemed to lock our messages, galleries, emails, and other personal storage. Using the locking pattern enhances security, and thus, apart from the known user of the Oppo Reno 8T 5G device, unknown people cannot access your Android phone. To overcome this critical situation, we have this article to help you unlock your Android devices by removing or bypassing the swipe lock Android screen. The solutions provided in this article are easily accessible to all users and are easy to operate.
So, if you have ever been stuck due to a lock code, go through the article to resolve the issue and swipe up to unlock a password that somehow gets forgotten.
Part 1: How to disable Swipe Screen to unlock when you can access the phone?
Some people do not pay much attention to their privacy and will not bother locking their Android devices. They would disable the swipe screen to unlock their devices. Thus, this section will talk about the basic solution to disabling the swipe up to unlock Android devices. Our main focus here is on a disabling method of swiping the screen when your Android device is accessible.
Let us look at the detailed steps below to remove the swipe screen to unlock the Android phone.
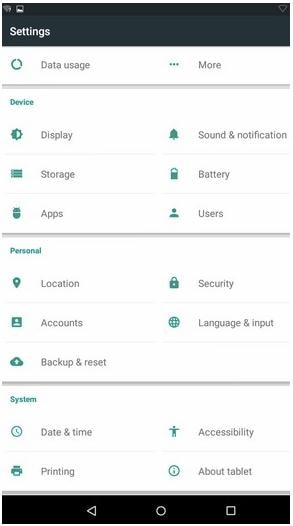
Step 1: To begin with, touch the gear icon (that is setting) on the main screen of your Android phone. The settings screen will display directly since it is a shortcut to get in. You will get a drop-down menu where you will see many options are available for your flexibility.
Step 2: Out of those, choose the “Security” tab to access your further.
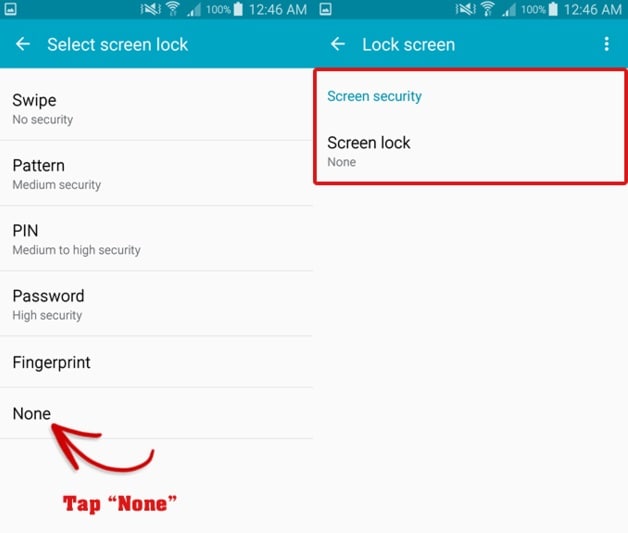
Step 3: It will prompt the tab as “Screen security,” You will be listed with three choices, namely, Screen lock, Lock screen options, and Owner Information.
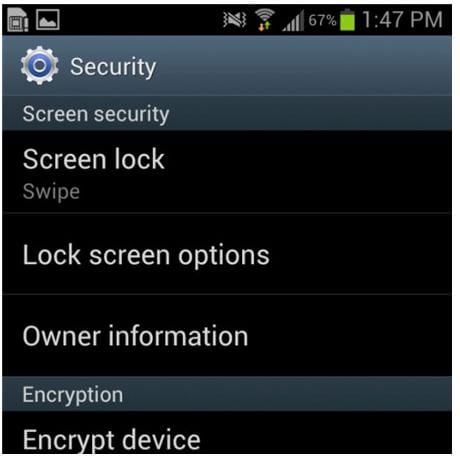
Step 4: Select the option called “Screen lock,” The next step is to enter your PIN code for security purposes. This step is carried out in Android phones to ensure you are the original owner of the Android device.
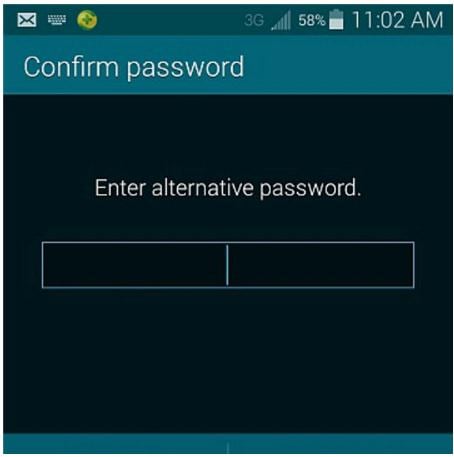
Step 5: If you click the PIN code option again, the drop-down menu will be listed with more options. Now select the option “None.”
That’s all. You have successfully run out of the disable commands for the swipe up to unlock the screen. You can now open and access your device without any security methods.
Part 2:How to remove/bypass Swipe to unlock when the phone is locked?
To unlock your device, the only solution is to follow the Dr.Fone - Screen Unlock (Android) . If you are looking to unlock the screen when the phone is locked, then this method solidly proves to bypass swipe lock Android when it is locked. It helps to resolve this issue by bypassing or removing the swipe screen without causing any loss to your data. This tool temporarily supports bypassing Android screens without data loss on Samsung and LG. As for other Android phones, all the data will disappear after unlocking with this tool.
The features of this Dr.Fone software are many. It gives a solution to four lock methods: a pin, pattern, fingerprint, and password. It is user-friendly, and even a user with no technical information can also use it with no issue. This tool is only limited to remove the screen lock on Samsung and LG without losing data. Your data will still be wiped out on other Android phones after using this tool.
Dr.Fone - Screen Unlock (Android)
Remove 4 Types of Android Screen Lock without Data Loss
- It can remove four-screen lock types - pattern, PIN, password & fingerprints.
- Only remove the lock screen. No data loss at all.
- No tech knowledge asked. Everybody can handle it.
- Work for Samsung Galaxy S/Note/Tab series, and LG G2, G3, G4, etc.
4,008,669 people have downloaded it
Tips: This tool also supports unlocking other Android screens beyond Samsung and LG. However, it does not support saving all the data after unlocking, like Samsung and LG.
Step 1: Initialize the Dr.Fone on the computer, and there will be many options in front of you. In that, select the “Screen Unlock”.
Step 2: Now, to bypass swipe lock Android, using the USB cable, connect the Android device to your computer, and it will prompt the Unlock Android Screen option.

Step 3: To enable the download mode on your Android device, shut down your phone>Simultaneously, press the volume down, Home button, and Power button >Press the Volume up button. Once your device is in download mode, the recovery kit will get downloaded.

Step 4: You will see the result right in front of you as Dr.Fone - Screen Unlock, recovery will bypass swipe lock Android without hampering your data. Foremost, you can now access your device without swipe up to unlock the screen.

Pretty simple, right? Dr.Fone - Screen Unlock to the rescue for the issue of swipe screen to unlock.
Part 3: How to turn off the swipe to unlock when the pattern is enabled?
In this section, we will cover how to turn off the swipe to unlock when the pattern lock of the Oppo Reno 8T 5G device is enabled. Therefore, here we will go through the process of turning off the swipe to unlock the feature of your device. This structure is formed in some interval of locking the screen.
The steps below imply turning off of swiping screen instantly:
Step 1: At first, open the app “Setting” present on your Android device.
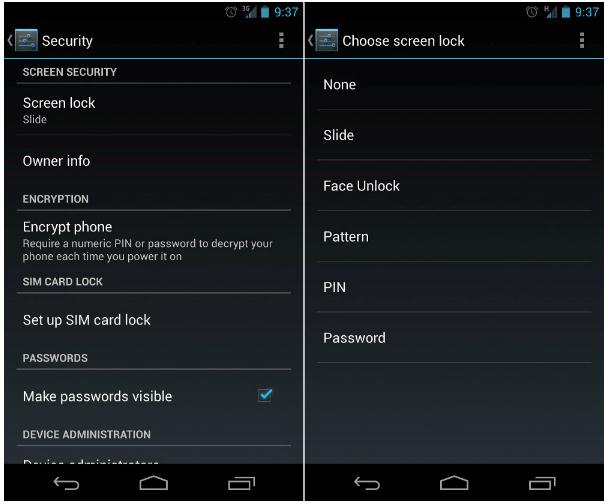
Step 2: There will be multiple interfaces. Now choose the option “Security.”
Step 3: To turn off the swipe screen, when the pattern is enabled then, choose “Screen lock” and then click on “NONE.”
Step 4: If you have enabled your pattern choice already, it will again prompt you to enter the pattern. Once you entered the pattern, the swipe screen lock will disappear.
Step 5: The final step is to reboot your Android device to update the feature of turning off the swipe screen. Now you can open your device at any time without using the pattern lock feature.
Note: Regardless of any situation of forgetting the Android lock password, you can go for an email account set up for swiping into the Android devices.
Conclusion
Now, to sum up, we would say that in this article, we tried to bring out the best solutions for your Android device in such cases wherein you want to disable your screen security. The Dr.Fone - Screen Unlock is simply a proven mechanism that delivers what we need and that, too, without any data loss. We ensure that you can disable the swipe screen to unlock easily and effectively using the methods given above. Hence, you can access your phone by bypassing swipe lock Android even if you forget the screen lock code. So, don’t just wait, but bring out the solution for the swipe screen to unlock the Android device with Dr.Fone - Screen Unlock (Android) now.
Also read:
- [New] In 2024, Decoding Instagram's Reels and Stories Evolution
- [Updated] 2024 Approved Google’s Augmented Reality Stickers in Spotlight - A Comparative Analysis
- [Updated] Elevate Your Channels A Guide to YouTube Metrics
- Access All Subtitles Top 10 Free Tools for YouTube Videos
- Apple's New Policy: Enabling Refurbished Components in Certain iPhone Fixes
- Delete Gmail Account With/Without Password On Realme 12 5G
- Downloading SamFw FRP Tool 3.0 for OnePlus 12R
- Expert Analysis of the Philips HF3505 Sunrise Simulator Alarm - Unveiling Its Features and Performance
- How To Unlock a Realme Narzo N55 Easily?
- In 2024, Best Realme 10T 5G Pattern Lock Removal Tools Remove Android Pattern Lock Without Losing Data
- In 2024, Crafting Captivating Storytelling with a Soundtrack on Instagram
- In 2024, How to Change Lock Screen Wallpaper on Realme
- In 2024, Pattern Locks Are Unsafe Secure Your Realme 12 Pro+ 5G Phone Now with These Tips
- Pattern Locks Are Unsafe Secure Your Nubia Red Magic 8S Pro+ Phone Now with These Tips
- Social Network Video Download for Audio Conversion
- ZDNET Highlights Unheralded Multi-Purpose Marvel as Leading Office Gadget of the Year
- Title: How to Bypass Android Lock Screen Using Emergency Call On Oppo Reno 8T 5G?
- Author: Aaron
- Created at : 2024-12-24 16:07:56
- Updated at : 2024-12-28 16:39:00
- Link: https://easy-unlock-android.techidaily.com/how-to-bypass-android-lock-screen-using-emergency-call-on-oppo-reno-8t-5g-by-drfone-android/
- License: This work is licensed under CC BY-NC-SA 4.0.