
Full Tutorial to Bypass Your Realme 12+ 5G Face Lock?
Full Tutorial to Bypass Your Realme 12+ 5G Face Lock?
Your android phone face unlock may be buggy, or the camera may be damaged. It can’t recognize your face. When you try multiple times in such cases, it will lock your device permanently. Are you stuck with a locked phone? And you’re still confused about what just happened. Face unlock may face problems such as
- Face unlock app may be buggy
- Your face unlock settings may be unstable
- Your phone camera or face unlock sensor may be damaged
- Someone else may have registered their face without your permission
Whatever the reason, they are equally big obstacles for you to use your phone as usual; trying to unlock your device can lead to a permanently locked phone. So how do you bypass face unlock?
Follow the guide below to bypass the face unlock settings and choose the best one for yourself.
How To Bypass Android Face Lock by Ourselves?
If you want to bypass face lock by yourself, then different methods can help you. These are all tested and work well.
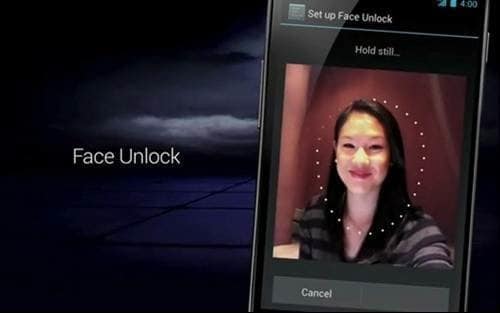
1. A Picture Possibly Bypasses Face Lock
You can use your photo to manipulate the face lock app. Simply use your photo to unlock the phone, which should work fine. If your phone doesn’t recognize your face from a photo, try again.
If it still doesn’t recognize your face, try a different photo or even change the camera’s lighting settings or the angles to see if that helps.
Anyway, this method is still unstable because of many uncontrollable factors. If everything fails, consider the following methods to bypass the face lock.
2. Hard Reset your phone
To get around the Android lock screen, perform a factory reset. While resetting your phone allows you to set a new password, it also erases all data from your device. This method works like a charm, but it also requires more technical knowledge. To bypass screen lock via factory reset, follow these steps.
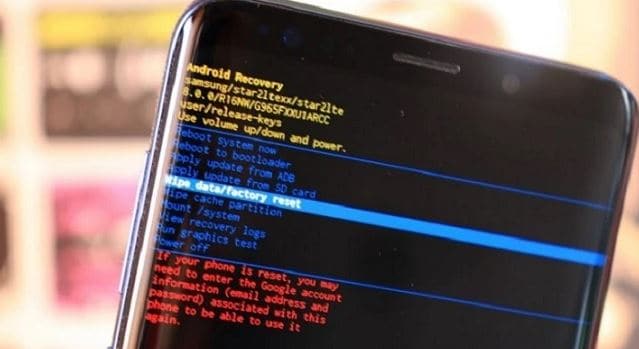
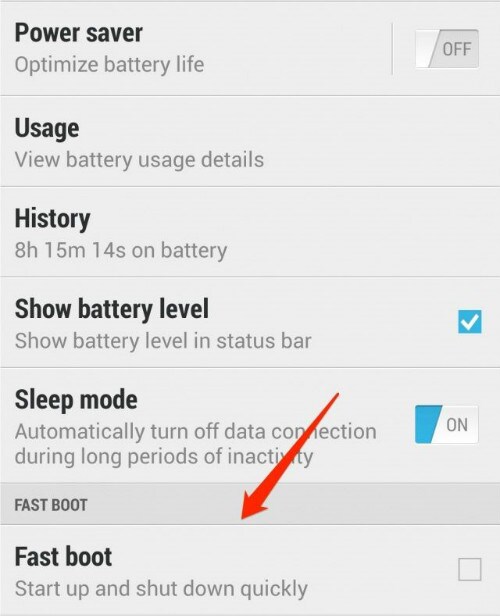
Step 1: Turn off your phone and hold the Power and Volume-down buttons simultaneously until the recovery mode screen appears. There are minor variations depending on the brand and model.
Step 2: Select the Wipe data/Factory Reset option using the volume buttons. To confirm the option, press the Power button.
Step 3: Choose Yes > Delete All User Data, then press the power button to continue. When the process is complete, turn on your phone.
So, before facing such awkward cases, like data loss, we suggest you have a backup habit of keeping your data safe.
3. Google Find My Device
Google Find My Device is a service that lets you remotely lock, track, and wipe data from stolen or lost phones. With a Google account and the password, it won’t be complicated to remove any locks on your phone. You can bypass the Android lock screen by following the steps below:
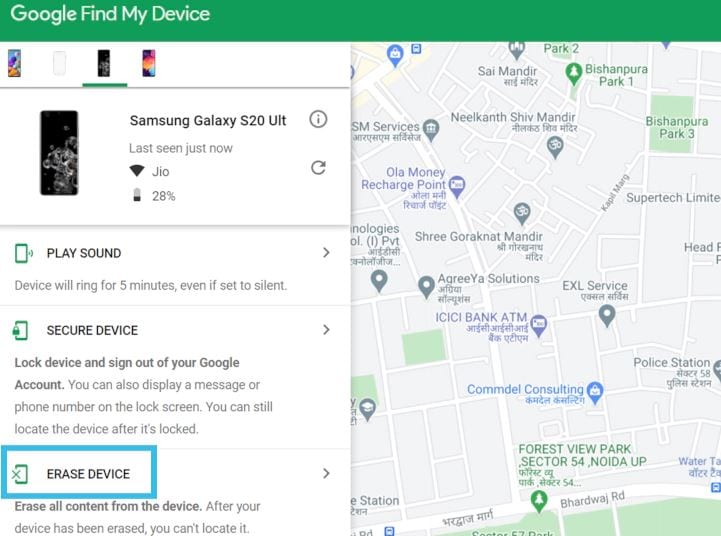
Step 1: Navigate to Find My Device and sign in with your Google account.
Step 2: Your phone receives a notification.
Step 3: Select Erase Device, confirm, and click Erase as a warning pops up on the screen.
Step 4: The factory reset process on your phone begins. When it’s finished, choose My Google Account instead of using your phone as if it were brand new.
Just like the hard reset, after using Google Find My Device, all your data and settings will be erased. Please make everything well prepared before you decide to unlock your device.
Easiest Way to Unlock Your Android Face Recognition Using Dr.Fone-Screen unlock
The methods mentioned above may be hard for you, and you don’t know any technical skills. If you are looking for an easy tool that can face unlocking for you, then Dr.Fone - Screen Unlock is all you need.
Dr.Fone by Wondershare has many useful tools, and Screen Unlock is one of them. It is the easiest and safest method to bypass the Android face lock. It is safe, secure, and easy to use.
The following guide explains how to use Dr.Fone-Screen unlock to bypass the Android face lock.
Step 1: Install and open Dr.Fone on your computer
Step 2: Run Dr.Fone on your PC and select “Screen Unlock” from the tools

Step 3: Select Unlock Android Screen
Please select” Unlock Android Screen” for the rest process.

Step 4: Select device model
Please click the button fitting your phone.

When arriving at this page, we have a lot of options to unlock your device screen for most phone brands, like Samsung, Nokia, LG, OPPO, etc.

Step 5: Enter into Recovery Mode
Here are examples of Samsung phones via its Recovery Mode to unlock your Android device screen.
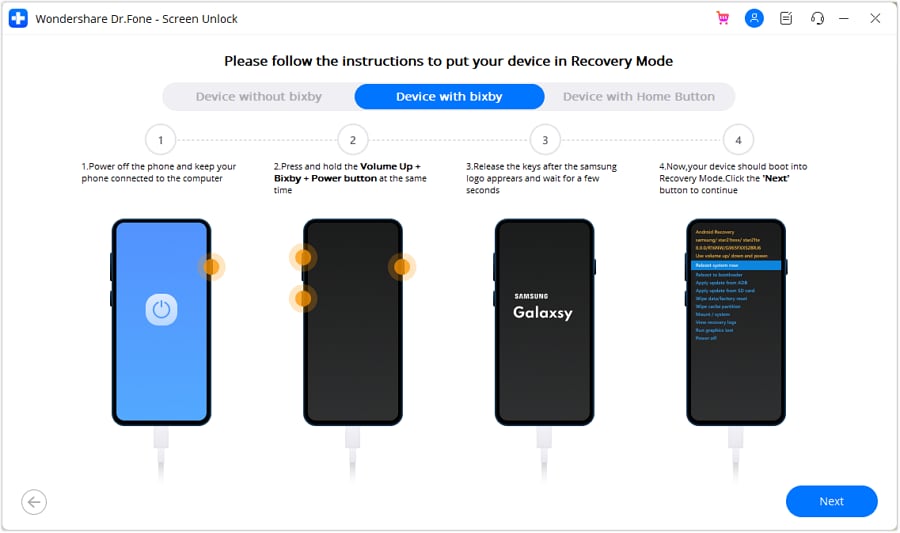
(Recovery Mode When the Samsung phone with Bixby)

(Recovery Mode When the Samsung phone without Bixby)
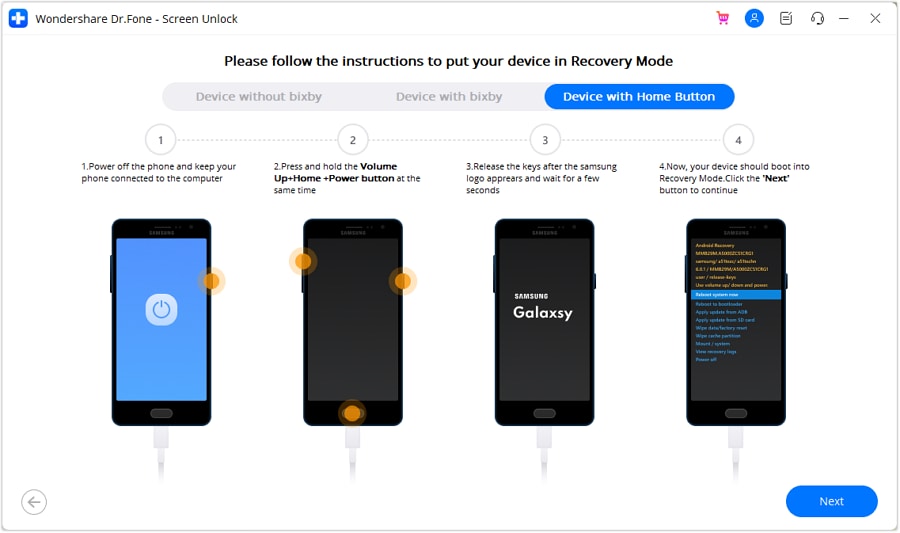
(Recovery Mode When the Samsung phone with Home button)
Step 6: Instructions to Wipe Cache Partition
This step in Recovery Mode is the most important to unlock your screen. Please click the buttons as instruction.
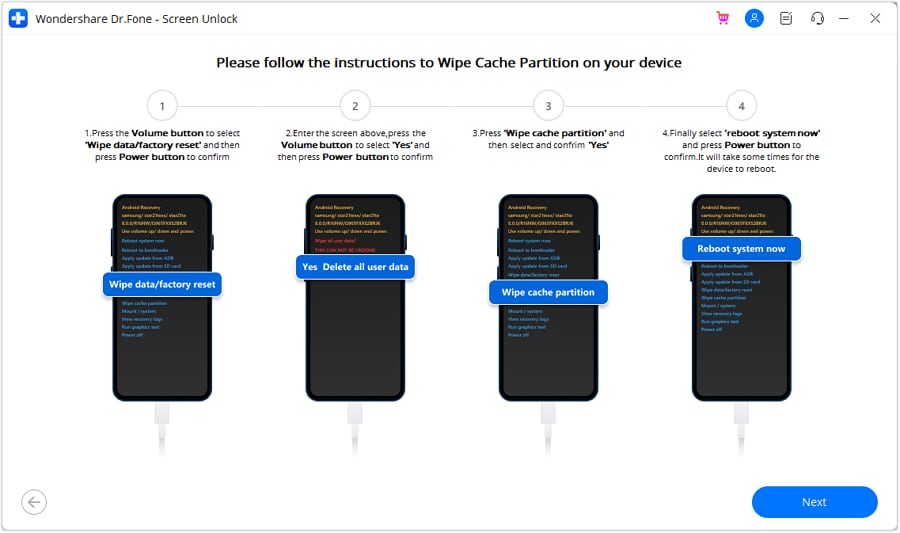
Now you can see your device is unlocked successfully

Conclusion
There are various methods to bypass Android face lock, but Dr.Fone-Screen Unlock is the easiest and safest method. Dr.Fone offers Screen Unlock and many other handy tools to help you recover, remove and unlock your Android phone without geeky knowledge. Dr.Fone-Screen Unlock is a step-by-step process, and you do not need to do anything; Dr.Fone will do all you want to do on your phone!
How to Unlock Realme 12+ 5G Bootloader Easily
Do you want to unleash the true power of your smart phone? Do you wish to have complete control over your smart phone? If yes, well, here is the answer; unlock bootloader. For people who are already into the tricks of hacking and rooting smart phones, might be aware of this. But still, there are exciting new developments. Bootloader is a code existing in all operating systems which usually comes pre-locked. So, it is important, if you wish to have a custom ROM installed on the Realme 12+ 5G device, or if you wish to have other controls like installing applications which are incompatible, to have the Realme 12+ 5G device bootloader unlocked. But going through with the process of unlocking bootloader and rooting the Realme 12+ 5G device will not help and rather might break the warranty of the Realme 12+ 5G device. This definitely calls for a diligent watch on how to unlock HTC bootloader. So, it is imperative as a user to know the process of HTC bootloader unlock. This article serves you with some ways you could follow to unleash the true power of your HTC device. Here’s how you can do it.
Part 1: Why We Want to Unlock HTC Bootloader
For people with HTC device, unlocking bootloader would mean complete authority over the smart phone and you have all the power to control the HTC device by all means. Since, bootloader usually comes pre-locked, unlocking the bootloader is the initial step if you would like to have a custom ROM installed in your device. There are various advantages of HTC unlock starting from gaining rights of control to installing latest custom ROMs in the phone and installing incompatible applications. Moreover, HTC unlock bootloader could boost the Realme 12+ 5G device speed and battery life and also help in making complete backups of the Realme 12+ 5G device. You could also have controls to remove bloatware from the HTC device. So, all in all, while there could be certain side effects, if not done properly, there are various advantages of unlocking HTC bootloader. If the process is carried out properly, the Android device could be the perfect smart phone you would like to have.
Part 2: How to Unlock Realme 12+ 5G Bootloader
Realme 12+ 5G is the flagship device of HTC by all means. With a world of features and offerings, Realme 12+ 5G truly is a beast. While the phone is very powerful without any modifications, the true potential is yet to be seen and that can only be done if the bootloader is unlocked. So, to have a complete control over the Realme 12+ 5G device, it is important to unlock the bootloader and the process has to be carried out diligently. One of the initial things that needs to be ensured is that the Realme 12+ 5G device is fully charged or atleast 80% mark. Make sure you have the fastboot drivers for the Realme 12+ 5G device configured on the windows machine and the Android SDK. Here are some of the steps which can be followed to unlock bootloader.
Step 1: It is always very important to keep the phone data backed up and more so when you are planning to unlock the bootloader.
As one of the initial measures, backup the Realme 12+ 5G device completely as bootloader unlocking process will wipe all the data off. So, backup all the data like photos, contacts, multimedia files, documents, etc.
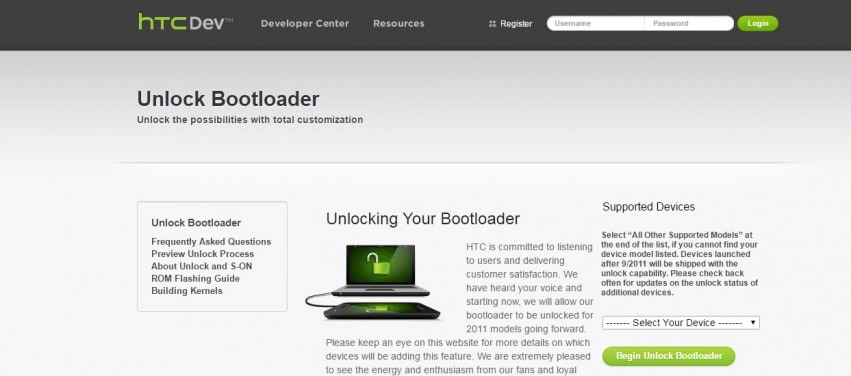
Step 2: Go to htcdev.com/bootloader. Ensure that you are registered with HTC and once the sign up is done, log in to HTC dev.
Now, ensure that HTC Sync Manager is installed on the PC.
Step 3: From the bootloader page, select your device using the drop down option as shown in the picture below.
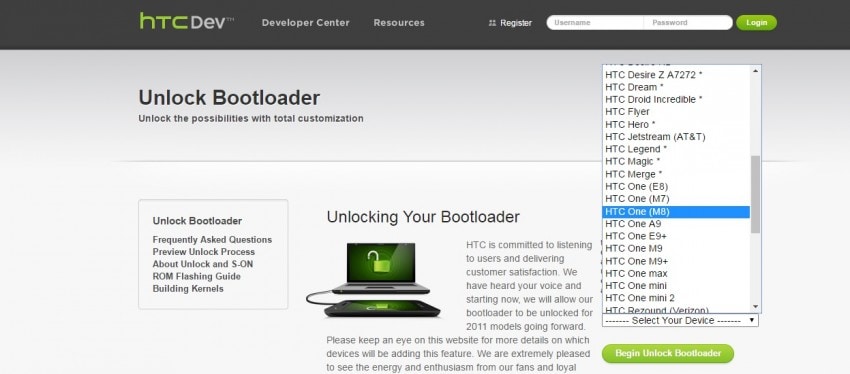
After selecting the Realme 12+ 5G device, click on “Begin Unlock Bootloader”, and then confirm all the dialogue boxes which come your way on screen.
Step 4: Now, you will be presented with four steps to put the Realme 12+ 5G device in bootloader mode. Disconnect the Realme 12+ 5G device from the PC and turn the Realme 12+ 5G device off completely. Press the volume down button along with the power button to switch the Realme 12+ 5G device on in bootloader mode.
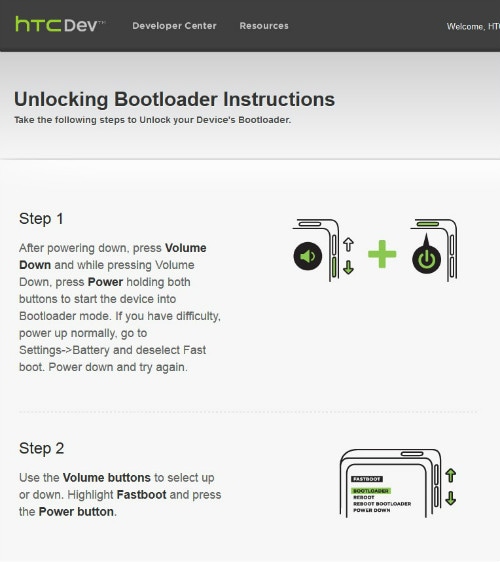
Step 5: Use the volume keys of the Realme 12+ 5G device to select Fastboot option along with pressing power button to confirm, after the Realme 12+ 5G device is in bootloader mode. Now, connect the Realme 12+ 5G device to the computer using a USB cable.
Step 6: Go to Fastboot folder on the PC and holding down the shift key, click on any empty space followed by a click on “Open command window here”.
Step 7: In the command prompt window, type “fastboot devices” and press enter. Realme 12+ 5G will show up in the command prompt.
Note: The drivers have to be installed correctly to see the Realme 12+ 5G device in the command prompt. So, if the Realme 12+ 5G device does not show up, reinstall HTC Sync Manager and try again after restarting the computer.
Step 8: On HTC Dev’s website third page, click on “proceed to Step 9”. Follow the steps listed and then click on submit. The unlock token code for the Realme 12+ 5G device will be mailed by HTC. Download the token and name it “Unlock_code.bin” and place the token in the fastboot folder.
Step 9: Now, in the command prompt window, type the following:
fastboot flash unlocktoken Unlock_code.bin
Step 10: On the Realme 12+ 5G , one message will appear asking if you want to unlock the Realme 12+ 5G device bootloader.
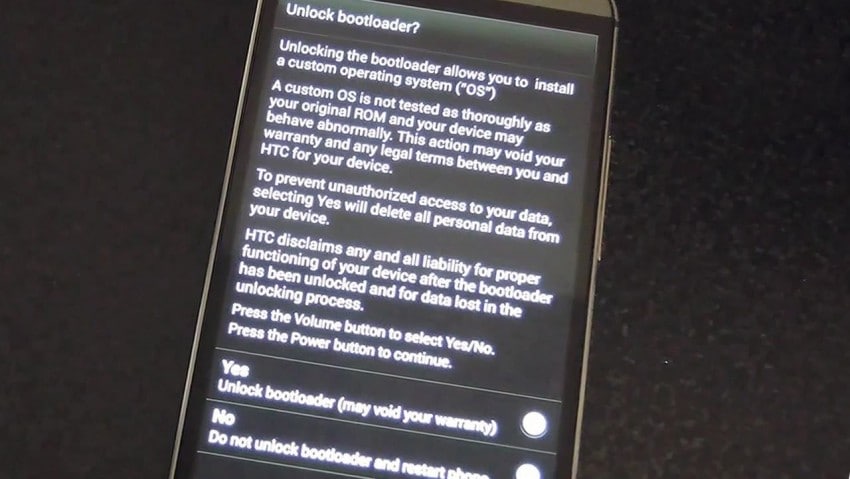
Use volume keys to select and power button to confirm. Once this is done, the Realme 12+ 5G device will restart once and it’s done. The device is now bootloader unlocked.
Mastering Android Device Manager: The Ultimate Guide to Unlocking Your Realme 12+ 5G Device
So, what is Android Device Manager? Android has this amazing native tool to help you locate and remote wipe your lost or stolen phone. We lock our phones via passwords or patterns or fingerprints to maintain the security but what if someone dares to meddle with your phone or unfortunately, it gets stolen? Don’t worry, all you need to do is let Android Device Manager unlock your Android phone. For this, it just needs to be enabled on your phone (before you unluckily locked yourself out of it). Android Device Manager unlocks your phone in a small amount of time, saving you from all the troubles.
In addition to this, the Android Device Manager also unlocks your password/pin-encrypted phone if you have forgotten the passcode by chance. The procedure is quite simple; all you need is a Google account to set this up onyour phone and then you can make use of any other online device to track down your lost or stolen phone or to even wipe all data in it. Phew!
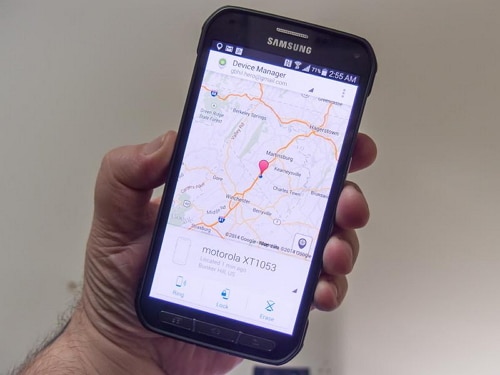
Using the Android Device Manager to track a lost phone
Part 1: What is Android Device Manager lock?
Android Device Manager is Google’s take on Apple’s Find My iPhone. Enabling the ADM is quite easy; just go to google.com/android/devicemanager on your computer and search through your list of devices that are already connected to your Google account. Once you are there, you can easily send a notification to the phone you want to enable remote password application and wiping upon.
ADM comes with a set of features that helps you to unlock your Android phone as well. It not only helps you to find your device, but also Ring it, lock it, and wipe and erase all the data as well, if your phone is lost or stolen. Once you’re logged into the ADM website from your computer, you can avail all these options once your phone is located. It is a wise option to get your device locked by Android Device Manager in case it is lost or stolen, so that your phone is secured.
Android Device Manager can unlock your phone under a specific set of circumstances only.
- • First of all, Android Device Manager needs to be enabled on your phone before it is lost, stolen, etc.
- • Secondly, your phone can only be tracked by ADM if the GPS option is switched on.
- • Thirdly, the Realme 12+ 5G device you are using for ADM, must be connected to Wi-Fi or internet, to login to your Google account.
- • Lastly, Android Device Manager is not compatible for all Android versions. For now, it is only compatible with devices running Android 4.4 and above, so your phone must be in this category for ADM to work.
Part 2: How to unlock Android phone with Android Device Manager?
Just act according to the following steps, and the Android Device Manager will unlock your phone.
1. On your computer or any other mobile phone, visit: google.com/android/devicemanager
2. Then, sign in with the help of your Google login details that you had used in your locked phone as well.
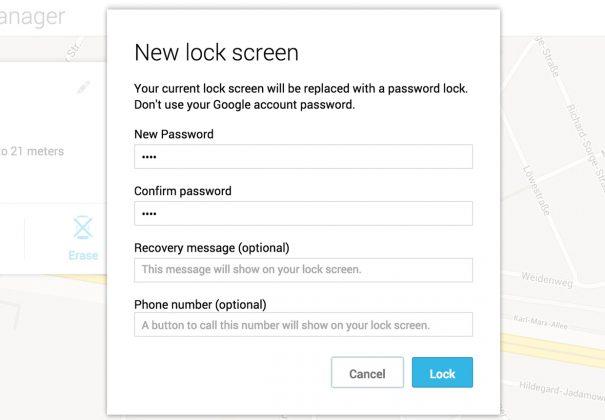
3. In the ADM interface, choose the Realme 12+ 5G device you want to unlock. Now, select “Lock”.
4. Enter a temporary password. Now go ahead and click on “Lock” again.
5. If the previous step was successful, you should be seeing a confirmation below the box with the buttons – Ring, Lock and Erase.
6. Now, you should see a password field on your phone screen. Enter a temporary password to unlock your phone.
7. Visit your phone’s lock screen settings and disable the temporary password.
The Android Device Manager has successfully unlocked your phone!
A downside to this process, is an error message faced by some users while using ADM. Many users have reported the issue, that when they have tried using ADM to unlock their locked device, an error message has occurred, saying, “since Google has verified that a screen lock is already set”. Basically, this error message conveys that you will not be able to unlock your phone using Android Device Manager, and this is a flaw on Google’s part, not your phone’s.
Part 3: What to do if phone is locked by Android Device Manager
There are 2 situations where you would want to know how to unlock the Android Device Manager lock – one, when you have unfortunately forgotten the screen lock passcode and the other is when your phone is locked by Android Device Manager.
ADM is built to completely lock your device so that unknown people cannot access it. So, if your phone is locked by Android Device Manager, you might be in a problem.While ADM is a wonderful tool to lock your phone or erase and wipe data if its stolen or lost, most of the users have reported the issue that they cannot unlock their phones that are locked by Android Device Manager. A possible solution to this is adding a temporary password via Google login and bypassing the ADM lock. Or, you can try resetting the password again by entering a new password via ADM. If that does not work, you can make use of several third-party applications which can be found in the internet, that will help to completely erase the Android Device Manager lock.
So, now you know how to unlock the Android Device Manager lock. Do keep in mind, your device must be connected to internet or Wi-Fi, to login to your Google account.
Part 4: Unlock Android devices with Dr.Fone - Screen Unlock (Android)
As mentioned before, many were unable to unlock their phones with ADM. This is why we use the Dr.Fone - Screen Unlock (Android) . It is hassle-free and easy-to-use; the Dr.Fone toolkit needs to be downloaded on your computer and with a few easy steps, it erases any kind of lock-screen passcode and avoids any kind of data loss as well!
Dr.Fone - Android Lock Screen Removal
Remove 4 Types of Android Screen Lock without Data Loss
- It can remove 4 screen lock types - pattern, PIN, password & fingerprints.
- Only remove the lock screen, no data loss at all.
- No tech knowledge asked, everybody can handle it.
- Work for Samsung Galaxy S/Note/Tab series, and LG G2, G3, G4, etc.
3,224,627 people have downloaded it
This tool works on removing all four types of lock-screen passcodes – PINs, Patterns, Fingerprints, and Passwords. Anyone can use this tool following these easy steps:
You can also use this tool to bypass the locked screen beyond Samsung and LG.Things you should pay attention is that it will remove all the data after finishing unloking on other brand android phone.
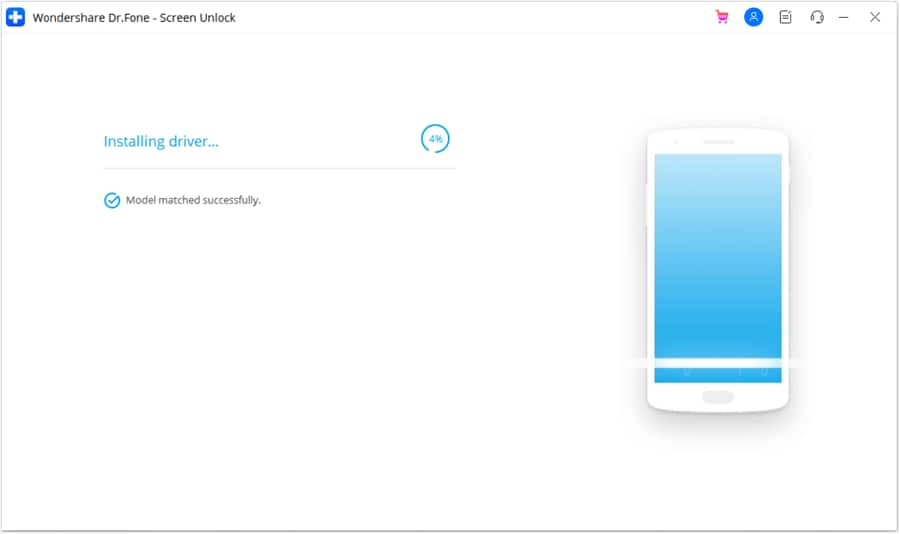
1. Fire up the Dr.Fone toolkit for Android on your computer and select the Screen Unlock among all the other tools.
2. Now, connect your Android device to the computer and select phone model in the list on the program.
3. Boot your phone into Download mode:
- • Power off your Android phone.
- • Press and hold the volume down+the home button + the power button at the same time.
- • Press the volume up button to enter Download Mode.

4. After you get your phone into the Download mode, it will start downloading a recovery package. Wait for this to be completed.
5. When the recovery package download is completed, Dr.Fone toolkit will begin removing the screen lock. This process will not cause any data loss on your Android device, so do not worry. Once the whole procedure is over, you can easily access your Android phone without entering any kind of password. Hurrah!

The Dr.Fone software is currently compatible with Samsung Galaxy S/Note/Tab series, and LG G2/G3/G4 series. For windows, it is compatible with 10/8.1/8/7/XP/Vista.
The Android Device Manager is an excellent initiative taken by Google to give people the chance to not lose any data and regain access to their phones. This also teaches us to take precautions before such unfortunate incidents take place. Phones are probably one of the most important belongings of ours, in which we confide all our private and confidential documents that we wouldn’t want to be meddled with.
So, make use of this guide and get back command over your Android phone.
Also read:
- [New] Mastering Subtitle Integration A Complete Guide for Social Media Platforms for 2024
- [Updated] Boost Your Video Impact Quickly - Learn Effective Techniques for FB Subtitle Creation for 2024
- [Updated] Latest Series Captivating Q&A for Podcast Audience
- Eufy Security Indoor Surveillance Camera S350: An In-Depth Analysis of Its Exceptional Movement Tracking Capabilities
- How to Reset your Nokia XR21 Lock Screen Password
- How to Unlock Poco C65 Pattern Lock if Forgotten? 6 Ways
- In 2024, 7 Ways to Unlock a Locked Oppo K11x Phone
- In 2024, Capturing Moving Images Mirrorless Versus DSLR
- In 2024, Downloading SamFw FRP Tool 3.0 for Realme
- In 2024, How Can We Unlock Our Realme 11 Pro Phone Screen?
- In 2024, How To Change Oppo A78 Lock Screen Clock in Seconds
- In 2024, How to Erase an iPhone 14 Plus without Apple ID?
- In 2024, How to Unlock Apple ID Activation Lock On Apple iPhone XR?
- The Ultimate Guide How to Bypass Swipe Screen to Unlock on Realme Narzo 60x 5G Device
- Windows PXE Boot Server 簡易設置法:實現安全且流程簡化
- Title: Full Tutorial to Bypass Your Realme 12+ 5G Face Lock?
- Author: Aaron
- Created at : 2025-01-07 17:21:09
- Updated at : 2025-01-13 16:12:19
- Link: https://easy-unlock-android.techidaily.com/full-tutorial-to-bypass-your-realme-12plus-5g-face-lock-by-drfone-android/
- License: This work is licensed under CC BY-NC-SA 4.0.