
Full Guide to Unlock Your Poco X5
Full Guide to Unlock Your Poco X5
Yesterday my kid was using YouTube on my Poco X5 to help solve an assignment. However, it wouldn’t take the Poco X5 pattern unlock when I tried opening the phone. Maybe the kid has accidentally changed the lock, but I don’t know what to do. Please help me.
This article is for you if you have been locked out of your Poco phone. Many individuals fail to remember their password or change it accidentally. However, it is not a big deal now. We’ll talk about the best Poco X5 password unlock tool today.
There are multiple ways to unlock your locked Poco device. All the solutions mentioned here are effective and work 99% of the time. However, we suggest you use Dr.Fone. Dr.Fone is expert software to answer all your Android needs. It is safe, secure, and free of data loss.

Part 1: 3 Easy Ways to Remove Your Poco X5 Lock
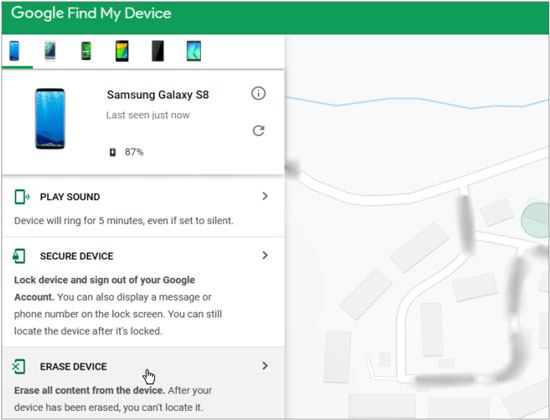
1. Google Find My Device
Google Find My Device is an inbuilt feature in Poco phones to unlock your phone through Google accounts. You can utilize it to unlock the Poco screen lock. However, you need to know that you will lose all your files on the Poco phone after the Poco X5 password unlocks. Therefore, make sure to back up your data before proceeding with the following steps:
- Ensure your locked Poco phone is connected to your Google account and WiFi/Data. Then open the Find My Device site on a PC, and sign in with your phone’s Google account.
- Kindly select your device, and tap the “Erase Device” option.
- Type your Google account credentials once more. Then, click the “Erase” symbol to begin the unlocking system. That will remove the pattern lock from your OPPO, and you can open it without effort.
2. Answer Security Questions
This method is for you if you have set security questions while making your Google ID. By addressing those questions, you can unlock the Poco X5 screen lock. In any case, this way is invalid on some old Android phones.
To unlock this way, you need to press the Forgot Password option. If you can’t see the “Forgot Pattern/Password button on your phone, follow these steps:
- Try unlocking your Poco smartphone with some wrong patterns a few times. Then you will see the “Forgot Pattern” symbol on the screen and tap it.
- Select the “Answer question” option to get to your security questions. Then, at that point, answer each of them correctly.

- It will automatically unlock your device if you answer all questions accurately. Then, it will expect you to set another screen lock for your OPPO. Therefore, keep the new PIN to yourself.

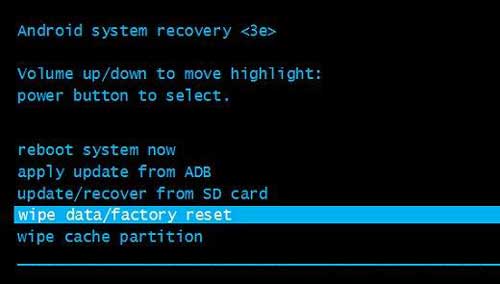
3. Hard Reset
If you wouldn’t worry about losing your user data, you can attempt this unlock method for your Poco X5. You won’t require any account or applications. It requires you to have sufficient battery life. It is simple. So let’s see how it is done.
- Check whether the battery percentage is over half. Then power off your Poco phone by holding the “Side/Power” key for around 10 seconds.
- Press and hold the “Volume Down” and “Side/Power” buttons till the Poco logo appears on display. Then, at that point, your phone is in recovery mode.
- Utilize the volume keys to pick the “Wipe Data/Factory Reset” choice, and press the “Side/Power” button to select it. Then, at that point, pick “Yes” to go on. You can reboot your Poco after the reset is finished, and the lock will be no more.
Part 2: The Efficient Tool for Your Poco X5 Unlock
Dr.Fone - Screen Unlock (Android) offers a wonderful tool that works to unlock Poco devices rapidly. This lock screen remover tool can unlock your phone from every five locks: PIN, passcode, face lock, pattern, or fingerprint in only a couple of basic steps. It works with all the Poco models hassle-free. So, download it right away for a safe unlocking experience. Here’s how you can use it:
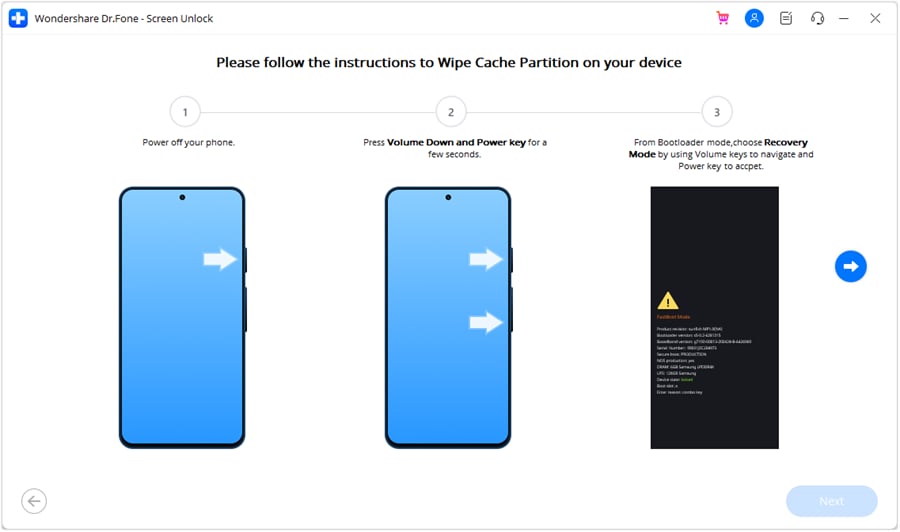
Step 1. Start your hard reset from Dr.Fone
Make your Poco X5 phone connected to the PC through a USB cable. Then, at that point, click “Screen Unlock” > “Android” on the program.
Step 2. Select Unlock Android Screen
When you arrive at this page, please choose the button “Unlock Android Screen”.

Step 3. Select device brand
We’ll offer you a phone brands list, almost all Android devices are here, for example, Samsung, Huawei, OPPO, Vivo, Lenovo, LG, etc. Then Select Poco to continue.

Step 4. Unlock your Poco X5 now
The following steps are the key to unlocking your Poco device. Attention! The unlock process will also wipe your data!
Great! Now the unlocking progress is done, and you can use your phone without entering password.


Bonus Tips: The Importance of Backing Up Your Android Data Regularly
The data loss on your Android phone or tablet can be extremely unpleasant. Subsequently, it’s suggested that you back up your Android phone or tablet consistently. It will keep you from losing your data. As an expert application, Dr.Fone Backup and Restore (Android) can help back up a wide range of data and settings on Android. In the meantime, it lets you review and restore the backup documents to another phone. Here’s how:
- Open the Dr.Fone software on your computer, and connect your phone to the PC through a USB connector and click OK. Then select the “Back up device” option.

- Tap the Backup option to begin the process.

- The process will require some time.
- After it is done, you can see where the backup is stored by clicking on the “View BackupS” option.

Conclusion
All the best Poco X5 password unlock tools are displayed above. They are helpful, dependable and safe to use. However, if you need the easiest tools, you must pick the Android Screen Unlock program. In this case, the Dr.Fone - Screen Unlock (Android) can unlock your Poco phone without any issue. Therefore, we strongly suggest you use Dr.Fone for backup and unlock your device.
How to Reset Gmail Password on Poco X5 Devices
Nowadays, along with Windows or Apple devices, Android devices are starting to take its place as one of the most popular, reliable, and efficient technical equipment brands. As a result, the use of Android as an operating system for both PC and portable tools is becoming an extremely hot trend.
Android devices pride themselves on providing their customers with the best features possible. Not only do they support offline features, but Android devices are also capable of offering users with several services online. One of them is the ability to make use of Gmail - a very famous email site nowadays.
Gmail being used directly by an Android tool is a great advantage, but it still contains some small drawbacks that users may have to go through. According to a recent survey, the majority of Android users were likely to wonder if they were able to reset Gmail password on Android devices.
Luckily for you, this performance is possible. In this article, a very informative and detailed description will be delivered to you to help you solve the problem of resetting your Gmail password.
Part 1: Reset Gmail Password When you Forget it
There will be times when you come into the situation of not knowing what your Gmail password is, or you just simply forget it. You want to change your password but you don’t have access to a computer or laptop to perform this task. Now with the help of Android, you can do it through your own Android devices.
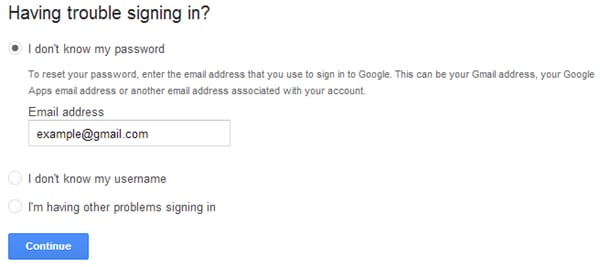
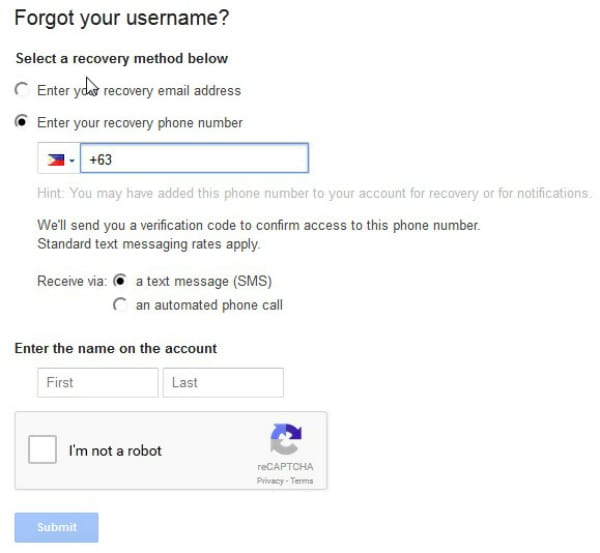
Step 1: Visit the Gmail login page from your Android device. Click on the Need helpline, which is highlighted in blue.

Step 2: After that, you will be moved to the Google Account Recovery page. There will be 3 main options which indicate 3 frequent problems. Select the first one, which is entitled “I don’t know my password”. Once you have chosen it, you will be required to fill in your Gmail address in the bar provided. Click on the Continue button as long as you have made sure to finish all these tasks.
Step 3: In this step, you may be asked to fill in a CAPCHA form. Just simply do it and move to the next page. There you had better type in the last password that you are still able to recall if possible, then click on the Continue button to move. Or else, you can skip this step by clicking on I don’t know button.

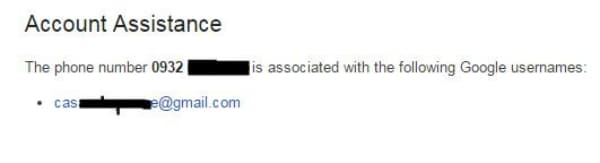
Step 4: Finally, you will be shown a list of options on how to reset your Gmail password on Android devices. You can either use your alternative email address or your phone number to receive a verification code. Bear in mind to fill in any required information and put a check in the CAPCHA box to submit the process.
Step 5: In this step, a blank bar will appear and it will demand you to type in your verification code. Just do it carefully to make sure there is no error. Once you have done it, a new screen will appear to tell you.


Step 6: After you have done all the previous steps, you will know how to reset your Gmail password directly from your Android device.
Part 2: Change Gmail Password When You Still Know it
Besides not knowing your password, there are still circumstances when you wish to change your current password for various reasons. Just simply follow these steps.
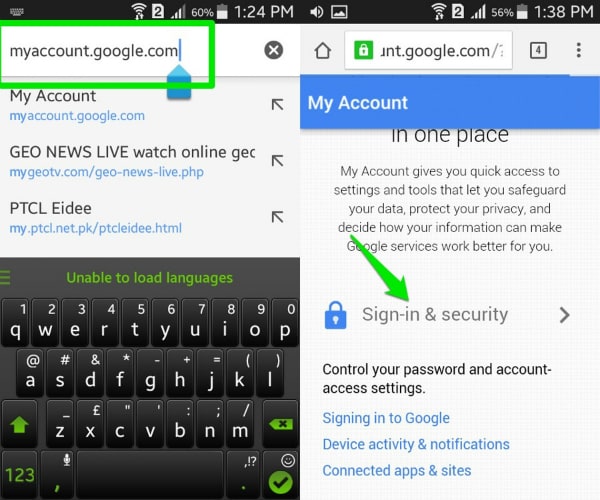
Step 1: Make sure your Android device is connected with the Internet. Then get access to the link myaccount.google.com. After logging into your account (or maybe you have already done this), scroll down, find the Sign-in and security option and choose it.
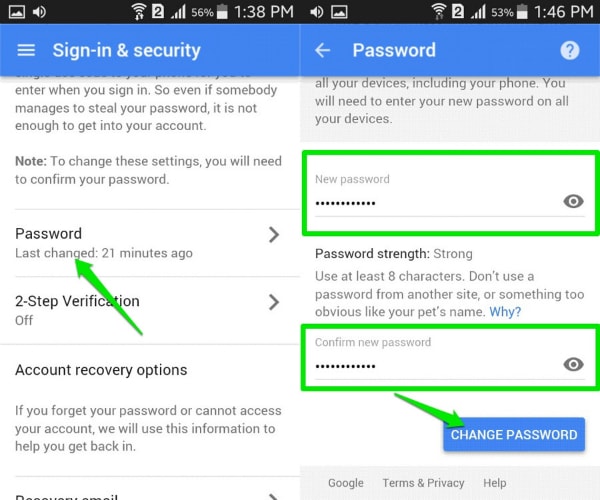
Step 2: Find the Password option in the list. Tap on it to be moved to another screen. In the menu, type in your new password that you wish to exchange, confirm it and then click on the Change password button.
Part 3: Bonus Tips
Gmail is undoubtedly a marvelous tool to use on Android devices, but have you really understood all the tips and tricks to take the best advantage of it? Below are the 5 most helpful tips that we want to offer you.
- Far from your imagination, Gmail on Android devices is capable of allowing you to make use of several accounts at the same time, even if it’s not a Gmail account. This performance not only helps you to organize your work better, but it also increase the efficiency of your job. Just simply log in your Gmail account on Gmail app, click on the down arrow which is placed next to your avatar and name, then choose Add account. You will be moved to another page, choose Personal (IMAP/POP) choice and follow the detailed guide on the screen.
- If your Android device is used by only one user, and you are guaranteed about the security of it, try to keep the Gmail logged in. It would help you to avoid wasting unnecessary time to sign in your account every time you need, not to mention that it prevent you from being confused of not knowing your account/password.
- You are capable of sorting your mails with a certain level of accuracy once you are fully aware of the features of Gmail app on Android devices. Just click on the email, then choose Settings menu and mark it as “Mark as not important”, “Mark important” or “Report to spam” owing to the priority of your email.
- Gmail app provided you with the ability to have conversations online, and whenever a message comes, there will be a sound. In case you are in a vital conference, or you don’t want to be disturbed by the noise, you can mute it. All you have to do is to tap into the conversation, choose the three dots icon then click on the Mute option in the menu.
- Enhance the speed and the accuracy of your search with the use of certain phrases. Let’s take an instance to see what Gmail can do for you in this case. If you want to search for the mails which have been sent by a certain person, typefrom:(name of the person on Gmail) in the searching bar. And in case you would love to look for a private message from that person, please type is:chat:(name of the person on Gmail) .
Part 4: Video on How to Reset Gmail Password on Android Devices
How To Fix OEM Unlock Missing on Poco X5?
Original Equipment Manufacturer (OEM) Unlock is a function on Android devices. It allows you to unlock your phone bootloader. A bootloader or bootstrap loader gathers the operating system files, loads them into memory, and hands over control, essentially starting your device. Unlocking the bootloader assists you in installing custom ROMs, flashing custom kernels, and rooting your phone.
However, this freedom comes with some trade-offs. Most manufacturers will void your warranty if you unlock the bootloader, and it can also make your phone face higher risks of malware and other security threats. Additionally, it can be difficult to relock the bootloader once you unlock it.
If you encounter the OEM unlock missing on your Android phone despite wanting to unlock your bootloader, this article can help. You will learn the step-by-step guide for the different methods to fix the missing OEM unlock option. Before diving into solutions, let’s explore why this option might be unavailable in the first place.

Part 1: Why Is OEM Unlock Missing on Your Device?
Finding that OEM Unlock is missing on your Android phones can be frustrating, particularly if you plan to modify your software or install a custom ROM. But don’t worry. There are several possible explanations for this. Let’s explore some of the most common reasons:
Manufacturer Restrictions
The Missing OEM Unlock option can often be due to restrictions imposed by your device’s manufacturers. They may intentionally remove this option to safeguard device security and compatibility. It is common with carrier-locked devices. As a result, the OEM Unlock option may not show.
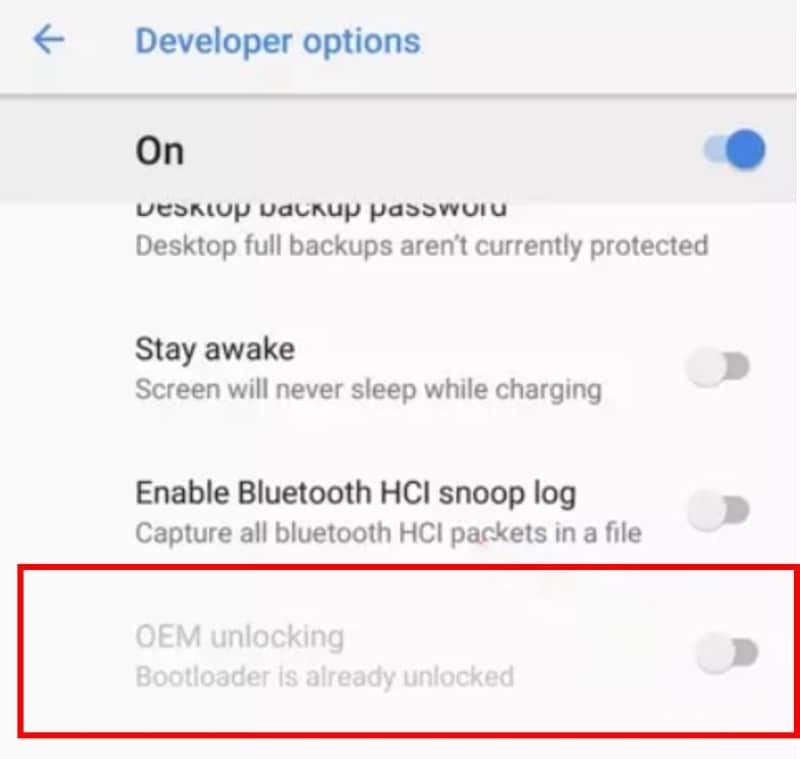
Bootloader Already Unlocked
In some cases, the Android OEM Unlock Missing issue arises when the bootloader has already been unlocked. Relocking the bootloader might make the option reappear. But exercise caution as this process can erase device data.
Developer Options Not Enabled
It might seem obvious, but sometimes the simplest things get overlooked. The OEM Unlock option can only be accessed from within Developer Options. If this menu isn’t enabled, you won’t see it.
Carrier-Locked Devices
The OEM Unlock Missing issue can also occur if your device is carrier-locked. Carriers often impose restrictions to prevent users from switching networks, and bootloader unlocking is one way to do that. Unfortunately, the missing OEM Unlock option is usually intentional, and unlocking your device can be more complicated.
Security Features
Enhanced security features, like Samsung’s KNOX, can sometimes conceal the OEM Unlock option. Temporarily turning off these features might show the option, but it’s crucial to be aware of the potential security implications of doing so.
Corrupted Bootloader
A corrupted bootloader can also lead to the Android OEM Unlock missing problem. The bootloader plays a role in the boot process, and if it’s damaged, it might not display the necessary options. This can be caused by software glitches, failed flashing attempts, or even hardware issues. In this scenario, you might need to consult your device’s manufacturer or a technical specialist to help repair or re-flash the bootloader.
Connectivity Issues
A poor connection between your device and computer can also prevent the OEM Unlocking from showing up. Check your cables and try using different USB ports to ensure a stable connection.
Part 2: How To Enable Missing OEM Unlock Without a Password?
Unlocking your phone’s bootloader (OEM Unlock) varies across models and brands. Some need a passcode or PIN after rebooting the phone, while others don’t. Even if your phone doesn’t require a separate password, your existing screen lock (password, PIN, pattern) will usually be needed to enable the missing OEM unlock option.
But what if you forgot that, too? Wondershare Dr.Fone - Screen Unlock can help bypass forgotten passwords and unlock your phone even if you don’t have the technical knowledge. Here’s a quick breakdown of its key features in this area:
- Success Rate
High success rate for bypassing various lock screen types, including PIN code, pattern lock, passwords, and fingerprints.
- Ease of Use
Provides a concise and intuitive interface that guides users with clear instructions and on-screen prompts.
- Comprehensive Features
Dr.Fone - Screen Unlock tool can remove the Android phone lock screen without resetting your Samsung or LG device. It can also help you bypass Google Factory Reset Protection (FRP) on mainstream Android brands.
- Extensive Device Compatibility
Aside from Samsung and LG, it covers a wide range of popular Android brands like Vivo, Huawei, Xiaomi, Oppo, etc.
Regain control in minutes with Dr.Fone. First, download the app to your desktop and install it. Once it’s up and running, launch Dr.Fone and prepare to unlock your device with ease. You’ll find detailed instructions below – even if you don’t know your phone’s lock screen, Dr.Fone has you covered.
- Step 1: Select Screen Unlock from the Toolbox homepage. Then, establish a connection between your locked Android device and your computer using a USB cable.

- Step 2: Specify the Poco X5 device type for screen lock removal.

- Step 3: Select Unlock Android Screen to proceed.
- Step 4: Choose the brand of your phone from the supported brands.
Note:
The following steps will vary based on your device’s manufacturer. Please refer to the instructions on your screen to proceed into Download or Recovery mode.
- Step 5: The screen unlock process is underway. If it encounters trouble, click Try Again. Once Dr.Fone successfully unlocks your Android device, tap Done.
Now that you’ve regained access to your device thanks to Dr.Fone - Screen Unlock, you can move forward with enabling the OEM unlock missing option. Next up, we’ll guide you through the steps in several ways. Let’s start with the Developer options.
Part 3: How To Enable OEM Unlock Missing From the Developer Options?
Developer Options, a hidden menu in Android, offers advanced features like app debugging and custom ROM installation. But if the Android OEM unlock option is missing, you can’t unlock your device’s bootloader. Below is a step-by-step guide for you so the OEM unlock missing option will show in the Developer Options. Remember, this process may erase your device data, so a complete backup is essential before proceeding.
- Step 1: Open the Settings app on your Android phone.
- Step 2: Navigate to About Phone at the bottom of the list, then tap Software information.

- Step 3: Tap on the Build number repeatedly (7 times) until you see a message saying, “You are now a developer!“ or similar.
- Step 4: Go back to Settings > System and find the Developer options menu.
- Step 5: Scroll down and tap the toggle switch next to Enable OEM Unlock to turn it on.

- Step 6: A warning message explaining the risks of turning on the OEM unlock will appear. Read it carefully and tap Enable if you want to proceed.

- Step 7: Enter your PIN or password to confirm the unlock when prompted
- Step 8: Your device will reboot, and OEM Unlocking will be enabled.
Part 4: How To Fix OEM Unlock Missing by Adjusting Date and Time?
Some manufacturers intentionally delay the availability of the OEM unlock after a software update for security reasons. Changing the date to a past date before the update rolled out can trick the system into displaying the option, as it thinks the update hasn’t happened yet. It is a temporary fix, and the option will likely disappear again later when the Poco X5 device automatically syncs the correct date.
If you intend to try this method, follow these steps to enable OEM unlock missing or greyed out after an Android update:
- Step 1: Open the Settings app.
- Step 2: Go to System or General management, depending on your Android version.
- Step 3: Tap on Date and Time.
- Step 4: Turn off Automatic date and time.

- Step 5: Tap on Set date and choose the desired older date from the calendar.
- Step 6: Tap on Set time and choose the desired time from the clock.
- Step 7: Tap on Done to save the changes.
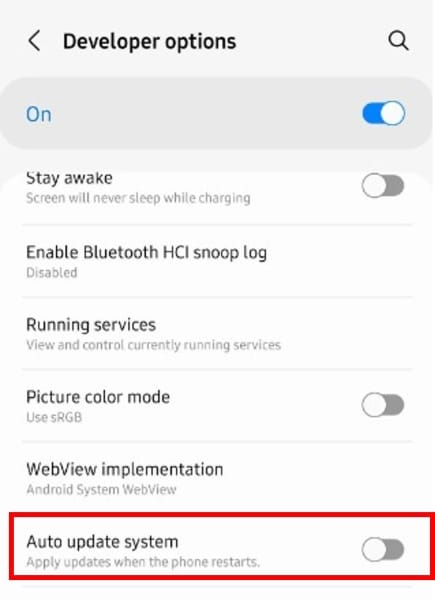
- Step 8: Go back to the Developers options and turn off the Auto update system option.
- Step 9: Go to Settings > Software update, then turn off Auto download over Wi-Fi.

This method should enable the OEM unlock missing issue. Otherwise, proceed to the next section for another solution.
Part 5: How To Fix OEM Unlock Missing by Removing SIM Card?
Certain carriers restrict bootloader unlocking on their devices to ensure compatibility and prevent unauthorized modifications. For these phones, unlocking the SIM card becomes crucial before you can toggle the OEM unlock option. Here are the steps to fix the OEM Unlock missing or greyed out using SIM card removal:
- Step 1: Use the SIM ejector tool (often included with your phone) or a small pin to push the tray out.
- Step 2: Go to Settings > General Management > Reset, then select Factory data reset. Enter your PIN or password if needed.

- Step 3: Review the warning and tap Reset to confirm.
- Step 4: Once the reset is complete, your phone will restart. Connect to Wi-Fi when prompted.
- Step 5: Skip any prompts to log in to your Google or email account. Then, repeat the process to open the Developer Options in the previous sections.
Conclusion
Having the OEM Unlock missing or greyed out can leave Android users feeling locked out of customization possibilities. Fortunately, this article has outlined helpful solutions like enabling the Android OEM Unlock missing option via the Developer Options. You can also try other methods above, like adjusting date and time settings or even a sim card removal trick. For those facing forgotten lock screens, we’ve offered guidance on bypassing them using the Dr.Fone - Screen Unlock tool to access the necessary phone settings.
While these methods provide a solid foundation, it’s always wise to research steps specific to your phone model. And never forget – caution is key. If things get technical, don’t hesitate to seek help from online communities or professional repair services.
Tips: Forget your device password and can’t get access to it? No worries as Dr.Fone is here to help you. Download it and start a seamless unlock experience!
- Title: Full Guide to Unlock Your Poco X5
- Author: Aaron
- Created at : 2024-07-15 20:04:29
- Updated at : 2024-07-16 20:04:29
- Link: https://easy-unlock-android.techidaily.com/full-guide-to-unlock-your-poco-x5-by-drfone-android/
- License: This work is licensed under CC BY-NC-SA 4.0.