Downloading SamFw FRP Tool 3.0 for Nokia C32
Downloading SamFw FRP Tool 3.0 for Nokia C32
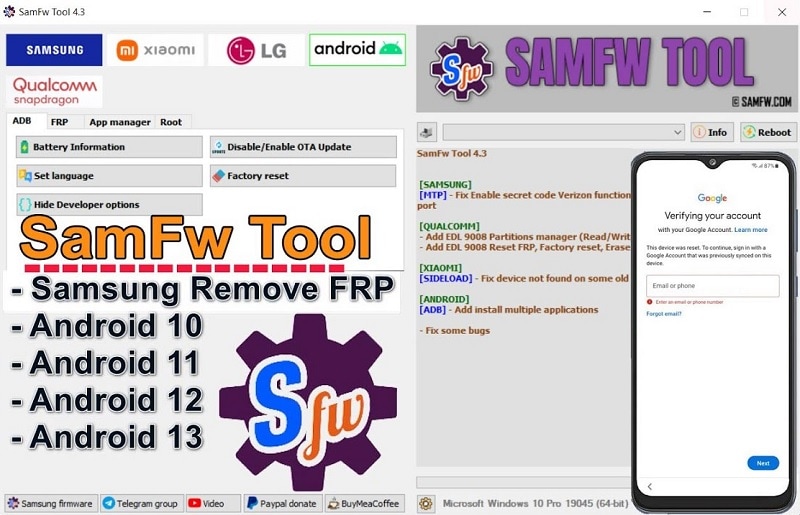
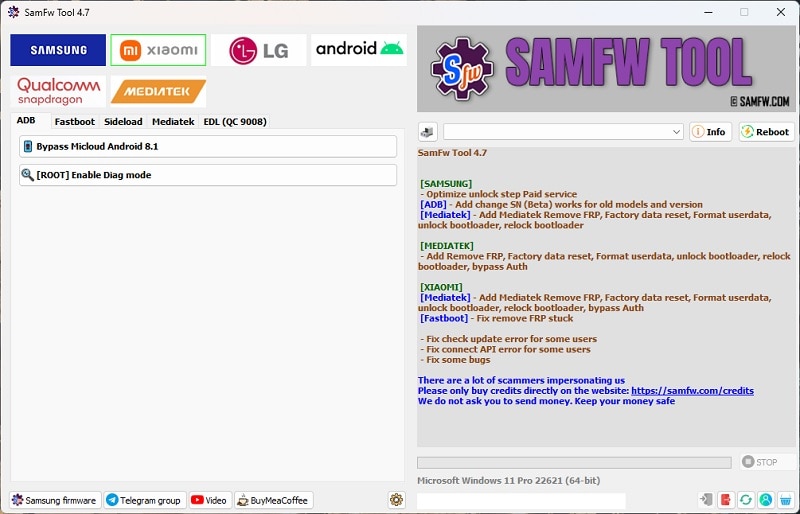
FRP (Factory Reset Protection) is a security feature for Android devices to prevent unauthorized access after a factory reset. SamFw FRP Tool is a popular solution for bypassing FRP on Samsung devices. Downloading the tool is crucial for users locked out of their devices.
The page discusses and evaluates its effectiveness with a comprehensive review. After that, you’ll see considering another option is wise, and the article will also recommend an alternative. Stay tuned for our insights. For now, you can download the SamFw FRP Tool for free and explore its features. Read on to learn more.

Part 1. A Detailed Introduction of SamFw FRP Tool
For many Samsung users, encountering a Google FRP lock can be a frustrating experience. A user recently reached out, saying:
“I’m facing a Google FRP lock issue on my recently acquired Samsung Galaxy S23 from eBay. Has anyone successfully used SamFw to bypass FRP without the previous owner’s account credentials?”
SamFw FRP Tool is designed to unlock Samsung devices afflicted by Google FRP locks. The tool aims to provide a solution for bypassing FRP without the previous owner’s credentials. It is beneficial for their Samsung devices to be locked out due to a factory reset.
Key Features of SamFw FRP Tool
Explore the essential features of the SamFw FRP Tool. Learn its key features for efficient Android device security solutions.
- Unlock Samsung without data loss
SamFw FRP Tool can unlock Samsung devices without causing any data loss during the process. It ensures that your personal information and files remain intact.
- Remove various Android locks
The tool can also remove other Android security measures. It can bypass pins, passwords, facial IDs, patterns, and fingerprints.
- Wide compatibility
SamFw FRP Tool supports a broad range of Android versions. It’s compatible with Android 5 to the latest Android 13.
- User-friendly FRP bypass
SamFw FRP Tool offers a straightforward solution to remove Google FRP locks. Its intuitive interface makes the process accessible for beginners.
How To Use SameFw FRP Tool
Here’s a comprehensive guide to help you bypass FRP using the Sam FRP bypass tool.
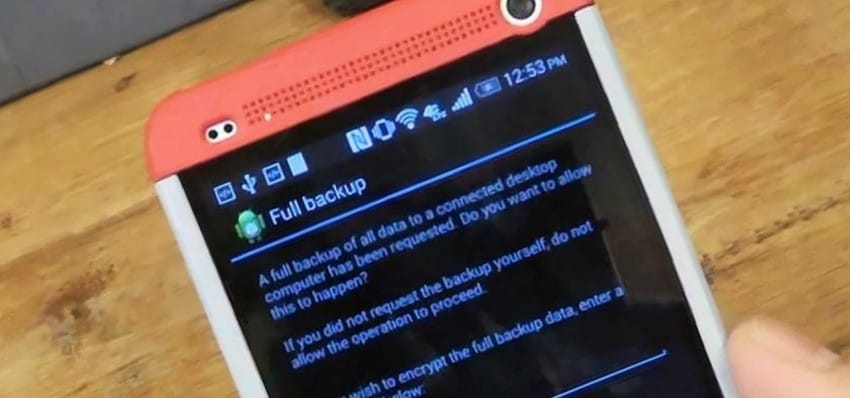
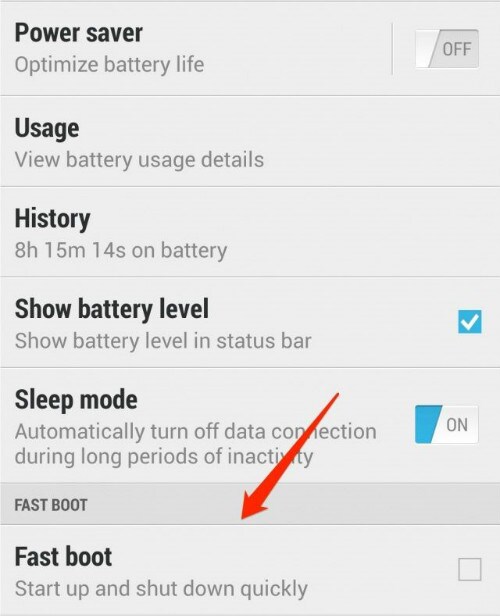
- Step 1: Download the SamFw FRP tool on your computer. Install the app and launch it afterward. Connect your Samsung to your computer.
- Step 2: Choose your device’s brand and click the Remove FRP button. Your phone screen will then display a notification requesting USB debugging permission. Tap OK to proceed.

- Step 3: Allow the process to complete. Upon completion, your device will automatically reboot as part of the FRP removal process. The reboot signals that the process bypassed the FRP lock. Close the pop-up and enjoy unrestricted access to your device.

Note
It’s important to note that the _SamFw FRP Tool_ is only compatible with Windows OS. Users with Mac or Linux systems may need to explore alternative solutions for FRP bypass.
If you’re seeking a reliable and flexible alternative to the SamFw FRP tool, Wondershare Dr.Fone - Screen Unlock (Android) is the best choice. Its proven track record and various compatibilities offer a seamless solution for Android devices. In addition, it makes it easy to work on FRP lock without a PIN or Google Account. Let’s explore further below.
Part 2. Best SamFW FRP Tool Alternative: Wondershare Dr.Fone
Wondershare Dr.Fone - Screen Unlock (Android) is the go-to choice for many users seeking efficient FRP bypass methods. The app is available for Windows, Mac, and Linux, adding to its versatility. Here are some reasons why it’s the best alternative to the SamFw FRP Tool.

- Versatile lock screen removal. Dr.Fone excels in removing various Android lock screen types. It offers a comprehensive solution for users facing different security challenges.
- Pin and Google Account bypass. The tool bypasses FRP without the need for a PIN or Google Account. It provides a hassle-free experience for users.
- Fast unlock process. Dr.Fone ensures a swift unlocking process. With the ability to remove the lock screen within less than 5 minutes, it minimizes inconvenience.
- Extensive device compatibility. Supporting over 2000+ Android models, Dr.Fone Screen Unlock - Android boasts extensive compatibility. It’s a versatile and reliable choice for users with various devices.
How To Bypass FRP With Dr.Fone - Screen Unlock (Android)
Dr.Fone - Screen Unlock (Android) is the ultimate alternative to the SamFw FRP Tool. Follow the steps outlined to bypass FRP without complications using the platform.
- Step 1: Download and install Dr.Fone - Screen Unlock (Android) on your computer. Launch the program, and select Toolbox > Screen Unlock from the main menu. Click Android as the Nokia C32 device type to continue.

- Step 2: Connect your Android device to the computer using a USB cable. Choose the Remove Google FRP Lock option.

- Step 3: Choose your Android device type and click Start to proceed to the next window. Afterward, choose All Android versions (One-Click Removal) if you don’t know the OS version of your phone. Click the Start button again to continue.

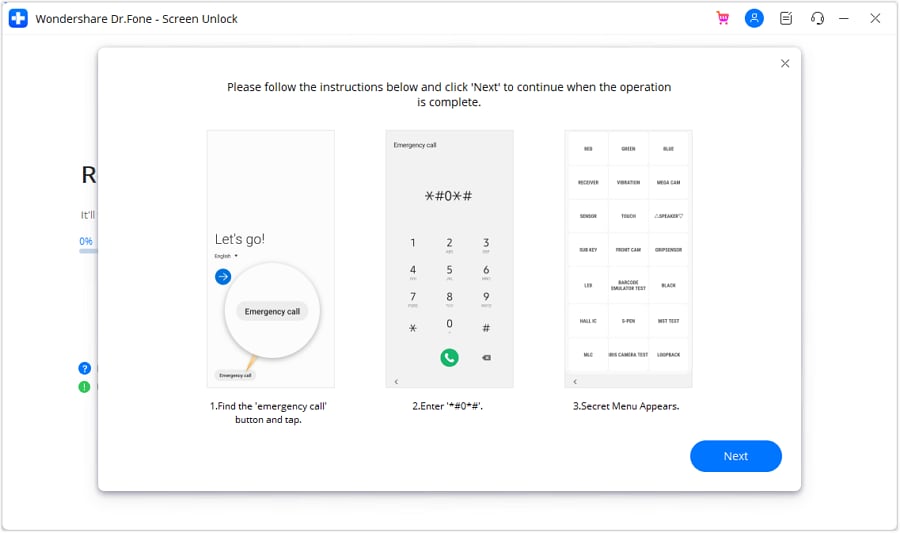
- Step 4: Next**,** follow the on-screen instructions. Locate the Emergency Call button on your Android and tap it. Dial “*#0*#” for a secret menu. Click Next in the app. Your Android will prompt the USB debugging option. Tap Allow on your phone, then click Authorized on your computer.
- Step 5: Dr.Fone will confirm the removal of the FRP locks from your Android device. After successful removal, the prompt window indicates completion. Click Done upon successful execution. If issues persist, retry the process with the Try Again option.

Part 3. Side-by-Side Comparison Between SamFw Tool and Dr.Fone
Choosing between SamFw Tool and Dr.Fone - Screen Unlock (Android) shouldn’t be hard. Here’s a concise side-by-side comparison evaluating their ease of use, speed, compatibility, features, and more.
| SamFw FRP Tool | Wondershare Dr.Fone | |
|---|---|---|
| Ease of Use | User-friendly interface, suitable for beginners | Intuitive design, making it accessible for all users |
| Unlock Speed | Efficient FRP bypass speed varies by device | Swift unlocking process, often under 5 minutes |
| Compatibility | Windows-only, limited OS compatibility | Wide compatibility with Windows and Mac, extensive Android device support |
| FRP Bypass Capability | Effective FRP removal, especially for Samsung devices | Bypasses FRP without a PIN or Google Account, versatile lock screen removal |
| Additional Features | Removes various Android lock screen types | Pin and Google Account bypass, extensive device compatibility |
Read More About FRP Bypass:
Top 5 Huawei Bypass FRP Tools for PC That Actually Work
Bypass FRP OPPO All Series like a Pro With/Without PC
Ways to Remove FRP Lock on Motorola Phones without a PC
Conclusion
SamFw FRP Tool is a viable option for users with FRP lock issues, particularly on Samsung devices. Its interface and effectiveness in removing FRP are noteworthy features. However, limitations arise with its Windows-only compatibility, which may impact user experience.
In comparison, Dr.Fone - Screen Unlock (Android) is a great alternative. Its design, fast unlocking process, and compatibility make it a versatile and reliable choice. The tool’s ability to bypass FRP without a PIN or Google Account adds to its appeal. Test both apps to see which one works best for your needs.
Tips: Forget your device password and can’t get access to it? No worries as Dr.Fone is here to help you. Download it and start a seamless unlock experience!
How to Unlock Nokia C32 Bootloader Easily
Do you want to unleash the true power of your smart phone? Do you wish to have complete control over your smart phone? If yes, well, here is the answer; unlock bootloader. For people who are already into the tricks of hacking and rooting smart phones, might be aware of this. But still, there are exciting new developments. Bootloader is a code existing in all operating systems which usually comes pre-locked. So, it is important, if you wish to have a custom ROM installed on the Nokia C32 device, or if you wish to have other controls like installing applications which are incompatible, to have the Nokia C32 device bootloader unlocked. But going through with the process of unlocking bootloader and rooting the Nokia C32 device will not help and rather might break the warranty of the Nokia C32 device. This definitely calls for a diligent watch on how to unlock HTC bootloader. So, it is imperative as a user to know the process of HTC bootloader unlock. This article serves you with some ways you could follow to unleash the true power of your HTC device. Here’s how you can do it.
## Part 1: Why We Want to Unlock HTC BootloaderFor people with HTC device, unlocking bootloader would mean complete authority over the smart phone and you have all the power to control the HTC device by all means. Since, bootloader usually comes pre-locked, unlocking the bootloader is the initial step if you would like to have a custom ROM installed in your device. There are various advantages of HTC unlock starting from gaining rights of control to installing latest custom ROMs in the phone and installing incompatible applications. Moreover, HTC unlock bootloader could boost the Nokia C32 device speed and battery life and also help in making complete backups of the Nokia C32 device. You could also have controls to remove bloatware from the HTC device. So, all in all, while there could be certain side effects, if not done properly, there are various advantages of unlocking HTC bootloader. If the process is carried out properly, the Android device could be the perfect smart phone you would like to have.
Part 2: How to Unlock Nokia C32 Bootloader
Nokia C32 is the flagship device of HTC by all means. With a world of features and offerings, Nokia C32 truly is a beast. While the phone is very powerful without any modifications, the true potential is yet to be seen and that can only be done if the bootloader is unlocked. So, to have a complete control over the Nokia C32 device, it is important to unlock the bootloader and the process has to be carried out diligently. One of the initial things that needs to be ensured is that the Nokia C32 device is fully charged or atleast 80% mark. Make sure you have the fastboot drivers for the Nokia C32 device configured on the windows machine and the Android SDK. Here are some of the steps which can be followed to unlock bootloader.
Step 1: It is always very important to keep the phone data backed up and more so when you are planning to unlock the bootloader.
As one of the initial measures, backup the Nokia C32 device completely as bootloader unlocking process will wipe all the data off. So, backup all the data like photos, contacts, multimedia files, documents, etc.
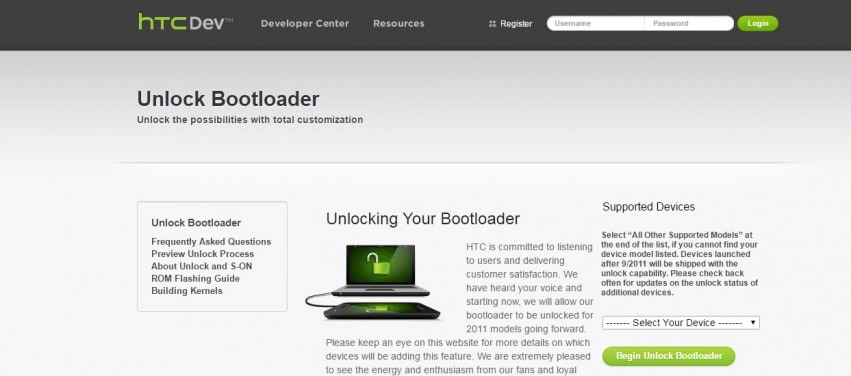
Step 2: Go to htcdev.com/bootloader. Ensure that you are registered with HTC and once the sign up is done, log in to HTC dev.
Now, ensure that HTC Sync Manager is installed on the PC.
Step 3: From the bootloader page, select your device using the drop down option as shown in the picture below.
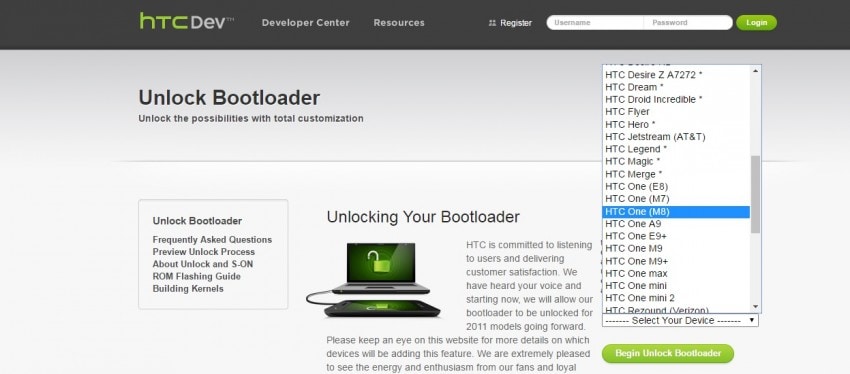
After selecting the Nokia C32 device, click on “Begin Unlock Bootloader”, and then confirm all the dialogue boxes which come your way on screen.
Step 4: Now, you will be presented with four steps to put the Nokia C32 device in bootloader mode. Disconnect the Nokia C32 device from the PC and turn the Nokia C32 device off completely. Press the volume down button along with the power button to switch the Nokia C32 device on in bootloader mode.
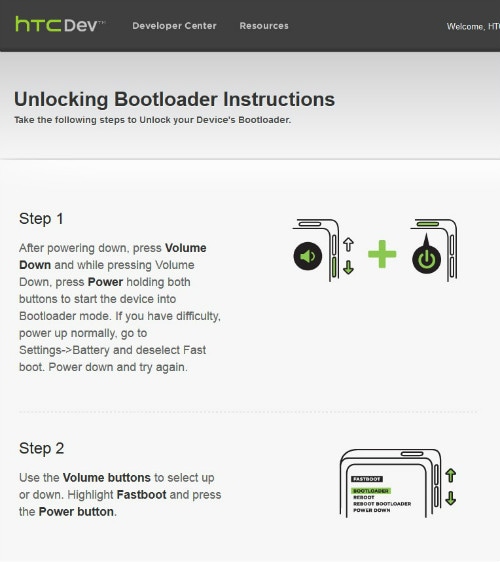
Step 5: Use the volume keys of the Nokia C32 device to select Fastboot option along with pressing power button to confirm, after the Nokia C32 device is in bootloader mode. Now, connect the Nokia C32 device to the computer using a USB cable.
Step 6: Go to Fastboot folder on the PC and holding down the shift key, click on any empty space followed by a click on “Open command window here”.
Step 7: In the command prompt window, type “fastboot devices” and press enter. Nokia C32 will show up in the command prompt.
Note: The drivers have to be installed correctly to see the Nokia C32 device in the command prompt. So, if the Nokia C32 device does not show up, reinstall HTC Sync Manager and try again after restarting the computer.
Step 8: On HTC Dev’s website third page, click on “proceed to Step 9”. Follow the steps listed and then click on submit. The unlock token code for the Nokia C32 device will be mailed by HTC. Download the token and name it “Unlock_code.bin” and place the token in the fastboot folder.
Step 9: Now, in the command prompt window, type the following:
fastboot flash unlocktoken Unlock_code.bin
Step 10: On the Nokia C32 , one message will appear asking if you want to unlock the Nokia C32 device bootloader.
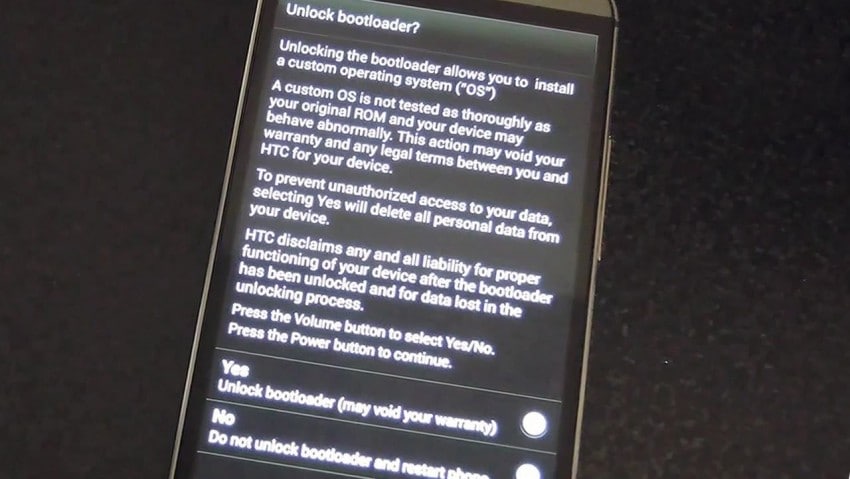
Use volume keys to select and power button to confirm. Once this is done, the Nokia C32 device will restart once and it’s done. The device is now bootloader unlocked.
How to Change Lock Screen Wallpaper on Nokia C32
Every smartphone user wants their lock screen wallpapers to be the finest quality. Since the Nokia C32 device comes with a generic lock screen wallpaper on itself, changing it is necessary. Regardless of your Android device, the need to change the lock screen wallpaper on Android is significant. If so, the article will provide two diverse techniques familiar to any Android device.
Along with the basic methods, the article will redirect its discussion to changing the lock screen wallpaper for different brands. Find more about how to change the lock screen wallpaper on Android with the available methods and techniques to bring aesthetics to your device.
Part 1: How To Change Lock Screen Picture on Android Phone With 2 Common Methods
Every Android smartphone has its interface to follow while changing the lock screen wallpaper or screen saver of the Nokia C32 device. However, before we dive into the Nokia C32 device-specific details, let’s dissect the two common methods to change the lock screen wallpaper on Android:
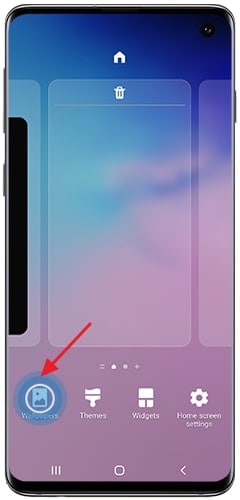
Method 1: Pressing Home Screen Method
The first thing to try for changing the lock screen wallpaper includes the long press technique. This technique is available for almost all Android devices, a basic approach to changing lock screen wallpapers. To know how it is done, follow the steps provided below:
Step 1: As you unlock your Android smartphone, press the clear region until the home-screen options appear on the front.
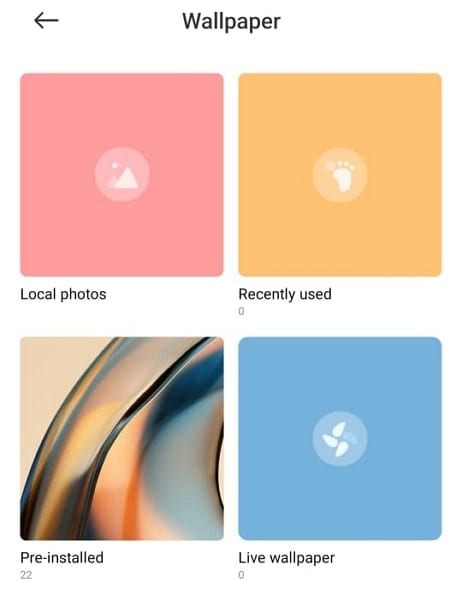
Step 2: Select the “Wallpaper” option in the available buttons to lead to another window showing different wallpapers.

Step 3: Out of all the wallpapers, select any of them and tap on the “Apply” button to set it as your lock screen wallpaper.
Method 2: Using Your Gallery
You can also set your favorite picture as the Android lock screen wallpaper from the settings provided in your gallery. To know how you can utilize your device’s Gallery, look into the steps provided next:
Step 1: Access the menu of your Android device and locate the “Gallery” app in the available options. Continue to locate your respective photo in the “Albums.”

Image name: lock-screen-wallpaper-on-android-3.jpg
Image alt: access the gallery
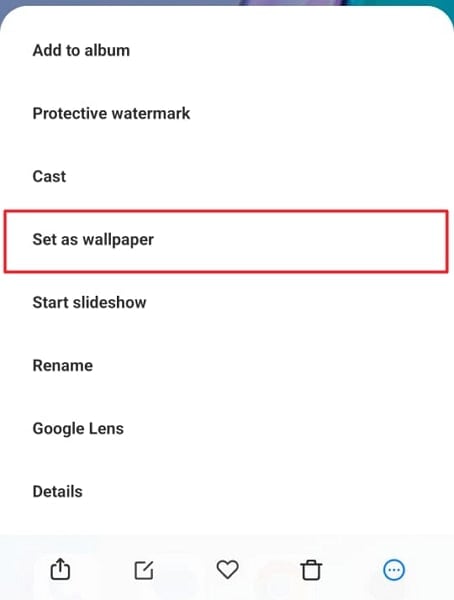
Step 2: Choose and open the image on the screen, and continue to select the “Three-Dotted” icon on the bottom-right of the screen.

Step 3: On selecting the option of “Set as wallpaper,” you will apply the particular image from the Gallery as your lock screen wallpaper.
Part 2: How to Change Lock Screen Wallpaper on Different Brands of Android Phones
The provided methods in the above part are comprehensive in changing the lock screen wallpaper of any Android smartphone. This, however, is not the same and is true for every Android device in the market. Since the difference in operation brings a clash for many users, the need for an idea for different smartphone brands is essential.
For this part, we will bring a guide explaining how to change the lock screen wallpaper on Android of different brands:
For Samsung Users
Step 1: On unlocking your Samsung, hold the empty space on your home screen to open a set of options. Select “Wallpapers” from the available list and continue to the next screen.
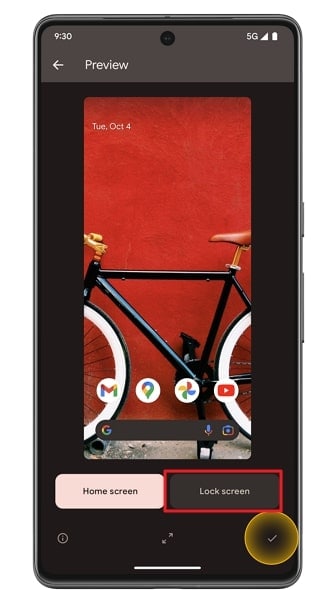
Step 2: Choose the option of “My wallpapers” or “Gallery” from the available list and select the wallpaper of your choice. As you select one, you will have to set it as your “Home screen,” “Lock screen,” or wallpaper for both screens.
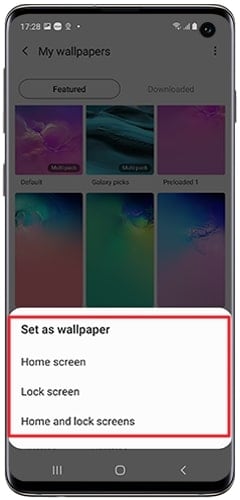
Step 3: Once you observe the image on the preview window, tap on the button on the bottom to set it as your lock screen wallpaper.

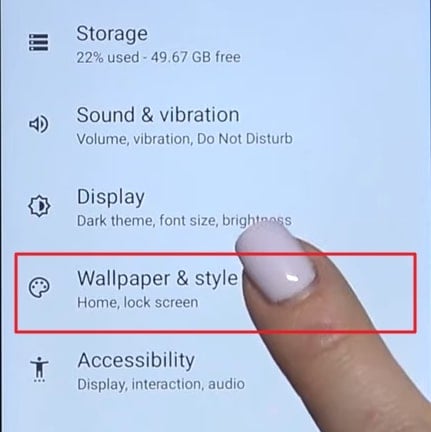
Step 1: As you access the home screen of your Google Pixel, continue to hold the space. This will open a list of options where you must tap on “Wallpaper & style.” Continue to select the “Change wallpaper” option to bring new colors to your Google Pixel.
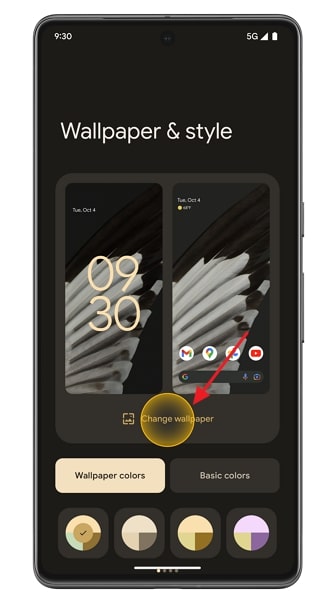
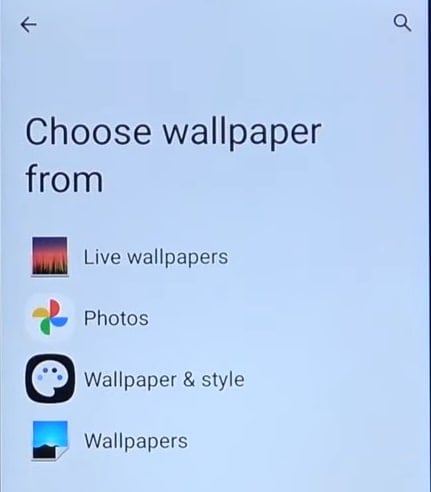
Step 2: On the next screen, select any particular category you want to set the lock screen wallpaper. For instance, if you selected “My photos,” choose your image and preview it on the following screen.
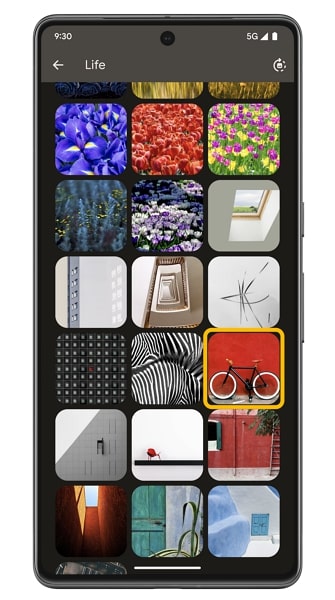
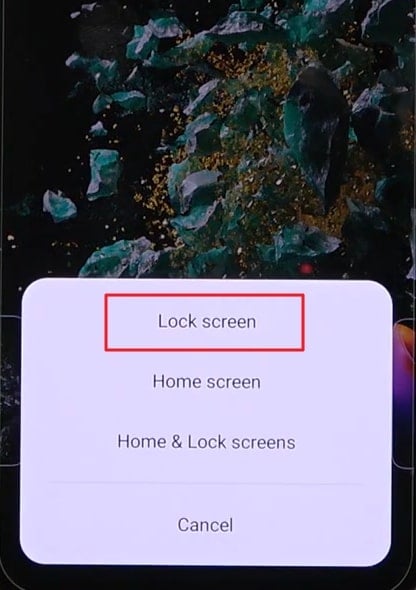
Step 3: To proceed, specify where you wish to set it as your wallpaper. As the options appear on the front, select the “Lock screen” option and continue to set your wallpaper.
For Motorola Users
Step 1: Lead into the “Settings” of your Motorola device and look for the “Wallpaper & style” option in the list.
Step 2: Select any options appearing on the next screen that defines the location from where you will add the new wallpaper. Selecting a particular wallpaper from the available options leads to the “Preview” screen.
Step 3: Continue to select the “Lock Screen” option on the preview screen and tap on the “Tick” icon at the bottom. To confirm, tap “Lock screen” to change the wallpaper on the lock screen of your Motorola.

Step 1: Launch the “Settings” application on your OnePlus smartphone and continue to the “Personalizations” option.

Step 2: On the next screen, continue to the “Wallpapers” section and go through the available media to select a new wallpaper.

Step 3: As you select a particular wallpaper and continue to the preview screen, select the “Apply” button and proceed to choose “Lock Screen” from the pop-up menu.
Part 3: Top 10 Download Sites About Cool Screen Wallpaper on Android
What if you feel that you do not have the coolest screen wallpaper that you can change on your Android device? Before changing your Android lock screen wallpaper on your device, find a unique option that can be easily replaced. Instead of limiting yourselves to the options available on the Nokia C32 device, you can consider moving to different download sites for downloading the coolest lock screen wallpaper:
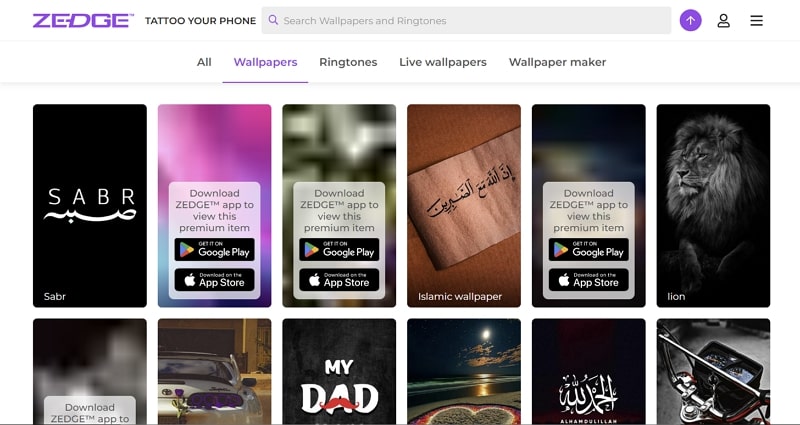
1. Zedge
Zedge is one of the most premium websites for accessing wallpapers for Android devices. With accessibility to content from exclusive artists, Zedge presents the best personalization options to its users. For effective wallpaper creation, you can add your creativity to bring in the best results for your device.

2. Interfacelift
For exclusive access to free wallpapers of multiple categories, Interfacelift provides some impressive and high-quality results. This intuitive wallpaper site provides some captivating options. Along with that, it asserts a special force on photographs of landscapes, which makes it a great site.

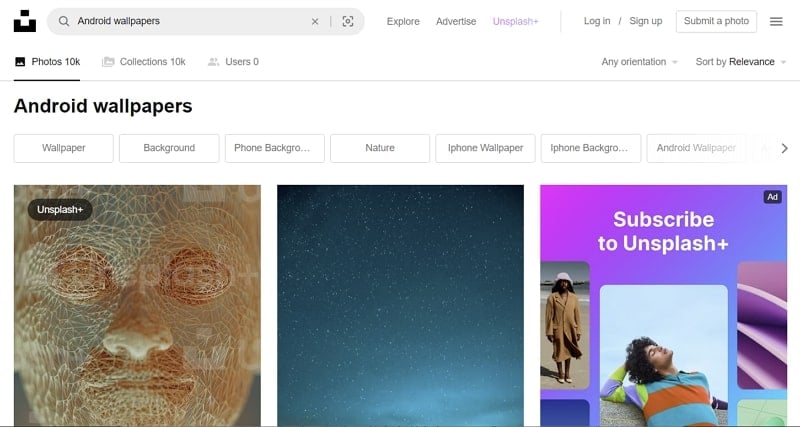
3. Unsplash
Known for keeping royalty-free, high-quality content, Unsplash can be a great Android wallpaper site. Download your favorite wallpapers that will perfectly suit your Android device. Along with its smooth interface, Unsplash offers diversity with its dedicated Unsplash+ plan.
Parental Control Software
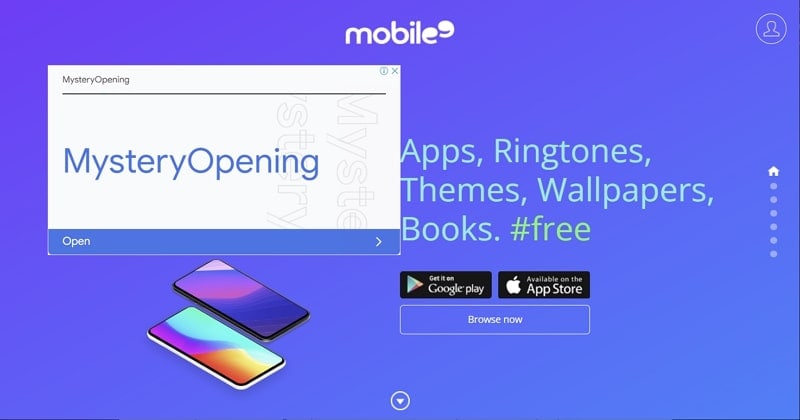
4. Mobile9
For variety, you can always go for Mobile9. This unique, expressive, and productive wallpaper site provides the best Android wallpapers. Following this, it offers multiple diversity of content, including ringtones and books. However, to get your hands on the finest quality wallpaper, do consider trying the site.
5. Dribbble
If you seek the best design for your Android lock screen, Dribbble provides the finest quality. Out of the 10,000+ designs, you can find your choice. Along with that, the site service also presents the wallpapers in dedicated categories. Searching for the right Android lock screen wallpaper gets easy in such an environment.

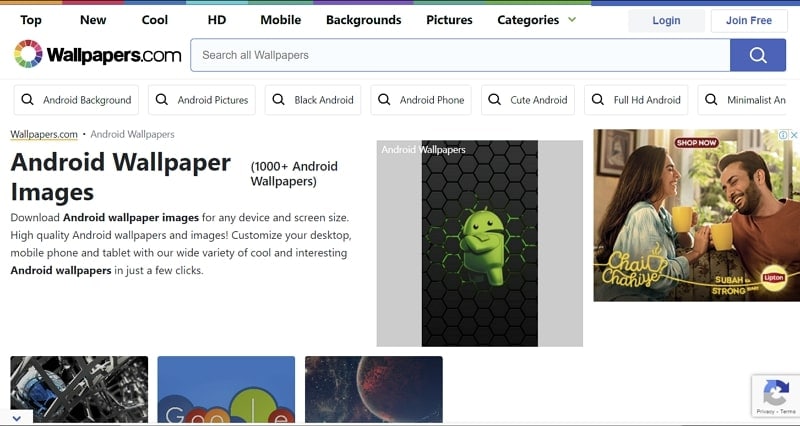
6. Wallpapers.com
For a service that provides dedicated Android lock screen wallpapers, Wallpapers.com holds a good position. With the finest wallpapers to use on the Android device, you can also customize the available wallpapers. Dedicated categories make it easy for users to select their favorite wallpaper from the 1000+ options.
7. Pexels
There are very few websites that offer the finest quality wallpapers for free. Pexels, being one of them, displays a great interface for users with sub-categorization. With descriptions for every wallpaper, you can select the best one for your device. Find a categorized section of more than 70,000 wallpapers on this platform.

8. Pixabay
Who won’t have heard of Pixabay as a haven for lock screen wallpapers? This platform provides a different perspective on wallpaper search. To find the best option, you can diversify your search according to orientation, size, and color. This makes your search much easier and swift for changing the Android lock screen.

9. 500px
To access the best wallpapers in the world, 500px is a good platform to keep in mind. While it helps a wide community fulfill their tasks, it can be a purposeful option. For diverse operability in the site, users can also sell their work into a global marketplace.
10. Wallpaperswide
From desktop to Android wallpapers, Wallpaperswide holds a diverse set of options. This platform is designed to provide a diversity of categories to its users. With a simple interface, it is a great option for gathering content.
Bonus Part: How To Unlock Android Screen if Forgotten the Password
Although you have learned how to change the lock screen wallpaper on Android, multiple complications can arise. One such problem that can occur on your device involves it getting locked. If the Nokia C32 device gets locked, you cannot use it. For an Android whose password is locked, you will require a platform to amend the problem.
Dr.Fone – Screen Unlock (Android) provides a complete platform to unlock the Android device. This is the right place to go if you seek to remove such locks from your device within minutes. With the option of bypassing any screen lock, it can protect your device’s data.
Such options make it the finest platform to resolve issues with the Android device. To know how one can unlock their Android device with Dr.Fone, look through the provided steps:
Step 1: Open Screen Unlock Tool
You need to download and launch Dr.Fone on your computer and continue to the “Screen Unlock” tool. On accessing the tool, connect your Android device with a cable.
Step 2: Start Unlocking the Android
Proceed to select the “Unlock Android Screen/FRP” option and continue into the “Unlock Android Screen” option.
Step 3: Select Mode and Device Details
If you intend not to lose data, continue to the “Remove without data loss” option. You will have to select the details of the connected Android device.

Step 4: Access Download Mode
Put your Android device in Download Mode by powering it off. Continue to press the “Volume Down,” “Home,” and “Power” buttons simultaneously. After a few seconds, press the “Volume Up” button to enter the Download Mode.

Step 5: Unlock Android Successfully
The package starts downloading as the Nokia C32 device gets into Download Mode. It will take a while until it completes. Once the download process gets completed, press the “Remove Now” button to remove the Android screen lock.
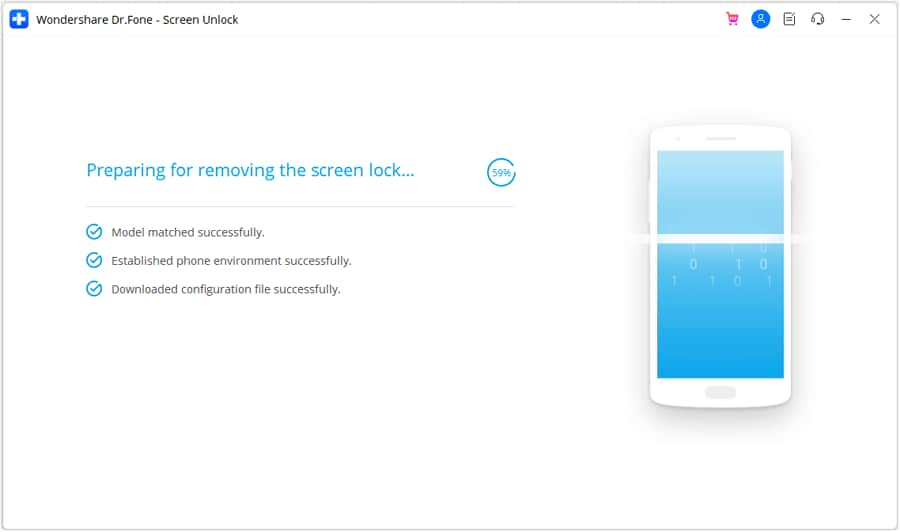
Image name: lock-screen-wallpaper-on-android-32.jpg
Image link: https://images.wondershare.com/drfone/guide/android-unlock-07.png
Image alt: start removing screen lock
Conclusion
The details provided are comprehensive in helping you change the lockscreen wallpaper on Android. While learning unique ways, along with dedicated techniques for smartphones, we are sure that you are clear about how to change lock screen picture on Android phone.Why not take a try now? This article has also introduced some of the best sites to download Android wallpapers. For effective results and to save your locked device from getting useless, use Dr.Fone – Screen Unlock.
- Title: Downloading SamFw FRP Tool 3.0 for Nokia C32
- Author: Aaron
- Created at : 2024-07-15 19:03:07
- Updated at : 2024-07-16 19:03:07
- Link: https://easy-unlock-android.techidaily.com/downloading-samfw-frp-tool-30-for-nokia-c32-by-drfone-android/
- License: This work is licensed under CC BY-NC-SA 4.0.