
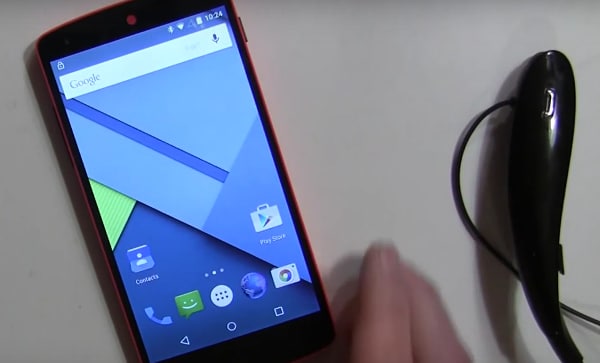
Delete Gmail Account With/Without Password On Realme
Delete Gmail Account With/Without Password On Realme 12 5G
Email accounts have proven their worth in digital devices beyond sending emails. Lately, Android devices have only operated with a Gmail account. This is because most of the data, such as contact information, messages, and other details, are saved across the storage space offered with the email. Against all recognizable uses of Gmail accounts, users look for ways how to delete Gmail accounts.
To this day, it is known that Gmail accounts can be removed with or without a password. However, one should know that if they consider deleting their Gmail account, they won’t be able to send or receive emails. With that, let’s proceed to reveal all essential methods that can be used to delete a Gmail account permanently. This article will also focus on a perfect tool that assists in making the process easier.

Part 1. Synopsis: Things To Know Before Deleting Gmail Account
Although the process of deleting a Gmail account sounds basic, there are many pointers connected to it. For that, this part is putting up a discussion on the important things that a user should know before they delete their Gmail account permanently:
- No Going Back: If you delete a Gmail account, the process is irreversible. All details and information will be lost, and the email won’t be trackable ever again.
- Cannot Reset Passwords if Connected: If the Gmail account is connected to any other service, make sure that you remember their passwords. Since the account will be deleted, you cannot reset their passwords.
- Access to Other Services: Although you are deleting your Gmail account, you can still access Google Photos, Google Drive, and other services.
- Lookout For Emails: Ensure that the emails in your account are saved. You can easily download them anywhere before deleting the Gmail account.
Part 2. Delete Your Gmail Account Using Your Password: Desktop Solution
For the first method, we will discuss how to delete a Google account with your password. You will use your computer for this process and access the Google Account services. The service helps you save all your essential Gmail data before you remove it. To understand how it makes it possible, look through the steps provided below:
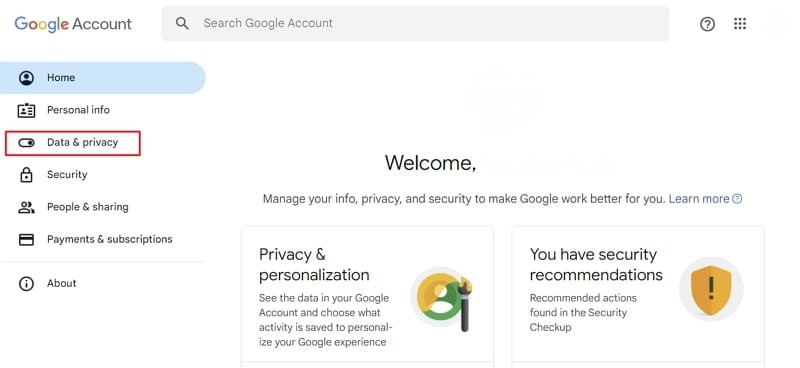
- Step 1. Access the website https://myaccount.google.com/ on your desktop browser and log in with your credentials. Proceed to the “Data & privacy” section from the left panel.

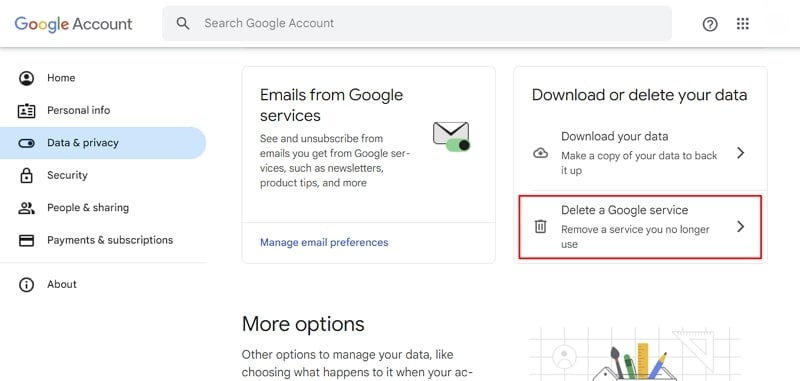
- Step 2. On the following window, scroll down and look for the “Delete a Google service” option. Accessing this would allow you to delete your Gmail account permanently.
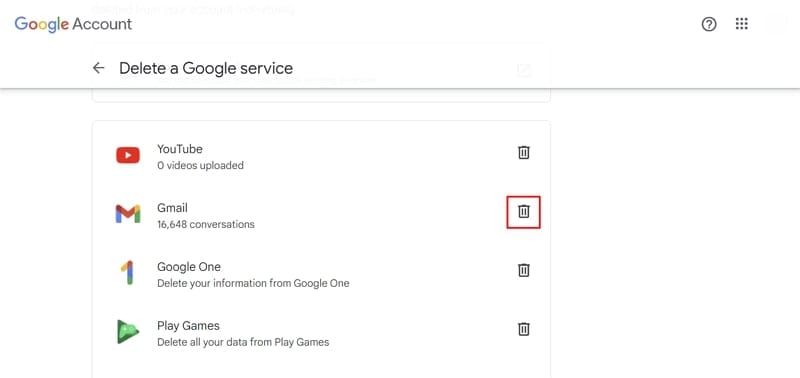
- Step 3. You will be led to a new screen where you need to provide your password credentials again. On successfully providing your password, look for the “Gmail” option on the next screen. Click the “Trash” icon to continue deleting the Gmail account.
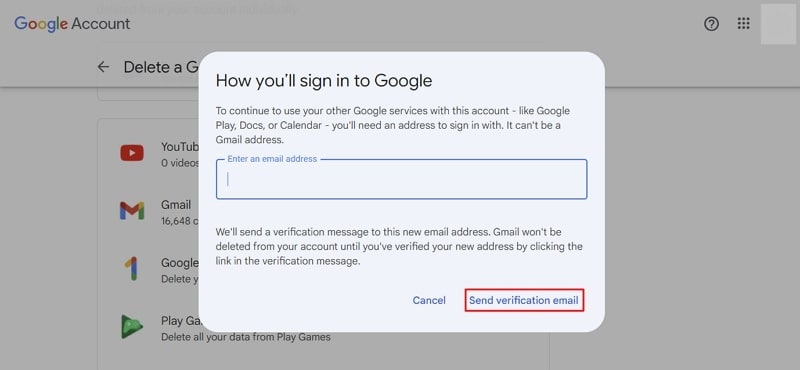
- Step 4. A new pop-up window opens, demanding another email address that can help connect to other Google services. Provide the email address and continue to click “Send verification email .” The Gmail account won’t be deleted until the user verifies the email sent to the new address.
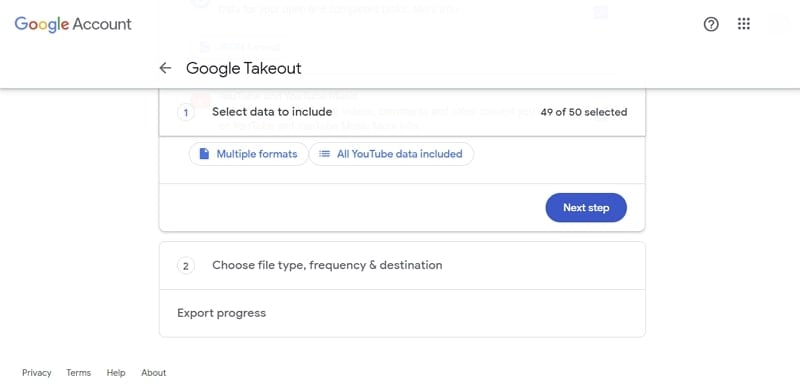
- Step 5. For those who want to save their email data, look for the “Download your data” option in the same window. This leads you to the Google Takeout window, where you need to select the data to include. After selecting the data, define the file type, frequency, and destination for exporting all important data.
Part 3. Delete Your Gmail Account From Your Smartphone: Android & iOS
If you use a smartphone device and want to delete your Gmail account from that particular device, you are at the right place. The following methods will help you understand how to delete Gmail from your Android and iOS devices:
Android Devices
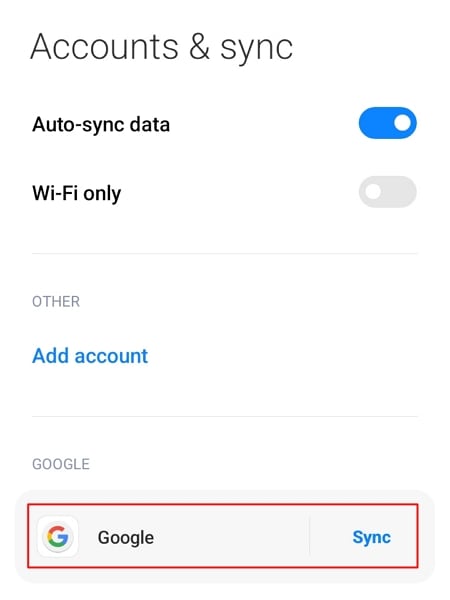
- Step 1. Look for “Settings” on your Android and continue to the “Accounts & sync” option in the list. As you proceed into the next window, look for the Google account and select it.

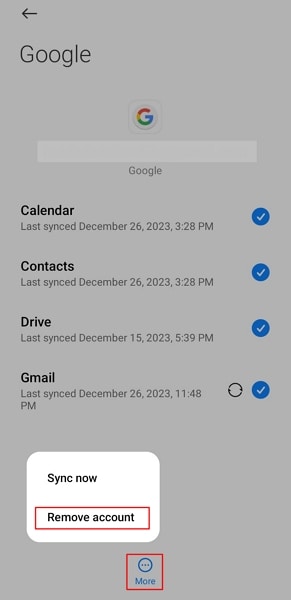
- Step 2. Select the “More” option at the bottom on the following screen. Choose the “Remove account” option in the pop-up menu and provide your credentials to execute the deletion of your Gmail account.
iOS Devices
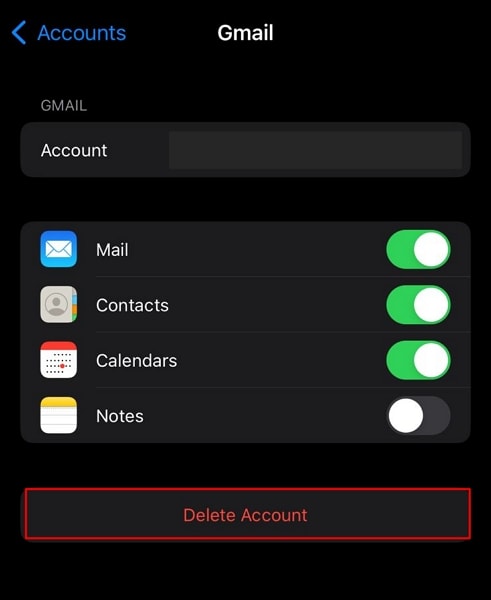
- Step 1. Open your iPhone’s “Settings” app and scroll down to the “Mail” option. You will find the “Accounts” option on the following screen, which you need to tap to proceed.
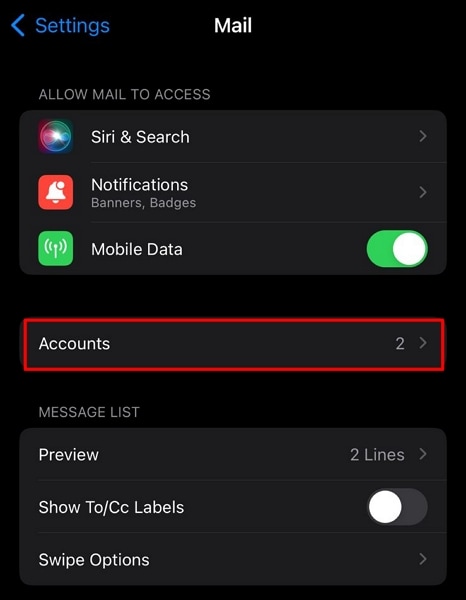
- Step 2. Discover the option of “Gmail” in the list of signed-in accounts and continue to the next screen. Select “Delete Account” to remove the account from your iOS device.
Part 4. Don’t Know Password of Device? Reset To Delete Gmail Account
What if you’ve forgotten the password to your smartphone device, and you have to delete your Gmail account permanently? In such cases, you are left with the option of accessing the Realme 12 5G device’s Recovery Mode and factory resetting the Realme 12 5G device, where possible. To know how it is done flawlessly, look through the steps provided next:
Android Devices
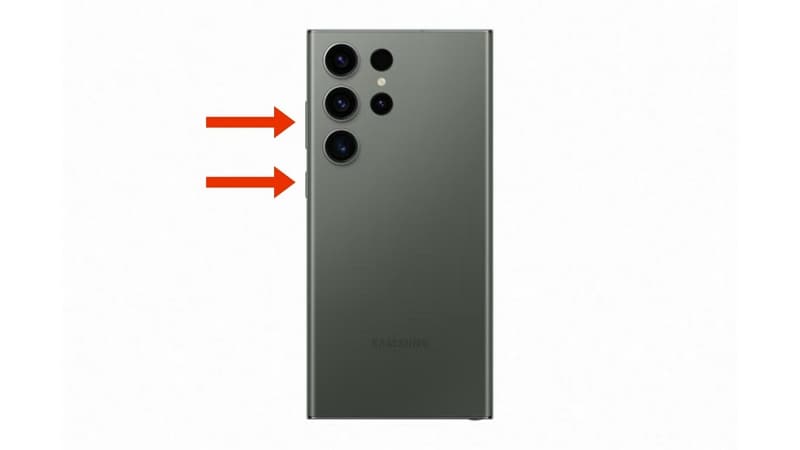
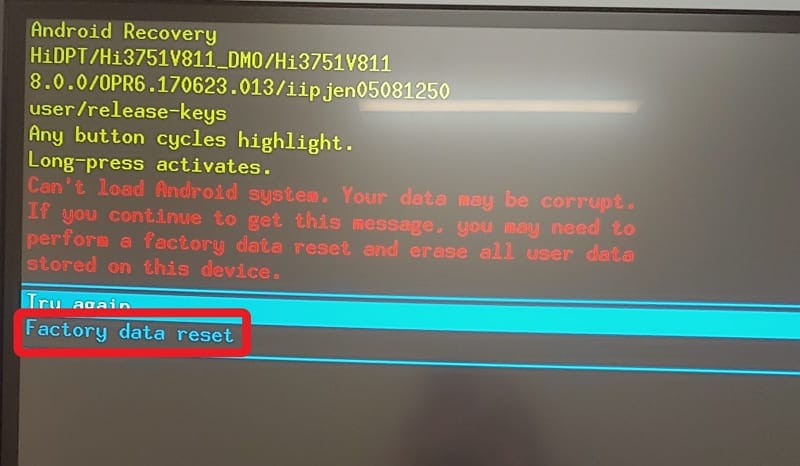
- Step 1. Those owning an Android device need to put it in Recovery Mode first. For that, use the combination of the “Power” and “Volume” keys to put the Realme 12 5G device in Recovery Mode.
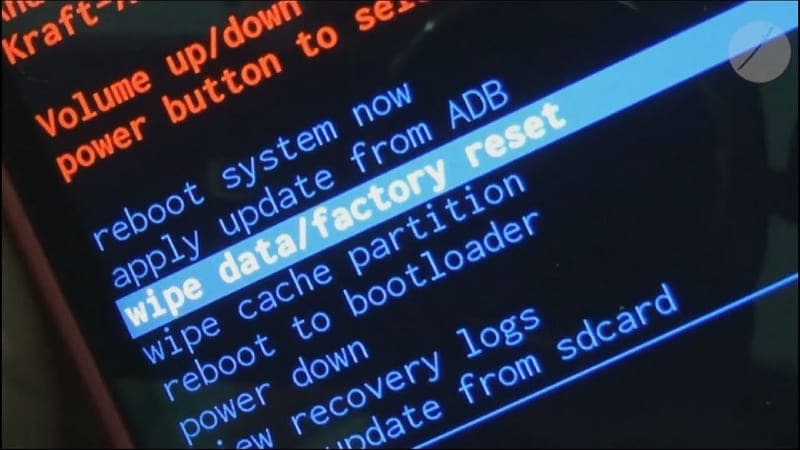
- Step 2. Once you boot into the Recovery Mode, use the Power and Volume buttons to scroll through the menu. Scroll down with the Volume buttons and select the “Wipe data/factory reset” option with the Power button.
- Step 3. Select “Factory data reset” on the next screen and confirm that factory reset your Android device successfully. The device automatically gets out of Recovery Mode and starts normally after resetting.
iOS Devices
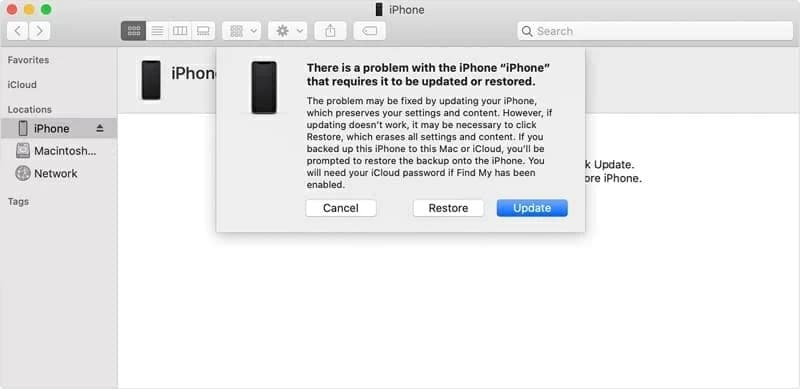
Step 1. You need to turn on Finder if you own a macOS Catalina or later device. Conversely, use iTunes if you have a macOS Mojave or earlier version or if you are using Windows. Connect your iPhone to the computer using the lightning cable and put it in Recovery Mode.
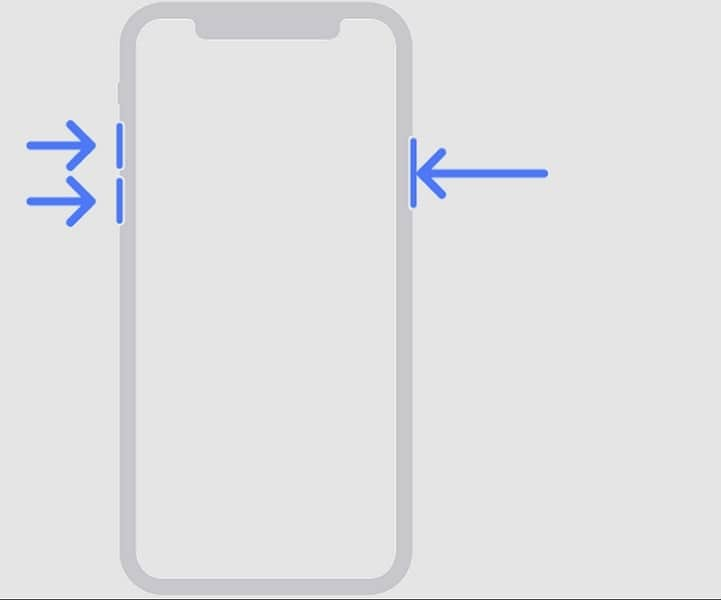
For iPhone X or Later Models: Press and release the “Volume Up” button, followed by the “Volume Down” button. Hold the “Side” button until the Recovery Mode screen appears.
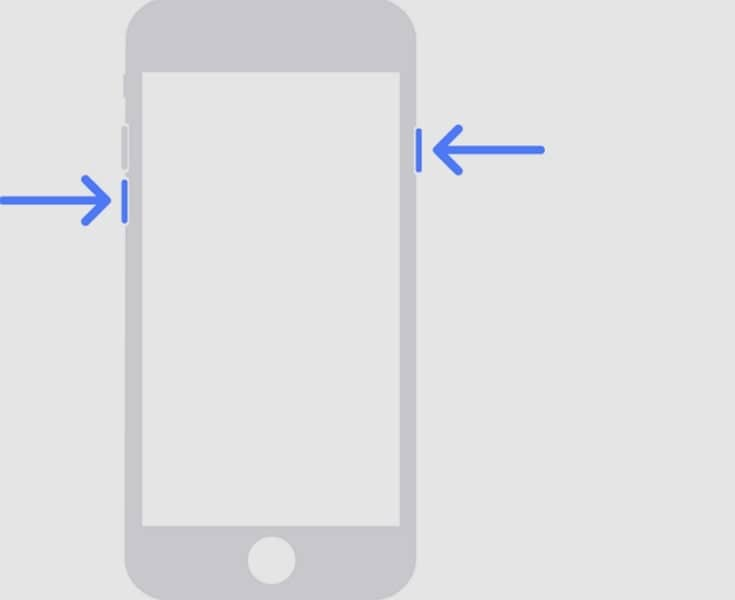
- For iPhone 7 Models: Hold the “Side” and “Volume Down” button until the Recovery Mode screen appears.

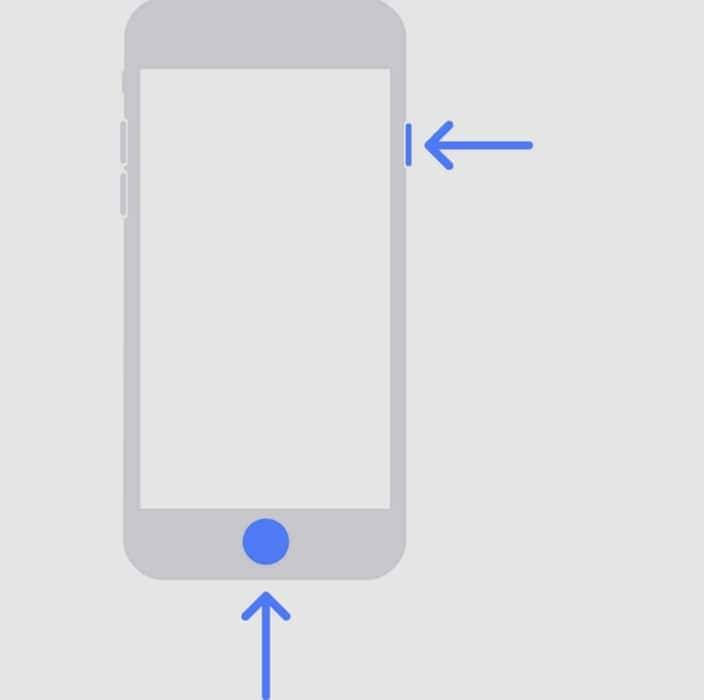
- For iPhone 6 and Earlier Models: Hold the “Side” and “Home” buttons simultaneously until the Recovery Mode screen appears.
- Step 2. The device automatically gets detected on Finder/iTunes, and a pop-up appears on the screen. Click “Restore” to reset your iOS device to factory settings.
Part 5. Remove Gmail Account From Device Without Password: Using Wondershare Dr.Fone
While you seek some appropriate way to close a Gmail account from a device whose password you’ve forgotten, you might get into Wondershare Dr.Fone. This all-in-one service offers a unique Screen Unlock feature that helps you restore your device. If you have forgotten the lock screen password of your Android device, Dr.Fone – Screen Unlock (Android) makes it exceptionally easy to recover.
Key Features of Wondershare Dr.Fone
![]()
Dr.Fone - Screen Unlock (Android)
The Best UnlockJunky Alternative to Bypass FRP and Solve Your Screen Locks
- Remove all Android screen locks (PIN/pattern/fingerprints/face ID) in minutes.
- Bypass the FRP lock of Samsung without a PIN or Google account.
- Everyone can handle the lock screen without any tech knowledge.
- Provide specific removal solutions to promise good success rate.
4,008,671 people have downloaded it
Whether it is your latest Samsung or other Android smartphone, the process is easy to work with. You might look for more details about this unique tool, for which some important features are highlighted as follows:
- It removes all major types of screen locks from your Android devices.
- Provides support to the latest Android devices, along with all mainstream brands.
- You can recover your device with and without data loss, according to your discretion.
Steps To Remove Google Account While Removing Screen Lock
The following steps highlight the way to remove screen lock from your Android device, which would also cover removing the Google Account automatically:
- Step 1.Launch Screen Unlock Feature
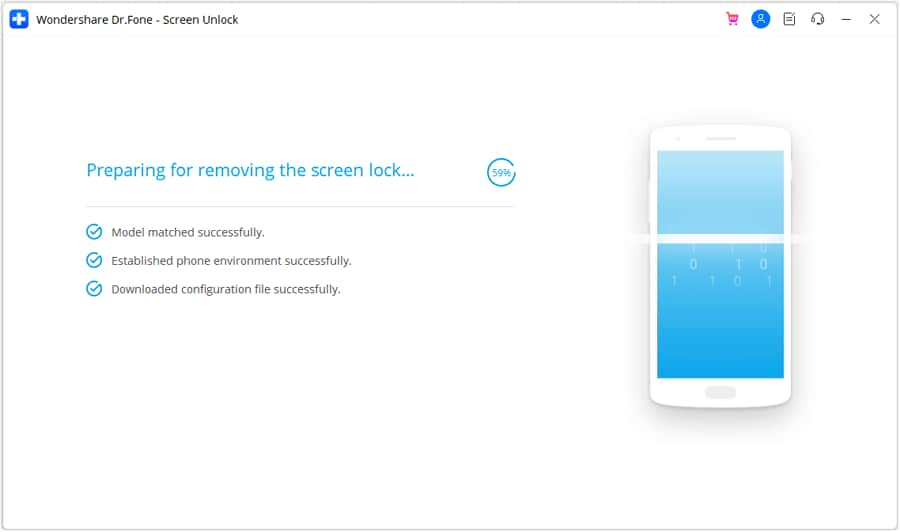
To start with the process, launch Dr.Fone on your computer and navigate to the “Toolbox” section. Proceed to the “Screen Unlock” feature, which opens a new window. After selecting “Android” as your device type, select “Unlock Android Screen” from the available options.

- Step 2.Select Device Brand and Unlock Mechanism
As you direct into the next window, select the brand of your Android device. Continue to select “100% Remove Screen Lock” from the following window.


- Step 3. Follow the Instructions and Successfully Remove the Screen Lock
According to your selected device brand, Dr.Fone provides guidelines for entering the specific mode. Follow the on-screen instructions to start unlocking the screen of your device. If the process is successful, click “Done” to conclude using Dr.Fone – Screen Unlock.


Conclusion
This article has specifically provided you with some important details on how to delete a Gmail account with ease. The article explains everything from the methods of deleting it from the computer to removing it from the Realme 12 5G device. Furthermore, it also serves as a guidance for those who have forgotten their device passwords. For that, they’ve provided an insight into Wondershare Dr.Fone – Screen Unlock and its unique functions.
Unlock Realme 12 5G Phone Password Without Factory Reset: Full Guide Here
In today’s fast-paced digital age, our smartphones are more than just communication devices; they are repositories of our personal and professional lives. However, there comes a time when we find ourselves locked out of our Realme 12 5G phones , desperately trying to remember a password or PIN that seems to have slipped our minds. The thought of a factory reset, which wipes our valuable data clean, can be daunting.
But fear not! This comprehensive guide is here to rescue you from the perils of forgotten passwords without factory reset. So, if you’re in a bind and need to regain access to your device, read on for a full guide to know how to unlock Realme 12 5G phone password without factory reset!
Method 1: Unlock Realme 12 5G Phones Running Older Android OS (4.4 Or Below) With Google Security Questions
Up until Android version 4.4, you could lock your phone screen with a pattern. Google allowed you to unlock the phone by answering security questions in case you forgot the pattern. Since these may also be easily guessed by people who are in possession of your device illegally, Google deprecated this method after Android 4.4. However, the phones running Android 4.4 or lower are still allowed to be unlocked using this method. So, if you have an old Realme 12 5G with Android 4.4 or earlier, here is how to unlock Realme 12 5G phone password without factory reset:
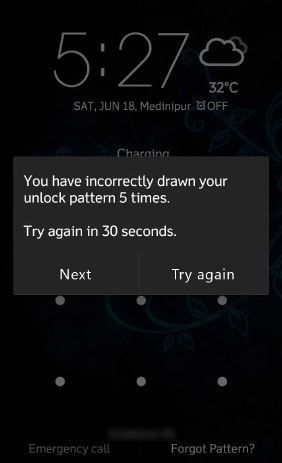
Step 1: You may already have entered the incorrect pattern a few times. If so, simply tap the Forgot Pattern to start the process of unlocking your Realme 12 5G phone screen. Else, deliberately enter incorrect pattern a few times till you see the Forgot Pattern option:
Step 2: Next, choose the option to reset the pattern by answering your Google credentials.
Step 3: Sign into the Google account that matches with the Google account on the phone.
Step 4: Lastly, create a new pattern to unlock your Realme 12 5G phone.
Side Tip
Now that you have unlocked your Realme 12 5G phone with Google security questions, we have a tip for you. For the safety and security of your data on your phone, it might be time to trade in the Realme 12 5G device for a newer phone with the latest Android OS. Between Android 4.4 and the Android 12 prevalent today, there have been massive security updates and code improvements that you can benefit from. It makes sense given that our phones hold a substantially large part of our personal and professional lives these days. And we are not even talking about features that you may or may not need - we are talking only from a data security point of view. Of course, you will also benefit from the massive performance improvements that have taken place thanks to hardware and software improvements over the years.
Method 2: Unlock Your Realme 12 5G Phone Using Wondershare Dr.Fone (Easy & Fast)
Now, since the previous method of unlocking your Realme 12 5G phone was deprecated after Android 4.4, what about the phones running newer versions? How to unlock a Realme 12 5G phone with a newer Android version? There are still a few methods that are available to you, but the best way to unlock a Realme 12 5G phone is to use this nifty little app called Wondershare Dr.Fone. And you will discover that there is nothing little about this app!
Dr.Fone is a collection of several modules unified in a single interface. Each of these modules is designed meticulously to serve a purpose for your device, such as unlocking your phone, repairing your phone, erasing data from your phone or wiping the phone securely, etc. With this approach, users are never encumbered with options. Instead, they can focus on every task in the simplest, easiest manner without worrying about doing something untoward because they could not understand the software. Dr.Fone is fast, intuitive and easy to use.

Step 1: Launch Dr.Fone on your computer. Select the Screen Unlock module.

Step 2: Click Unlock Android Screen.

Step 3: Select the first option – 100% Remove Screen Lock as Realme 12 5G devices cannot be unlocked without data loss.

Step 4: Choose your phone brand carefully – Realme 12 5G in this case.

Step 5: Complete the instructions to download the software to your phone.
Step 6: The software will start downloading, and if everything went smoothly you will see a screen to click Remove Now.
Step 7: When all is done, you will see the following:

Your Realme 12 5G phone screen is now unlocked. Click the button below to unlock Realme 12 5G phone password without factory reset now!
Method 3: Factory Reset Realme 12 5G Phones (Wipes User Data)
There is a standard factory reset built into every Realme 12 5G phone to allow users to erase the Realme 12 5G device and start over fully. This option wipes all user data and resets the phone to how you received it in the box. Naturally, this is not a preferred way, as it requires the phone to be set up all over again and that takes time. Also, all data will need to be backed up beforehand in order to restore it again. Overall, this method consumes a lot of time.
Step 1: Go to Settings > Backup & Reset.
Step 2: Tap Factory Reset > Reset Phone.
Step 3: Tap Erase Everything.
Method 4: Use Google Find My Device To Unlock Realme 12 5G Phones (Wipes User Data)
Google Find My Device is an online service by Google that is used to locate and track your Android devices. It works like how Apple’s Find My works for its range of hardware. Using Find My Device, you can play a sound on the Realme 12 5G device to locate it in the house if you have misplaced it, lock the phone in case it is lost, and wipe the Realme 12 5G device remotely.
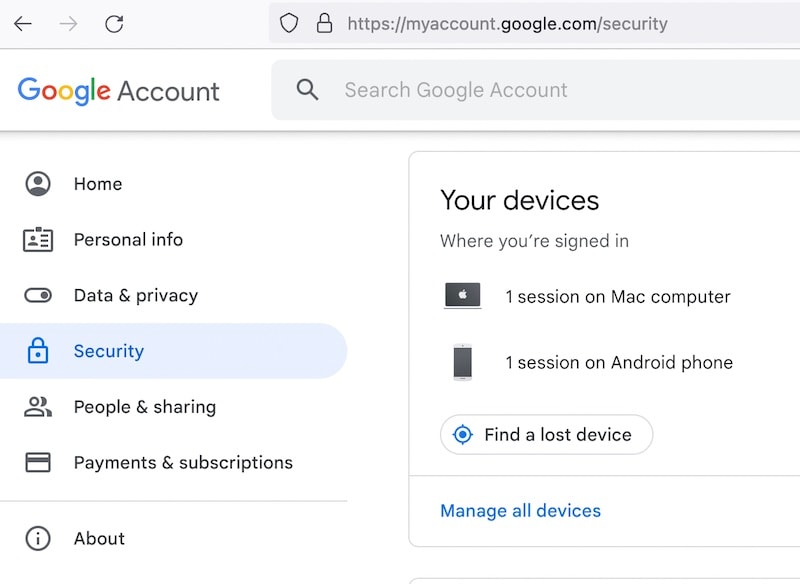
Step 1: Go to https://accounts.google.com .
Step 2: Log in and go to Security > Your Devices:
Step 3: Click Find A Lost Device.
Step 4: Select the Android device you want to wipe carefully if you have a few:
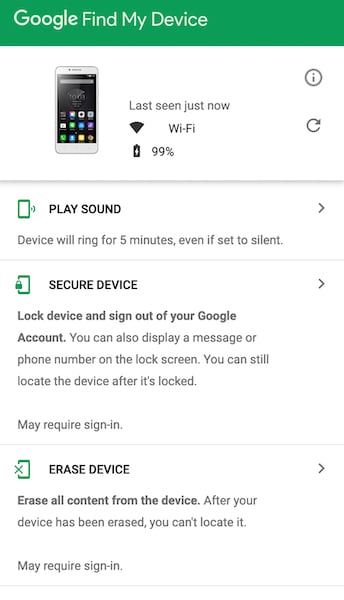
Step 5: Click Erase Device and confirm.
Step 6: After the erasure, your device will need to be set up all over again.
Method 5: Request Service Provider To Unlock Your Realme 12 5G Phone
If your Realme 12 5G phone is tied to a service contract and you want to unlock your device to use it with other service providers, this method is for you. You can request your service provider to unlock your Realme 12 5G phone provided their conditions are met. Usually, they will be happy to oblige if there are no dues and the service period is over.
Bonus Tip: If You Want To Disable Screen Lock
Sometimes, you may not need to secure your device at all. For example, if you have an old device that you want to use as a media player in your car or to give to children to play games, you may not want to password-protect the Realme 12 5G device. This is how to disable screen lock on Android:
Step 1: Navigate to Settings > Security > Screen Lock.
Step 2: Enter the PIN or pattern.
Step 3: Choose None and confirm.
### ConclusionThere are a handful of methods you can use to unlock a Realme 12 5G phone in case you forget the password or PIN or pattern. Especially for the old pattern-based screen locks, it is easy to unlock the phone if you know the answers to the security questions in your Google account. However, to unlock Realme 12 5G phone screen without password on newer Android versions, you need technical knowledge, or you can use third-party software such as Wondershare Dr.Fone. Using Dr.Fone Screen Unlock, you can unlock your phone quickly with no technical mumbo jumbo to confuse you. All you will get is a software that guides you every step of the way so you can unlock Realme 12 5G phone easily.
Unlocking the Power of Smart Lock: A Beginner’s Guide for Realme 12 5G Users
Google constantly comes up with features to simplify the way users interact and complete tasks on the Android platform. One of the most important features that techies loved to debate about was the Smart Lock Android, a secure password manager functioning in sync with a Google account on the Android phone.
Part 1: What is Android Smart Lock?
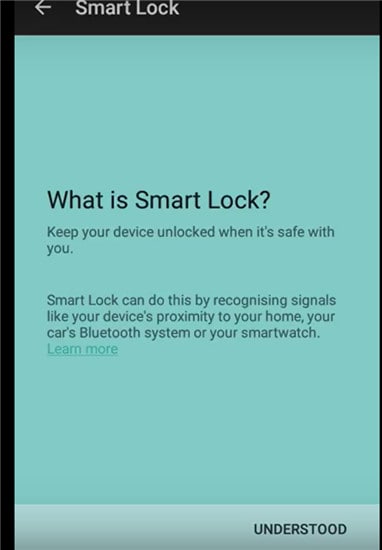
Android Lollipop added a feature called Smart Lock, and the feature was devised as a smart tool to prevent the Android phone from locking once it was initially unlocked. In other words, the feature overrides an Android phone’s Lock Screen feature, thereby saving users the need to enter passwords every time the Realme 12 5G device locks.
If you’re at home, it’s likely your android phone is locked out if you haven’t accessed at for some time. Smart Locks solves the problem in many ways. It allows you to allocate trusted places. Once you within range of the trusted places, your phone won’t lock. Trusted devices come next. Smart Lock is assigned to Bluetooth and Android NFC unlock devices.

Finally, trusted face unlocking is the ultimate face recognition system that unlocks your Android device as soon as you look at it across the front-facing camera. A face unlock first introduced with Android Jelly Bean and has been significantly improved in later versions.
Turning On Smart Lock
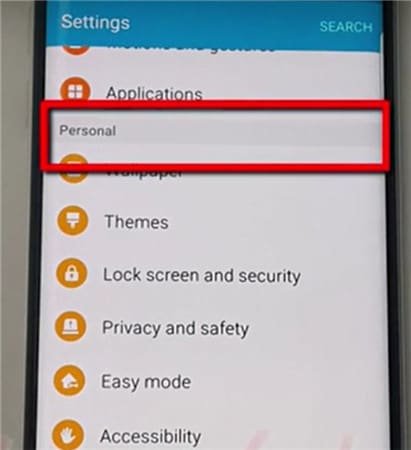
The feature is enabled by first accessing settings. For example, in a Samsung Galaxy S6:
Tap on Settings, which is the gear symbol.
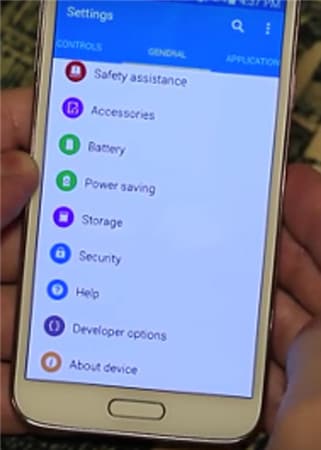
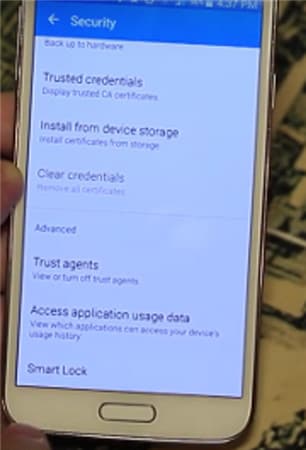
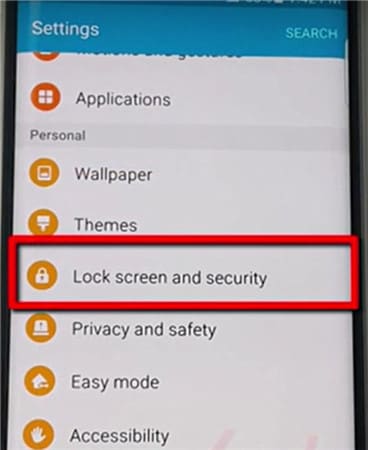
- • Click on Personal and tap on Security.
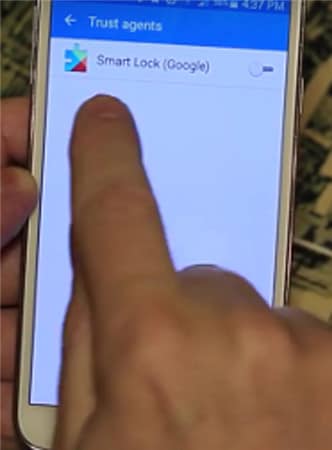
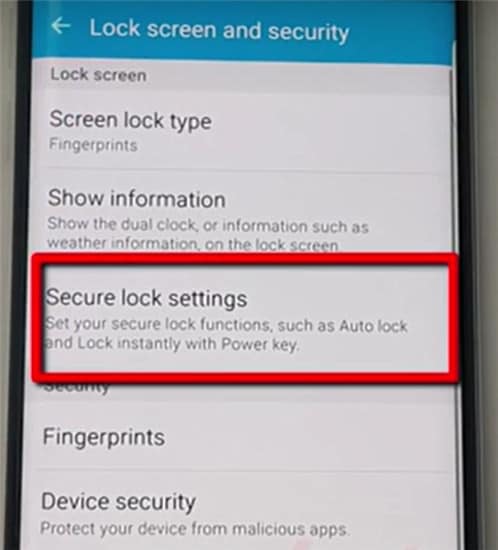
- • Go to Advanced and tap on Trust agents and make sure Smart Lock is turned on.
- • Under Screen Security tap Smart Lock.
- • Here, you need to enter your Screen Lock. If you haven’t done so, set up a password and PIN by following the on-screen prompts. The screen Lock is needed every time you have to change the Smart Lock settings.
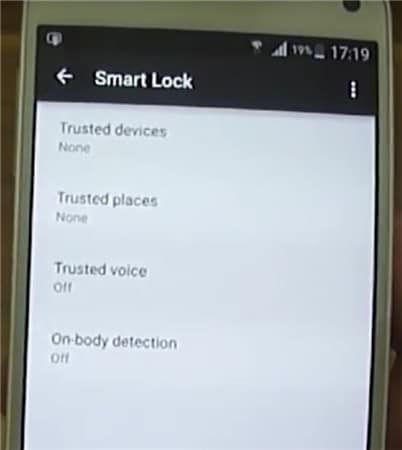
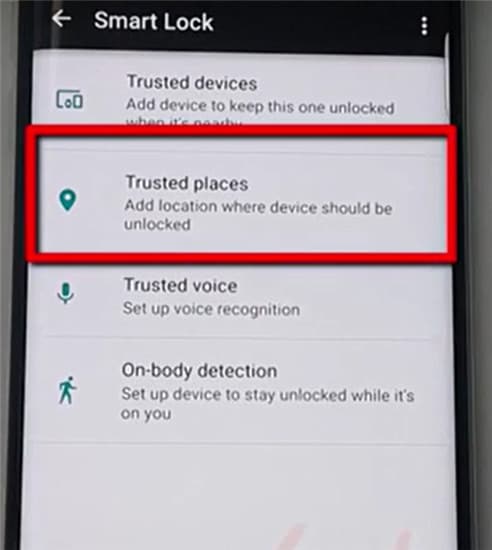
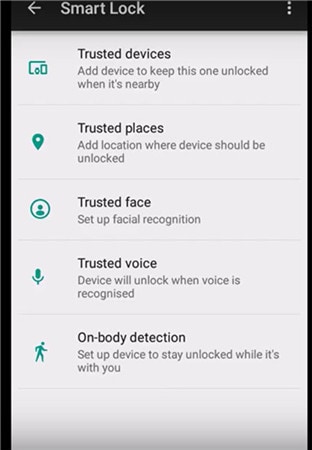
Within Smart Lock, there are three options for setting the system. You can set up trusted devices, trusted face, and trusted places individually, combining two or all three at the same time. You can choose just one trusted face, but you have the option to set up as many trusted devices and trusted places as needed.
Part 2: Turn On Smart Lock For Android with Trusted Devices
You can decide on a trusted device to be paired with Smart Lock Android.
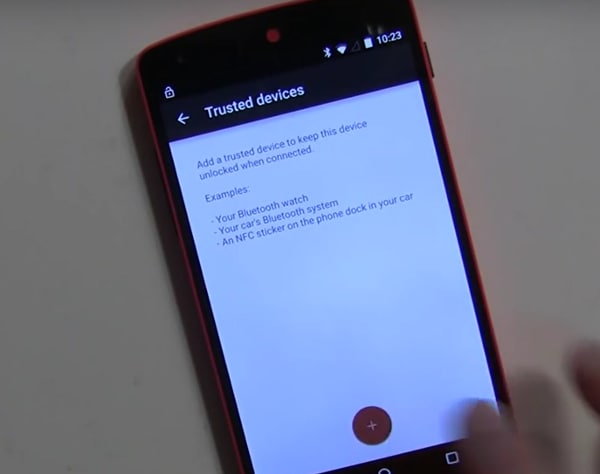
For example, you can set up a Smart Lock for Bluetooth in your Android Bluetooth settings. It can also be done for Android NFC unlock devices. Examples include the Bluetooth system in your car, NFC unlocks, android sticker on the car’s phone dock, or Bluetooth in your watch.
- • Go to Settings.
- • Tap on Security and then Smart Lock.
- • Existing paired options are listed under Trusted Devices.
- • Initially, trusted devices will show None.
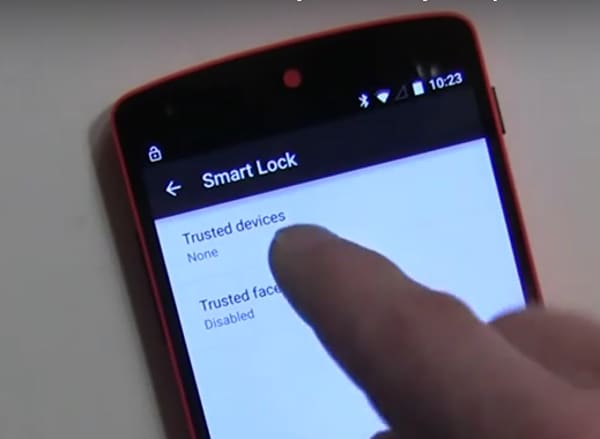
Tap on Add Trusted Devices.
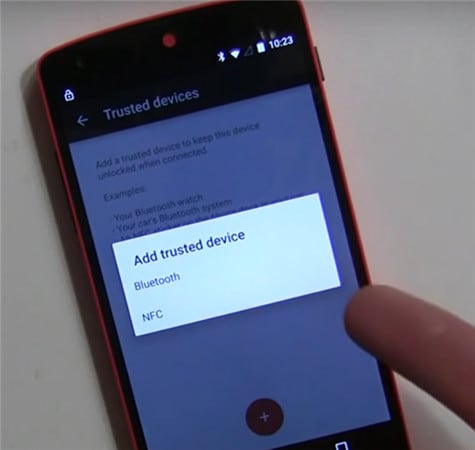
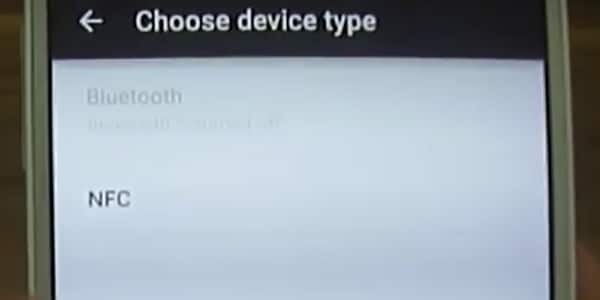
The next screen is the Choose Device Type.

Since you have already paired Bluetooth, it will ask you to choose the Realme 12 5G device from the list.
- • As an example, let’s take the case of LG HBS800. It may show Not connected until you add it.
- • It will show up under Trusted devices in the Smart Lock menu.
- • When you turn the added device on, Smart Lock now unlocks the Android mobile.
Similarly, other Bluetooth and NFC unlock android supported gadgets can be added under the list of Trusted Devices.
Part 3: Turn On Smart Lock For Android With Trusted Locations
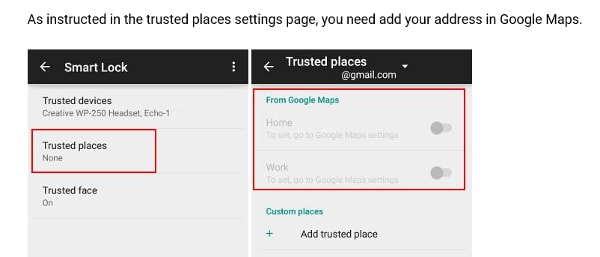
You can also add locations or addresses to Smart Lock Trusted Locations, and the phone unlocks automatically as soon as you arrive at the desired location. For example, you can set up your home or work address under Trusted Locations.
Check current settings first.

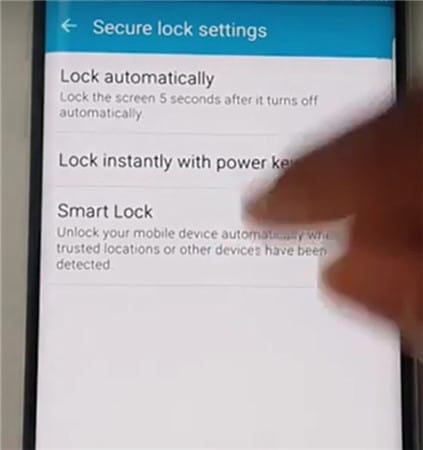
On a new Android phone, visit Settings>Personal.
Then Lock Screen and Security.
Then Secure Lock Settings.

Tap Smart Lock.

Tap on Trusted Places.
Tap on Add Trusted Places
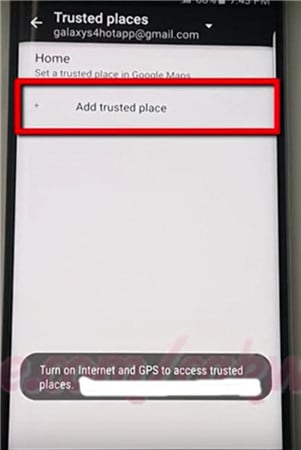
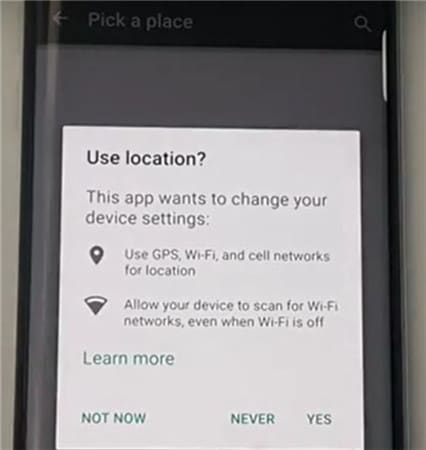
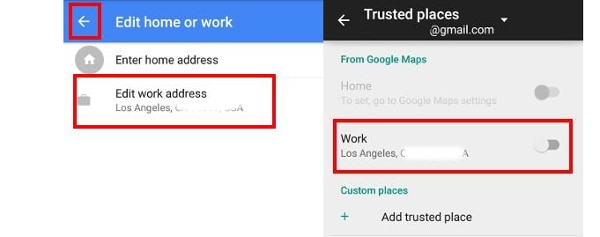
- • Initiate the Google Maps app on the Android phone. Make sure the Internet and GPS are on.
- • Pick a place.
- • Click on Settings.
- • Click on Edit home or work. You can now add or edit the required addresses.
- • As an example, click on the Enter work address.
- • You now have the option to type in the address or use the address listed on Google Maps as the required work address.
- • A successful addition is listed and can be edited under the Edit work address.
- • Close the Google Maps app.
- • The work address is automatically propagated and configured with Smart Lock settings.
- • Go back to Settings> Security> Smart Lock> Trusted Places.
- • The work address you added is now listed under Work.
Parental Control Software
- • However, it is not yet configured as a Smart Lock option. Tap the location once, and it is enabled.
- • The switch along the address to the right turns blue, indicating it is enabled.
- • The work address is now listed under Trusted places for Work.
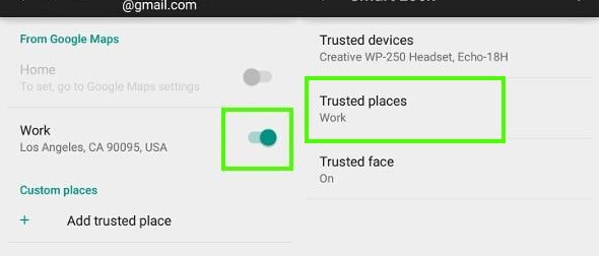
- • The phone is now configured for the work address and will unlock whenever you are at the location.
- • Since it works on Google Maps, the feature works through an Internet connection.
Part 4: Turn On Smart Lock For Android With Trusted Face
The feature recognizes your face and then unlocks the Realme 12 5G device. Once you set up the Realme 12 5G device to recognize your face as a trusted face, it will unlock the Realme 12 5G device as soon as it recognizes you.
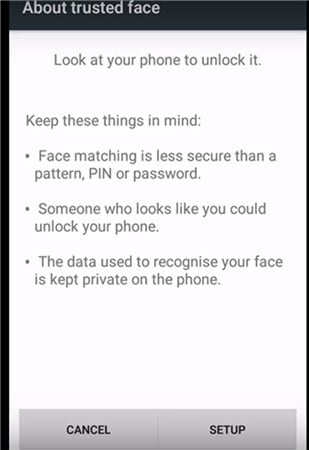
PRECAUTION: At best, this can be the first level of security, as one who resembles you to some extent can unlock the Realme 12 5G device. Photographs are not stored in the system. The device does hold necessary data to recognize your face, and the security level is determined by how good the Realme 12 5G device is configured. The data is not accessed by any app or loaded onto a Google server for backup.
Setting Up Trusted Face
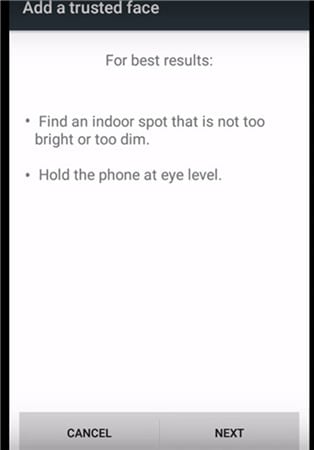
- • Go to Smart Lock and tap Trusted Face.
- • Tap on Setup. Follow on-screen instructions.
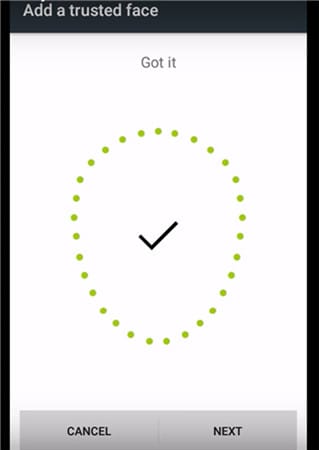
The device begins to gather data about your face. The trusted face icon appears. As a backup, in case Smart Lock does not recognize your face, use the manual system by applying the PIN or password to unlock the Realme 12 5G device.
In case Trusted Face is not required, tap on reset Trusted Face appearing under the Trusted Face menu. Tap on Reset to reset the option.
How To Improve Facial Recognition In Your Bluetooth and Android NFC Unlock Devices
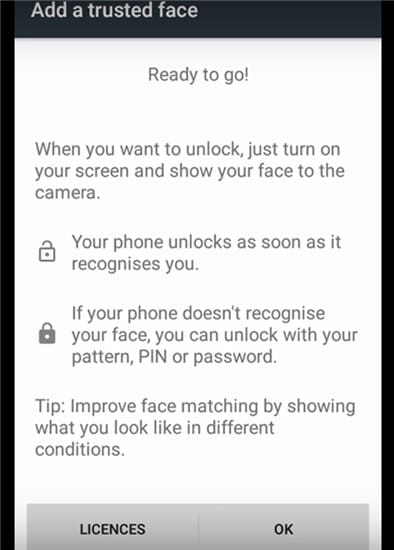
- • If you feel facial recognition is not up to the mark, go to Smart Lock and tap on a Trusted face.
- • Tap on Improve face matching.
- • Tap on Next and follow instructions on the screen to complete the task.
Smart Lock Android is a great feature and is only going to improve on time. With added security measures being introduced by Google for Bluetooth and NFC unlock android devices, including configuration to Google maps and Gmail, the feature may be one of the most important features to overcome constant blocking of devices even in protected places.
Video on How to Remove Android Lock Screen Without Data Loss
- Title: Delete Gmail Account With/Without Password On Realme
- Author: Aaron
- Created at : 2024-07-15 20:36:13
- Updated at : 2024-07-16 20:36:13
- Link: https://easy-unlock-android.techidaily.com/delete-gmail-account-withwithout-password-on-realme-by-drfone-android/
- License: This work is licensed under CC BY-NC-SA 4.0.