
Complete Review & Guide to Techeligible FRP Bypass and More For Oppo K11x
Complete Review & Guide to Techeligible FRP Bypass and More For Oppo K11x
In today’s tech-driven world, safeguarding your devices is crucial. FRP, or Factory Reset Protection, is a shield against unauthorized access, yet accessing your device can sometimes be a hurdle. That’s where FRP bypass tools come to the rescue, offering solutions to unlock your device hassle-free.
Among these tools, Techeligible FRP stands out, known for its reliability and efficiency in bypassing FRP barriers. Let’s delve into the realm of FRP bypass, explore the significance of these tools, and uncover how Techeligible FRP bypass simplifies unlocking your device securely.

Part I. A Comprehensive Overview of Techeligible
Techeligible is a useful platform that offers useful solutions to help most Android users. It’s especially useful for individuals stuck with FRP locks or wanting to unlock their mobile devices. But Techiligible’s arsenal doesn’t stop there. Third-party tools are available for practically any Android problem. There’s even a Techeligible app called Quick Shortcut Maker, which allows you to create shortcuts to your Android device’s settings.
Techeligible FRP bypass tools give solutions and customized advice for popular brands and models. It provides a ton of instructions for Samsung Galaxy M22, M21, Oppo A53, and LG devices. These courses are constantly updated to ensure compatibility with the most recent Android operating system.

Useful Features of Techeligible
Check out the main features that Techeligible has to offer below:
- **Bypassing FRP Accounts.**Techeligible excels at bypassing FRP accounts.
- **Unlocking Android Smartphones.**The tools assist users in unlocking Android smartphones. It also does not require passwords or Google account information.
- **FRP APK Download.**Techeligible makes it simple to obtain FRP APK utilities.
- **File Management.**It assists in the management of critical files to improve the overall user experience.
Where and How To Download FRP Tools by Techeligible
To access Techeligible’s tools, you can download them from their official website. The installation package size is modest, ensuring swift downloads without burdening your device’s memory. They’ve supplied a number of solutions based on your individual needs. Here’s how to download Techeligible FRP tools:
- Step 1: Navigate to Techelegible’s official website and select Download FRP Tools from the main menu.

Step 2: Choose the tool that you want to download. Techeligible offers varied sections for FRP bypass. They are as follows:
APKs and Files for FRP Bypass
They describe how to unlock FRP on any Android smartphone without using a PC. A list of all FRP bypass APKs, such as the Quick Shortcut Maker Techeligible app, can be found here.
- FRP Bypass Applications
Direct FRP bypass apps provide a broader range of FRP bypass options.
- Computer FRP Tools
These tools function similarly to a bridge. To begin, connect the Android device to the computer. Then, using the computer Techiligible FRP tools, you can bypass the Google Account lock.
- Step 3: To begin downloading, click the Download button.
_Note:_ Download the APK directly from your phone to install it when FRP locks the Oppo K11x device. APK can also be installed using OTG or ADB.
Phone Brands Supported by Techeligible
Techeligible extends its support across multiple phone brands, making it versatile for various users. For further information, you may also search for your device’s model number in their website’s search box.
|
Samsung
Huawei
LG
ZTE
Asus
Oppo
Xiaomi
Sony
Tecno
Symphony
|
BQ Aquarius
Alcatel
Vivo
QMobile
Itel
Google Pixel
Coolpad
Oneplus
Doogee
TCL
|
Nokia
Motorola
Lenovo
Micromax
HTC
Infinix
Panasonic
Honor
Realme
Blu
|
| — | — | — |
Pros of Techeligible
In general, Techeligible FRP tools can provide the convenience for users below:
- **User-Friendly Interface.**Simple steps for hassle-free device unlocking.
- **Tool Variety.**Various tools cater to different FRP bypass needs.
- Works with a wide range of diverse Android devices.
Cons of Techeligible
On the other side, these points disclose the inconvenience Techeligible is facing:
- Limited success with certain device models
- Occasional updates required for improved performance
- Website contains several floating advertisements
Techeligible FRP simplifies the bypass process with its straightforward interface and an array of tools catering to different device models. Accessible across various phone brands, it offers a user-friendly solution to unlocking your device from FRP barriers.
Part II. How To Bypass a Phone Using Techeligible?
How do you use the Techeligible FRP bypass tools now that you have them? There are a few crucial steps to using them. Let’s have a look at these Techeligible FRP bypass steps:
To use Techeligible, you must possess the following three sections:
- Account Manager for Google
- FRP bypass APK tools
- PC FRP software
Google Account Manager
Using the appropriate Google Account Manager, you may effortlessly download the files. This account assists you in locating the proper gadget. Furthermore, this stage assists you in your search for the appropriate gadgets. The setup can be selected from the official website.

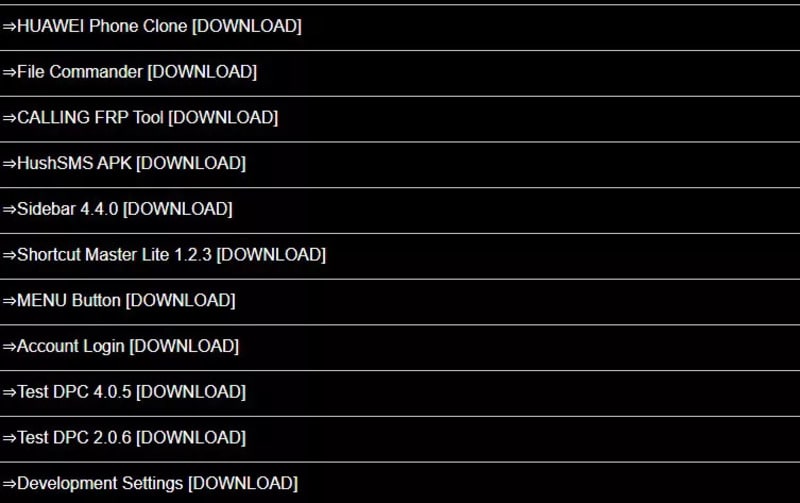
FRP Bypass APK Tools
If you want to reset your devices, you can utilize several bypass APK programs that will be connected to your PC. The graphic below shows several distinct sorts of APK tools.
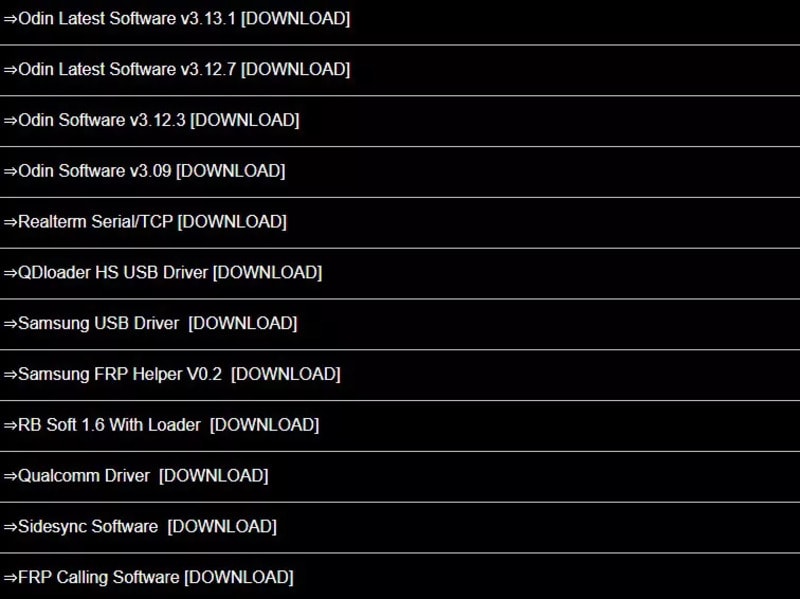
PC FRP Tools
PC FRP utilities assist you in connecting devices to the PC. These tools are simple to use and make it simple to reset the Oppo K11x devices. You only need to download the relevant file to get started.
Step-by-Step Guide
Now check out below the steps on how to use the Techeligible FRP Bypass feature:
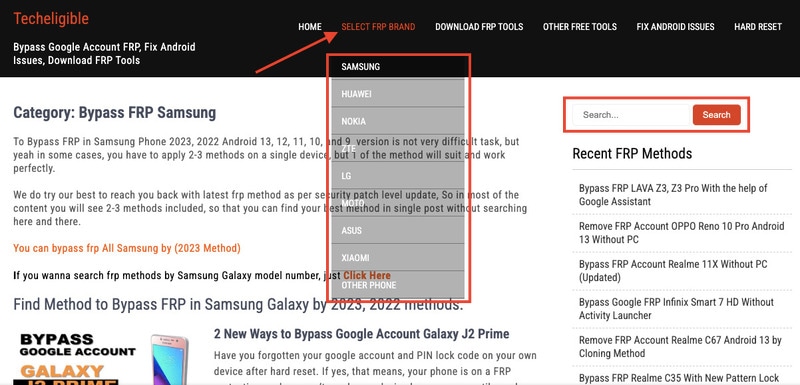
- Step 1: Go to the official website and select the link for your device’s brand. You will now be led to a category page containing FRP bypass solutions.
- Step 2: On Techeligible, choose your gadget model from the category page. You can also use the in-site search at the top of the sidebar to rapidly locate solutions for certain models.
- Step 3: A full guide will appear on the screen. Download the tools required for your specific phone model according to the guide. Then, follow the instructions for removing your specific device’s FRP lock.
Part III. Wondershare Dr.Fone: Best Alternative to Techeligible FRP
Unlocking an Android device locked by FRP barriers is a little complicated with Techeligible. But fear not, a simpler path awaits with Dr.Fone - Screen Unlock (Android). It stands tall as a user-friendly alternative to the complex process of using Techeligible. It’s designed to streamline the FRP bypass, ensuring a smoother unlocking experience for Android users.

Advantages of Dr.Fone - Screen Unlock
Revel in the benefits that Dr.Fone – Screen Unlock has to offer, making it an excellent choice for unlocking Android devices:
- **Simplicity at Its Core.**You don’t need to be a tech whiz; the process is designed for simplicity, making it accessible to all users.
- **Zero Data Loss.**Users can rest easy knowing that unlocking does not jeopardize data integrity. Your photographs, chats, and apps are safe and secure.
- **Wide Compatibility.**Works seamlessly across various Android devices.
- **Fast and Efficient.**Fone - Screen Unlock operates swiftly, saving you time in unlocking your Android device.
- **Secure and Safe.**It ensures data safety during the unlocking process, preserving your personal information.
- It’s not only about opening a locked screen; Dr.Fone provides a variety of unlock modes targeted to certain conditions, such as a forgotten password, PIN, pattern, or fingerprint.
- **High Rate of Success.**Fone - Screen Unlock delivers a dependable solution, even for difficult lock cases, with a high success rate in unlocking locked screens.
Step-by-Step Guide to Unlocking Android With Dr.Fone
Dr.Fone - Screen Unlock simplifies the daunting task of unlocking an Android device. Its user-friendly interface and effective functionality offer a smoother, more accessible alternative to Techeligible. This ensures that unlocking your Android device becomes a hassle-free experience. Learn how to use Dr.Fone – Screen Unlock (Android) below:
- Step 1: Download the most recent Wondershare Dr.Fone version and connect your Android device to your computer via a USB cable. Access the unlock screen tool after connecting by navigating to the Toolbox and selecting Screen Unlock.

- Step 2: Select Android to unlock your Android screen lock when prompted. You’ll see two options on the next screen. Select Unlock Android Screen.
- Step 3: You will then be led to a new screen where you may select the brand of your mobile device.

- Step 4: From the two options displayed on the screen, select Remove without Data Loss.
- Step 5: To unlock the Android screen, you must first select the Brand, Device Name, and Device Model. To advance, click the associated checkbox to enable the option that states I agree with the warning and am ready to proceed. Click Next to proceed with unlocking the screen.

- Step 6: When prompted to confirm the process, enter 000000. To start the software, input the code and then click Confirm.
- Step 7: Once you’ve identified your Android device’s model, Dr.Fone will guide you through entering Download Mode. Following the on-screen directions will take you to the next steps, where you may complete the operation. The following screens show the status of the screen unlocking procedure, which includes downloading the platform’s required drivers and configuration files.

- Step 8: A new screen will appear, signaling the operation is finished. If your device’s screen unlock problem has been resolved, click Done. If this is not the case, click the Try Again button.
Learn More About FRP Bypass:
Ways to Remove FRP Lock on Motorola Phones without a PC
Bypass FRP OPPO All Series like a Pro With/Without PC
Bypassing Google FRP Lock on Xiaomi, Redmi, and Poco Easily
Tips: Forget your device password and can’t get access to it? No worries as Dr.Fone is here to help you. Download it and start a seamless unlock experience!
Conclusion
In the realm of device security, FRP barriers stand tall, ensuring protection but sometimes causing inconvenience. That’s where Techeligible FRP bypass tools come in, easing your access to locked devices. However, in this article, you learned that navigating through FRP challenges becomes simpler with Dr.Fone - Screen Unlock (Android).
Its user-friendly approach and efficiency make it an ideal alternative to Techeligible FRP. Remember, while safeguarding your devices is crucial, finding an easy-to-use solution matters too. Choose Dr.Fone for a smoother, hassle-free experience in unlocking your Android device. Keep your device secure while making accessibility a breeze with Dr.Fone.
Top 12 Prominent Oppo K11x Fingerprint Not Working Solutions
Part 1. Optimal Solution: Unlock With Wondershare Dr.Fone Directly
Facing a malfunctioning fingerprint on your Oppo K11x can be frustrating. In this scenario, the most effective resolution is the removal of the registered fingerprint. Yet, traditional methods of removing the fingerprint can be difficult and pose security risks. In this case, going for tools like Wondershare Dr.Fone is the best choice. This tool ensures your Pixel device is at no risk.
Dr.Fone offers a swift solution to remove the Android lock screen in five minutes. It effectively removes 4 types of screen locks. These include patterns, PINs, passwords, and fingerprints. Dr.Fone can bypass the Android FRP lock without needing a PIN or Google account. It ensures accessibility to the Android device without such credentials.
![]()
Dr.Fone - Screen Unlock (Android)
The Best UnlockJunky Alternative to Bypass FRP and Solve Your Screen Locks
- Remove all Android screen locks (PIN/pattern/fingerprints/face ID) in minutes.
- Bypass the FRP lock of Samsung without a PIN or Google account.
- Everyone can handle the lock screen without any tech knowledge.
- Provide specific removal solutions to promise good success rate.
4,008,672 people have downloaded it
Prominent Features of Wondershare Dr.Fone
- FRP bypass is enabled for brands like Samsung, Xiaomi, Redmi, Oppo, Realme , and Vivo.
- With Dr.Fone, bypassing screen locks can be achieved without data loss.
- Fone supports 2000+ Android phones and tablets from over 18 brands for screen unlocking.
Step-by-Step Guide To Remove Fingerprint Type Lock on Google Pixel Using Dr.Fone
With Dr.Fone, you can resolve the Oppo K11x fingerprint sensor not working issue within minutes. Below is a detailed walkthrough for removing a fingerprint lock on a Google Pixel:
- Step 1: Connecting and Accessing Screen Unlock Feature on Dr.Fone
Open Wondershare Dr.Fone and connect your Android device via a USB cable. Once the connection is established, navigate to the “Toolbox” tab and choose “Screen Unlock.” Upon reaching the new screen, choose the “Android” option. Then, select “Unlock Android Screen” from the options on the following screen.
- Step 2: Selecting Google As the Oppo K11x device Brand and Activating Recovery Mode
Afterward, you’ll be guided to a subsequent screen prompting you to choose the Oppo K11x device brand, Google. Once you select the brand, you’ll be directed to enter a specific mode corresponding to it. For Google Pixel Devices, the specific mode to enter is Recovery Mode. Simply follow the on-screen instructions to activate Recovery Mode on your device.
- Step 3: Initiate the Fingerprint Removal Process
After entering Recovery Mode, the screen unlocking procedure will initiate automatically. Please wait for the fingerprint removal process to finish. In case of failure, select “Try Again” to attempt unlocking again. Upon successfully unlocking your Android device’s screen, tap “Done.”

Part 2. 11 Conventional Solutions To Resolve Pixel Fingerprint Not Working
The solution above using Wondershare Dr.Fone is an effective and comprehensive method. It can tackle fingerprint recognition issues, but sometimes, users may look for simpler alternatives. We will explore conventional solutions that can address Pixel fingerprint problems. Each solution will also explain the underlying reasons for the Pixel 6 fingerprint sensor issue.
1. Fingerprint Sensor Not Touched Firmly
Problem
If the fingerprint sensor fails to recognize your fingerprint, it might be due to inadequate pressure. This could also be due to improper finger placement on the sensor.
Solution: Firm Placement
Ensure you firmly place your finger on the sensor, covering it entirely. Avoid too much pressure, but make sure the sensor fully contacts your fingerprint.
![]()
2. Device Showing Glitches
Problem
Glitches or software bugs in your Pixel device may cause disruptions. This can include issues with the fingerprint sensor’s functionality. These problems can range from minor issues to severe software glitches.
Solution: Restart Your Pixel Device
One of the easiest and simplest solutions is to restart your Pixel phone. You can do that by pressing the “Power” and the “Volume Up” keys. It will lead to a pop-up power menu where you must choose “Restart” to reboot your device.
![]()
3. Outdated Firmware
Problem
An outdated operating system or firmware can lead to compatibility issues. This can lead to malfunctioning features like the Pixel 6A fingerprint sensor not working.
Solution: Check for Updates
The best way to resolve this issue is to update your Pixel device. Having an outdated version of Android OS can lead to an accumulation of bugs and glitches. Moreover, it can seriously affect the Oppo K11x device’s performance, causing many issues. Here is how to check and update your Pixel phone:
Instructions. On your Pixel device, access the “Settings” app. Within Settings, scroll down to tap the “System” option. On the following screen, hit the “System update” option to check if any latest update is available. Here, if you see any updates, download and install them promptly. Before initiating the update, ensure your device is connected to a stable Wi-Fi network with sufficient battery charge.
![]()
4. Dirty Phone or Sensor
Problem
Accumulated dirt, dust, or residue on the phone or fingerprint sensor can cause obstruction. This can lead to the failure to properly recognize your fingerprint.
Solution
1. Cleaning the Phone
Employ a gentle, dry microfiber cloth for wiping down the complete surface of your Pixel device. Take particular care to thoroughly clean the region surrounding the fingerprint sensor. Refrain from utilizing rough substances or strong chemicals as they could potentially cause harm to the Oppo K11x device.
2. Fingerprint Sensor Cleaning
Gently wipe the fingerprint sensor area using a clean, dry cloth to ensure thorough cleaning. For better results, consider using a dampened cotton swab with water or isopropyl alcohol. Before using it again, ensure the sensor is entirely dry.
3. Compressed Air or Soft Brush
Use compressed air or a soft brush if there’s visible debris or particles around the sensor. Be cautious not to apply excessive pressure that might damage the sensor.
![]()
5. Screen Protector: Dirty or Damaged
Problem
A smudged or impaired screen protector might disrupt the working of the fingerprint sensor. This can potentially cause it to fail to recognize your fingerprint.
Solution
1. Clean the Screen Protector
Start by effectively cleaning the screen protector on your Pixel device. For a thorough cleaning, consider utilizing a screen cleaning solution. Ensure that the screen protector is free from any dirt or debris.
2. Replace Damaged Protectors
Is the screen protector visibly damaged, scratched, or peeling off? If yes, consider replacing it with a new one. Damaged protectors can hinder fingerprint recognition and compromise device protection.
3. Check Compatibility
Ensure the screen protector is designed to be compatible with fingerprint sensors. Some protectors may obstruct or interfere with the sensor’s functionality.
4. Remove Air Bubbles
There can be air bubbles trapped under the screen protector. If there are, gently press them out towards the edges using a card designed for this purpose.
![]()
6. Clean Your Finger
Problem
The problem may lie with your fingers rather than the Oppo K11x device. Unclean or moist fingers can hinder accurate fingerprint recognition on the sensor, causing the Oppo K11x fingerprint sensor to not work.
Solution
1. Cleanse and Dry Your Hands
Remove any dirt, oil, or moisture that might cause issues with the fingerprint sensor. It’s crucial to wash and thoroughly dry your hands. Additionally, verify that your fingers are entirely dry before engaging the sensor. The reason is any moisture or dampness may cause inaccuracies in fingerprint identification.
2. Avoid Oily or Greasy Substances
Refrain from touching oily or greasy surfaces before using the fingerprint sensor. These substances can transfer onto your fingers, affecting sensor accuracy. If your fingers are dirty or damp, pause to clean them using a dry, clean cloth.
![]()
7. Covering Screen if Fingerprint on Screen
Problem
Fingerprint marks or smudges on the screen might disrupt sensor functionality. This leads to inaccurate recognition when you try to unlock your device.
Solution
1. Avoid Covering the Sensor Area
Be cautious while cleaning the screen to avoid covering or smudging the area around the fingerprint sensor. Precise cleaning around this area prevents interference with sensor functionality.
2. Use Proper Holding Technique
While holding the Oppo K11x device, avoid placing your fingers or palms over the fingerprint sensor. Opt for holding the Oppo K11x device to minimize accidental contact with the sensor area.
![]()
8. Fingerprint Sensor Not Visible
Problem
Misconfigured settings on your Pixel device can lead to situations where the fingerprint sensor is not visible. It can lead to scenarios where the Oppo K11x device fails to recognize your screen unlocking attempt.
Solution: Adjust the Setting To Consistently Display the Sensor
You must adjust the display settings to ensure the fingerprint sensor is always visible. To do that, you can begin by opening the Settings app. Navigate to the “Display” tab and select “Lock Screen.” On the following window, toggle on “Always show time and info.”
![]()
9. Low Touch Sensitivity
Problem
The fingerprint sensor may have low touch sensitivity . It can lead to difficulties in accurately recognizing fingerprints, leading to Oppo K11x fingerprint not working.
Solution
1. Adjust Sensitivity Settings
Accessories like a screen protector might impact the performance of your Pixel device’s touch sensitivity. When using a screen protector, your Pixel enhances touch sensitivity. To do that, navigate to the Settings app and open it. Move to the “Display” window and scroll down to the last option. Toggle on the “Screen protector mode” to increase the screen sensitivity.
![]()
2. Finger Re-Enrollment
Delete existing fingerprints and re-register them. This re-enrollment can sometimes improve sensitivity and help remove the issues. Here is how you can delete and re-enroll your fingerprint:
- Step 1. In the Settings app of your Pixel, tap “Security & Privacy.” Then, press “Device Unlock” and choose “Fingerprint Unlock.” The device will now ask you to provide your device PIN or password.
![]()
- Step 2. Tap “Fingerprint Unlock” on the following screen and delete the previously enrolled fingerprints. Then, press “Add fingerprint” and follow the on-screen prompts to complete the process.
![]()
10. Other Hardware Issues
Problem
Persistent fingerprint sensor problems might indicate underlying hardware issues . This could go beyond common troubleshooting and might require professional help.
Solution
1. Inspect for Physical Damage
Thoroughly examine your Pixel device for any physical damage. These include cracks, dents, or scratches around the fingerprint sensor area. Physical damage could affect the sensor’s functionality.
2. Safe Mode Check
Boot the Oppo K11x device in safe mode to determine if third-party apps are causing conflicts. To do that, press the “Power” key with any volume key to access the power menu. Afterward, long-press the “Power Off” option until the “Reboot to Safe Mode” option appears on your device’s screen. Press “OK” to reboot into Safe Mode and test the fingerprint sensor’s functionality.
![]()
3. Professional Assessment
If you suspect hardware issues, seek professional help from authorized service centers. A clear sign of hardware issues can be visible damage or the sensor failing to function even in safe mode.
11. Factory Reset as Last Resort
Problem
Did all other troubleshooting methods fail to resolve persistent fingerprint sensor issues? Then, a factory reset might be required to revert the Oppo K11x device to its original settings.
Solution
1. Backup Data
Before initiating a factory reset, ensure that all crucial data is safeguarded. This encompasses contacts, photos, documents, and any other significant files. Use Google’s backup services or third-party apps to securely back up your data .
2. Initiating Factory Reset
Proceed with the following steps to execute a factory reset on your Pixel device:
- Step 1. On your Pixel smartphone, navigate to Settings and access the “System” tab. Here, scroll down to the bottom and tap “Reset Options.”
![]()
- Step 2. In “Reset Options,” choose “Erase All Data (Factory Reset)” to continue. Afterward, select “Erase All Data” on the next screen and follow the instructions to complete the process.
![]()
In summary, this article detailed various methods to fix the Oppo K11x fingerprint not working. Diverse approaches were explored, from simple steps like sensor cleaning to advanced solutions like factory resets. However, Dr.Fone stands out among these solutions as a top-tier option. It offers a secure and efficient resolution to the persistent problem of fingerprint failure on the Oppo K11x .
How to Remove a Previously Synced Google Account from Your Oppo K11x
The setting up process of a new Android phone requires you to add a Google account that saves all activities and data of the phone like search history, details of online shipping, play store purchases, and more. Once the account is set, it cannot be changed till you delete everything from your phone. Moreover, with the introduction of FRP lock, even a factory reset will not remove the synced Google account.
So, now what if you want to sell your phone or have purchased a second-hand device that is still associated with the previous owner’s Google account? No, worries as there are workarounds available that will help you remove your previously synced google account from your Android device.
Keep reading to know more in detail about how to bypass previously synced google accounts.
Heres a full guide on how to remove google account from android, click to know more!
Part 1: Remove Previously Synced Google Account from Android Phone Without Phone Reset
In this part, we will discuss the methods that can be used for removing the previously synced account from your Android phone without a phone reset.
Method 1: Removing Google Account using the Android Settings Menu
If you just plan to reset your phone, maybe because of the lag caused by the phone cache, and you know the inconvenience of Google FRP as a protection mechanism, then you can remove Google FRP through the Settings menu.
The steps for this method are listed below.
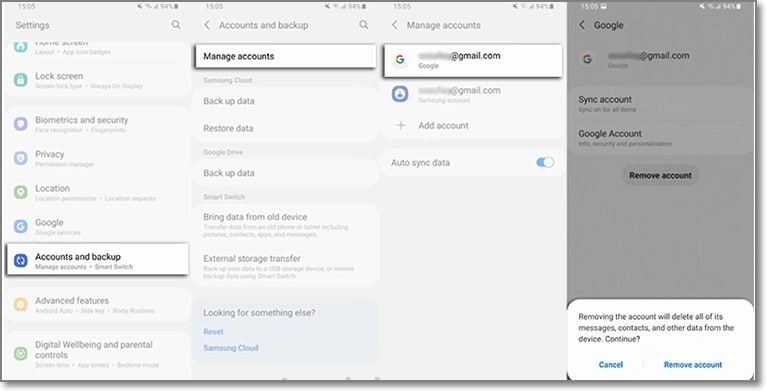
- Step 1: On your Android phone go to the Settings option and choose Accounts & Backup.
- Step 2: Select the Manage Accounts option now and the list of the associated Google Devices will appear.
- Step 3: Choose and click on the Google Account that you want to remove and a pop-up message will appear to inform you that all the account data will be deleted with this action.
To confirm the removal of the account, click on the Remove account button.
Method 2: Remove the Google account from the Android phone using the computer
There is another method using which you can remotely remove the Google account associated with your phone. The steps for the method are listed below.
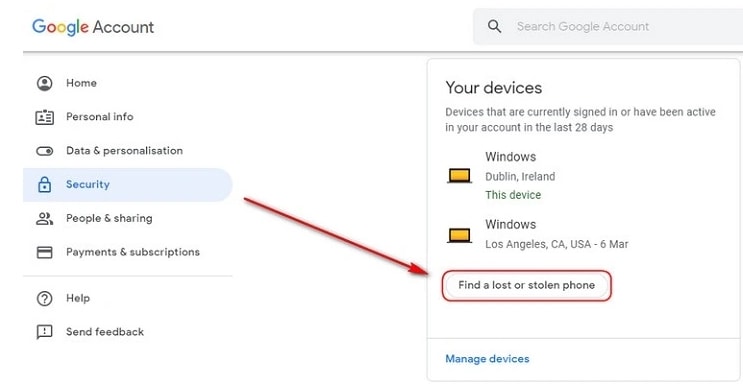
- Step 1: Using another device or a PC, sign in to your Google account that was previously synced on this device and choose the Security option.
- Step 2: Next scroll down and then tap on the Your devices option and choose to Manage devices.
- Step 3: You will now see the list of devices linked to your Google account. Next, tap on Find a lost or stolen phone and then select the Remove option present next to Account access.
- Step 4: You will be again asked if you want to delete the account. Select the Remove option.
- Step 5: The account will be removed successfully and the confirmation message will appear.
Note: This method will actually sign out you from the Google account and will not delete it permanently. To again get access to the account, a notification will appear on your phone to enter the password.
Part 2: How to Disable Factory Reset Protection to Bypass Google Account Verification After Factory Reset
The Factory Reset Protection (FRP) is a security feature for the Android device that allows factory reset only after the associated Google ID and password are entered correctly. With multiple accounts and passwords to remember there is quite a possibility that you may forget your Android phone Google account details and here the need to bypass Google account verification arises.
Though there are multiple tools available we recommend Dr. Fone - Screen Unlock (Android) as the best and the most reliable option. Using this excellent Windows and Mac-based software, FRP lock on all popular Android devices including Samsung, LG, HTC, and others. The tool is simple to use and requires no technology. There is also an option where you can unlock your device if you do not know the OS version.
![]()
Dr.Fone - Screen Unlock (Android)
Get into Locked Phones within Minutes
- 4 screen lock types are available: pattern, PIN, password & fingerprints.
- Easily remove the lock screen; No need to root your device.
- Everybody can handle it without any technical background.
- Provide specific removal solutions to promise good success rate
4,008,669 people have downloaded it
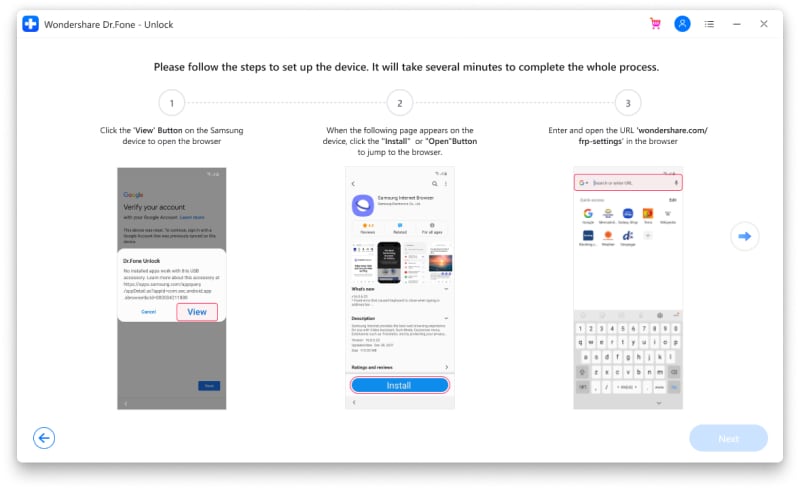
Steps to remove FRP lock using Dr. Fone-Screen Unlock (Android)
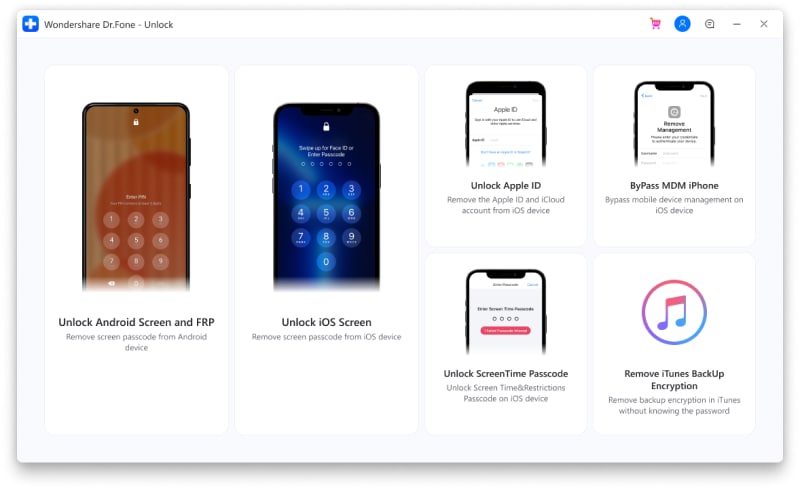
Step 1: Download, install and run the software on your system, and from the main interface choose the Screen Unlock option. Make sure that your phone is connected to WiFi.
Step 2: Next, choose Unlock Android Screen/FRP and then select the Remove Google FRP Lock option.
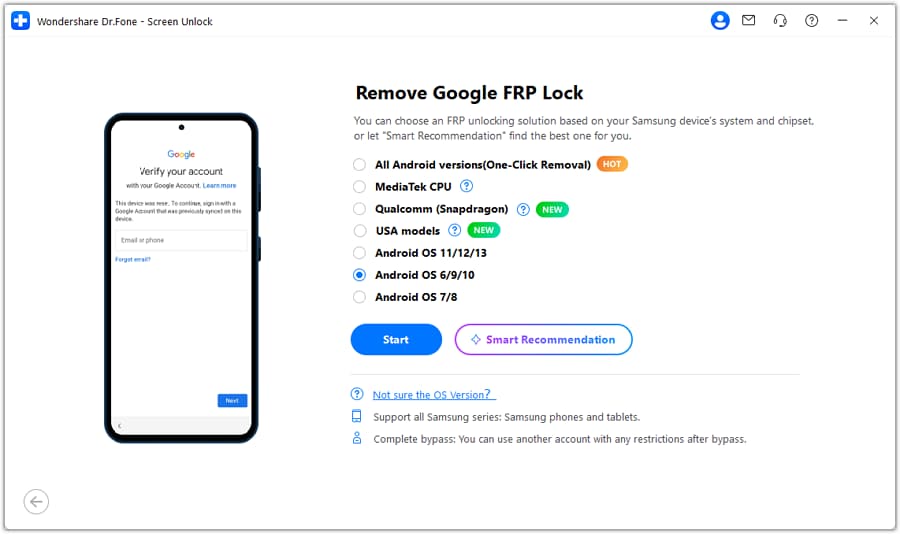
Step 3: Next, choose the OS version of your device from the given options, and then using a USB cable, connect your phone to your system.
Step 4: After the Oppo K11x device is connected, the Oppo K11x device information will appear on the software for you to confirm and the notification for the same will be sent to your Android phone.
Step 5: Now follow the notifications for removing the FRP lock and in the browser enter drfonetoolkit.com.
Step 6: Next, click on the Android 6/9/10 button, choose Open Settings and select the PIN option to set a PIN to be used in the further steps.
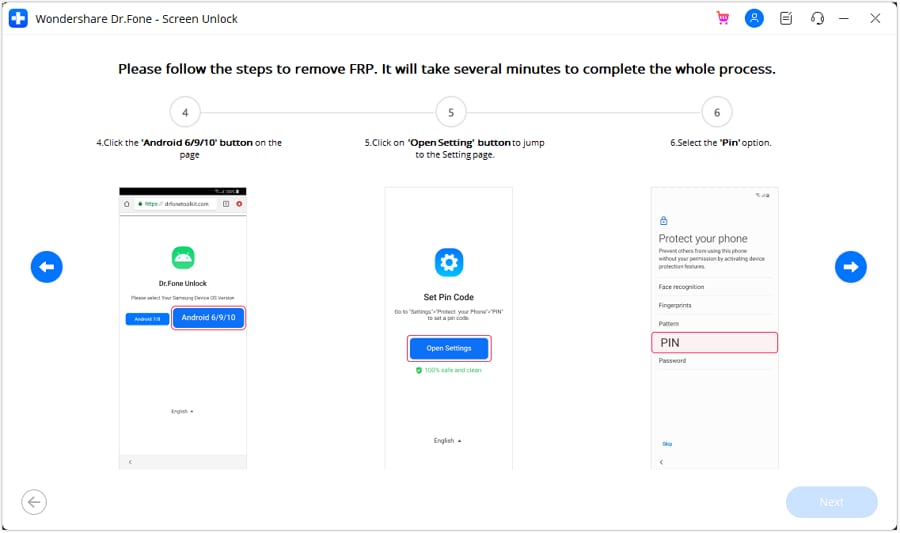
Step 7: Keep following the steps as they appear till you reach the Google Account Sign-In page. Here click on the Skip option that will successfully remove and bypass the Google Account.

The above given are the brief steps for the FRP bypass process. To learn about the entire process in detail, check Dr.Fone-Screen Unlock (Android) guide .
Part 3: Hire a Remote FRP Removal Service to Bypass ZTE/Motorola After Factory Reset
To bypass the FRP lock on your ZTE, Motorola, and Samsung device, there is also an online service called UnlockJunky.com that claims to remove the FRP lock and previously linked account on your Android device within 5-15 minutes. This is a paid service that also claims that if they are unable to remove the lock, they will refund the amount to their customers.
So, if you cannot sign in with a Google account that was previously synced, you can give this, method a try.
Step 1: Open the official service page Unlockjunky on your browser.
Step 2: Next, choose the Oppo K11x device’s brand, model, and unlock type from their respective drop-down menus. Click on Unlock Now button after entering the details.
Step 3: Now you need to initiate the order by providing the details asked and completing the payment.
Step 4: Next, the software needs to be downloaded and installed on your system, and using a USB cable, connect your phone to your computer.
Step 5: Connect with one of the support provider members through the live chat and they will help you remove the FRP lock on your Android phone.
With the steps above, you can remove the account previously synced on this device.

Limitations of using the Unlockjunky method:
- This is a paid service.
- Works only with Motorola, ZTE, and Samsung devices.
- There is no surety that the service will work for removing the FRP lock on your devices.
- If you have to remove the FRP lock from multiple devices, a separate payment for each device has to be done.
Conclusion
Above we have listed several ways to remove a previously synced Google account on your Android device. The best of all the listed solutions is Dr. Fone - Screen Unlock (Android) as it supports bypassing FRP lock on multiple Android devices in a hassle-free manner. Once the license is purchased, you can unlock as many numbers of devices as you want without any worries.
Also read:
- [Updated] Master Your Digital Creations - Selecting Top 7 NFT-Generating Platforms for 2024
- Advanced Workshop Naming Service 2023
- Beginner’s Blueprint for Speedy Video on Snapchat
- Capturing Moments Like Never Before Toolwiz App's 2023 Review for 2024
- Effortless Integration: Managing MS Office Documents Within Google Drive
- Fine-Tuning Timestamps in Windows Files: Step by Step
- Get Epson DS-530 Software Compatible with 64-Bit Windows 10
- In 2024, How to Unlock Oppo A1 5G Phone without Any Data Loss
- In 2024, Mastering Android Device Manager The Ultimate Guide to Unlocking Your Oppo A78 5G Device
- Non-Game Console Apps Excelling at Game Recordings
- The Best Action Hats Motorcycle Cameras Reviewed and Ranked
- The Ultimate Guide to OnePlus Nord CE 3 5G Pattern Lock Screen Everything You Need to Know
- Unlock Oppo K11 5G Phone Password Without Factory Reset Full Guide Here
- Unlock Your OnePlus Phone with Ease The 3 Best Lock Screen Removal Tools
- Unlock Your OnePluss Potential The Top 20 Lock Screen Apps You Need to Try
- Title: Complete Review & Guide to Techeligible FRP Bypass and More For Oppo K11x
- Author: Aaron
- Created at : 2025-01-01 04:17:53
- Updated at : 2025-01-06 20:54:08
- Link: https://easy-unlock-android.techidaily.com/complete-review-and-guide-to-techeligible-frp-bypass-and-more-for-oppo-k11x-by-drfone-android/
- License: This work is licensed under CC BY-NC-SA 4.0.